
How to uninstall BlueStacks completely from Windows 11 and 10

Prefer to fix it yourself? The manual steps follow.
6 methods in this guide
- What BlueStacks installs
- Before you start
- The steps
- 1. Back up your data
- 2. Close BlueStacks
- 3. Uninstall in Settings
- 4. Run the official cleaner
- 5. Delete leftover folders
- 6. Restart and check
- What it leaves behind
- Remove BlueStacks Services
- If it will not uninstall
- Confirm it is gone
- Restore Windows settings
- FAQ
I can't fully uninstall BlueStacks. I cannot even find it, so how could I delete it? I tried to find a way to uninstall it, but without success. I probably need to remove more folders or files, and I have no idea how to do that. What should I do?
BlueStacks is an Android emulator, and Windows does not need it, so it is safe to remove. The complete way is to uninstall it in Windows Settings and then run the cleaner tool that BlueStacks publishes, which also clears BlueStacks X and BlueStacks Services. Back up your instances first, because the uninstall deletes your Android apps and locally saved game progress.
Close BlueStacks, open Settings > Apps > Installed apps and uninstall every BlueStacks entry: BlueStacks 5, BlueStacks X and BlueStacks Services. Then download the official cleaner, BSTCleaner_native.exe, from the BlueStacks support site, run it and wait for the message "Process has been finished". Empty the %temp% folder, restart, and check that the two BlueStacks_nxt folders are gone. If the Windows uninstall fails, or BlueStacks is not in the list at all, go straight to the cleaner: it is started on its own, not from that list.
| Program | BlueStacks 5 (the App Player), BlueStacks X (also called BlueStacks 10) and BlueStacks Services. |
|---|---|
| Publisher | now.gg, Inc., Campbell, California (the company named in the BlueStacks terms of use). |
| Safe to remove | Yes. Windows does not use it. Your Android apps, instances and game progress saved on the PC are deleted with it. |
| Leaves behind | Sometimes the folders C:\Program Files\BlueStacks_nxt and C:\ProgramData\BlueStacks_nxt, files in %temp%, and Windows virtualization settings that were changed for it. |
| Official removal tool | The BlueStacks cleaner, BSTCleaner_native.exe (version 1.09 on the day we checked), linked from the BlueStacks support site. |
| What stops working | Android apps and games that you ran through BlueStacks, and the notifications of BlueStacks Services. |
| Needs a restart | Not required by BlueStacks. We advise one before you check for leftovers, and Windows asks for one if you change Windows features. |
| Time | 10 to 20 minutes, most of it the backup. |
| Not covered here | BlueStacks on a Mac (BlueStacks Air). One FAQ item points to the official steps. |
Facts checked on 11 October 2026. Steps written for Windows 11 (25H2 and 26H2) and Windows 10 22H2, read against BlueStacks and Microsoft documentation.
What BlueStacks is and what it puts on your PC
BlueStacks is an Android emulator for Windows: it runs Android apps and games in a window. It is a third-party program from now.gg, Inc., not a part of Windows, and nothing in Windows depends on it.
A PC with BlueStacks can show three separate entries, and people who search for "BlueStacks_nxt" or "BlueStacks Services" are looking at parts of the same product.
| Part | What it is | How you meet it in Windows |
|---|---|---|
| BlueStacks 5 (App Player). | The emulator itself. Each Android instance has its own folder and a virtual disk file named Data.vhdx. | An entry in the apps list. The process HD-Player.exe in Task Manager. |
| BlueStacks X (BlueStacks 10). | A launcher and game store for Android, cloud and PC games. It uses the App Player to run games on the PC. | A second entry in the apps list. It is installed in the same location as BlueStacks 5. |
| BlueStacks Services. | The background part that sends Windows push notifications (deals, game announcements, recommendations) and shows the BlueStacks icon in the notification area. | The entry "BlueStacks Services" in Programs and Features. |
| Folder name BlueStacks_nxt. | The folder name that BlueStacks 5 uses, once for program files and once for your data. | C:\Program Files\BlueStacks_nxt and C:\ProgramData\BlueStacks_nxt. |
Safe to remove: yes. You lose the Android apps inside BlueStacks and any progress that a game stored only on this PC. Windows, your other programs and your files are not affected.
BlueStacks does not publish a list of the Windows services, drivers or scheduled tasks it installs. This page therefore names only what BlueStacks' own documentation names, and says so where we could not confirm a detail.
Before you start: what you lose and how to keep it
BlueStacks itself warns that uninstalling removes your applications, instances and game data. Decide first whether you want any of it back: the official steps for the cleaner tool show no question about what to keep.
| Way to keep it | What it saves | Limit |
|---|---|---|
| Backup inside BlueStacks 5 (version 5.10 and above). | Installed apps, game controls, user data, macros, settings and instances. | A backup from a newer version cannot be restored on an older one, and an older backup may fail on a newer version. |
| Sign in to the game with an account (Google, Facebook or the game's own). | The progress of that game, stored by the game and restored when you sign in again. | Only games that offer account linking. |
Manual copy of Data.vhdx. | App data of one instance, for example game progress. | Same BlueStacks version only. Key mapping, macros and instance settings are not saved. |
Save the backup outside the BlueStacks folders, for example in Documents or on another drive. A backup stored inside a BlueStacks_nxt folder is deleted together with it.
You need an administrator account for the uninstall, the same as for the installation. Windows 10 left support on 14 October 2025: the steps below still apply to it, with the differences noted.
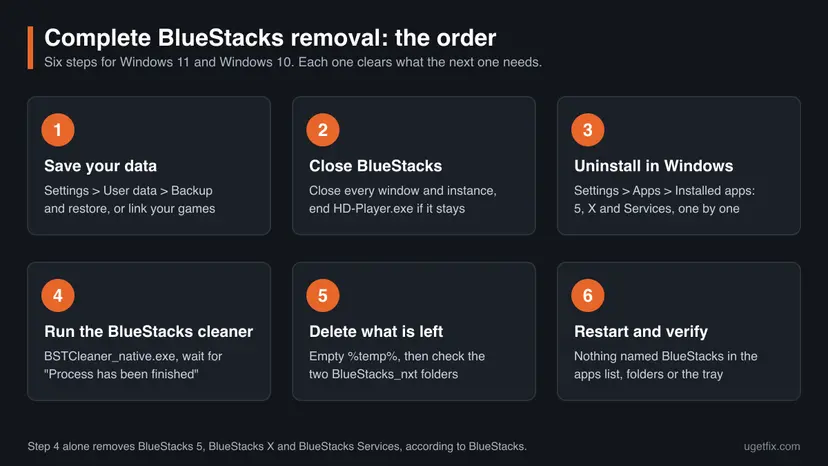
How to uninstall BlueStacks completely, step by step
Do the steps in order. If Windows cannot uninstall BlueStacks, or it is missing from the list of apps, skip Step 3 and continue with Step 4.
Step 1. Back up what you want to keep
5 minutesNo riskYou have games or apps in BlueStacks that you may want again.
The uninstaller and the cleaner both delete the instances, and with them every app and every game save that exists only on this PC. A backup made now is the only way to bring them back.
- Open BlueStacks 5 and click the gear icon on the side toolbar to open Settings.
- Select User data, then Backup and restore, then Create backup, and click Start.
- Choose a folder outside the BlueStacks folders and click OK.
- Wait for the message that confirms the backup and shows where it was saved. This can take a few minutes.
- Open each game you care about and sign in with the account it offers, so that the progress is stored by the game.
On a version older than 5.10 there is no backup menu. Close BlueStacks, open C:\ProgramData\BlueStacks_nxt and copy the whole Engine folder and the file bluestacks.conf to a safe place. BlueStacks calls this a last resort, and it restores only on the same version.
For your own files outside BlueStacks, the general procedure is here: Back up your files (Windows Backup, File History, Time Machine).
It worked if: The backup folder exists in the place you chose, and your main games show you as signed in.
If not: If BlueStacks does not start, press Win + R, open %ProgramData%\BlueStacks_nxt\Engine, open the folder of the instance (for example Pie64) and copy Data.vhdx to another drive.
Step 2. Close BlueStacks and every process it runs
2 minutesNo riskAlways, before any uninstall attempt.
Windows cannot delete a file that a running program holds open. BlueStacks can stay active after its window is closed, through an instance or through BlueStacks Services, and an open file can block the uninstaller.
- Close every BlueStacks window. If you use the Multi-instance Manager, stop all instances there.
- Press Ctrl + Shift + Esc to open Task Manager.
- Look for
HD-Player.exeand for any process whose name starts with BlueStacks. - Select each one and click End task.
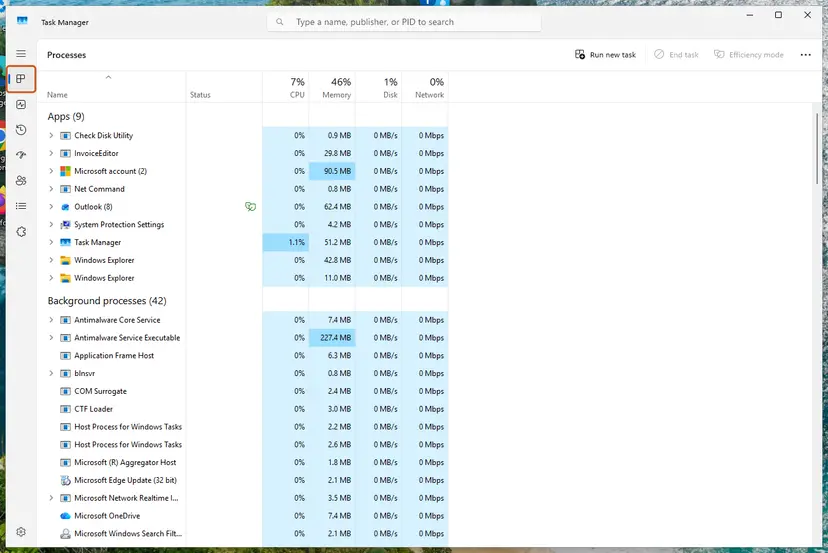
More ways to close a program that will not quit: Close a frozen app (Task Manager, Force Quit).
It worked if: Task Manager lists no process named BlueStacks and no HD-Player.exe.
If not: Restart the PC, do not open BlueStacks after the restart, and continue with Step 3.
Step 3. Uninstall BlueStacks in Windows Settings
5 minutesRead the warningBlueStacks is shown in the list of installed apps.
This runs the uninstaller that BlueStacks registered in Windows, which is the normal way to remove a desktop program. BlueStacks 5, BlueStacks X and BlueStacks Services are separate entries, so one click does not remove the three of them.
This deletes your Android apps, instances and game data on this PC. Finish Step 1 first if you want any of it back.
- Select Start > Settings > Apps > Installed apps. On Windows 10 the page is called Apps & features.
- Type
BlueStacksin the search box above the list. - On Windows 11, select More (the three dots) next to the first BlueStacks entry, then Uninstall. On Windows 10, select the entry, then Uninstall.
- Follow the directions on the screen until the uninstaller closes.
- Repeat for every other entry that starts with BlueStacks, such as BlueStacks X and BlueStacks Services.
- If an entry cannot be removed in Settings, open Control Panel > Programs > Programs and Features, right-click it and select Uninstall.
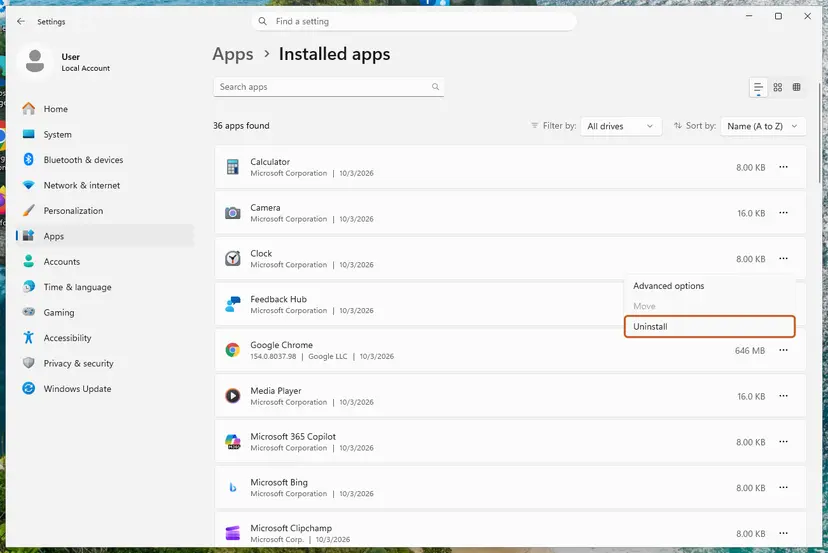
The general procedure, with pictures of each Windows screen: Uninstall a program or app in Windows.
It worked if: A search for BlueStacks in the list of installed apps returns nothing.
If not: Do not repeat the same uninstall many times. Continue with Step 4: the cleaner is started on its own, not from the Windows list.
Step 4. Run the official BlueStacks cleaner tool
5 minutesRead the warningAlways for a complete removal, and first of all when Step 3 failed.
This is the removal method that BlueStacks support gives: one tool that uninstalls BlueStacks 5, BlueStacks X and BlueStacks Services. It is a separate program that you start yourself, so you can run it when the entry in the Windows list is broken or missing.
The official steps show no question about what to keep: you run the tool and it uninstalls. Apps, instances and game data of BlueStacks on this PC are removed. Make the backup in Step 1 before you run it.
- Open the BlueStacks support article How to uninstall BlueStacks 5, BlueStacks X and BlueStacks Services completely.
- Click the second link, the tool "to uninstall all versions of BlueStacks 5, BlueStacks X, and BlueStacks Services". The file is named
BSTCleaner_native.exe. - Check in your browser's download list that the file came from
cdn3.bluestacks.com, then open it. - Click Yes when Windows asks for permission.
- Wait for the message Process has been finished and click OK.
The same support article has a first link, an older cleaner for BlueStacks 4 and BlueStacks 5. Use that one only if you still have BlueStacks 4.
It worked if: You see "Process has been finished", and no BlueStacks entry is left in the list of installed apps.
If not: Read the section "BlueStacks will not uninstall" below: it lists each failure and its way out.
Step 5. Empty the Temp folder and delete the leftover folders
5 minutesLow riskAfter the cleaner, to clear what it did not delete.
The official BlueStacks instructions end with emptying the Windows Temp folder. The two BlueStacks_nxt folders are checked by hand, because a folder that was in use during the uninstall can stay on the disk.
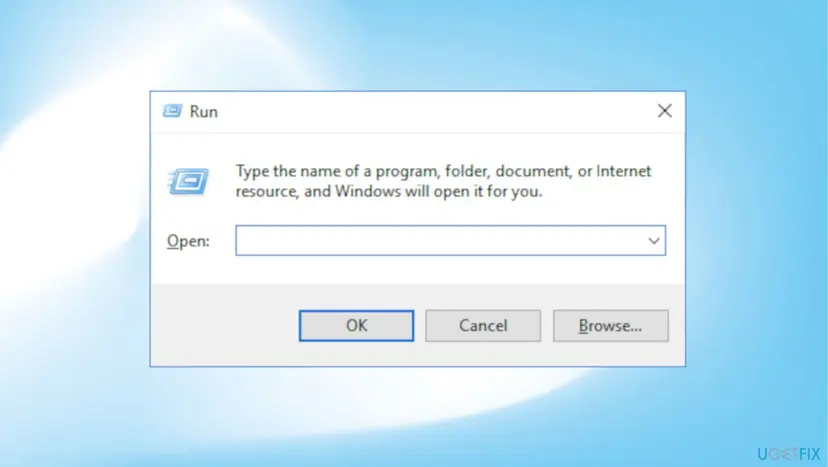
- Press Win + R, type
%temp%and click OK. - Press Ctrl + A, then Delete. If Windows says a file is in use, select Skip.
- Press Win + R, type
C:\Program Filesand press Enter. Delete the folderBlueStacks_nxtif it is there. - Press Win + R, type
C:\ProgramDataand press Enter. Delete the folderBlueStacks_nxtif it is there. - If you installed BlueStacks on another drive, look for a
BlueStacks_nxtfolder in the place you chose and delete it. - Empty the Recycle Bin to get the disk space back.
Other safe ways to get space back after a large program is gone: Free up disk space and delete temporary files.
It worked if: Neither BlueStacks_nxt folder exists, and the Temp folder holds only files that Windows is using.
If not: If a folder refuses to be deleted, restart the PC and delete it before you open anything else. See the FAQ item about BlueStacks_nxt.
Step 6. Restart the PC and confirm BlueStacks is gone
3 minutesNo riskAt the end, and before you install BlueStacks again.
A restart ends any BlueStacks process that survived and releases files that were locked. Only after it can you trust the checks, and only then is a fresh installation clean.
- Select Start > Power > Restart.
- After the restart, open Settings > Apps > Installed apps and search for
BlueStacks. - Open the notification area near the clock and check that no BlueStacks icon is shown.
- Go through the table in the section "How to confirm BlueStacks is completely gone" below.
It worked if: No BlueStacks entry, icon, process or folder is found anywhere in the checks.
If not: Run the cleaner from Step 4 once more after the restart, then repeat Step 5.
What BlueStacks leaves behind and where to find it
These are the places that BlueStacks' own documentation names. Check them after Step 4.
| Where | What it is | Delete it? |
|---|---|---|
Folder C:\Program Files\BlueStacks_nxt. | Program files of BlueStacks 5. BlueStacks says this location is the same wherever you install it. | Yes, after the uninstall. |
Folder C:\ProgramData\BlueStacks_nxt. | Your data: the Engine folder with the instances, the settings file bluestacks.conf, custom controls and logs. | Yes. Copy it first if you want a manual backup. |
Folder BlueStacks_nxt on another drive, for example D:\BlueStacks_nxt. | The same data folder when you chose a custom location in the installer. | Yes. |
File Data.vhdx inside Engine, in a folder such as Pie64 or Nougat32. | The virtual disk of one Android instance: its apps and their data. | Yes. It goes with the folder. |
Folder %temp%. | Temporary files of Windows and of installers. | Yes. BlueStacks tells you to delete everything in it. |
| Entry "BlueStacks Services" in the apps list. | The notification and store part that BlueStacks lists next to BlueStacks 5 and BlueStacks X. | Uninstall it, do not delete its files by hand. |
| Registry keys. | BlueStacks' documentation names none, and its removal steps do not include the Registry Editor. We could not confirm any key name. | Leave them. Do not search the registry for the word BlueStacks and delete the results. |
| Windows services, drivers and scheduled tasks. | Not listed by BlueStacks. We could not confirm their names. | Do not hunt for them by hand. If something named BlueStacks still runs, run the cleaner again. |
| Your own backup folder. | The backup you made in Step 1. | Keep it until you are sure you do not need it. |
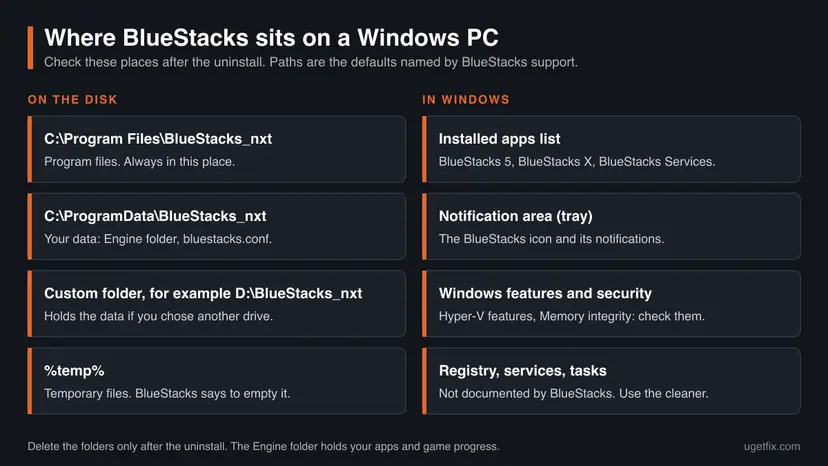
The old advice to open the Registry Editor and delete a BlueStacks key is not part of the current official steps. A settings key that stays behind does not start any program, and a wrong deletion in the registry can break other software.
How to remove BlueStacks Services from your PC
BlueStacks Services is a separate entry, so it can stay after BlueStacks 5 is gone and keep showing notifications. You can uninstall it: it belongs to BlueStacks, not to Windows.
- Type Control Panel in the Start menu search and open it.
- Select Programs, then Programs and Features.
- Find BlueStacks Services in the list, right-click it and select Uninstall.
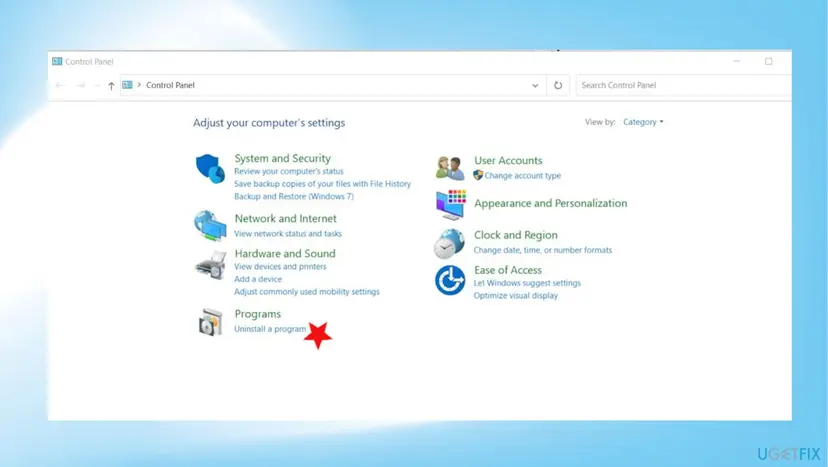
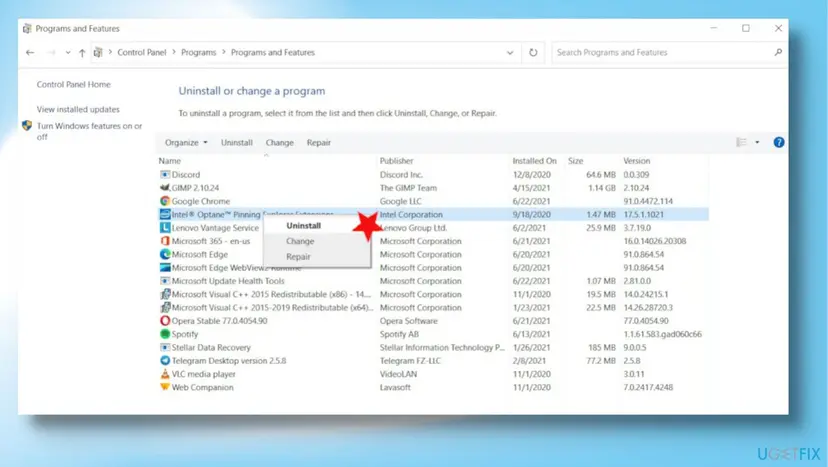
These are the steps BlueStacks gives for removing its store, and they apply to Windows 11 and 10. If the entry is missing or the uninstall fails, run the cleaner from Step 4: BlueStacks states that it uninstalls BlueStacks Services as well.
If you only want the notifications to stop and plan to keep BlueStacks, click the three dots on a BlueStacks notification and choose Turn off all notifications for BlueStacks Services.
BlueStacks will not uninstall: each failure and its way out
These are the failures people search for, each with its likely cause. Find yours in the table.
| What you see | Why | Way out |
|---|---|---|
| BlueStacks is not in Installed apps, but its folders or icon are still there. | The Windows entry is gone or was never written, so Windows has nothing to run. | Run the cleaner from Step 4. You start it yourself, not from the list. |
| The uninstall starts and then fails, freezes or shows an error. | A BlueStacks process is still running, or an earlier uninstall stopped halfway. | Restart the PC, do not open BlueStacks, then run the cleaner. |
| BlueStacks Services stays in the list. | It is its own entry and is not removed with BlueStacks 5. | Uninstall it in Programs and Features, or use the cleaner. |
The folder BlueStacks_nxt will not delete. | A file in it is open, or your account is not an administrator. | Do Step 2, restart, and delete the folder from an administrator account. |
| The cleaner does not start or closes at once. | Windows asked for permission and it was refused, or security software stopped the file. | Run it from an administrator account and click Yes. Check that the file came from cdn3.bluestacks.com. |
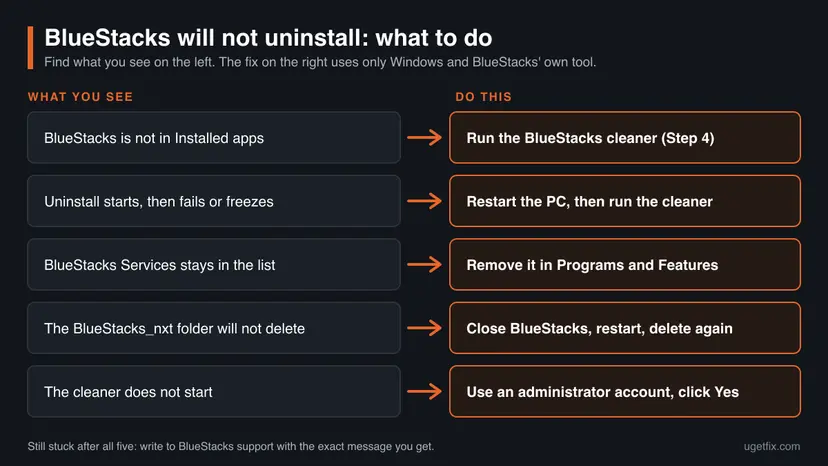
If security software blocks the cleaner and you are sure the file is the one from the BlueStacks article, pause the protection for the few minutes the tool needs and turn it back on straight after: Turn off Microsoft Defender protection for a moment.
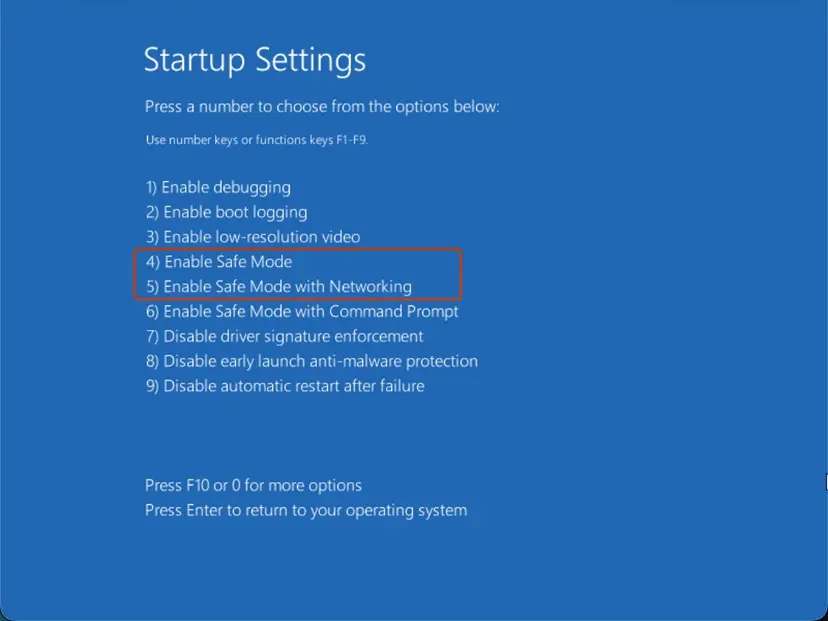
- A folder is still locked after a restart. Start Windows in Safe Mode, where BlueStacks does not load, and delete the folder there: Start Windows or a Mac in Safe Mode.
- Windows 10 reports a broken uninstall entry. Microsoft offers the Program Install and Uninstall troubleshooter for Windows 10 on this support page. For Windows 11 the same page lists a restart and the uninstall from Settings instead.
- Nothing helps. Write to BlueStacks at [email protected] and quote the exact message you get.
How to confirm BlueStacks is completely gone
Run these checks after the restart in Step 6. Every one of them must come back empty.
| Check | How | Clean result |
|---|---|---|
| Apps list. | Open Settings > Apps > Installed apps and search for BlueStacks. | No result. |
| Command. | Open Terminal and run winget list BlueStacks. The command also lists programs that were not installed with winget. | No installed package is found. |
| Program folder. | Press Win + R and enter C:\Program Files\BlueStacks_nxt. | Windows says it cannot find the folder. |
| Data folder. | Press Win + R and enter C:\ProgramData\BlueStacks_nxt. | Windows says it cannot find the folder. |
| Processes. | Open Task Manager with Ctrl + Shift + Esc and sort by name. | No HD-Player.exe and no name that starts with BlueStacks. |
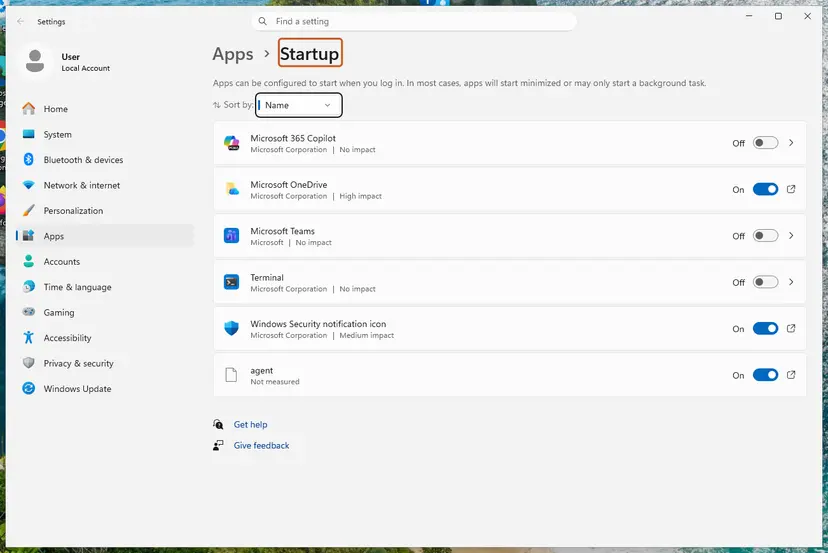
| Startup. | In Task Manager, open Startup apps (the Startup tab on Windows 10). | No BlueStacks line. |
| Notification area. | Click the arrow near the clock. | No BlueStacks icon. |
If one check still finds BlueStacks, run the cleaner once more and repeat only that check. More on turning off programs that start with Windows: Stop apps from opening at startup.
Windows settings changed for BlueStacks, and how to put them back
BlueStacks 5 lists enabled virtualization among its requirements, and its older help articles asked users to change Windows for it. BlueStacks does not say that the uninstall or the cleaner reverses these changes, so check them yourself.
| Change made for BlueStacks | Where it came from | How to put it back |
|---|---|---|
| Memory integrity turned off. | The BlueStacks article on running version 5.14 and below without Hyper-V. | Open Windows Security > Device security > Core isolation details and set Memory integrity to On. Restart if Windows asks. |
Hypervisor switched off with bcdedit /set hypervisorlaunchtype off. | The same article, the Command Prompt method. | In an administrator Command Prompt run bcdedit /set hypervisorlaunchtype auto. Restart. |
| Features unchecked: Hyper-V, Windows Hypervisor Platform, Windows Sandbox, Virtual Machine Platform, Windows Subsystem for Linux. | The same article, the Windows Settings method. | Open Control Panel > Programs > Turn Windows features on or off, check the ones you use, click OK and restart. |
| Features turned on: Virtual Machine Platform, Windows Hypervisor Platform. | The BlueStacks Hyper-V tool, or the article on launching with Hyper-V enabled. | Leave them on if you use Windows Subsystem for Linux, Windows Sandbox or other virtual machines. Otherwise uncheck them in the same window. |
Memory integrity is a Windows security feature that protects against malicious drivers, so turning it back on is the one change worth making on every PC. To see whether the Windows hypervisor is running, type msinfo32.exe in the search box and open System Information. The line "A hypervisor has been detected" means it is on.
Current BlueStacks 5 versions run with Hyper-V on or off, according to BlueStacks. If you install it again, you should not need to change these settings a second time.
Frequently asked questions
Is there an official BlueStacks uninstaller tool?
Yes. BlueStacks publishes a cleaner tool, the file BSTCleaner_native.exe, and links it from its support article on uninstalling BlueStacks 5, BlueStacks X and BlueStacks Services. On the day we checked, the link pointed to version 1.09 on cdn3.bluestacks.com. You run it, click Yes when Windows asks for permission, and wait for the message "Process has been finished". BlueStacks does not publish a detailed list of what the tool deletes, only that it uninstalls the three products completely. Download it only through the BlueStacks support site. Tools with a similar name on other sites are not the official one.
What is the BlueStacks_nxt folder, and can I delete it?
BlueStacks_nxt is the folder name that BlueStacks 5 uses, and you can delete it once BlueStacks is uninstalled. There are two of them. C:\Program Files\BlueStacks_nxt holds the program files. C:\ProgramData\BlueStacks_nxt holds your data: the Engine folder with the Android instances, the settings file bluestacks.conf, controls and logs. If you chose another drive in the installer, the data folder is there instead. Do not delete these folders while BlueStacks is still installed, because the program will stop working and the Windows uninstaller may then fail. Uninstall first, then delete what is left.
Why is BlueStacks_nxt not deleting?
The usual reason is that a BlueStacks process still has files open in that folder. Close every BlueStacks window, end HD-Player.exe and any process named BlueStacks in Task Manager, and try again. If that fails, restart the PC and delete the folder before you open anything else. Both folders sit in protected places, Program Files and ProgramData, so you also need an administrator account. If BlueStacks is still installed, run the official cleaner first and delete the folder afterwards. As a last step, start Windows in Safe Mode and delete it there.
Is BlueStacks safe, yes or no?
Yes, when the installer comes from bluestacks.com. BlueStacks is a legitimate commercial Android emulator from now.gg, Inc., and the company states on its site that the program does not carry any malware or spyware. That is the publisher's own statement, not an independent audit. Two things deserve care. First, an installer from any other site may be altered, so download only from the official one. Second, older BlueStacks help articles asked users to turn off Memory integrity, a Windows security feature. If you did that, turn it back on after the uninstall, as described above.
Will uninstalling BlueStacks delete my games and progress?
Yes, everything that is stored only on the PC is deleted. BlueStacks itself warns that the uninstall removes your applications, instances and game data. Progress survives in two cases. If the game is linked to an account, such as Google, Facebook or the game's own login, the game restores your progress when you sign in again on any device. If you made a backup in BlueStacks under Settings, User data, Backup and restore, you can restore it after a new installation. A backup from a newer BlueStacks version cannot be restored on an older one.
Can I uninstall BlueStacks Services and keep BlueStacks 5?
You can uninstall BlueStacks Services on its own, because Windows lists it as a separate program. Open Control Panel, Programs, Programs and Features, right-click BlueStacks Services and select Uninstall. BlueStacks describes these steps as the way to remove its store from the PC. We could not confirm whether a later BlueStacks update installs it again, so check the list after you update. If you only want fewer pop-ups, there is a lighter option: open a BlueStacks notification, click the three dots and turn off the notifications for BlueStacks Services.
How do I uninstall just one app inside BlueStacks?
You do not need to remove BlueStacks for that. Open BlueStacks 5, press and hold the left mouse button on the app's icon on the home screen, click Uninstall when it appears and confirm with OK. The second way goes through Android itself: open the System apps folder, then Settings, then Apps, click the app, click Uninstall and confirm with OK. Both ways remove only that app and its data inside the instance. BlueStacks and your other apps stay as they are.
Do I have to edit the registry to remove BlueStacks completely?
No. The current official removal steps from BlueStacks are the cleaner tool and emptying the Temp folder, and they do not mention the Registry Editor. Older guides tell you to delete a BlueStacks key under HKEY_LOCAL_MACHINE, but we could not confirm any key name in BlueStacks' present documentation, so this page does not give one. A settings key that stays behind takes almost no space and does not start a program. Searching the registry for a word and deleting every match is a real risk for other software. If you edit the registry for any reason, make a backup of it first.
Does this guide work for BlueStacks on a Mac?
No, this page covers Windows 11 and Windows 10 only. On a Mac the current product is BlueStacks Air, and BlueStacks gives its own short method: open BlueStacks Air, click BlueStacks in the top menu bar, select Uninstall BlueStacks and confirm with Yes. According to BlueStacks, this removes the app and its files. If you drag the app to the Bin instead, you also have to delete its leftover folder by hand, and the BlueStacks support article on uninstalling BlueStacks Air gives the exact location.
Can I install BlueStacks again after a complete removal?
Yes. BlueStacks' own articles use the cleaner before a fresh installation, and its uninstall article ends with the line that you can now download BlueStacks 5 again from the official site. Restart the PC first so that no old process or locked file is left. During the new installation you can pick another drive for the data. To get your apps back, restore the backup from Step 1 under Settings, User data, Backup and restore. Install the same version if you can: BlueStacks says an older backup may fail on a newer version, and a newer backup cannot be restored on an older one.
Sources
- Microsoft Support: Uninstall or remove apps and programs in Windows (support.microsoft.com)
- Microsoft Support: Fix problems that block programs from being installed or removed (support.microsoft.com)
- Microsoft Support: Device Security in the Windows Security app (Memory integrity) (support.microsoft.com)
Did this fix work?
One click, no account. It tells the next reader which guides are worth their time.
Questions and experiences: uninstall BlueStacks completely from Windows 11 and 10
Still broken, or found a fix we did not cover? Ask here: members and our editors answer. Reading is open; writing needs a free account.
…