How to fix
“Automatic Repair couldn’t repair your PC”
on Windows
Resolve the "Automatic Repair couldn’t repair your PC" error on Windows 10 quickly and effectively. Expert-tested solutions await you!
What causes How to Fix “Automatic Repair couldn’t repair your PC” on Windows 10?
- Boot configuration error
- Corrupted system files
- Issues with recent updates
- Hardware failures
- Conflicting software
Repairs Windows system files, removes malware, and restores a clean OS state — without reinstalling.
Isn’t it a paradox that the Automatic Repair can’t fix problems on Windows? I’ve read somewhere about how Microsoft is proud about its automatic repair functions, which help people to solve problems like errors or boot problems, but apparently, those automatic solutions are not functioning either…
I’ve received a Boot configuration error and could not to log on to my Windows desktop. That’s why I tried to use Windows Automatic Repair, which brought my another error saying: “Automatic Repair couldn’t repair your PC.” Could you please tell me if there is something that I could do to fix this situation?
Microsoft is one of the leading tech company in the world[ref en-1] and no one could argue with that. Windows OS is its major product, which has been used from 1983 up till now. Even though the first Windows version was not available to many people, those who had a personal computer and some IT skills were able to be the predecessor of Windows OS users.
In retrospect, Microsoft has been improving the OS in a speedy and reasoned way, so that each new version of OS or its updates overcome the shortcomings of the ancestor. That’s how it should be, isn't it? Unfortunately, but the operating system is a very complicated, intricate, elaborate or, let us call, mysterious piece of invention that it can hardly be programmed in a perfect way.
While some of Windows errors occur year after year,[ref en-2] the others emerge with the new updates, patches, new OS type, and so on. Recently people started a real fuss on the official Microsoft’s forum about a paradoxical Windows 10 bug related to Automatic Repair.
Automatic Repair is a built-in Windows 10 service, which can be launched using a bootable installation media and serve as a fixer for Windows boot failure[ref en-3] regardless of whether it’s BSOD, infinite loop or boot freeze. However, many cases have been registered when launching an Automatic Repair service, people are exposed to an error saying “Automatic Repair couldn’t repair your PC.”
While Windows users tend to call this issue a “paradox,” we don’t see anything surprising here because all programs, services, processes, etc. running on Windows 10 OS can encounter issues and, therefore, fail to work. Automatic Repair is not an exception.
A guide on how to fix “Automatic Repair couldn’t repair your PC” on Windows 10?
The most important thing here is that “Automatic Repair couldn’t repair your PC” error has a solution or rather plenty of them. However, we are not going to list tens of fixes here because the majority of “Automatic Repair couldn’t repair your PC” error victims have managed to fix it by using one of these three solutions.
NOTE: for all the method listed below you have to have a Bootable installation media. If you don’t have it yet, can create it by using this tutorial. If you cannot log on to your PC, then you should use an alternative PC, for example, friends' or work PC.
Method 1. Fix MBR/DBR/BCD
- Insert Windows installation media and click the Power button.
- Press any key to boot using an external drive.
- Select your language preferences and click Next.
- Select Repair your computer and click Troubleshoot.
- Press Advanced Options and select Command Prompt (With networking).
- In the Command Prompt window, type the following commands pressing Enter after each of them:
bootrec.exe /fixmbr
bootrec.exe /fixboot
bootrec.exe /rebuildbcd - Finally, restart your PC.

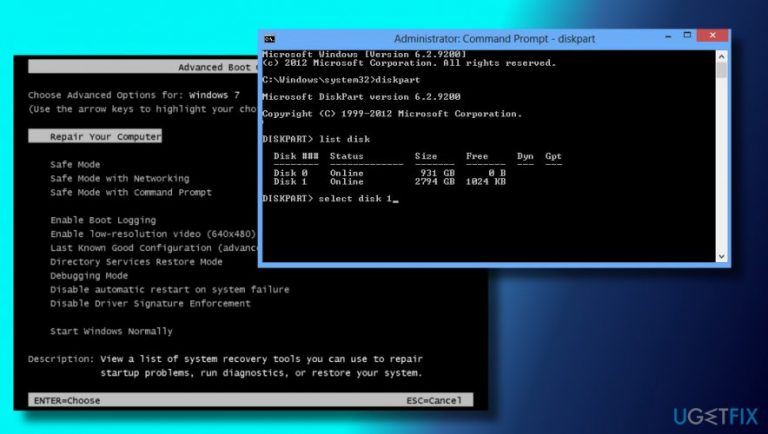
Method 2. Fix damaged system files using the Diskpart
- Insert Windows installation media and click the Power button.
- Press any key to boot using an external drive.
- Select your language preferences and click Next.
- Select Repair your computer and click Troubleshoot.
- Press Advanced Options and select Command Prompt (With networking).
- Type Diskpart and then paste the following commands pressing Enter after each of them:
select disk 1
select partition 1
active
extend filesystem
exit
bootrec.exe /rebuildbcd
bootrec.exe /fixmbr
bootrec.exe /fixboot - Reboot the system to save the changes and check if these commands helped to fix Automatic Repair couldn’t repair your PC error on Windows 10.

Method 3. Recover Windows Registry
- Insert Windows installation media, press the Power button, and then click any key to boot from it.
- Select your language and press Next.
- Click Shift + F10 to open Command Prompt.
- Type cd C:\\windows\\system32\\logfiles\\srt\\ (change your drive letter accordingly).

Recover windows registry - After that, type SrtTrail.txt and press Enter to open the required file in the notepad.
- Click Ctrl + O.
- Find File types and select All Files.
- Navigate to C:\\windows\\system32, find CDM, right-click it and select Run as Administrator.
- Type cd C:\\windows\\system32\\config command in the command prompt window.
- Add .bak file extension to Default, Software, SAM, System and Security files to create their backups. To do so, type the following command in the command prompt window and press Enter after each:
rename DEFAULT DEFAULT.bak
rename SAM SAM.bak
rename SECURITY SECURITY.bak
rename SOFTWARE SOFTWARE.bak
rename SYSTEM SYSTEM.bak
copy c:\\windows\\system32\\config\\RegBack c:\\windows\\system32\\ - Finally, reboot your PC.
Hopefully, these steps have helped you to fix Automatic Repair couldn’t repair your PC bug. If you still see this error message, please let us know and we will analyze your case separately.
If you have managed to fix the problem and boot into your PC successfully, we would highly recommend installing [d1], which is a PC optimization tool with an inbuilt antivirus system. It means that one simple software will take care of your PC’s performance regarding system files, registries, and even virus/malware protection.
Bottom line
To fix the 'Automatic Repair couldn’t repair your PC' error, you can try using a bootable installation media to access Automatic Repair, perform a system restore, or run the command prompt to repair system files. If none of these solutions work, consider seeking professional help or reinstalling Windows.
Frequently asked questions
Try booting into Safe Mode and then perform a system restore to revert your PC to a previous state. If that doesn't work, consider using the Windows 10 installation media for repair options.
Yes, you can access your files by booting from a Windows 10 installation media and selecting 'Repair your computer' to use the command prompt or file recovery options.
You can bypass the Automatic Repair screen by forcing a shutdown three times, which should trigger the Windows Recovery Environment where you can access advanced troubleshooting options.


Report an issue
What's wrong with this guide? We review every report and update or remove content.
Report received — thank you. We'll review and fix it.
You need a free account to submit a report.
Be the first to comment