How to fix
Hyper-V Audio not working
on Windows
Resolve Hyper-V audio issues in Windows 11 effortlessly with proven solutions. Get your sound back fast and trust our expert-tested methods!

What causes How to fix Hyper-V Audio not working in Windows 11?
- Driver conflicts
- Outdated drivers
- Incorrect audio settings in the virtual machine
- Audio enhancements enabled
Repairs Windows system files, removes malware, and restores a clean OS state — without reinstalling.
Hello. When I use Hyper-V on Windows 11 the audio is not working. Is there any way to fix this issue?
Microsoft's Hyper-V virtualization[ref en-1] technology allows users to create virtual machines on their Windows computers. It's a popular choice for developers, IT pros, and others who need to run multiple operating systems on a single device. Hyper-V offers several advantages, such as the ability to test new software, isolate different environments, and consolidate hardware.
Users can save files to a specific location with a unique name using the "Save As" window in Microsoft Office and Microsoft 365 applications such as Word or Excel. This window may appear unexpectedly, causing users to be frustrated and interfering with their workflow. The "Save As" window appearing repeatedly can have a significant impact on user productivity and frustration, resulting in time and productivity loss.
In some cases, users may experience issues with Hyper-V Audio not working in Windows 11. A number of factors can contribute to this problem, including driver conflicts, outdated drivers, or incorrect audio settings in the virtual machine.
The impact of this issue varies depending on the use case. For example, if a user is running a multimedia application in a virtual machine, the lack of audio functionality may render the application unusable. In other cases, the lack of audio may not be a critical issue, but it can still limit the virtual environment's functionality.
There are several possible solutions for the Hyper-V Audio issue in Windows 11. These include updating audio drivers, checking audio settings in the virtual machine, and disabling audio enhancements. However, the specific solution will depend on the underlying cause of the issue.
In this guide, you will find 4 steps that should help you fix Hyper-V Audio not working in Windows 11. Keep in mind that the manual troubleshooting process may be lengthy. If you want to avoid it, use a maintenance tool like [d1]. It can fix most system errors, BSODs,[ref en-2] corrupted files, and registry[ref en-3] issues. Otherwise, follow the step-by-step instructions below.
Enable Hyper-V
If you have not enabled Hyper-V on you machine yet, here is a way to do it:
- Open Notepad on your Windows device
- Create a new file
- Copy and paste the following script into the file:
pushd "%~dp0"
dir /b %SystemRoot%\servicing\Packages\*Hyper-V*.mum >hyper-v.txt
for /f %%i in ('findstr /i . hyper-v.txt 2^>nul') do dism /online /norestart /add-package:"%SystemRoot%\servicing\Packages\%%i"
del hyper-v.txt
Dism /online /enable-feature /featurename:Microsoft-Hyper-V -All /LimitAccess /ALL
pause
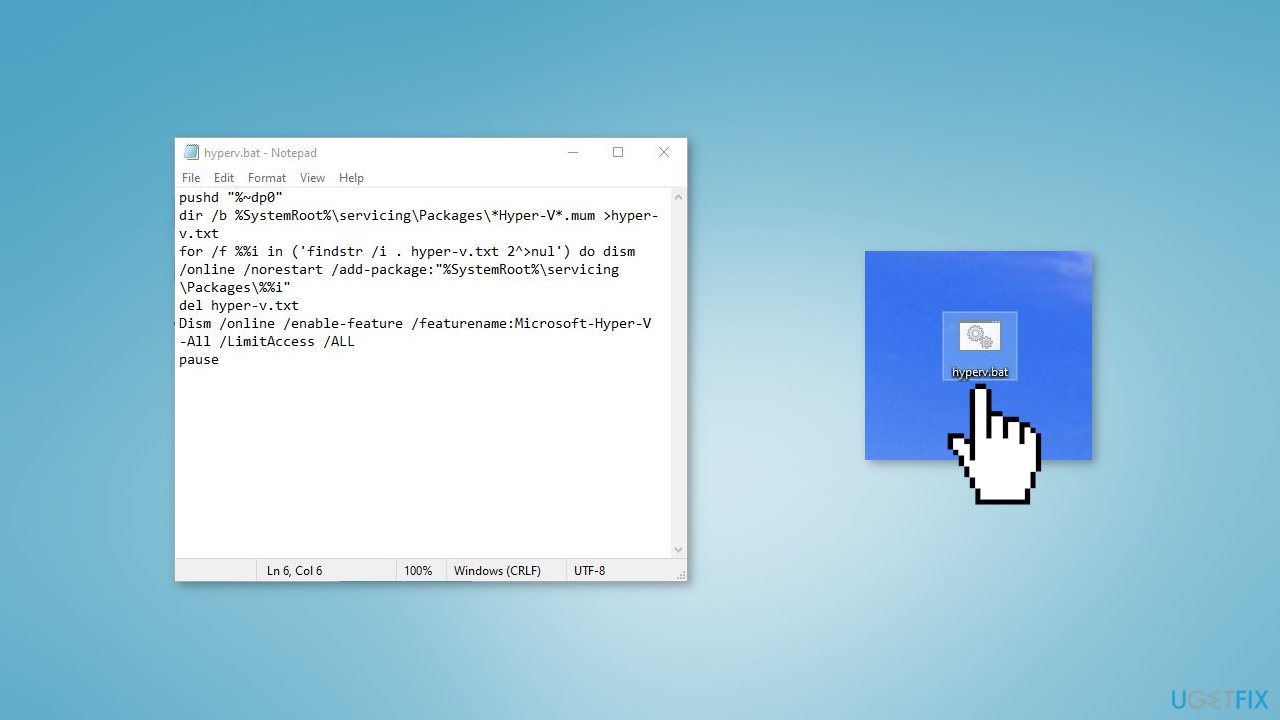
- Click on File > Save as, type hyperv.bat in the name field, and click on Save
- Navigate to the location where the file was saved
- Right-click on the file and select Run as administrator
- The Command Prompt will now open and start installing Hyper-V on your device
- Wait for the procedure to complete
- When the installation completes, the Command Prompt will ask you to restart your system
- Type Y and press Enter to proceed with the restart
- After your device restarts, Hyper-V will be enabled on your device
Solution 1. Run Playing Audio Troubleshooter
- Press the Windows key + I on your keyboard to open the Settings app
- Scroll down and select Troubleshoot from the list of options
- Click on Other troubleshooters
- Scroll down to the Find and fix other problems section and click on Playing Audio
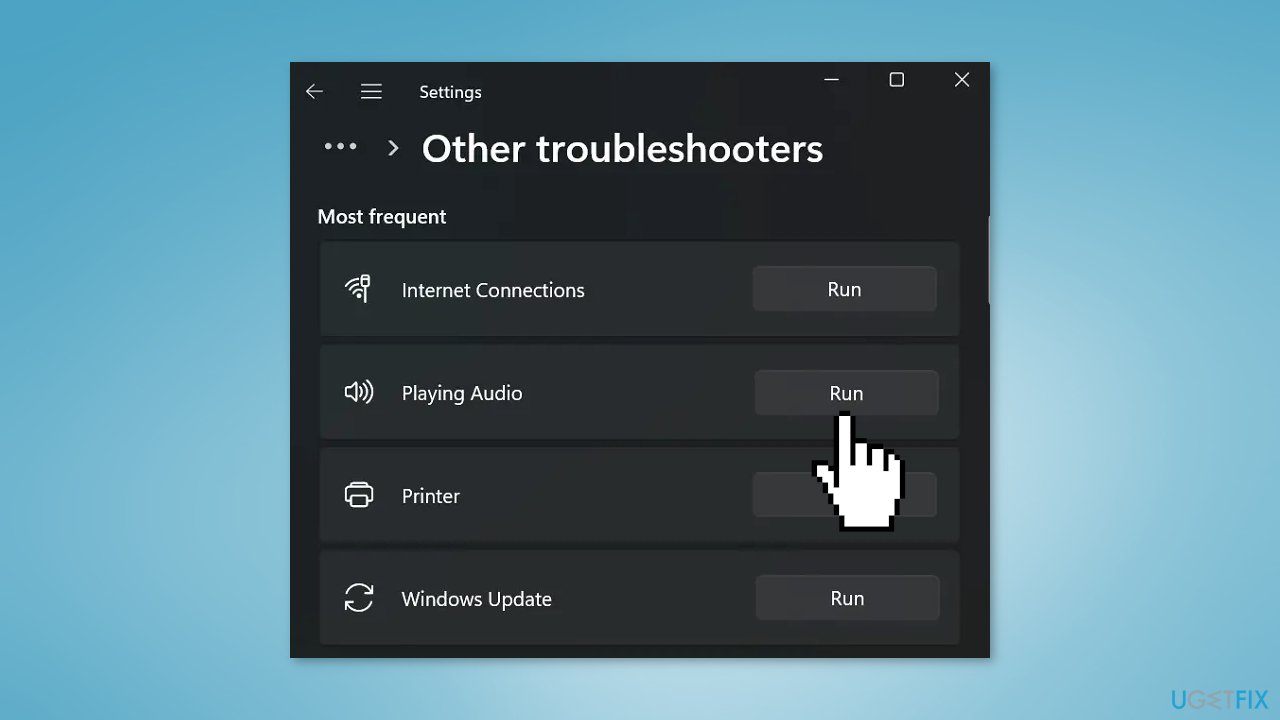
- Click on the Run troubleshooter button
- Wait for the troubleshooter to run and complete the process
- Once the process is complete, the troubleshooter will display a message with the results of the troubleshooting.
- If the troubleshooter was able to fix the issue, restart your device to apply the changes and verify if the problem is resolved.
Solution 2. Update Audio Drivers
Outdated drivers could be the cause of this issue. In this case, you can fix it automatically by using [rev id="DriverFix"], which will scan your PC for missing and out-of-date device drivers. Or you can update them manually:
- Open Settings
- Click on Update & Security
- Click on Windows Update
- Click the Check for updates button
- Click the View optional updates option
- Click the Driver updates tab
- Select the driver you want to update
- Click the Download and install button
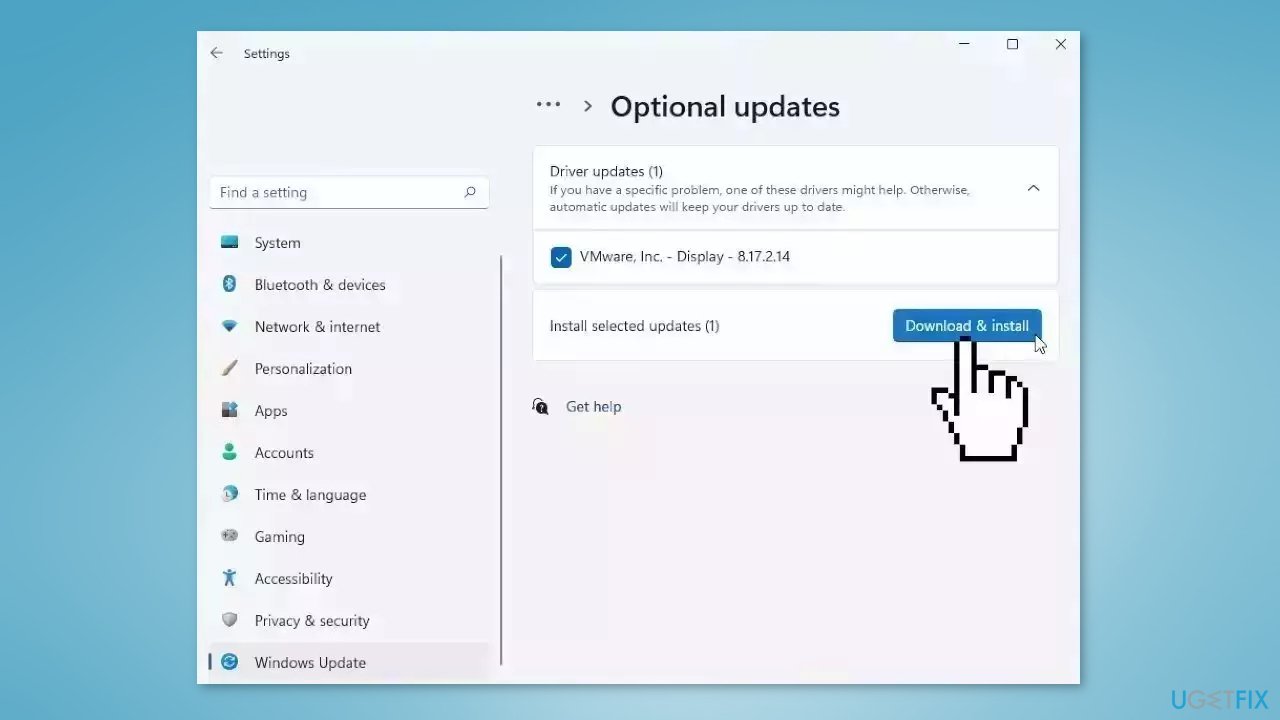
If the View optional updates link is not available after checking for updates, then Windows Update does not have any new drivers or any updates for other products at that particular time.
Solution 3. Restart Windows Audio Service
- Press the Windows key on your keyboard
- Type Services in the search box
- Click on the Services app to open it
- Scroll through the list of services to locate the Windows Audio service
- Right-click on the service
- Click on Restart from the options menu that appears
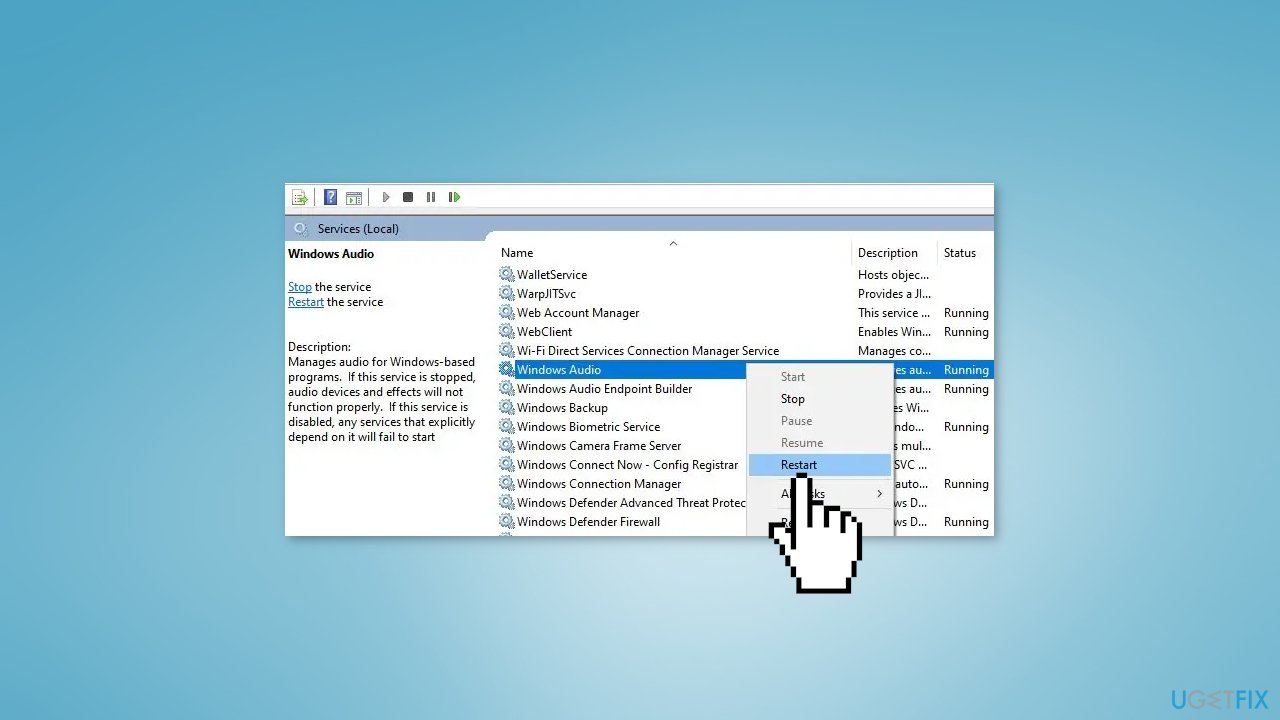
- Wait for the service to restart
- Once the service has restarted, close the Services app
- Check if the audio issue has been resolved
Solution 4. Configure Remote Desktop Settings
- Press the Windows key on your keyboard
- In the search box, type Remote Desktop Connection and click on it to open
- Click on Show Options located at the bottom of the window
- Click on the Local Resources tab
- Scroll down to the Remote Audio section
- Click on the Settings button
- Select Play on this computer under the Remote audio playback section
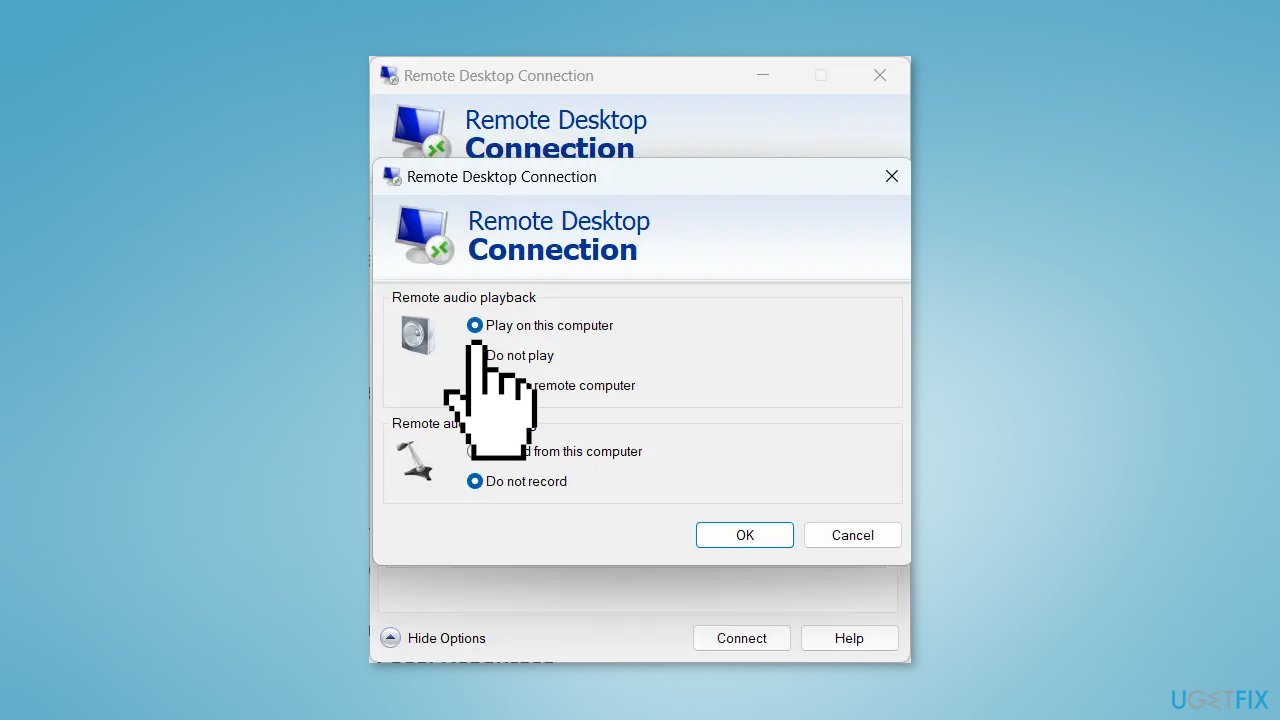
- Click on OK to save the changes
- You can now connect to the remote desktop session and the audio should be played on your local computer
Bottom line
To fix the Hyper-V audio issue in Windows 11, you can update audio drivers, check audio settings in the virtual machine, and disable audio enhancements. If these steps do not resolve the problem, consider using a maintenance tool to address system errors.
Frequently asked questions
Audio issues in Hyper-V on Windows 11 can occur due to misconfigured settings or lack of audio device support in the virtual machine configuration.
To enable audio support, go to the settings of your virtual machine, select 'Add Hardware', and choose 'Audio Adapter' to add it.
If the audio still doesn't work, ensure that the virtual machine's integration services are updated and that the host audio device is functioning correctly.




Report an issue
What's wrong with this guide? We review every report and update or remove content.
Report received — thank you. We'll review and fix it.
You need a free account to submit a report.
Be the first to comment