How to fix
FVEAPI.dll Bad Image error
on Windows
Resolve the FVEAPI.dll Bad Image error in Windows 10 or 11 quickly and effectively. Expert-tested solutions ensure your system runs smoothly again.
What causes How to fix FVEAPI.dll Bad Image error in Windows?
- Corrupted system files
- Missing system files
- Malware presence
- Software conflicts
- Issues with BitLocker functionality
Repairs Windows system files, removes malware, and restores a clean OS state — without reinstalling.
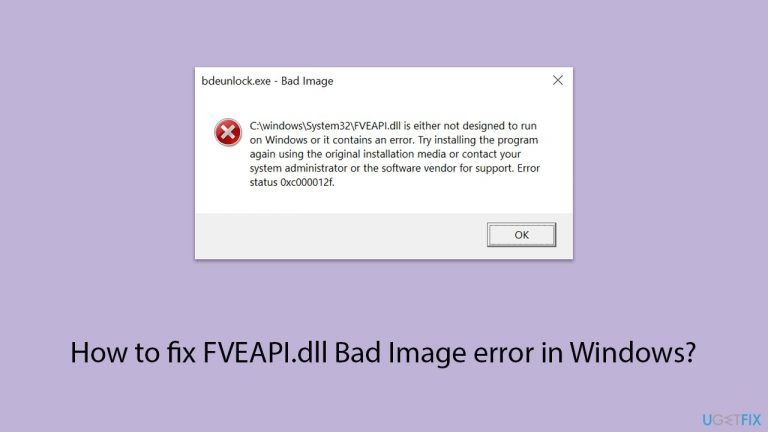
Help me please - I don't know what to do. My Settings app is not working. Whenever I try to open it, I receive an error "This app can't open there's a problem with your PC refresh might fix the problem." I click Refresh but then I always receive a Bad Image error with C:\Windows\system32\FVEAPI.dll referenced. What should I do?
The "FVEAPI.dll missing or not found" error is an issue for Windows users, particularly when attempting to access the Settings application. This error typically manifests through an inability to operate within Settings, with the system often prompting you to refresh the page.
However, upon attempting to refresh, you may encounter a message stating "FVEAPI.dll is either not designed to run on Windows or it contains an error" among other variations. This disruption is linked to the FVEAPI.dll file, which is integral to BitLocker's functionality.
BitLocker is a security feature in Windows that encrypts data to protect it from unauthorized access. Issues with the FVEAPI.dll file can lead to more severe problems, including the encryption of all drives on a PC, subsequently blocking access to them.
The root causes of FVEAPI.dll Bad Image error can vary but typically involve corrupted or missing system files, possibly exacerbated by malware or other software conflicts.
Addressing this problem can be complex and might involve actions such as restoring corrupted files, conducting a thorough malware scan, or using System Restore to revert the computer to a previous state where this error did not exist.
Additionally, repairing, resetting, or re-registering the Settings app, or performing a repair installation of Windows are potential steps that could rectify the issue.
For a hassle-free resolution to such issues, particularly when dealing with corrupted or missing system files, using PC repair software [d1] might be an optimal solution. These tools specialize in automatically detecting and restoring missing or corrupted files, streamlining the repair process without the need for manual interventions.

Fix 1. Access safe mode (if required)
Safe mode starts your PC with a minimal set of drivers and services. If malware or software conflicts are causing issues, accessing Safe Mode can help diagnose the problem without interference.
- From the login screen, hold the Shift key on your keyboard and click Power > Restart.
- Once you enter the recovery environment, click Troubleshoot.
- Go to Advanced options > Startup Settings.
- When prompted, click Restart.
- After restart, pick either 4/F4 for Safe Mode or 5/F5 for Safe Mode with Networking.
- Once is Safe Mode, proceed with the troubleshooting steps below.

Fix 2. Run a malware scan
Running a malware scan can help detect and remove malicious software that might be causing the FVEAPI.dll error. You can run any reputable third-party software or employ the built-in Microsoft Defender as follows:
- Type Windows Security in the Windows search bar and hit Enter.
- Select Virus & threat protection.
- Pick Scan options.
- Choose Microsoft Defender Offline scan and click Scan now
- Your computer will immediately reboot and begin a deep scan.

Fix 3. Repair corrupted files
SFC and DISM scans can sometimes fix corrupted system files related to DLLs.
- Type cmd in Windows search.
- Right-click on Command Prompt and pick Run as administrator.
- User Account Control window will show up - click Yes when prompted.
- Then, copy and paste the following command, pressing Enter after:
- sfc /scannow
- Wait for the scan to complete.
- Once the SFC scan is finished, run the following set of DISM commands, pressing Enter after each one:
DISM /Online /Cleanup-Image /CheckHealth
DISM /Online /Cleanup-Image /ScanHealth
DISM /Online /Cleanup-Image /RestoreHealth - Close down the Command Prompt and restart your device.

Fix 4. Repair or reset the Settings
app Resetting or repairing the Settings app can resolve issues caused by app corruption or misconfiguration.
- Type Settings in Windows search.
- Right-click on the result and select App Settings.
- Scroll down and click Repair.
- If that does not work, try the Reset option.

Fix 5. Reregister Settings app
Re-registering the Settings app can resolve underlying issues by refreshing its registration status within Windows.
- Type PowerShell in Windows search.
- Right-click and select Run as administrator.
- When UAC shows up, click Yes.
- Copy and paste the following command, pressing Enter after:
Get-AppXPackage -AllUsers -Name windows.immersivecontrolpanel | Foreach {Add-AppxPackage -DisableDevelopmentMode –Register “$($_.InstallLocation)\AppXManifest.xml” -Verbose} - Close down PowerShell and see if the issue is resolved.

Fix 6. Create a new user account
Creating a new user account can determine if the current user profile is corrupt.
- Open Windows Settings.
- Go to Accounts then Family/Family & other users.
- Under Other users, click Add account/Add someone else to this PC.
- Follow the prompts to create a new user account. If you don't have Microsoft account details, you can choose I don't have this person's sign-in information followed by Add a user without a Microsoft account.
- Assign a username and password for the new account and complete the setup.
- Then go back to the Accounts section. Under Family/Family & other users, select the newly created account and click Change account type.
- Under Account type, pick Administrator and click OK.

Fix 7. Try System Restore
System Restore can revert system files, programs, and settings to a previous state where everything was functioning correctly.
- Type System Restore in the search box and click Create a restore point.
- In the System Properties window, click System Restore.
- Click Next, choose a restore point from before the issues began, and click Next again.
- Follow the on-screen instructions to complete the restoration.
- Restart your computer after the process completes

Fix 8. Repair-install Windows
A repair installation will reinstall Windows’ system files without deleting your personal data, apps, and settings.
Create Windows ISO
- Download Windows 11 Installation media from the official Microsoft website. [Windows 10 version]
- Double-click the MediaCreationTool.exe file to launch it.
- When UAC shows up, click Yes.
- Accept license terms.
- Select Language and Edition (make sure it matches the one you have currently installed) or simply mark the Use the recommended options for this PC and click Next).
- Select the ISO file and click Next.
- Pick the location for your ISO file and wait till all the needed files are downloaded, then click Finish.

Repair-install Windows
- Go to the location of your ISO file, right-click, and select Mount.
- Run the setup.exe file.
- You will be asked whether you want to update Windows to the latest version - pick Not right now and click Next.
- Accept Terms and Windows will make several checks to ensure everything is fine.
- Click Change what to keep.
- Here, you have several options: Keep your files and apps, Keep files only, or Keep nothing - choose what suits you the best. Click Next.
- Finally, click Install to begin the installation process.
Bottom line
To fix the FVEAPI.dll Bad Image error, you can restore corrupted files, conduct a thorough malware scan, or use System Restore. Additionally, consider repairing, resetting, or re-registering the Settings app, or performing a repair installation of Windows. If none of these solutions work, using PC repair software may provide an optimal resolution.
Frequently asked questions
The FVEAPI.dll Bad Image error is typically caused by corrupted system files, incompatible software, or issues with the Windows update process in Windows 10 and 11.
You can repair the FVEAPI.dll Bad Image error in Windows 11 by running the System File Checker tool (sfc /scannow) and performing a DISM scan to restore system files.
Yes, third-party security software or recently installed applications can conflict with system files, leading to the FVEAPI.dll Bad Image error in both Windows 10 and 11.


Report an issue
What's wrong with this guide? We review every report and update or remove content.
Report received — thank you. We'll review and fix it.
You need a free account to submit a report.
Be the first to comment