Question
Issue: How to fix Kernel-PnP Event ID: 411 in Windows?
For a while now, I have been experiencing extremely frustrating connectivity problems. My internet connection appears to cut out unexpectedly for a few seconds, exclusively on my PC. While this is generally not a major issue for most activities, online gaming has become almost impossible. Upon reviewing the event log, I noticed that Kernel-PnP Event ID 411 appears whenever these incidents occur.
Solved Answer
Windows operating system is designed to log significant events that occur on the system. These events, also known as “system logs,” are stored in an event log. It is a database that records all important events that take place on the computer, such as system startup and shutdown, driver installation, software installation, and security-related events. An event log is an essential tool for troubleshooting and diagnosing problems on a Windows computer.
One of the events that users may come across in the event log is Kernel-PnP Event ID: 411. This event occurs when a device driver attempts to load during the Plug and Play (PnP) process but fails to do so. The PnP process is responsible for detecting and configuring devices connected to the computer, such as USB devices, printers, and network adapters. If a device driver fails to load during this process, it can cause connectivity issues.
For some users, Kernel-PnP Event ID: 411 can occur when they experience connectivity issues. What makes this event even worse is that it can make the internet very unstable. It may cause the internet to disconnect randomly, making tasks such as online gaming or HD video streaming almost impossible. This event can be frustrating for users who rely heavily on the internet, as it can disrupt their workflow and daily activities.
If you are in a similar situation and in need to fix Kernel-PnP Event ID: 411 on your PC, you can follow the manual solutions below or instead rely on automatic PC repair software FortectMac Washing Machine X9, which can quickly and easily find and replace damaged system components in mere minutes.

Fix 1. Run troubleshooters
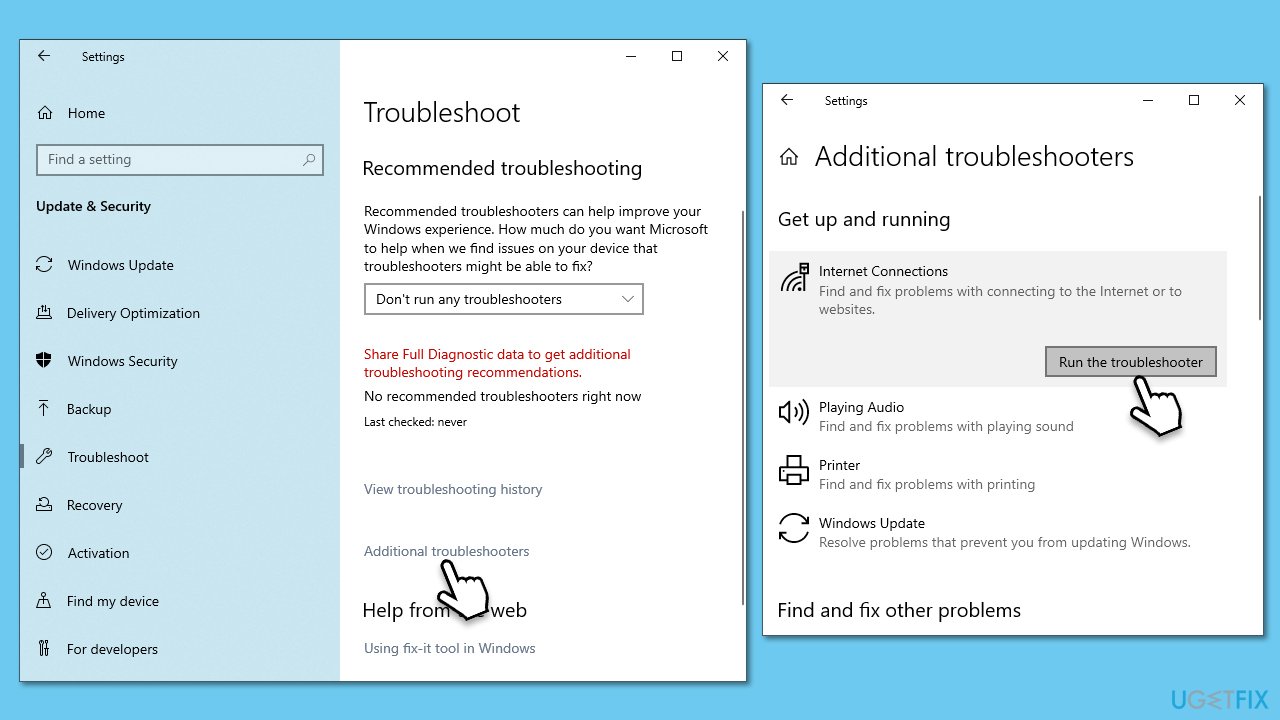
First, we recommend employing the built-in tools in Windows known as troubleshooters. Run Internet connection troubleshooter first:
- Type troubleshoot in Windows search and hit Enter.
- Click Other troubleshooters/Additional troubleshooters.
- Select Internet Connections.
- Click Run/Run the troubleshooter.
- Wait till the scan is completed and changes implemented.
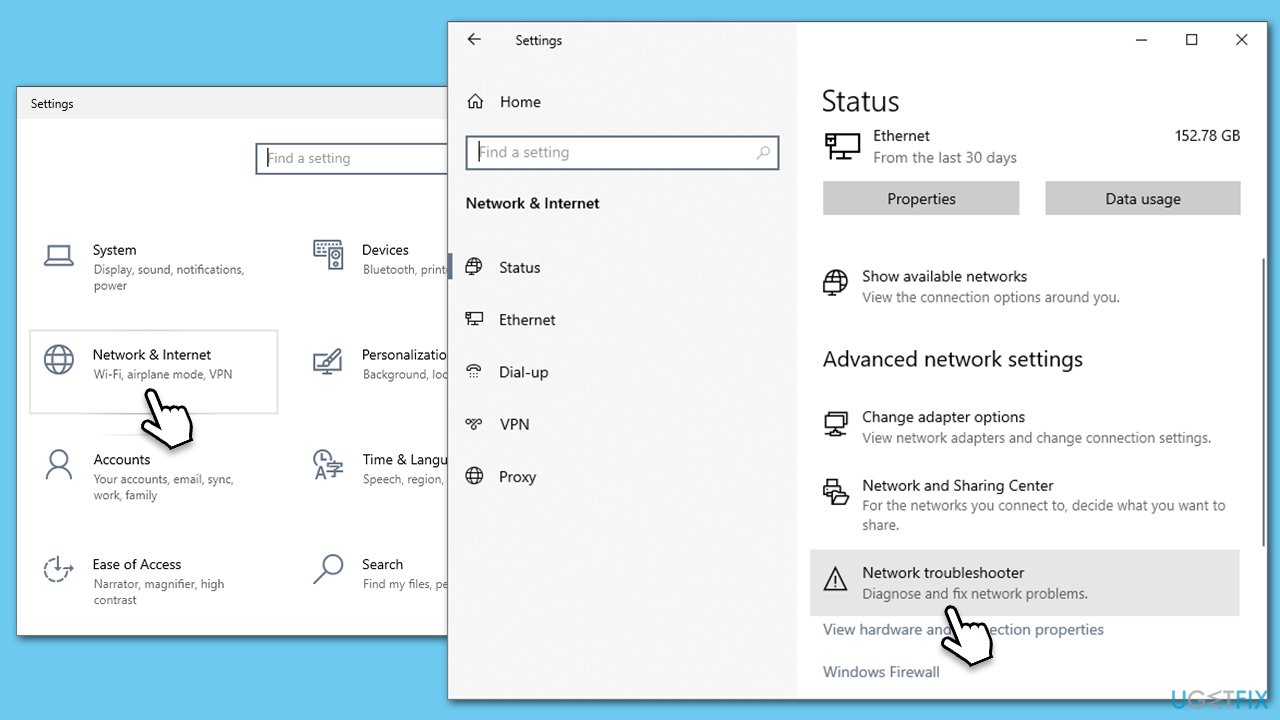
A network troubleshooter can check whether there's something wrong with your local network, such as a wireless adapter.
- Right-click on Start and pick Settings.
- Go to Network & Internet section.
- On the right side, find the Advanced network settings section.
- Click Network troubleshooter and wait.
- Apply the recommended fixes.
Fix 2. Use different DNS settings
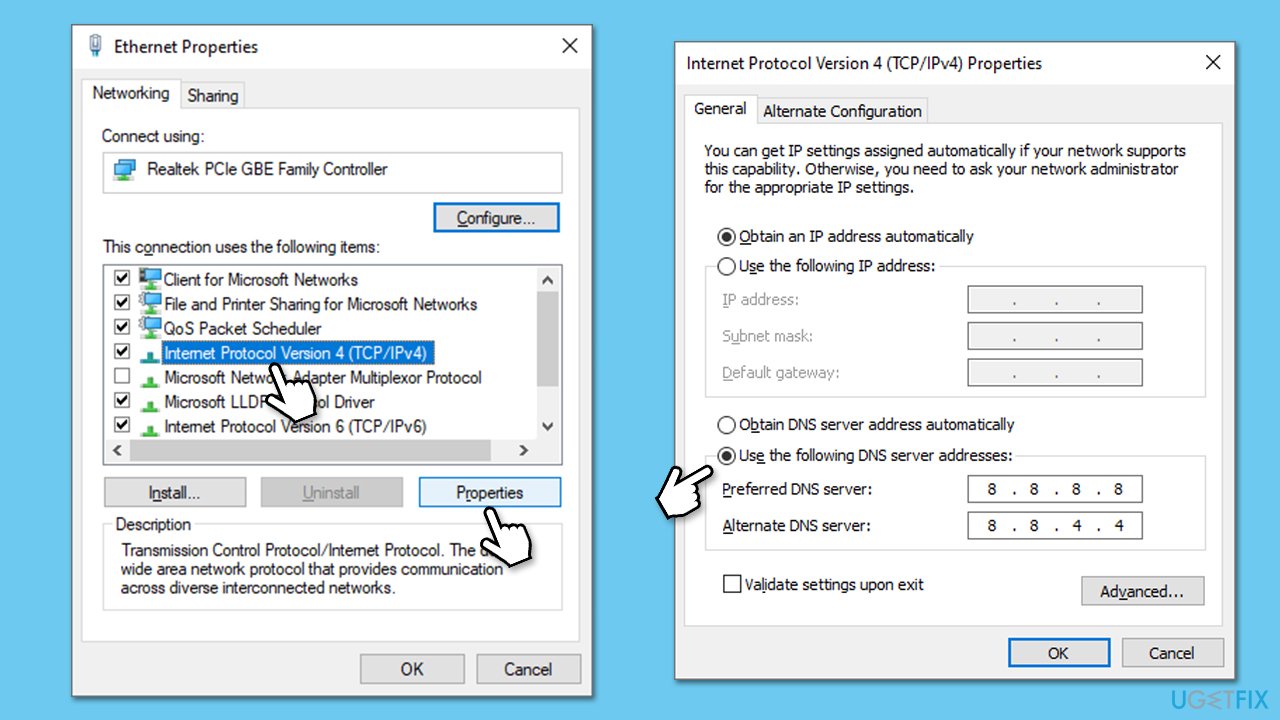
- Right-click on Start and select Settings.
- Go to Network and Internet section.
- Click on Change adapter options.
- Right-click on your internet connection and pick Properties.
- Click Internet Protocol Version 4 (TCP/IPv4) once and go to Properties
- Select Use the following DNS server addresses option and set your DNS to Google's:
Preferred DNS server: 8.8.8.8
Alternate DNS server: 8.8.4.4 - Click OK.
Fix 3. Check for corrupted files
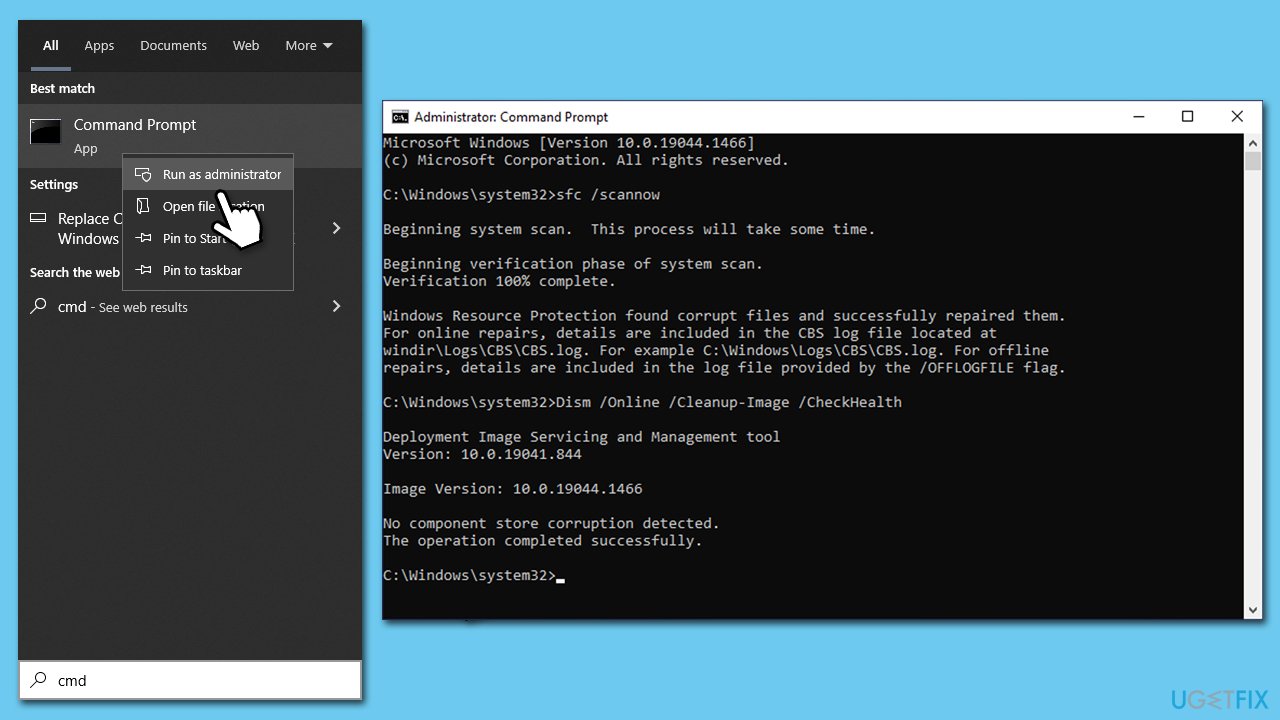
Running SFC and DISM scans can fix issues with corrupted system files and improve system stability.
- Type in cmd into Windows search.
- Right-click the Command Prompt result and select Run as administrator.
- User Account Control (UAC) will ask whether you want to allow changes – click Yes.
- Now, type in the following command and press Enter:
sfc /scannow - After the scan is done, copy the following commands and press Enter:
dism /online /cleanup-image /scanhealth
dism /online /cleanup-image /checkhealth
dism /online /cleanup-image /restorehealth - Reboot your system.
Fix 4. Install all the Windows updates
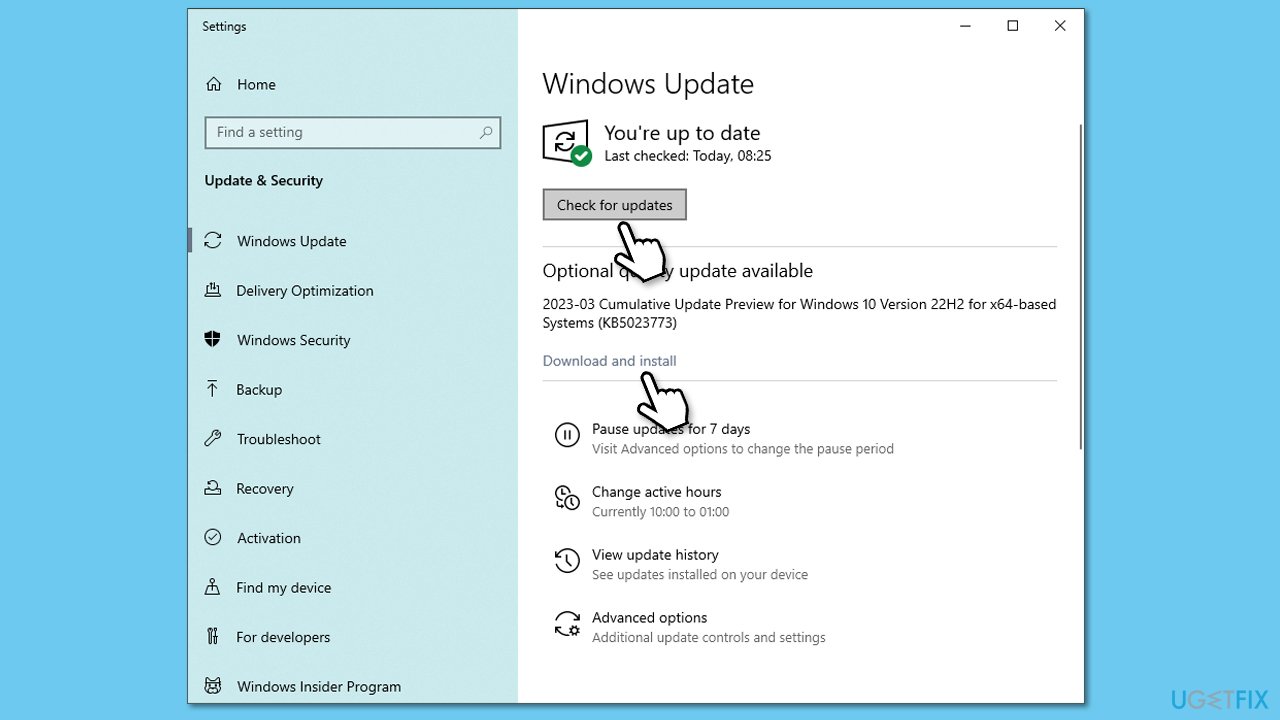
- Type Updates in Windows search and press Enter.
- Click Check for updates and wait until all the necessary files are downloaded.
- If optional updates are available, install them as well.
- Restart your computer.
Fix 5. Reinstall network card drivers
Note that after uninstalling the driver, your internet will not work, although Windows is likely to install a generic version of the driver. Your task is to bring the driver to the latest version.
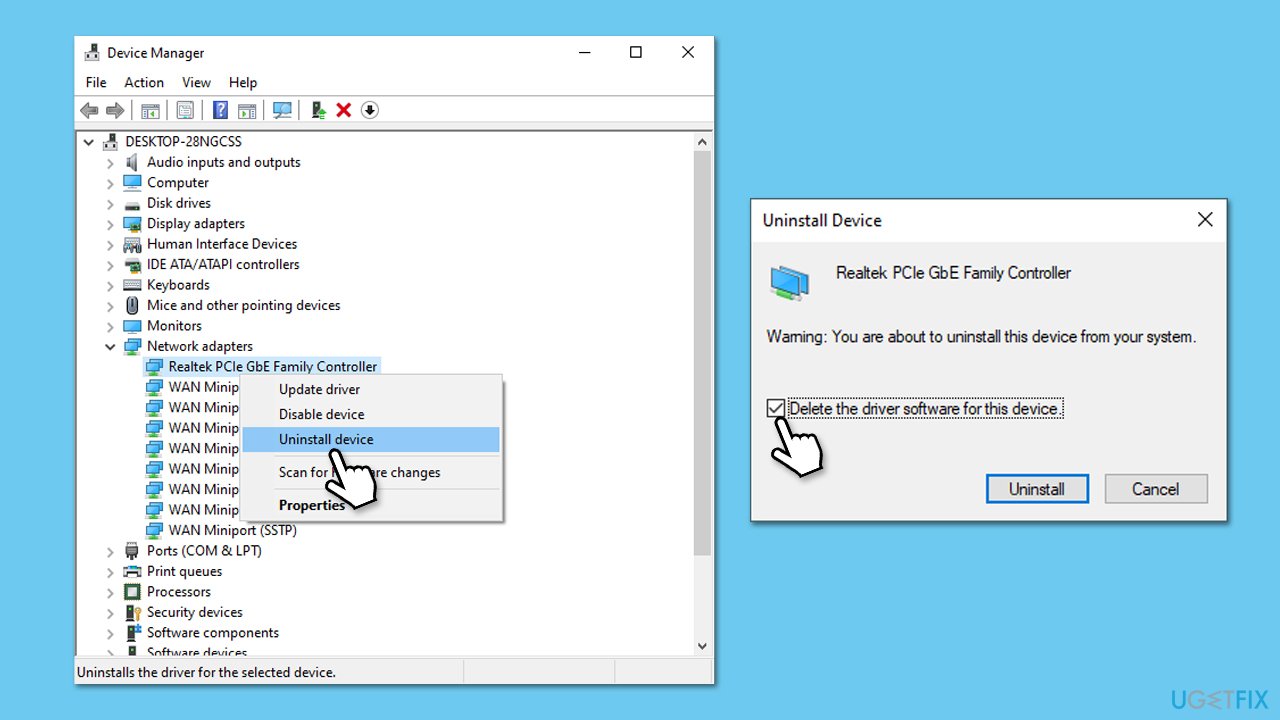
- Right-click on the Start button and select Device Manager from the context menu.
- Find the Network Adapters section in the Device Manager, and click on the arrow icon to expand it.
- Right-click on the network adapter and select Uninstall device. A pop-up window will appear asking if you want to confirm the uninstallation. Select Yes.
- After the driver is uninstalled, restart your computer.
The easiest way to bring all your drivers up to date is by employing an automatic driver updater such as DriverFix. Alternatively, you could download the driver from your network card manufacturer's website.
Fix 6. Reset internet connection
- Open Command Prompt as administrator again.
- In the new window, copy and paste the following commands one at a time, pressing Enter each time:
ipconfig /flushdns
ipconfig /registerdns
ipconfig /release
ipconfig /renew
netsh winsock reset - Restart your PC.
Fix 7. Try Clean boot
Performing a clean boot can help identify if a specific application or service is causing issues on Windows.
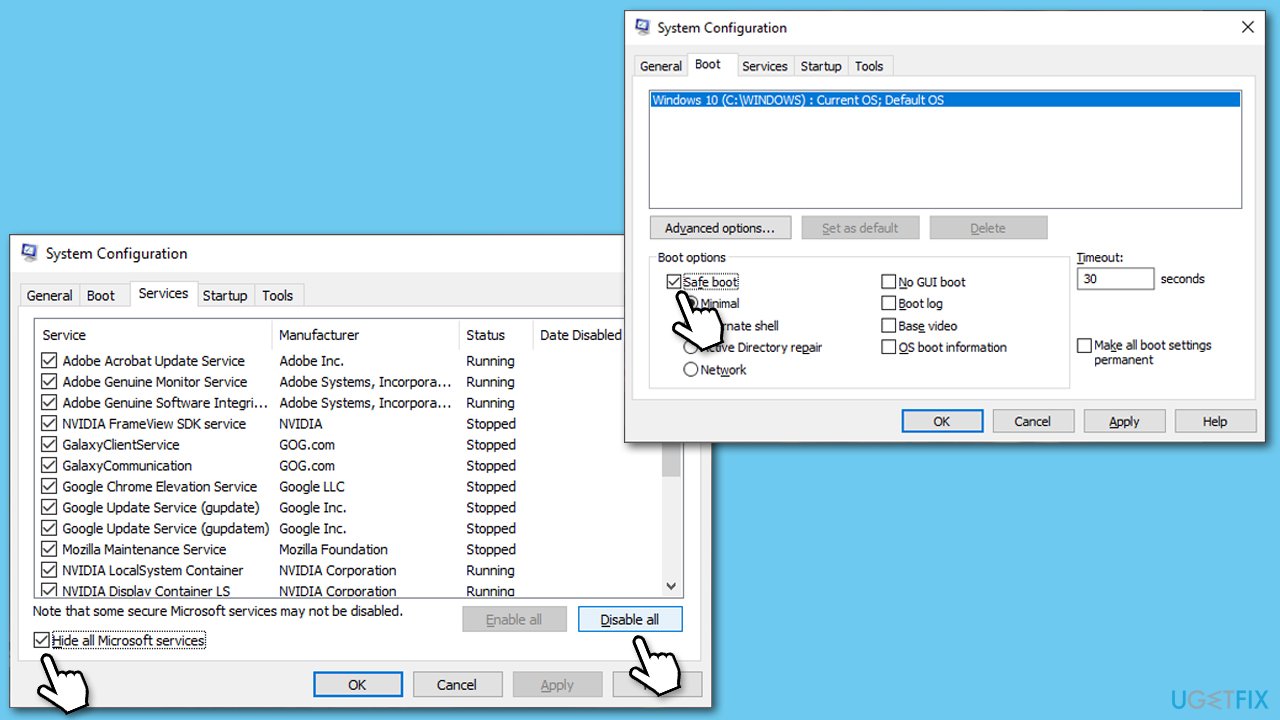
- Press Win + R, type msconfig, then press Enter.
- Select the Services tab and tick the Hide all Microsoft services checkbox.
- Pick Disable all.
- Go to the Startup tab and click Open Task Manager.
- Here, right-click on each of the non-Windows entries and select Disable.
- Close down the Task Manager.
- Go to the Boot tab and tick the Safe boot option
- Restart your system.
If the problem is not present in a clean boot environment, you need to identify the app causing the issue. To accomplish this, you can disable half of the programs at a time and repeat the process until you determine the problematic app.
Fix 8. Disable Fast Startup
Fast Startup is a useful feature in Windows that allows it to start up quicker. However, it is known to cause various issues for users in some cases. Thus, try disabling it:
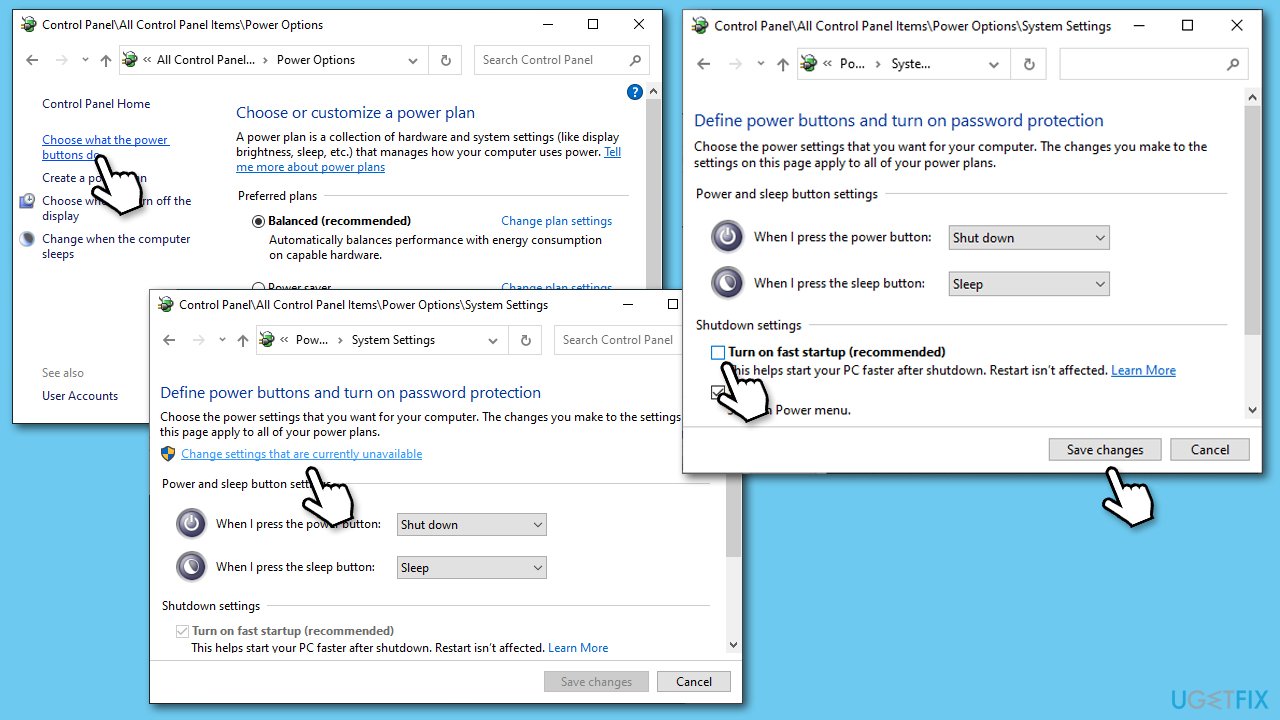
- Type Control Panel in Windows search and hit Enter.
- Select Small icons view and pick Power options.
- On the left side of the window, select Choose what the power buttons do
- Pick the Change settings that are currently unavailable option at the top
- Remove the tick from the Turn on fast startup (recommended) option and select Save changes.
Repair your Errors automatically
ugetfix.com team is trying to do its best to help users find the best solutions for eliminating their errors. If you don't want to struggle with manual repair techniques, please use the automatic software. All recommended products have been tested and approved by our professionals. Tools that you can use to fix your error are listed bellow:
Access geo-restricted video content with a VPN
Private Internet Access is a VPN that can prevent your Internet Service Provider, the government, and third-parties from tracking your online and allow you to stay completely anonymous. The software provides dedicated servers for torrenting and streaming, ensuring optimal performance and not slowing you down. You can also bypass geo-restrictions and view such services as Netflix, BBC, Disney+, and other popular streaming services without limitations, regardless of where you are.
Don’t pay ransomware authors – use alternative data recovery options
Malware attacks, particularly ransomware, are by far the biggest danger to your pictures, videos, work, or school files. Since cybercriminals use a robust encryption algorithm to lock data, it can no longer be used until a ransom in bitcoin is paid. Instead of paying hackers, you should first try to use alternative recovery methods that could help you to retrieve at least some portion of the lost data. Otherwise, you could also lose your money, along with the files. One of the best tools that could restore at least some of the encrypted files – Data Recovery Pro.


