How to fix
Error code VAL 51 in Valorant
on Windows
Resolve error code VAL 51 in Valorant quickly on Windows 10 or 11. Get expert-tested solutions and fix your gaming experience in minutes!
What causes How to fix error code VAL 51 in Valorant?
- User-side network issues
- Corrupt webcache files
- Firewalls interfering with connections
- Security software blocking access
- Ongoing server issues
Repairs Windows system files, removes malware, and restores a clean OS state — without reinstalling.
Hello. I wanted to play Valorant on my Windows PC but I got the VAL 51 error code. Any way to fix this?
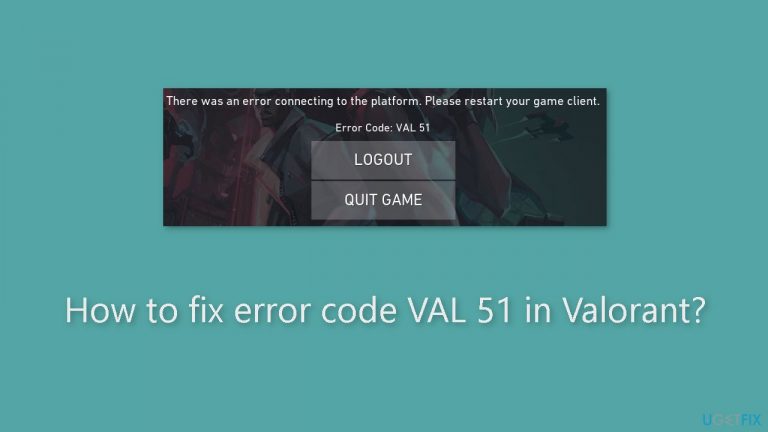
Error code VAL 51 in Valorant is a connection issue that can be quite frustrating for players. When this error occurs, the full error message reads: "There was an error connecting to the platform. Please restart your game client. Error Code: VAL 51." It basically means that your gaming client was unable to connect to Valorant's servers.
Users who encounter the VAL 51 issue may suffer serious consequences because they won't be able to play the game or enjoy it. Particularly when players are anxious to explore the world of Valorant, it might result in lost time, interrupted gaming sessions, and an overall feeling of frustration.
The VAL 51 error could have a number of causes. First, user-side network issues including erratic or sluggish internet connections can cause this error. Corrupt webcache files, which house temporary game data, could potentially be at blame. The VAL 51 issue can occasionally be caused by firewalls or security software interfering with communications between the gaming client and the Valorant servers.
Users often need to address the precise root cause of the problem in order to fix the VAL 51 error. This could entail fixing webcache files, troubleshooting network issues, or modifying security software settings to permit Valorant to access to its servers. However, depending on the underlying cause and the setup of the user's system, the precise procedures to fix the problem may change.
In this guide, you will find 7 steps that should help you fix error code VAL 51 in Valorant. You can also use a maintenance tool like [d1] that can fix most system errors, BSODs,[ref en-1] corrupted files, registry[ref en-2] issues, or clear cookies and cache.[ref en-3] Otherwise, follow the step-by-step instructions below.

Method 1. Check Riot Game Servers
This error may be the result of an ongoing server issue on their part. Therefore, verify the current status of Riot game servers to ensure they are operational. Utilize a free online server status detection website to determine if a server outage is occurring.
Method 2. Update Valorant
- Open the Riot Client using Windows Search.
- Navigate to the VALORANT game on its home screen.
- If an update is available for the game, locate the Update VALORANT option.

- Click on this button to start updating your game.
- Wait for the update to complete.
- After the update is finished, launch VALORANT.
- Check if the VAL 51 error is resolved.
Method 3. Clear the Logs and Webcache
- Click on the QUIT GAME button shown in the error prompt.
- Press the Windows key + R to open the Run command box and enter %LocalAppData% in the open field.
- In the Explorer window, locate the VALORANT folder and open it.
- Go to the Saved folder and open the logs folder.
- Select all the files present in this folder using the CTRL + A hotkey, followed by the Delete button.
- After that, repeat the above step for the webcache folder.
- Once done, close the File Explorer window and reopen the Run command box using the Windows key + R.
- Enter services.msc in the open box to open the Services app.
- Scroll down and look for the vgc service.

- Right-click on the vgc service and choose the Properties option from the context menu.
- In the vgc Properties window, set the Startup type to Automatic and click the Start button to start the service. If the service is already running, click on the Stop button and then press the Start button.
- Click on the Apply > OK button and close the Services app.
- Finally, restart your computer.
Method 4. Turn off Windows Firewall
- Press the Windows key + R to open the Run dialog box.
- Type control and press Enter.
- In the Control Panel, select System and Security (ensure the View by option is set to Category).
- Choose Windows Defender Firewall.

- On the left side of the screen, click Turn Windows Firewall on or off.
- Select the bubble next to Turn off Windows Defender Firewall (not recommended).
- Click OK to save the changes.
- Optionally, you can also disable the Windows Defender Firewall for both the private and public network settings.
Method 5. Modify DNS Settings
- Press the Windows key + R to open the Run dialog box.
- Type control and then press Enter on your keyboard to open the Control Panel.
- Click Network and Internet. (Make sure you've set Category as the View by.)
- Click Network and Sharing Center.
- Click on your network connection (whether it's Ethernet, Wi-Fi, or others).
- Click Properties.
- Click Internet Protocol Version 4 (TCP /IPv4) and then click Properties.
- Select the bubble next to Use the following DNS server addresses.

For Preferred DNS server, type 8.8.8.8
For Alternate DNS server, type 8.8.4.4
Tick Validate settings upon exit and then click OK.
Method 6. Flush DNS
- Open the Search box.
- Type cmd.
- Right-click Command Prompt from the results.
- Select Run as administrator.
- In the Command Prompt window that appears, type the following command:
ipconfig /flushdns

- Press Enter.
- If successful, the Command Prompt will report back with Successfully flushed the DNS Resolver Cache.
- Once done, restart your computer.
Method 7. Reinstall Valorant
- Press the Windows key + I to launch Settings.
- Go to the Apps > Installed apps section.
- Locate the VALORANT app.
- Press the three-dot menu button next to it.
- Choose the Uninstall option and follow the prompts.

- After uninstalling, ensure there are no leftover or residual files associated with the VALORANT game on your system.
- Delete any such files.
- Restart your computer.
- Now, download the latest version of the game from its website.
- Install it on your PC.
Bottom line
To fix error code VAL 51 in Valorant, you can check the status of Riot game servers, troubleshoot network issues, repair webcache files, or adjust security software settings. If these steps do not resolve the issue, consider using a maintenance tool to address system errors and corrupted files.
Frequently asked questions
Error code VAL 51 typically indicates a problem with the game’s connection to the Riot servers or an issue with your network settings.
To fix error code VAL 51, try resetting your network settings, checking for Windows updates, and ensuring that Valorant is allowed through your firewall.
Yes, improper DNS settings or an outdated network driver on Windows 10 can contribute to error code VAL 51, so ensure your drivers are updated and consider switching to a public DNS like Google’s.


Report an issue
What's wrong with this guide? We review every report and update or remove content.
Report received — thank you. We'll review and fix it.
You need a free account to submit a report.
Be the first to comment