How to fix
KB5018483 fails to install
on Windows
Resolve KB5018483 installation issues in Windows 11 quickly and efficiently. Get expert-tested solutions to fix errors with zero traces left.

What causes How to fix KB5018483 fails to install in Windows 11?
- Different operating system settings
- Installed applications causing conflicts
- Enabled or disabled services affecting updates
- Corrupted system files
- Issues with the update itself
Repairs Windows system files, removes malware, and restores a clean OS state — without reinstalling.
I have been trying to install the latest Windows update KB5018483, and it always fails, saying I should try again later. I did try again but to no avail. Is there anything that can be done about this, or should I simply wait? Thanks.
Windows update failures can be extremely frustrating, especially if you are dealing with some type of bug[ref en-3] or you want to check out the newest feature promised in the newest update. Unfortunately, there are plenty of users who come across Windows update errors or failures when they try to implement the newest patches.
KB5018483 is one of the installments that was released for Windows 11 systems in late October 2022. It included a lot of improvements to the existing features, such as better search results or the addition of the Task Manager when right-clicking the taskbar. Likewise, it promised various fixes, including issues with the font size of Chinese characters, issues in games that use Microsoft D3D9, etc.[ref en-1]
In any case, the newest update is something that many users were looking forward to. Unfortunately, some users who wanted to install KB5018483 were unable to because they were receiving the 0x80070017 error instead. The error message, as per usual, did not bring any insights into why Windows failed to install the update or how to fix this issue.
The reasons why KB5018483 fails to install on Windows 11 could be many, as each operating system is different and has different settings, installed applications, services enabled or disabled, etc. Thus, in order to find a way how to fix the update failure, you'll have to go through several different troubleshooting steps.
Before proceeding with the manual steps below, we recommend you scan your system with [d1] PC repair tool, which can automatically eliminate common Windows problems for you.
1. Run the troubleshooter
A good place to start is by running the built-in Windows troubleshooter, which can often point out what's going on with the update failures.
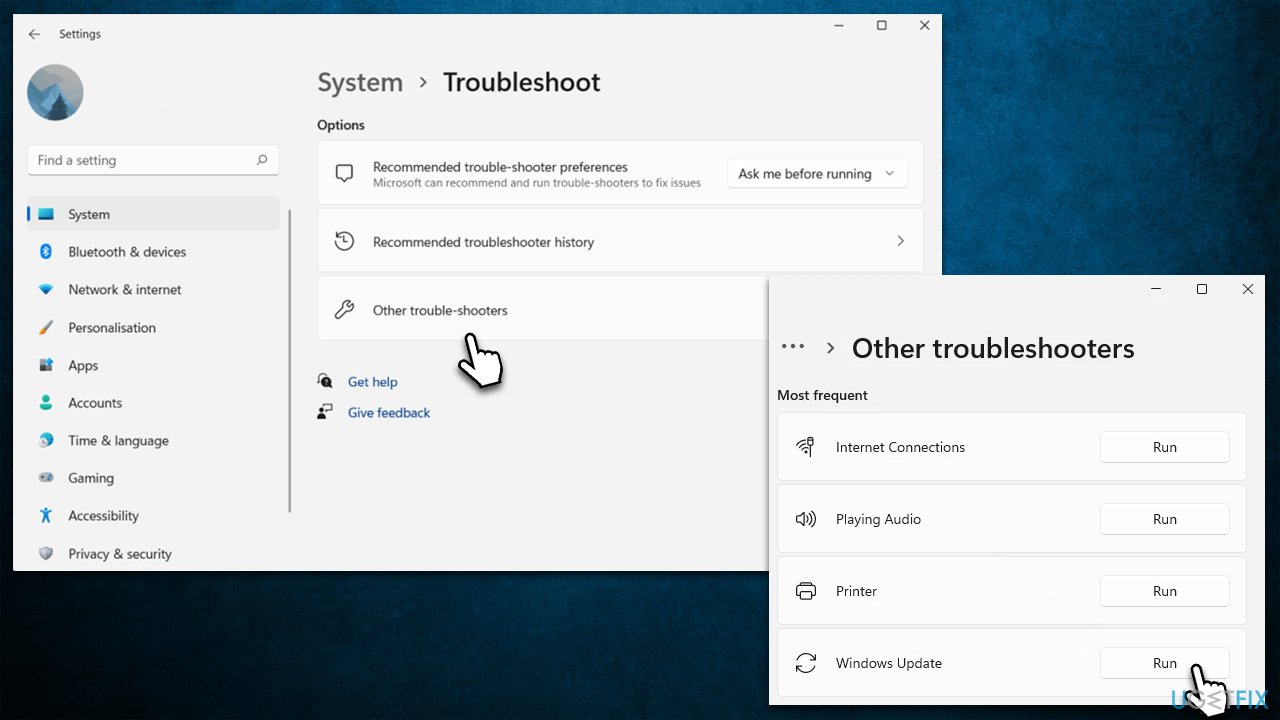
- In Windows search, type in troubleshoot and press Enter (you can also go to Start > Settings > System > Troubleshoot)
- Pick Other trouble-shooters (in Windows 10, pick Additional troubleshooters)
- Scroll down to locate the Windows Update option and click Run
- Wait till the scan is finished, apply the changes, and try running the update process once again.
2. Ensure your system files aren't corrupted
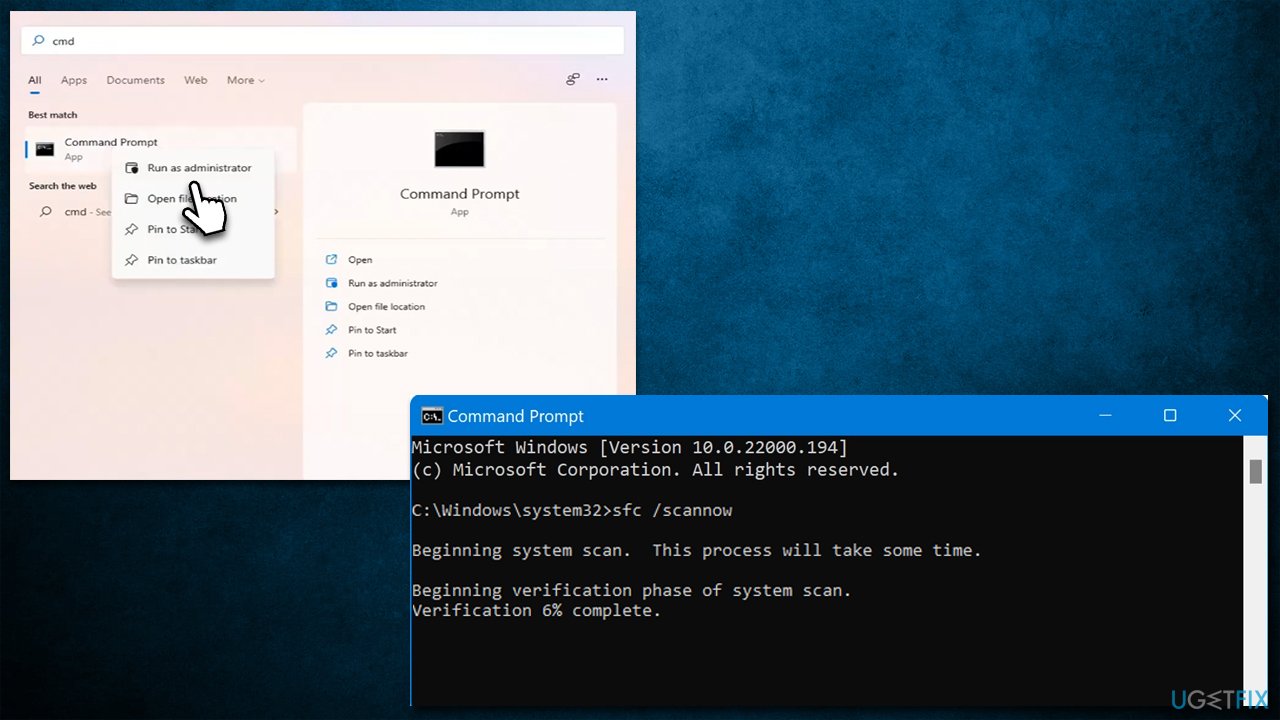
Running DISM and SFC scans can help to eliminate any system-related issues of file corruption. It would also check the system's image integrity.
- Type cmd in Windows search
- Right-click on Command Prompt result and select Run as administrator
- Paste the following command into the new window:
sfc /scannow - Press Enter and wait till the scan is finished
- Once done, run this set of commands, pressing Enter after each:
DISM /Online /Cleanup-Image /CheckHealth
DISM /Online /Cleanup-Image /ScanHealth
DISM /Online /Cleanup-Image /RestoreHealth - Restart the system.
3. Check the relevant services
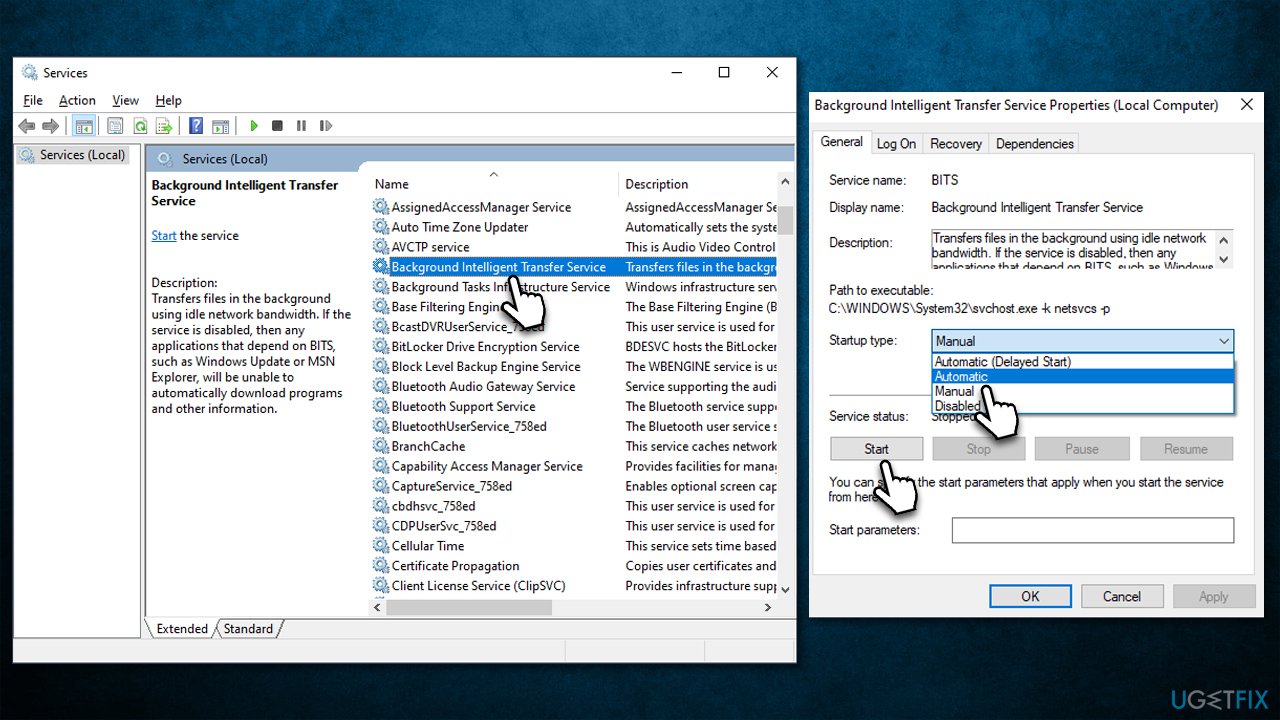
BITS (Background Intelligent Transfer) and Windows Update services should both be running for the update process to go smoothly. If they aren't, you should enable them; otherwise, restart the services.
- Type in Services in Windows search and press Enter
- Scroll down a bit to find Background Intelligent Transfer Service (BITS)
- If it is already running, right-click and select Restart
- if the service is not running, double-click it, pick Automatic under the Startup type drop-down menu
- Click Start, Apply, and OK
- Locate Windows Update Service and do the same as with the BITS service.
4. Reset Windows Update Components
Bugged caches can be one of the main reasons for Windows update failures. That can be fixed by resetting Windows Update components as follows:
- Access Command Prompt as administrator (explained above)
- Use the following commands, pressing Enter each time:
net stop wuauserv
net stop cryptSvc
net stop bits
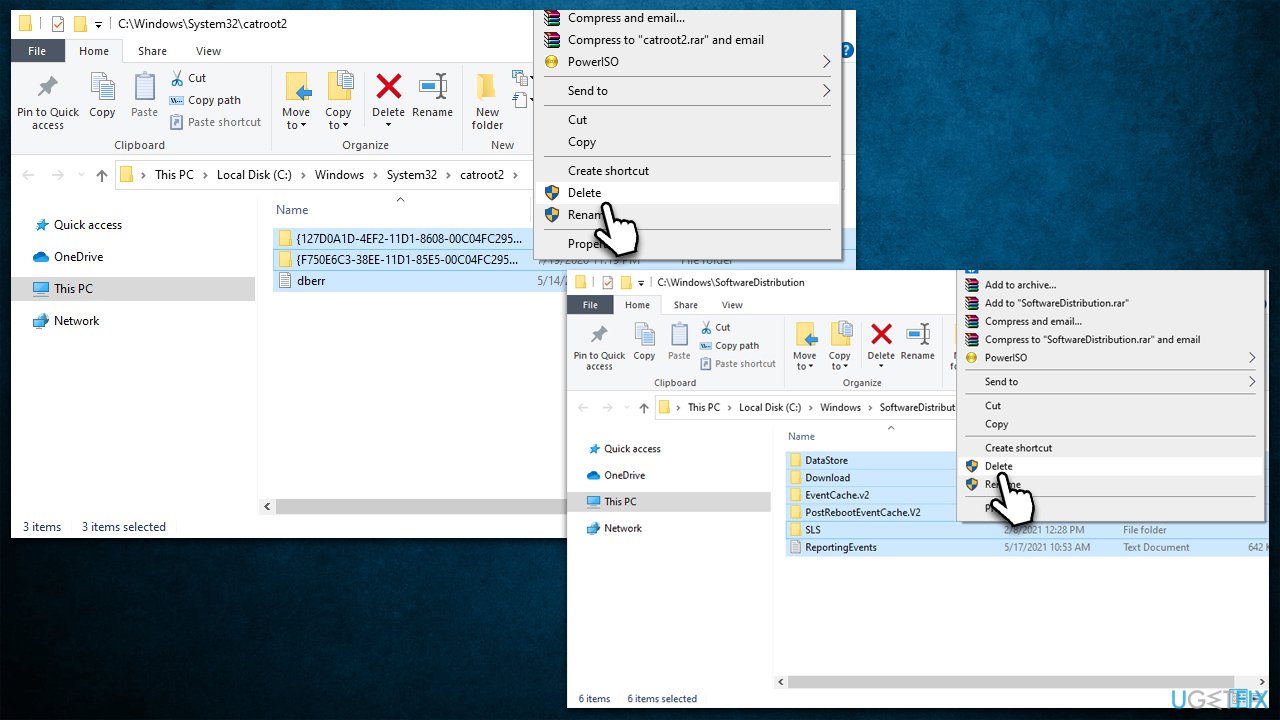
net stop msiserver - Press Win + E to open File Explorer (make sure Hidden Files are visible)
- Go to the following locations and delete the contents of these folders:
C:\Windows\System32\catroot2
C:\Windows\SoftwareDistribution
- Go back to the Command Prompt window and use these commands, pressing Enter every time:
net start wuauserv
net start cryptSvc
net start bits
net start msiserver - Restart your computer.
5. Disable third-party antivirus
One of the most common reasons why Windows updates fail is the presence of a third-party antivirus. Upon installation, a security application makes changes on the kernel[ref en-2] level usually, which can impact the way the OS operates. In particular, some overly-aggressive security applications may block connections to Microsoft servers, resulting in Windows update errors or installation failures. To check if it's the case, you should either temporarily disable protection and attempt to download the newest update or simply uninstall the software.
6. Use Media Creation Tool
You can always employ the installation media from the official Microsoft website to upgrade your system.
- Visit the official Microsoft website and download Windows 11 installation media
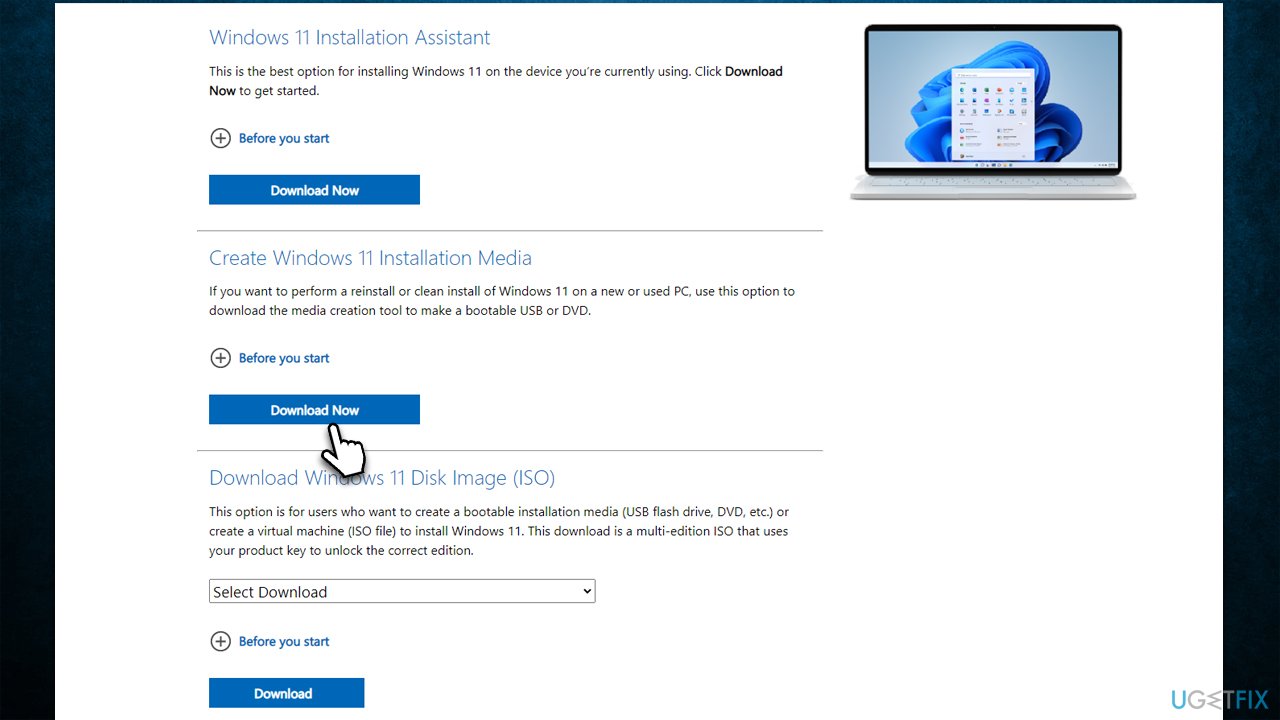
- Double-click the installer, select Yes when UAC shows up, and agree to the terms
- Select Upgrade this PC now and click Next
- Windows will start downloading the needed files
- Agree to terms again and click Next
- Before installing, make sure that you are happy with your choices (you can click Change what to keep option if not)
- Click Install to begin the upgrade process.
Bottom line
To fix the KB5018483 installation failure, start by running the built-in Windows troubleshooter and consider using a PC repair tool to resolve common issues. If these steps do not work, you may need to explore additional troubleshooting methods or wait for a future update.
Frequently asked questions
First, try running the Windows Update Troubleshooter to automatically detect and fix problems. If that doesn't work, consider manually downloading the update from the Microsoft Update Catalog.
You can check for installed updates by going to Settings > Windows Update > Update history, where you'll find a list of all updates, including KB5018483.
Yes, common error codes include 0x800f0922 and 0x8007000d, which indicate issues with the update process; resolving these may involve checking your internet connection or ensuring sufficient disk space.




Report an issue
What's wrong with this guide? We review every report and update or remove content.
Report received — thank you. We'll review and fix it.
You need a free account to submit a report.
Be the first to comment