
How to fix LiveKernelEvent 141 crash error?

Prefer to fix it yourself? The manual steps follow.
- 8methods
- 20 minutes for the driver and settings fixes; a few sessions of the same game to confirm
- Intermediate
Applies to Windows 11 and Windows 10 desktops and laptops with an NVIDIA, AMD or Intel graphics card or integrated graphics
8 methods in this guide
Hello, I hope you can help me. Every time I play a game for some time, it crashes, and there are no error messages. In some cases, I can play for a few hours before a crash happens again. When I checked the Event Viewer, it reports that LiveKernelEvent code 141 has occurred. Any ideas?
LiveKernelEvent 141 is the entry Windows writes when one engine of the graphics card stops answering in time and Windows resets that engine. The PC keeps running, but a game or app can close with no message. Read the report first, then do a clean install of the graphics driver.
Code 141 is Microsoft's VIDEO_ENGINE_TIMEOUT_DETECTED: one display engine of the graphics card did not respond in time. It is a live dump, not a blue screen. Open perfmon /rel and note when it happens (Fix 1), then remove the graphics driver and install the current one clean (Fix 2). If it returns, set the card and memory to stock speeds (Fix 3) and check heat and power (Fix 6).
| Error | LiveKernelEvent, Code 141, listed in Reliability Monitor as Hardware error. The report lines read Problem Event Name: LiveKernelEvent and Code: 141. |
|---|---|
| Where it appears | In Reliability Monitor (perfmon /rel) and in the problem reports of Control Panel, often after a game closes by itself or the screen freezes for a moment. There is usually no message on screen. |
| Main cause | An engine of the graphics card took longer than Windows allows (two seconds by default). Most often a faulty or mismatched graphics driver, then overclocks, heat or a weak power supply. |
| Fastest fix | Remove the current graphics driver and install the newest one from NVIDIA, AMD or Intel with a clean installation (Fix 2). |
| Also written as | live kernel event 141, LiveKernelEvent code: 141, live kernel 141, livekernalevent 141, hardware error 141, code 141 hardware error, 0x141, VIDEO_ENGINE_TIMEOUT_DETECTED. |
| Microsoft's description | "One of the display engines failed to respond in timely fashion." Microsoft adds that this code "can never be used for a real bug check; it is used to identify live dumps." |
| Often seen with | LiveKernelEvent 117 (the whole adapter timed out), 142 (a process was blocked from the GPU) and the message "Display driver stopped responding and has recovered." |
| Affects | Windows 11 and Windows 10 alike, with any graphics card. Players report it most in graphics heavy games. |
| Vendor status | Not a known Windows bug with a patch. Microsoft documents the code as a timeout of the graphics engine and points to display drivers, hardware settings, cooling and power for its sibling code 0x117. |
| Time to fix | 20 minutes for Fixes 1 to 3. Each change needs a few sessions of the same game before you know it worked. |
Facts checked on 16 October 2026. Steps written for Windows 11 (25H2 and 26H2) and Windows 10 22H2.
What LiveKernelEvent 141 means
A LiveKernelEvent is a report that Windows files when it took a snapshot of kernel memory, called a live dump, without crashing the PC. The Code field is the number of that snapshot in hexadecimal, written without 0x. Code 141 is 0x00000141, which Microsoft names VIDEO_ENGINE_TIMEOUT_DETECTED: one of the display engines of the graphics card failed to respond in time.
A graphics card has several engines, for example for 3D drawing, for video decoding and for copying memory. Windows watches each one. If an engine does not finish or pause its task within the timeout, two seconds by default, Windows resets that engine. This watchdog is called Timeout Detection and Recovery (TDR). Microsoft documents that an engine reset blocks GPU access for the process that keeps causing the timeouts and logs code 142 for it, so the process does not take the whole system down.
Windows restores the desktop after a reset, but a game that cannot recover its graphics device can end or show a black frame. Microsoft says some DirectX applications "might just render black" after recovery and must be restarted. That fits the question above: the game stops, the PC does not. We could not confirm from Microsoft which of your crashes is a plain game crash and which is an engine reset, so the report in Fix 1 decides.
- Problem Event Name
- LiveKernelEvent
- Code
- 141 (live dump code 0x00000141, VIDEO_ENGINE_TIMEOUT_DETECTED)
- Summary in Reliability Monitor
- Hardware error
- Parameter 2
- A pointer into the responsible device driver module, which is how a report can point at a graphics driver
- Timeout
- 2 seconds by default (Microsoft's TDR documentation)
People type this report in many ways: live kernel event 141, livekernelevent code 141, livekernelevent code: 141, live kernel 141 and the misspelling livekernalevent 141. All of them are the same Reliability Monitor entry. Searches for hardware error 141, code 141 hardware error or windows hardware error code 141 most likely come from the word Hardware error in that entry.
That word is the category Windows uses for live kernel reports. It does not prove that a part is broken. The Win32 error list also has a number 141, but it belongs to an unrelated drive-substitution error and has nothing to do with this report. In most cases of LiveKernelEvent 141 the driver or a setting is the cause.
Why LiveKernelEvent 141 happens: causes ranked
Microsoft's page for code 141 does not list causes. Its page for the sibling code 0x117 does. That code comes from the same recovery system, applied to the whole adapter. The list starts with a display driver that needs updating. Then come hardware conditions such as overclocked parts, wrong memory settings, too little cooling, too little power and defective parts. It ends with visual effects or too many background programs. The table puts those in the order users report them for 141 and ties each one to a fix.
| Cause | How often | How to tell | Fix |
|---|---|---|---|
| A corrupt, wrong or old graphics driver, including one Windows Update placed over yours. | Most often | It started after a driver or Windows update, or the report names a graphics driver. | Fix 2 |
| A graphics card overclock or undervolt, a factory boost mode, or an XMP or EXPO memory profile. | Often | A tuning tool runs at startup, or memory runs faster than its standard speed. | Fix 3 |
| A game or app that overloads the GPU, an unpatched game build, or overlays and recorders running together. | Often | It happens in one game only, often in the same scene. | Fix 4 |
| A software conflict or missing Windows updates. | Sometimes | It started after installing a tool, or updates have been pending for weeks. | Fix 5 and Fix 7 |
| Heat, a weak or failing power supply, or a card not fully seated. | Sometimes | Crashes come after 10 to 30 minutes of load, or the fans are loud just before. | Fix 6 |
| A drive with file system errors. | Rarely | Other programs also crash or files are damaged. | Fix 8 |
| A graphics card that is failing. | Rarely, but real | Crashes stay with a clean driver at stock settings, good temperatures and a good power supply. | Still broken section |
A single 141 after a long gaming session can be a one-off. Several entries a week, crashes you can repeat in the same game, or a 141 followed by a blue screen are the signs to work through the fixes below.
LiveKernelEvent 141 compared with 117 and 142
Reports of 141 often come with other graphics recovery codes. Microsoft's TDR article explains how they relate.
| Code | Name | What it means for you |
|---|---|---|
| 141 | VIDEO_ENGINE_TIMEOUT_DETECTED | One engine of the GPU timed out and was reset. Engine timeouts do not count toward the GPU hang limit unless the engine reset fails. |
| 117 | VIDEO_TDR_TIMEOUT_DETECTED | The whole graphics adapter hung and was reset. See LiveKernelEvent 117. |
| 142 | VIDEO_TDR_APPLICATION_BLOCKED | Windows blocked the process that kept causing engine timeouts from using the GPU. |
| 124 | WHEA hardware error | A hardware error reported by the processor or platform, not the graphics timeout. See LiveKernelEvent 124. |
Microsoft adds that Windows can promote an engine timeout to a full GPU hang if the engine reset fails. By default Windows stops the PC with a blue screen when five or more GPU hangs and recoveries happen within one minute. So repeated 141 and 117 entries are the same fault getting worse, and one set of fixes covers both.
How to fix LiveKernelEvent 141
Fix 1 shows you when and in what the error happens. Fix 2 solves the most common cause. Fixes 3 and 4 take load and tuning off the card, Fix 5 updates Windows, Fix 6 checks the hardware, and Fixes 7 and 8 rule out software conflicts and the drive. Change one thing at a time and play the same game before you go on.
| What you see or have | Start with |
|---|---|
| You do not know when it happens or which driver is involved. | Fix 1 |
| It started after a graphics driver or Windows update. | Fix 2 |
| A GPU tuning tool, a factory boost mode, XMP or EXPO is on. | Fix 3 |
| It happens in one game only. | Fix 4, then Fix 2 |
| Updates have been pending for a long time. | Fix 5 |
| It happens after some minutes of heavy load, or the PC is dusty or has an older power supply. | Fix 6 |
| It started after you installed a tool, overlay or driver utility. | Fix 7 |
| Everything is clean, stock and cool, and it still happens. | The still broken section |
Fix 1. Read the LiveKernelEvent 141 report and note when it happens
5 minutesNo riskEveryone, before changing anything. It takes five minutes and shows whether one game, one driver or the whole PC is involved.
Parameter 2 of the report points into the driver that did not respond, and Microsoft's advice for the sibling code 0x117 is to check the System log in Event Viewer for other errors that identify the device or driver. Knowing the driver and the moment saves you from guessing.
- Press Win + R, type
perfmon /reland press Enter. - Select a day with a red X. Under Critical events, find the line Hardware error and select View technical details.
- Check that it shows
Problem Event Name: LiveKernelEventandCode: 141. Write down the date and the time. - Press Win + R, type
eventvwrand press Enter. Open Windows Logs > System and look at the warnings and errors from the same minute, especially entries from the display driver. - Note what you were doing: the game, a second monitor, a video in the browser, or leaving the PC after wake from sleep.
| What you find | What it points to | Go to |
|---|---|---|
| Entries only while one game runs | That game's load, an update it needs, or an overlay | Fix 4 |
| A display driver error or "Display driver stopped responding and has recovered" in the same minute | The graphics driver timed out | Fix 2, Fix 3 |
| Entries after 20 or more minutes of load | Heat or power | Fix 6 |
| 141 together with 117 or 142 | Repeated GPU hangs; the same cause, worse | Fix 2, then Fix 6 |
Keep a short log with date, time and the game. A fault that comes once a week makes every change look like a success unless you write it down.
It worked if: You know in which game and at what moment 141 appears, and which fix to start with.
If not: If the report names nothing and the System log is empty, start with Fix 2 anyway: the graphics driver is the most common cause.
Fix 2. Remove the graphics driver and install the current one clean
15 minutesLow riskMost readers, and always when the entries started after a driver update, a Windows update or a change of graphics card.
A corrupt driver, or the wrong one for the card, is the usual reason an engine stalls. Microsoft's first point for the sibling code is to install the latest display driver updates so that the driver supports the TDR process properly. A clean install also removes leftovers of an older package.
Download the current driver for your exact card from NVIDIA, AMD or Intel first and keep it on the PC, because the screen can go dark during the removal. On a laptop, check the laptop maker's support page as well, since it may supply its own graphics package. Then remove and reinstall the driver:
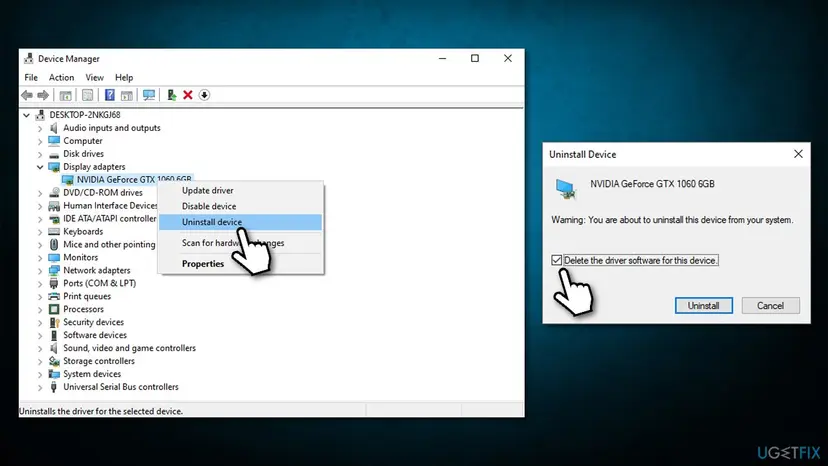
- Open Device Manager. Right-click Start and select Device Manager.
- Open the device's Driver tab. Expand the category (for example Display adapters), right-click the device, select Properties and open the Driver tab. Driver Date and Driver Version show what is installed now.
- Update the driver. Select Update Driver and let Windows search automatically. To use a driver you downloaded from the device maker, select Browse my computer for drivers instead and point to the unpacked folder.
- Or roll back the driver. If the problem started after a driver update, select Roll Back Driver, choose a reason and select Yes. The button is greyed out when Windows has no earlier driver to return to.
- Or reinstall the driver. Select Uninstall Device. Tick Attempt to remove the driver for this device only if you want Windows to delete the driver package too, then select Uninstall.
- Restart. Restart the PC. Windows detects the device again and installs a driver for it.
- Check optional driver updates. Open Settings > Windows Update > Advanced options > Optional updates. If driver updates are listed, tick the ones you need and select Download & install.
These steps were written for Windows 11 24H2 and later. The full page with the other versions and what each result means: Update, roll back or reinstall a driver
Other drivers can also be involved. The chipset driver of the motherboard is the one players mention most, so install the newest chipset package from the board or laptop maker as well. Take it from the maker's own support page, not from a driver updater tool.
It worked if: The game that crashed before runs through, and no new 141 entry appears in Reliability Monitor over several sessions.
If not: If 141 returns with a clean driver, take the tuning off the card and memory (Fix 3).
Fix 3. Stop overclocking the graphics card, processor and memory
15 minutesLow riskA GPU tuning tool, a boost or OC mode in the card maker's app, an undervolt, a processor overclock or an XMP, EXPO or DOCP memory profile is on.
Microsoft lists over-clocked components and incorrect memory configuration and timings among the hardware causes behind the sibling code 0x117. A part pushed past its stable speed can take too long on a task and trip the timeout, which players with overclocked CPUs or GPUs report as random crashes.
- Open every tuning tool that starts with Windows and reset its profile to default. Turn off any boost mode or undervolt curve in the card maker's own app.
- Open the firmware setup. On Windows 11 go to Settings > System > Recovery and select Restart now next to Advanced startup. On Windows 10 use Settings > Update & Security > Recovery.
- Select Troubleshoot > Advanced options > UEFI Firmware Settings > Restart.
- In the BIOS, turn off the memory profile (XMP, EXPO or DOCP) and any processor overclock, or load the default settings. Save and exit.
- Play the game that crashed.
Loading BIOS defaults can also reset the boot order or the storage mode on some boards. Take a photo of each BIOS page before you change anything.
If the PC is stable for a week at stock speeds, turn the memory profile back on and watch for a new 141. If it returns, leave the profile off or lower the memory speed one step.
It worked if: No new 141 entry after several sessions of the same game at stock settings.
If not: If 141 still appears at stock speeds, look at the game itself (Fix 4).
Fix 4. Update the game and cut the background load on the GPU
15 minutesLow riskThe entries come from one game, or you run overlays, recorders and a browser with video together with the game.
Microsoft tells you to make sure graphics intensive applications such as games are fully patched, and it names visual effects and too many background programs as a reason the video card cannot respond in time.
- Install every update for the game from its store or launcher.
- Verify the game files in the launcher: How to verify game files in Steam, Epic Games, Xbox app, EA app, Battle.net and GOG Galaxy.
- Close overlays and recorders you do not need while testing: the launcher overlay, the GPU maker's overlay and recording feature, and any screen recorder.
- Lower the graphics preset one step, and turn off ray tracing and frame generation for one test session.
- Close the browser and other programs that use the GPU, such as video players and animated wallpaper, and play again.
If the crashes stop, add the overlays and programs back one at a time to find the one that matters.
It worked if: The game runs through the scene that crashed before, at least at the lower preset.
If not: If only lower settings help, the card may run hot or short of power under full load: go to Fix 6.
Fix 5. Install all pending Windows updates
15 to 30 minutesLow riskUpdates have been waiting for a while, or you have never opened the optional updates list.
Microsoft asks you to keep graphics software such as DirectX up to date, and DirectX is delivered through Windows Update. Cumulative updates also carry fixes for the graphics stack.
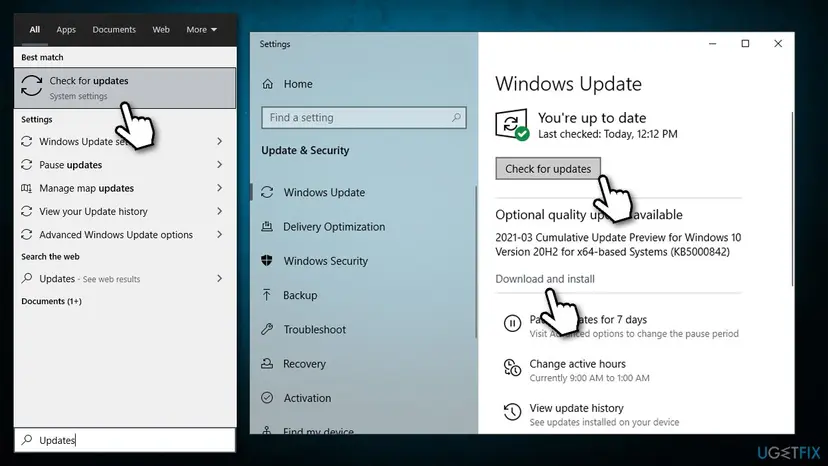
- Type Updates in the Windows search box and press Enter.
- Select Check for updates and let Windows download and install what it finds.
- Open the optional list: on Windows 11 select Advanced options > Optional updates, on Windows 10 select View optional updates.
- Tick the pending updates you want and select Download and install. If you just installed the graphics driver from the card maker, leave the optional graphics driver unticked so that Windows does not replace it.
- When nothing is left, select Restart now, then select Check for updates once more to see whether new ones appeared.
It worked if: Windows Update shows that you are up to date, and the game runs through.
If not: If updates fail to install or nothing changes, go on with Fix 6.
Fix 6. Check cooling, power and how the card is seated
30 minutesLow riskCrashes come after some minutes of heavy load, the fans spin loud before a crash, the PC is dusty, or the power supply is old or small for the card.
Microsoft names insufficient system cooling and insufficient system power among the causes for the sibling code 0x117. A card that throttles from heat or loses voltage under load can stall long enough for Windows to reset an engine.
- Watch the GPU temperature while you repeat what causes the crash, using the performance page or overlay of the card maker's app.
- Shut down and unplug the PC. Clean dust from the card fans, the processor cooler and the case filters, and check that every fan spins.
- Press the graphics card firmly into its slot and check that the latch is closed.
- Reconnect every power cable to the card fully. Use separate cables from the power supply for each socket if the supply allows it.
- Compare your power supply with the size the card maker recommends on the product page.
- On a laptop, keep the vents clear and use the maker's own power adapter.
Do not open a laptop or a pre-built PC that is still under warranty: ask the maker. Always unplug a desktop and hold the power button for a few seconds before you touch anything inside.
It worked if: The GPU stays within the temperatures its maker states, and the crash does not return under the same load.
If not: If temperatures and power look fine, rule out software conflicts (Fix 7).
Fix 7. Use a clean boot to find a conflicting program
20 minutesLow riskThe entries started after you installed a program, overlay, capture tool or driver utility, and Fixes 2 to 4 did not help.
A clean boot starts Windows with only Microsoft's own services. If the crashes stop, a background program causes the conflict, and Microsoft names too many background programs as one reason a video card cannot answer in time.
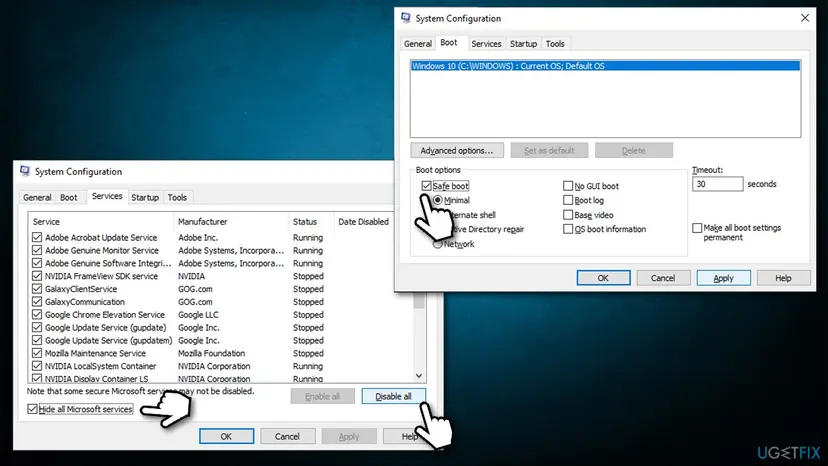
- Open System Configuration. Select Search on the taskbar, type msconfig and select System Configuration from the results.
- Hide Microsoft services. On the Services tab, select the Hide all Microsoft services check box. Only services from other companies stay in the list.
- Disable the remaining services. Select Disable all, then select Apply.
- Open Task Manager. On the Startup tab of System Configuration, select Open Task Manager.
- Disable the startup apps. On the Startup apps tab in Task Manager, select each item whose status is Enabled and select Disable. Write down or take a screenshot of the items you disable: you need the list to turn them back on.
- Confirm the changes. Close Task Manager. On the Startup tab of System Configuration, select OK.
- Restart and test. Restart the PC. Windows now starts in a clean boot environment: try again the thing that failed (run the app, install the update, uninstall the program).
These steps were written for Windows 11 25H2 and 26H2. The full page with the other versions and what each result means: How to perform a clean boot in Windows
Play the game for as long as it usually takes to crash. If it runs clean, turn the services and startup items back on in halves until the crash returns. Return to normal startup when you finish.
It worked if: The game runs without a 141 in the clean boot, and you can name the program that brings it back.
If not: If it crashes in a clean boot too, a program is not the cause: look at the disk (Fix 8) and the still broken section.
Fix 8. Check the system drive for errors
30 minutes to a few hoursLow riskOther programs crash too, files are damaged, or the earlier fixes found nothing.
A damaged file system can corrupt game or driver files that load during play. This is a rare cause for a graphics timeout, so it comes last, but the check is free and rules the drive out.
- Type cmd in the Windows search box, right-click Command Prompt and select Run as administrator.
- Type the command below and press Enter.
C:is the drive to check. - Windows may say it cannot run because the volume is in use and ask whether to schedule the check at the next restart. This is a question, not an error: type Y and press Enter.
- Restart the PC. The check runs before Windows starts and can take a long time on a large drive.
Command Prompt (administrator)
chkdsk C: /f /r /x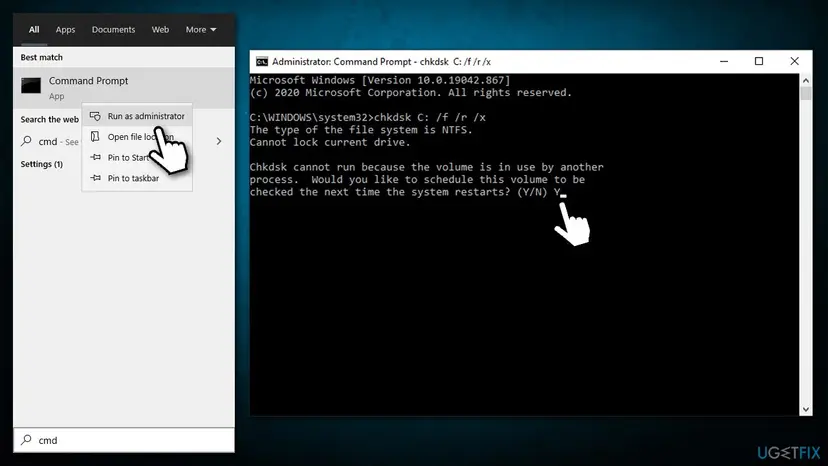
The full explanation of the options is in Check a disk for errors (chkdsk).
It worked if: The check finishes and reports no errors, or it repairs them and Windows starts normally.
If not: If 141 still appears, follow the still broken section.
If LiveKernelEvent 141 keeps coming back
By now the card runs a clean driver at stock speeds, it is cool and well powered, and Windows and the drive are checked. A 141 that remains points to the card itself or to its work with the rest of the PC. Microsoft's own list for the sibling code ends with defective parts and suggests the hardware diagnostics of the system maker.
- Test the memory. Run Windows Memory Diagnostic and read the MemoryDiagnostics-Results entry in the System log: How to test your RAM with Windows Memory Diagnostic.
- Run the maker's diagnostics. Dell, HP, Lenovo and other PC makers ship hardware tests. Run the full test, not the quick one.
- Swap test. Try the card in another PC, or another card or power supply in yours. The part whose swap stops the crashes is the faulty one.
- Try the other GPU. On a laptop or PC with integrated graphics, test the same game on the integrated GPU. If it runs clean there, the dedicated card or its driver is the problem.
- Warranty. Contact the seller or the card maker with your log of dates, the driver versions you tried and the steps above.
- Give support the files. Live dumps are stored in
C:\Windows\LiveKernelReportsand its subfolders; if a blue screen also happened, small dumps are inC:\Windows\Minidump.
A technician can open a dump in WinDbg and run !analyze -v, which Microsoft says shows the faulting module name. That is the evidence a support desk can act on.
How to keep LiveKernelEvent 141 from coming back
- Install graphics drivers from the card maker and keep one known good version saved offline.
- Turn on XMP, EXPO or a GPU overclock only after the PC has been stable at stock speeds.
- Clean dust from the card and the case filters every few months.
- Check Reliability Monitor once a month for new 141 or 117 entries.
- Keep games and their launchers updated.
- Do not stack tuning tools: one in the BIOS and another in Windows is hard to undo.
- Do not let a driver updater tool replace the maker's graphics driver.
- Do not reinstall Windows to fix a 141 before you have tried Fixes 2 to 6.
Windows 10 left support on 14 October 2025. On a Windows 10 PC the graphics makers will test new drivers for it less over time, which is one more reason to plan the move to Windows 11.
Frequently asked questions
What does LiveKernelEvent 141 mean?
It means one engine of the graphics card stopped responding and Windows reset it without crashing the PC. Microsoft names code 0x141 VIDEO_ENGINE_TIMEOUT_DETECTED: one of the display engines failed to respond in a timely fashion. Windows waits two seconds by default; if the engine neither finishes nor pauses its task, Windows resets that engine and writes a live dump. In Reliability Monitor this shows as Hardware error with Problem Event Name LiveKernelEvent and Code 141. The usual causes are the graphics driver, overclocks, heat and power.
Is LiveKernelEvent 141 a hardware error?
Not necessarily. Reliability Monitor files every live kernel report under Hardware error, but that is a category and not a diagnosis. For the sibling code 0x117 Microsoft lists the display driver first, then hardware conditions: overclocked parts, memory settings, cooling, power and, last, defective parts. If the error stays with a clean driver at stock speeds, good temperatures and a good power supply, then treat it as hardware and test the card. Until then the driver or a setting is the likelier cause.
Why does my game crash with LiveKernelEvent 141 but show no error?
Because Windows recovers the desktop and the game is left without a working graphics device. Microsoft documents that an engine reset blocks GPU access for the process that keeps causing timeouts, and that some DirectX applications might just render black after recovery and have to be restarted. The game then closes or freezes, and the only trace is the Reliability Monitor entry. Players report this most in graphics heavy games. Start with Fix 1 to see which game is behind each entry, then Fix 2.
What is the difference between LiveKernelEvent 141 and 117?
Code 141 is a timeout of one engine of the graphics card, code 117 a timeout of the whole adapter. Microsoft says engine timeouts do not count toward the GPU hang limit, though Windows can promote an engine timeout to a full hang if the engine reset fails. The causes and the fixes are the same, so the steps on this page also apply to 117. Our guide on LiveKernelEvent 117 covers that code in detail.
Is LiveKernelEvent 141 a blue screen?
No. Microsoft says 0x141 can never be used for a real bug check and only identifies live dumps. You see a freeze, a flicker, a black screen or a closed game, and Windows keeps running. A blue screen can follow when hangs repeat: by default Windows stops the PC when five or more GPU hangs and recoveries happen within one minute. If you see blue screens next to your 141 entries, treat them as the same fault and work through Fixes 2 to 6.
Why do I get LiveKernelEvent 141 on Windows 11?
For the same reasons as on Windows 10: the recovery system is the same, and so is the code. We found no Microsoft known issue that ties a Windows 11 update to code 141. If the entries started right after a big update, the update may have installed a different graphics driver, so do a clean install from the card maker (Fix 2). Most player reports we found are from Windows 10, which left support on 14 October 2025.
Is Event ID 141 the same as LiveKernelEvent 141?
No. An Event ID is a number in Event Viewer that belongs to one source, and many sources use 141 for unrelated events. LiveKernelEvent 141 is a code in a Reliability Monitor report. To connect the two, open the System log in Event Viewer at the same minute as the report, as Fix 1 shows. Searches for code 141 can also mean errors in other programs; this page is about the Windows graphics engine timeout only.
Can a weak power supply cause LiveKernelEvent 141?
Yes, it can. Microsoft lists insufficient system power next to insufficient cooling among the hardware reasons for the sibling code 0x117. A card that loses voltage under load can stall long enough for Windows to reset an engine. Signs are crashes after some minutes of heavy load and several graphics cards or fixes that did not help. Check the power supply against the size the card maker recommends, reseat every power cable, and test with another power supply if you can (Fix 6).
Can I ignore LiveKernelEvent 141?
A single entry after a long session is often harmless, because Windows recovered as designed. Do not ignore it when it repeats, when a game closes and you lose progress, or when a blue screen follows. Those are signs that the card cannot finish its work in time, and the cause usually gets worse. Keep a short log of dates and games, and start with Fix 1.
Sources
- Microsoft Learn: Bug Check 0x141 VIDEO_ENGINE_TIMEOUT_DETECTED (learn.microsoft.com)
- Microsoft Learn: WDDM support for timeout detection and recovery (TDR) (learn.microsoft.com)
- Microsoft Learn: Bug Check 0x117 VIDEO_TDR_TIMEOUT_DETECTED (sibling code, causes and troubleshooting) (learn.microsoft.com)
Did this fix work?
One click, no account. It tells the next reader which guides are worth their time.
Questions and experiences: fix LiveKernelEvent 141 crash error
Still broken, or found a fix we did not cover? Ask here: members and our editors answer. Reading is open; writing needs a free account.
…