How to fix
Multiple Chrome tabs showing up when pressing Alt + Tab
on Windows
Are multiple Chrome tabs cluttering your Alt + Tab view in Windows 10 or 11? Get quick fixes and expert tips to streamline your experience, fixed in min…
What causes How to fix multiple Chrome tabs showing up when pressing Alt + Tab in Windows?
- Windows bug related to Alt + Tab functionality
- Accessing Chrome's full-screen mode
- Phantom tabs wasting Windows resources
- Corrupted system files
- Outdated Windows version
Repairs Windows system files, removes malware, and restores a clean OS state — without reinstalling.
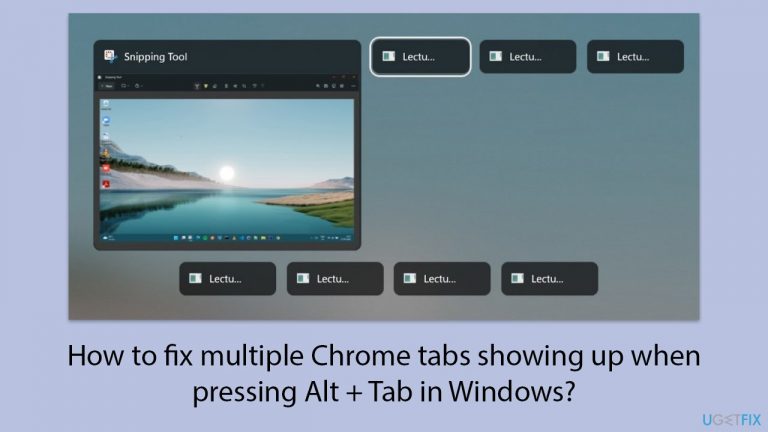
I'm getting multiple instances of phantom Chrome tabs that have been closed when pressing ALT + TAB and I am not able to access them anymore to try closing them again. The only way to close them is to restart the PC, and then rinse and repeat. Is this a Chrome issue or a Windows issue? I'm using Windows 11 version 23H2.
Recently users have noticed a strange phenomenon where they see multiple Chrome tabs that can't be closed or accessed when pressing Alt + Tab. While it seems like these phantom tabs are wasting Windows resources, it is most likely related to a Windows bug, and Chrome has nothing to do with it.
For most, this issue started after they accessed Chrome's full-screen mode by pressing F11. The only way that people can get rid of multiple tabs after pressing Alt + Tab is by restarting their PCs, which can be a pretty annoying thing to deal with. Another way to avoid this issue is to avoid using fullscreen mode, which is also not an ideal solution.
While there was no official reply from Microsoft about this, there are several ways you can fix the multiple Chrome tabs showing up when pressing Alt + Tab in Windows.
First of all, some users found that accessing full-screen mode again resolved the problem for them. Others said that restarting Windows Explorer stopped the bug from appearing. Windows Explorer handles many of the UI elements, so it is not surprising that this fix worked for most.
If that does not help, you can try other solutions, such as installing the latest Windows updates, trying to repair corrupted files, performing Clean Boot, or repairing Windows installation. Below you will find the instructions for all these steps; if you want to keep your PC troubleshooting off your shoulders, you can always rely on automatic tools such as [d1].

Fix 1. Access and exit full-screen mode in Chrome
Switching in and out of full-screen mode can reset the graphical interface and remove phantom tabs.
- Open Chrome.
- Press F11 to enter full-screen mode.
- Press F11 again to exit full-screen mode.

Fix 2. Restart Windows Explorer
Restarting Windows Explorer can refresh the user interface and clear any visual glitches.
- Press Ctrl + Shift + Esc to open Task Manager.
- Click More details if needed.
- Look for Windows Explorer.
- Right-click and select Restart.
- Several UI elements will disappear for a few moments and reappear soon thereafter.

Fix 3. Install all the available Windows updates
Updating Windows ensures that you have the latest bug fixes and improvements that may resolve the issue.
- Type Updates in Windows search and press Enter.
- When the new window opens, click Check for updates (or Install all if pending) and wait.
- If there are optional updates available, install them as well.
- After updating, restart your computer.

Fix 4. Repair corrupted system files with SFC and DISM
This method can fix corrupted system files that might be causing the issue.
- Type cmd in Windows search.
- Right-click on Command Prompt and select Run as administrator.
- The User Account Control window will ask whether you want to allow changes - click Yes.
- In the Command Prompt window, paste the following command and press Enter:
sfc /scannow - Once the scan is complete, use the following commands and press Enter each time:
Dism /Online /Cleanup-Image /CheckHealth
Dism /Online /Cleanup-Image /ScanHealth
Dism /Online /Cleanup-Image /RestoreHealth - (Note: if you get an error executing this last command, add /Source:C:\RepairSource\Windows /LimitAccess to it and try again).
- Restart your computer.

Fix 5. Perform Clean Boot
A clean boot can help identify if any third-party applications are causing the problem.
- Press Win + R, type msconfig, then press Enter.
- Select the Services tab and tick the Hide all Microsoft services checkbox.
- Pick Disable all.
- Go to the Startup tab and click Open Task Manager.
- Here, right-click on each of the non-Windows entries and select Disable.
- Close down the Task Manager.
- Go to the Boot tab and tick the Safe boot option
- Reboot your system.
- If the issue is not occurring in this mode, it means that conflicting software is causing it. To find which one, disable each of the services one by one or in groups and reboot your device. After that, update, pause, or uninstall the problematic app or/and service.

Fix 6. Repair-install Windows
Repair-installing Windows can fix system issues without affecting your personal files and applications.
- Download Windows 11 Installation media from the official Microsoft website. [Windows 10 version]
- Double-click the MediaCreationTool.exe file to launch it.
- When UAC shows up, click Yes.
- Accept license terms.
- Select Language and Edition (make sure it matches the one you have currently installed) or simply mark the Use the recommended options for this PC and click Next).
- Select the ISO file and click Next.
- Pick the location for your ISO file and wait till all the needed files are downloaded, then click Finish.
Repair-install Windows
- Go to the location of your ISO file, right-click, and select Mount.
- Run the setup.exe file.
- You will be asked whether you want to update Windows to the latest version - pick Not right now and click Next.
- Accept Terms and Windows will make several checks to ensure everything is fine.
- Click Change what to keep.
- Here, you have several options: Keep your files and apps, Keep files only, or Keep nothing - choose what suits you the best. Click Next.
- Finally, click Install to begin the installation process.

Bottom line
The issue of multiple Chrome tabs appearing when pressing Alt + Tab is likely due to a Windows bug, particularly after using full-screen mode in Chrome. To resolve this, users can try accessing full-screen mode again, restarting Windows Explorer, installing the latest Windows updates, or repairing corrupted files. If none of these solutions work, consider performing a Clean Boot or repairing the Windows installation.
Frequently asked questions
This issue occurs because Windows 10 groups Chrome tabs as separate instances in the Alt + Tab view. You can change this behavior by adjusting Chrome's settings or using a different tab management extension.
To prevent this, you can disable the 'Use hardware acceleration when available' option in Chrome's settings, which may help reduce the number of tabs displayed in the Alt + Tab menu.
Yes, you can reset Chrome settings to default, which may resolve the issue of multiple tabs showing up by going to Settings > Advanced > Reset and clean up.


Report an issue
What's wrong with this guide? We review every report and update or remove content.
Report received — thank you. We'll review and fix it.
You need a free account to submit a report.
Be the first to comment