How to fix
StartUpCheckLibrary.dll missing
on Windows
Resolve the StartUpCheckLibrary.dll missing error in Windows 10 and 11 effortlessly. Get expert-tested solutions and fix it in minutes!
What causes How to fix StartUpCheckLibrary.dll missing in Windows?
- Missing StartUpCheckLibrary.dll file
- Corrupted system files
- Failed installation of an update
- Corrupt installation of software
- Recent Windows update causing issues
Repairs Windows system files, removes malware, and restores a clean OS state — without reinstalling.
Hello. After upgrading my Windows machine every time I turn it on a prompt pops up saying that StartUpCheckLibrary.dll is missing. How can I solve this?
Windows is one of the most widely used operating systems around the globe. It is loved for the user-friendly interface, built-in troubleshooters, easy updating process, and many other things. However, sometimes updates become the reason behind various system errors. In this article, we will talk about the StartUpCheckLibrary.dll is missing error. The full message says:
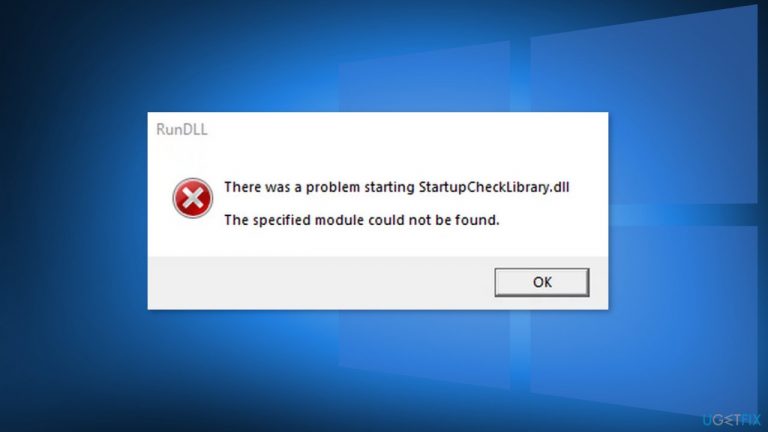
There was a problem starting StartUpCheckLibrary.dll
The specified module could not be found.
In this case, the prompt clearly states that the system is missing one file. Most times, this error appears when users turn on their computers. Many of them say that they have installed a Windows update recently. Sometimes Windows updates can do more harm than good and cause important system file corruption or disappearance.
People can start experiencing various issues like errors, crashes, bugs, decrease in performance, inability to perform basic tasks, such as viewing pictures or videos, copying files, running specific programs, and so on. In this guide, you will find 6 solutions that may help you fix StartUpCheckLibrary.dll missing in Windows.

A DLL[ref en-1] (Dynamic-Link Library) contains code and data that can be used by more than one program at the same time. You may see the "StartUpCheckLibrary.dll is missing" error because important system files are corrupted and are causing the system directory to be unable to find this file. The error can also appear after an attempted installation of an update that failed or a corrupt installation.
If you want to avoid going through all the possible troubleshooting options, we recommend you use a maintenance tool like [d1]. It can fix various system errors, corrupted files, registry[ref en-2] issues, BSoDs[ref en-3] automatically so you do not have to. If you already tried that, and it did not work or you want to solve this manually, proceed to the guide below:
Solution 1. Repair Corrupted System files and Check Disk
Use Command Prompt commands to repair system file corruption:
- Open Command Prompt as administrator
- Use the following command and press Enter:
sfc /scannow

- Reboot your system
- If SFC returned an error, then use the following command lines, pressing Enter after each:
DISM /Online /Cleanup-Image /CheckHealth
DISM /Online /Cleanup-Image /ScanHealth
DISM /Online /Cleanup-Image /RestoreHealth - Ensure that your disk is not damaged. You can perform checks using Administrative Command Prompt:
- If you are using an HDD as your main driver (where your operating system is installed - C: by default), use the following command and press Enter:
chkdsk c: /f - If you are using SSD, use this command:
chkdsk c: /f /r /x - If you receive an error, type in Y and hit Enter
- Restart your device to perform the check
Solution 2. Remove the File from Antivirus Quarantine
- Press the Windows key and search for Windows Security

- Open Virus & Threat Protection and select Threat History
- Go to Quarantine Threats and check if StartUpCheckLibrary.dll is there
- If it is there, then restore the StartUpCheckLibrary.dll file

- You may have to add an exception for the file in Windows Defender settings to avoid future issues with the file
Solution 3. Remove the File from Task Scheduler
- Press the Windows key and type Task Scheduler
- Expand Task Scheduler Library and then expand Microsoft and then expand Windows

- Select Application Experience and double-click on StartupCheckLibrary
- Navigate to the Actions tab and select Start a Program
- Click on the Edit button
- Remove the StartupCheckLibrary.dll from the Argument box and click on the OK button

- Reboot your PC
Solution 4. Use AutoRuns to Remove StartUpCheckLibrary.dll Traces
- Download the Microsoft Autoruns
- Extract the downloaded zip file and then open it

- Right-click on Autoruns and select Run as Administrator
- Search for StartupCheckLibrary
- Uncheck any entries pointing to the StartupCheckLibrary file

- If there is no entry related to StartupCheckLibrary, then delete all the entries where the file could not be found in the Image Path column
- Restart your PC
Solution 5. Use the Registry Editor to Remove the Traces of the File
- Click on the Windows button and search for Registry Editor.
- Choose Run as Administrator
- Navigate to the following:
Computer\\HKEY_LOCAL_MACHINE\\SOFTWARE\\Microsoft\\Windows NT\\CurrentVersion\\Schedule\\TaskCache\\Tasks\\{391B74BA-C53C-4BDB-922C-B24E3ACFB09D}
- Right-click on {391B74BA-C53C-4BDB-922C-B24E3ACFB09D} and then select Delete
- You can also open the Edit menu and select Find

- Search for startupchecklibrary and then remove the entry suspected to create the issue
- Exit the Registry Editor and reboot your PC
Solution 6. Perform a Repair Install
- Download the Windows 10 ISO file
- Now mount the ISO file
- Double-click on the file setup.exe to start the repair, install from the mounted drive
- When the installation provides the License Terms, read them and click Accept

- Windows 10 will now check for updates and will install the ones available
- When all is set, click Install
- When the installation is complete, follow the on-screen instructions
Bottom line
This article provides solutions such as repairing corrupted system files and using Command Prompt commands to fix the StartUpCheckLibrary.dll missing error. If these methods do not resolve the issue, consider using a maintenance tool or seeking further assistance.
Frequently asked questions
You can try restoring the missing DLL file by running the System File Checker tool; open Command Prompt as an administrator and type 'sfc /scannow'. If that doesn't work, consider reinstalling the application that requires the DLL.
While it's possible to download the DLL from third-party websites, it's not recommended due to potential security risks; instead, use trusted repair tools or restore the file from a recovery point.
To prevent such errors, ensure that your Windows 10 or Windows 11 system is regularly updated and run antivirus scans to keep your system free of malware that may corrupt DLL files.


Report an issue
What's wrong with this guide? We review every report and update or remove content.
Report received — thank you. We'll review and fix it.
You need a free account to submit a report.
Be the first to comment