How to fix
Valorant VAN9003 error
on Windows
Resolve the Valorant VAN9003 error on Windows 10 or 11 effortlessly. Follow our expert-tested solutions for a seamless gaming experience, fixed in minutes!
What causes How to fix Valorant VAN9003 error in Windows?
- TPM 2.0 not enabled
- Secure Boot not enabled
- Incompatibility with Windows 11
- Security elements not activated
- Issues with BIOS configurations
Repairs Windows system files, removes malware, and restores a clean OS state — without reinstalling.
Hello. When I try to launch Valorant on my Windows PC, I get the VAN9003 error. Is there a way to fix it?
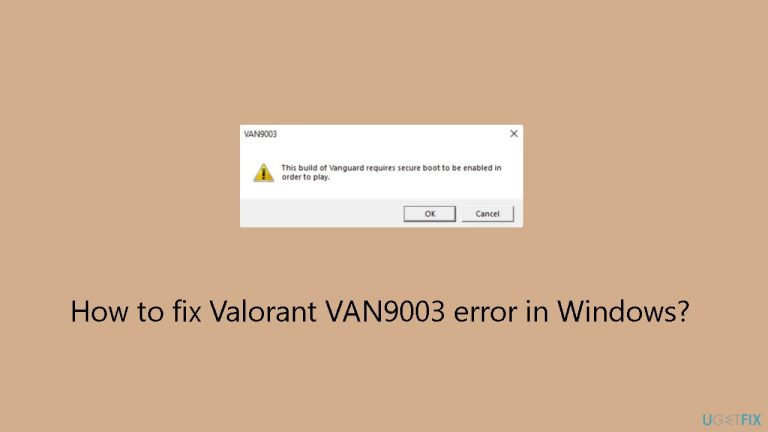
When TPM (Trusted Platform Module) 2.0 and Secure Boot are not enabled on a user's device, a recurrent problem known as the VAN9003 error appears in Valorant on Windows. This error manifests as an obstacle to launching the game, with players encountering messages such as:
This build of Vanguard requires secure boot to be enabled in order to play
or:
Initial attestation failure: Secure boot requirement not met.
The core issue is that Valorant requires the activation of both Secure Boot and TPM 2.0 due to its special requirements on Windows 11. When certain security elements aren't enabled, Valorant has problems launching, which results in the VAN9003 issue. This error could result in crashes while trying to enter the main menu in addition to preventing the game from launching.
The annoying inability for users to enjoy Valorant on their Windows 11 devices is the result of this issue. The error disrupts the gaming experience, causing inconvenience and frustration among players who are eager to engage in the game but are prevented by the VAN9003 error.
To resolve this issue, make sure the Windows 11 device has both TPM 2.0 and Secure Boot enabled. However, despite the straightforward nature of the solution, users may face challenges in navigating these settings, especially if they are not familiar with BIOS configurations.
In this guide, you will find 6 steps that should help you fix Valorant VAN9003 error in Windows. If you experience any other OS issues, you can run a maintenance tool like [d1] that can fix most system errors, BSODs, corrupted files, and registry issues. Otherwise, follow the step-by-step instructions below.

Solution 1. Change Secure Boot Mode
- Turn off the computer.
- Power on the computer.
- When the logo appears, press Esc, F1, F2, F10, or F12, depending on the system manufacturer, to access the BIOS.
- In the BIOS, go to Advanced mode.
- Select Settings from the left pane.
- Click on Advanced.
- Choose Windows OS Configuration from the list.
- Click on Secure Boot.
- Set Secure Boot to Disabled.
- Change the Secure Boot Mode to Custom.
- After the System Mode changes to User, set Secure Boot Mode to Standard again.
- Select Secure Boot and choose Enabled from the options.

- Save the changes.
- Exit the BIOS.
- Boot Windows.
- Press the Windows key + S to open Search.
- Type System Information in the text field.
- Click on the relevant result.
- In the Summary tab, ensure that the Secure Boot State reads On.
Solution 2. Enable TPM
- Press the Windows key + R to open Run.
- Type tpm.msc in the text field and press Enter.
- Check the status listed:
When Enabled: The TPM is ready for use.
When Disabled: Compatible Trusted Platform Module (TPM) cannot be found on this computer.
- If disabled, access the PC’s BIOS.
- In the BIOS, navigate to Advanced Settings and select Security.
- Click on Trusted Computing.

- Choose Security Device Support and select Enable from the options.
- Save the changes and exit the BIOS.
Solution 3. Set the VGC Service to Automatic
- Press the Windows key + R to open Run.
- Type services.msc in the text field and press Enter.
- Scroll down and locate the VGC service.
- Right-click on the VGC service and select Properties.

- In the Properties window, choose Automatic from the Startup type dropdown.
- Click the Start button under Service status.
- Click Apply and then OK to save the changes.
Solution 4. Switch to UEFI Mode
- Access the BIOS.
- Go to Settings.
- Click on Advanced.
- Select Windows OS Configuration.
- Choose the BIOS CSM/UEFI Mode entry.

- From the list of options, select UEFI.
- Save the changes.
- Exit the BIOS.
Solution 5. Run Valorant in Compatibility Mode
- Right-click on the Valorant launcher.
- Select Properties from the context menu.
- Go to the Compatibility tab.
- Tick the checkbox for Run this program in compatibility mode for.
- Select Windows 8 from the dropdown menu.
- Click on Apply.
- Click on OK to save the changes.
Solution 6. Run the Riot Repair Tool
- Visit the official support website for the tool download.
- Alternatively, contact the support team for the tool.
- Request the executable (.exe) version from the support team.

- The official download is an MSI file, while the team-shared version is easier to run.
Bottom line
To fix the Valorant VAN9003 error, ensure that both TPM 2.0 and Secure Boot are enabled on your Windows 11 device. Follow the provided steps to change the Secure Boot mode and access BIOS settings. If these solutions do not resolve the issue, consider using a maintenance tool to address other potential system errors.
Frequently asked questions
The VAN9003 error typically arises due to outdated game files, network issues, or problems with Riot's anti-cheat system. Ensuring that your game is updated and your network connection is stable can help resolve this issue.
To troubleshoot the VAN9003 error on Windows 11, try restarting the Riot Client, checking your internet connection, and running the game as an administrator. Additionally, consider verifying the integrity of the game files through the Riot Client.
Reinstalling Valorant can be a last resort if other troubleshooting steps fail to fix the VAN9003 error on Windows 10 or Windows 11. However, it's often more effective to first try updating drivers and checking for software conflicts.


Report an issue
What's wrong with this guide? We review every report and update or remove content.
Report received — thank you. We'll review and fix it.
You need a free account to submit a report.
Be the first to comment