
How to fix Windows upgrade error 0x8007007f?

Prefer to fix it yourself? The manual steps follow.
- 7methods
- 5 minutes to 2 hours
- Beginner to intermediate
Applies to Upgrades from Windows 10 to Windows 11 (and Windows 11 to a newer version) with the Installation Assistant, Windows Update or setup.exe
7 methods in this guide
Hello. I tried to upgrade my PC to Windows 11, but I keep receiving the "Something went wrong. Select try again and if that doesn't work contact Microsoft support for help. Error code 0x8007007f" message. Is there a way to fix this?
Error code 0x8007007f means Windows Setup tried to call a function in a DLL file and could not find it, so the upgrade to Windows 11 stops or rolls back. It is almost never a hardware fault. Start the Installation Assistant with Run as administrator after you clear old setup files, or upgrade from the ISO instead.
Right-click a fresh download of the Windows 11 Installation Assistant and select Run as administrator from an administrator account (Fix 1). If it fails again, delete the leftover C:\$WINDOWS.~BT setup files and free 9 GB on drive C (Fix 2), or skip the assistant: mount Microsoft's Windows 11 ISO and run setup.exe (Fix 3).
| Error | Something went wrong. Select try again and if that doesn't work contact Microsoft support for help. Error code 0x8007007f, in the Windows 11 Installation Assistant. |
|---|---|
| Where it appears | In the Installation Assistant, often a few seconds after you start it or during the download. In Windows Update, the upgrade fails and the PC rolls back to Windows 10. |
| Main cause | Setup could not load a function from one of its DLL files. Most often the tool ran without full administrator rights, or files of an earlier attempt are in the way. |
| Fastest fix | Run the assistant as administrator (Fix 1), then clear old setup files (Fix 2). The ISO with setup.exe (Fix 3) works when the assistant keeps failing. |
| Also written as | 0x8007007F, 8007007f, 0x8007007f-0x2000A in SetupDiag, Win32 error 127 or ERROR_PROC_NOT_FOUND. People also type it short, as 0x8007007. |
| Affects | Windows 10 PCs upgrading to Windows 11, and Windows 11 PCs moving to a newer version. The assistant runs only on x64 PCs with Windows 10 version 2004 or later. |
| Microsoft's status | No known issue and no fix in an update. Microsoft's download page, read on 15 October 2026, offers Windows 11 version 26H2 and says you need to be an administrator to run the assistant. |
| Where the cause is written | setuperr.log and setupact.log in C:\$WINDOWS.~BT\Sources\Panther, and the Rollback folder next to it after a rollback. |
| Time to fix | 5 minutes for Fix 1, 15 minutes for Fix 2. The upgrade itself takes one to two hours after any fix. |
Facts checked on 15 October 2026. Steps written for Steps written for Windows 10 22H2 and Windows 11 25H2 and 26H2, against Microsoft's download page for Windows 11 version 26H2.
What error code 0x8007007f means in the Windows 11 upgrade
The full message in the Installation Assistant reads: "Something went wrong. Select try again and if that doesn't work contact Microsoft support for help. Error code 0x8007007f". The code itself is a Windows system error in a wrapper. The last part, 007F, is error 127, which Microsoft lists as ERROR_PROC_NOT_FOUND: "The specified procedure could not be found."
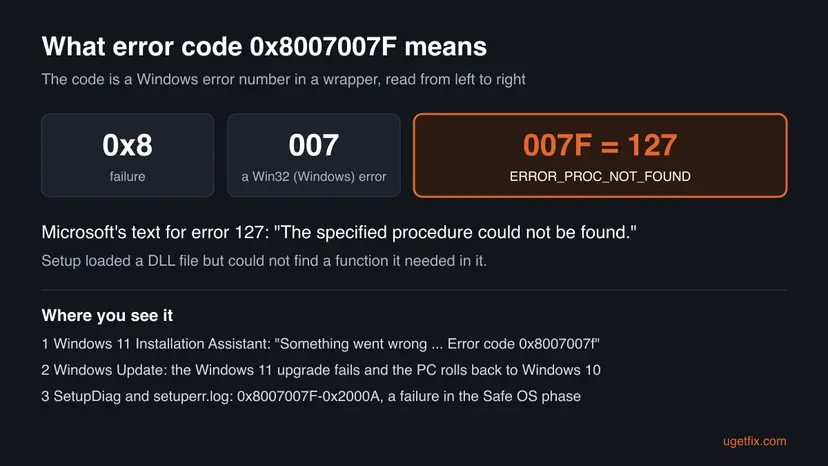
| Where you see it | What it looks like | What it tells you |
|---|---|---|
| Windows 11 Installation Assistant | A "Something went wrong" screen with Try again and the code | The assistant or the Setup it started failed to load a part of itself. |
| Windows Update | The Windows 11 upgrade installs, restarts and then undoes itself | Setup failed after the restart and rolled back to your old Windows. |
SetupDiag or setuperr.log | 0x8007007F-0x2000A, or lines with LoadLibraryExW ... failed gle=0x7f | The second part names the phase. In the Microsoft Q&A case below it was the Safe OS phase. |
0x8007007F, 8007007f and 0x8007007 are the same error. 0x8007001F is a different one. A Microsoft Q&A volunteer moderator notes that duplicate user profiles typically cause that code, not 0x8007007F. 0xC06D007F also ends in 7F but comes from a program, not from Windows Setup, and this page does not cover it.
Why the Windows 11 upgrade fails with 0x8007007f
Microsoft has not published a single cause. A missing function means that Setup loaded the wrong copy of a DLL, a damaged one, or one it was not allowed to use. The ranking below joins what error 127 means with what Microsoft Q&A moderators and users report. Each cause points to a fix.
| Cause | How often | How to tell | Fix |
|---|---|---|---|
| The assistant ran without full administrator rights. | Most often reported | You double-clicked the file, or your account is a Standard user. | Fix 1 |
| Files of an earlier upgrade attempt are left on drive C, or there is too little space. | Often | You tried before. C:\$WINDOWS.~BT or C:\ESD exists, or less than 9 GB is free. | Fix 2 |
| The assistant's own download or start is the problem. | Often | The error appears every time in the assistant, but you have not tried another tool. | Fix 3 |
| An old or incompatible driver, most often the graphics driver. | Sometimes | Memory integrity lists incompatible drivers, or the graphics driver is years old. | Fix 4 |
| Third-party programs and services load their own DLLs into Setup. | Sometimes | The upgrade restarts and rolls back, and setuperr.log names a migration plugin. | Fix 5 |
| Damaged Windows system files. | Less often | SFC reports files it could not repair. | Fix 6 |
| A third-party antivirus blocks Setup. | Rarely | A security program other than Microsoft Defender is installed. | Fix 7 |
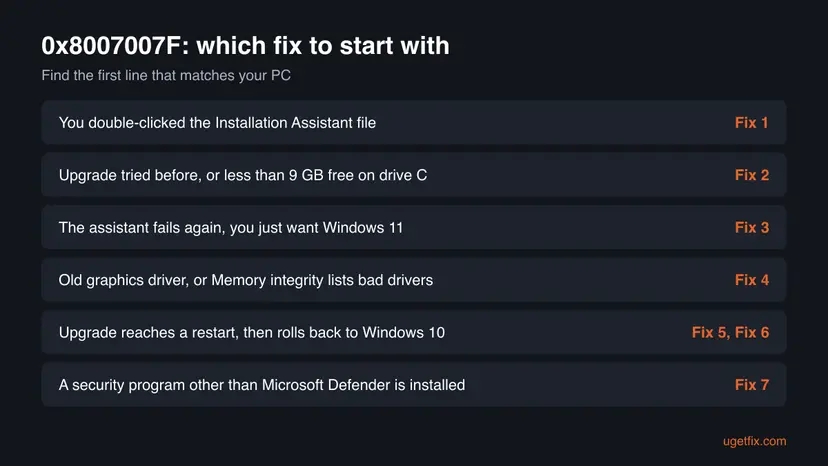
Many readers fix 0x8007007f simply by starting the assistant with Run as administrator. Users on Reddit also report that a new graphics driver and a restart cleared it. Both are reports, not Microsoft statements, but they cost two minutes, so try them first.
Where Windows Setup writes the real cause of 0x8007007f
If the upgrade got past the first screen, Setup keeps its logs in the hidden folder C:\$WINDOWS.~BT. Read them before Fix 2, because Fix 2 deletes that folder. A Microsoft Q&A volunteer moderator asks for exactly these files when helping with this error.
- Press Win + R, type
C:\$WINDOWS.~BT\Sources\Pantherand press Enter. - Open
setuperr.login Notepad. Search with Ctrl + F for0x8007007fand forgle=0x7f. - Look at the DLL named on those lines, for example
WSManMigrationPlugin.dllorRasMigPlugin.dllin the Q&A case. - If the PC rolled back, also copy the
C:\$WINDOWS.~BT\Sources\Rollbackfolder. - Zip
setupact.log,setuperr.logand the Rollback folder to keep them for support.
| What the log shows | What it means | Go to |
|---|---|---|
MIG lines with a migration plugin DLL and 0x8007007f | Setup failed while moving your apps and settings to Windows 11. | Fix 5, then Fix 3 |
Failed to run sysprep platform actions with 0x8007007f | The failure was in the Safe OS phase, after the first restart. | Fix 4, then Fix 5 |
A driver file (.sys) or a third-party program folder | A driver or program injects a DLL that Setup cannot use. | Fix 4 or Fix 7 |
| No Panther folder at all | The assistant stopped before Setup began. | Fix 1, then Fix 3 |
How to fix error code 0x8007007f in the Windows 11 upgrade
Fix 1 and Fix 2 solve the common cases and change nothing outside the upgrade's own files. Fix 3 uses Microsoft's ISO instead of the assistant. Fix 4 to Fix 6 deal with drivers, other programs and system files, and Fix 7 tests a third-party security program.
| What you see or have | Start with |
|---|---|
| You double-clicked the Installation Assistant, or your account is a standard user. | Fix 1 |
| You tried to upgrade before, or less than 9 GB is free on drive C. | Fix 2 |
| The assistant fails every time and you only want Windows 11. | Fix 3 |
| The graphics driver is old, or Memory integrity lists incompatible drivers. | Fix 4 |
| The upgrade restarts, reaches a percentage and rolls back to Windows 10. | Fix 5 |
| SFC finds damaged files, or the error also shows up in other programs. | Fix 6 |
| A security program other than Microsoft Defender is installed. | Fix 7 |
Fix 1. Run the Installation Assistant as administrator from an administrator account
5 minutesNo riskYou started the assistant with a double-click, or you are not sure your account is an administrator.
Microsoft's download page says you need to be an administrator to run this tool. Without full rights, Setup cannot load some of its DLLs from protected folders, and a missing function shows up as error 127, 0x8007007f.
- Press Win + I and open Accounts > Your info. Under your name it must say Administrator.
- If it says Standard user, sign in with an administrator account, or ask the owner of the PC to change your account type.
- Close the assistant if it is open. Download it again from Microsoft's Download Windows 11 page.
- Right-click
Windows11InstallationAssistant.exeand select Run as administrator. Step by step: How to run a program as administrator or in compatibility mode. - Select Yes in the User Account Control prompt and let the assistant check your PC.
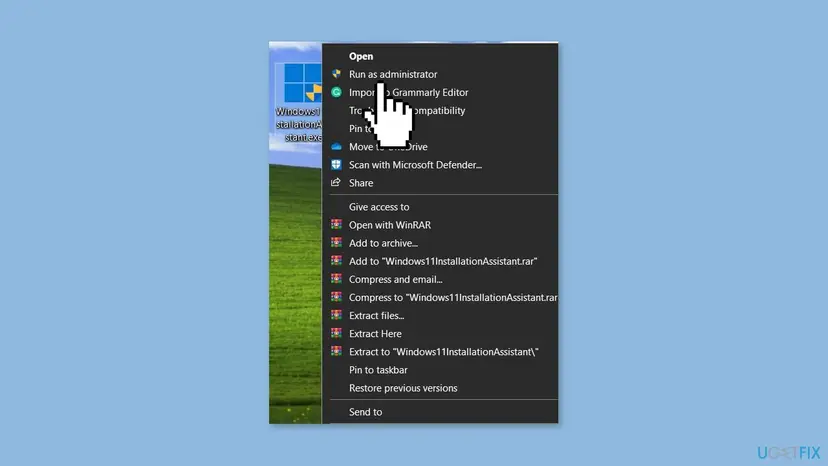
Keep User Account Control on. The administrator start needs the UAC prompt to raise the assistant's rights, so turning UAC off is not a fix.
It worked if: The assistant shows the license terms with Accept and Install and then the download progress, without the error.
If not: If 0x8007007f comes back, go to Fix 2 to clear the files of earlier attempts.
Fix 2. Delete the files of earlier upgrade attempts and free 9 GB on drive C
15 minutesLow riskYou tried to upgrade before, the PC rolled back once, or drive C has less than 9 GB free.
A Microsoft Q&A volunteer moderator's first step for this error is to delete C:\$WINDOWS.~BT, C:\$WINDOWS.~WS and C:\ESD and run Setup again. Half-written files from a failed attempt can hold a wrong copy of the DLL that Setup then loads.
- Copy the logs first if you may need them, as in the section on where the cause is written.
- Close the assistant. Press Win + R, type
cleanmgrand press Enter. Choose drive C:. - Select Clean up system files, choose drive C: again and wait for the list.
- Check Temporary Windows installation files and Windows upgrade log files, then OK and Delete Files. Step by step: Free up disk space and delete temporary files.
- In File Explorer select View > Show > Hidden items (on Windows 10 View > Hidden items). Delete
C:\$WINDOWS.~BT,C:\$WINDOWS.~WSandC:\ESDif they are still there. - Check in This PC that drive C has at least 9 GB free, restart the PC and run Fix 1 again.
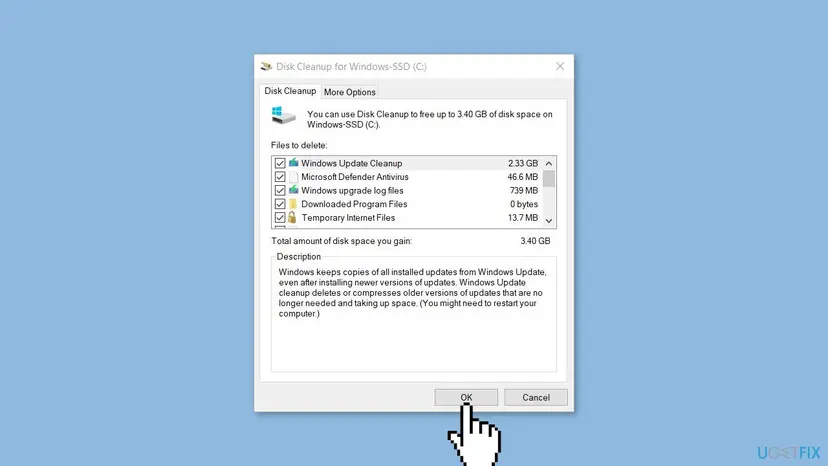
C:\Windows.old holds your previous Windows after a finished upgrade and lets you go back. Delete only the three setup folders named above, and only while no upgrade is running or waiting for a restart.
It worked if: The three folders are gone, drive C shows 9 GB or more free, and a new run of the assistant downloads Windows 11 without the error.
If not: If the error comes back on a clean drive, go to Fix 3 and use the ISO.
Fix 3. Upgrade from the Windows 11 ISO with setup.exe
1 to 2 hours, mostly download and installLow riskThe Installation Assistant fails every time, and you only want Windows 11 on this PC.
The ISO contains the full Setup, so nothing is assembled by the assistant on your PC. Microsoft's page says that mounting the ISO performs an upgrade of your current system, and the Q&A moderator suggests the ISO because it can be reused for another attempt.
- Back up the files you cannot lose: Back up your files (Windows Backup, File History, Time Machine).
- On Microsoft's Download Windows 11 page, under Download Windows 11 Disk Image (ISO) for x64 devices, choose the edition and your language, then 64-bit Download.
- Right-click the ISO file and select Mount. If Mount is missing, open Properties, select Change next to Opens with, choose Windows Explorer and Apply.
- Open the new drive in File Explorer and double-click
setup.exe. - Follow Setup. Under Choose what to keep, select Keep personal files and apps, then Install.
Mount the ISO file itself. Do not unpack it with an archive program and look for a file to run: the Q&A moderator had to correct exactly that mistake.
It worked if: Setup shows Ready to install with Keep personal files and apps, then restarts the PC a few times and ends on the Windows 11 sign-in screen.
If not: If Setup from the ISO also stops with 0x8007007f, read setuperr.log and go to Fix 4 and Fix 5.
Fix 4. Update the graphics driver and remove incompatible drivers
15 minutesLow riskThe graphics driver is old, Memory integrity lists incompatible drivers, or the upgrade fails after the first restart.
Drivers load their own DLLs during the Safe OS phase of the upgrade, where SetupDiag reported 0x8007007F-0x2000A in the Q&A case. The moderator checks Memory integrity for incompatible drivers before any new attempt, and users report that a new graphics driver alone fixed the error.
- Open Windows Security > Device security > Core isolation details. If it lists incompatible drivers under Memory integrity, note their names.
- Update or remove each listed driver from the maker of the device, or in Device Manager: Update, roll back or reinstall a driver.
- Install the newest graphics driver from NVIDIA, AMD or Intel, or from the PC maker's support page.
- Press Win + I, open Windows Update > Advanced options > Optional updates (on Windows 10 Update & Security > Windows Update > View optional updates) and install the driver updates there.
- Restart the PC and run the upgrade again, as in Fix 1 or Fix 3.
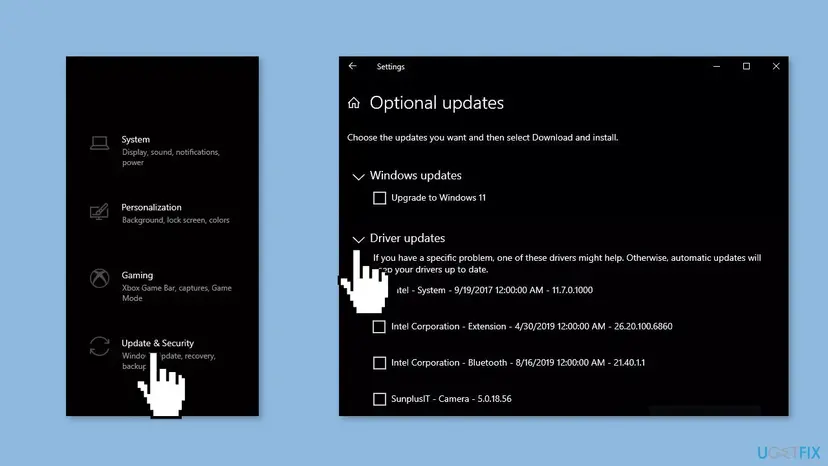
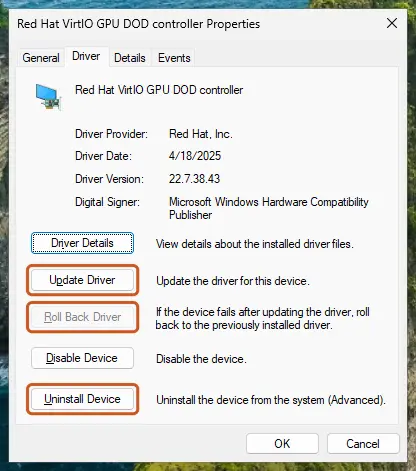
It worked if: Memory integrity shows no incompatible drivers, and the upgrade passes the first restart without rolling back.
If not: If the upgrade still rolls back, start it from a clean boot with Fix 5.
Fix 5. Start Windows with a clean boot and run Setup again
15 minutes plus the upgradeLow riskThe upgrade reaches a percentage, restarts and rolls back, or the log names a migration plugin.
Third-party services and startup programs can load their own DLLs into Setup's processes. The Q&A moderator advises a clean boot before an in-place upgrade so that only Microsoft services run while Setup loads its plugins.
- Press Win + R, type
msconfigand press Enter. - On the Services tab, check Hide all Microsoft services first, then select Disable all. Step by step: How to perform a clean boot in Windows.
- Disable the startup apps in Task Manager, select OK and restart the PC.
- Run the assistant as administrator, or
setup.exefrom the ISO, and let the upgrade finish. - After the upgrade, open
msconfigagain and select Normal startup.
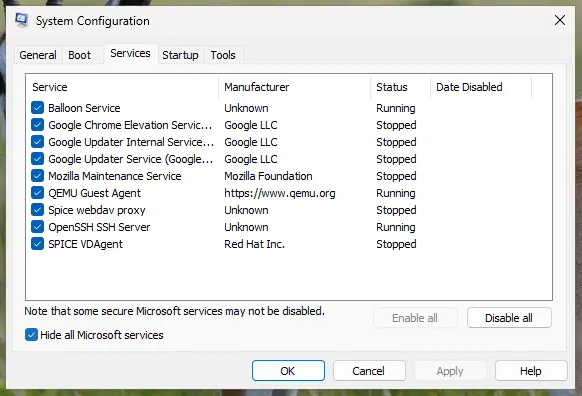
It worked if: The upgrade passes the restarts and Windows 11 starts. Programs you disabled start again after Normal startup.
If not: If it still rolls back with 0x8007007f, repair the system files with Fix 6.
Fix 6. Repair Windows system files with DISM and SFC
20 minutesNo riskSFC or DISM has not run yet, or other programs also report missing functions or DLL files.
Setup copies parts of your current Windows into the new one. If a system DLL is damaged or a wrong version, the function Setup looks for is missing. The Q&A moderator runs these two commands when the log names a DLL in C:\Windows\system32.
- Open Command Prompt as administrator.
- Repair the Windows image first, then check the system files:
dism /online /cleanup-image /restorehealth sfc /scannow - Restart the PC when both are done. Step by step: Run DISM and SFC to repair Windows system files.
- If the log named a DLL, check that it exists, for example with
dir C:\Windows\system32\WSManMigrationPlugin.dll.
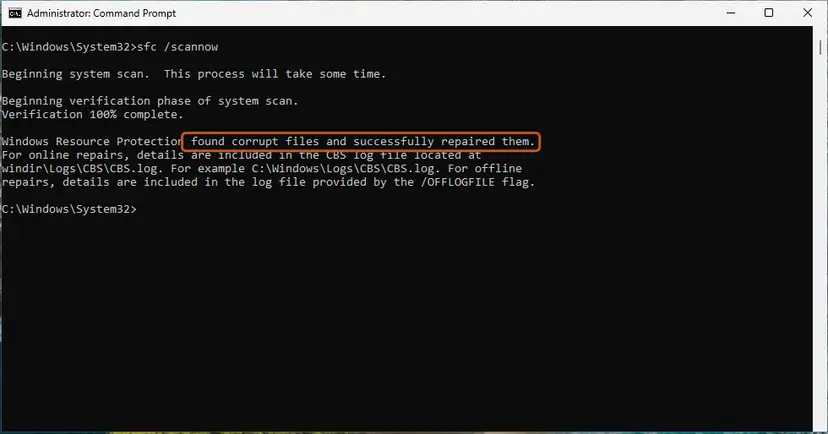
It worked if: SFC ends with a line that it found no integrity violations, or that it repaired them. The next upgrade passes the step where it failed.
If not: If the DLL is intact and the error stays, go to Fix 7, then read the section on what to do when it is still there.
Fix 7. Uninstall a third-party antivirus for the upgrade
15 minutesLow riskA security program other than Microsoft Defender is installed, and Fix 1 to Fix 6 changed nothing.
Security programs load their own DLLs into other processes and some guard the setup folders. The Q&A moderator advises uninstalling third-party antivirus before the upgrade and reinstalling it after. Microsoft Defender turns itself on while it is gone, so the PC stays protected.
- Write down the program's name and your licence key or account so you can reinstall it.
- Press Win + I, open Apps > Installed apps (on Windows 10 Apps > Apps & features), find the security program and select Uninstall: Uninstall a program or app in Windows.
- If it will not uninstall cleanly, use the removal tool from the program's maker.
- Restart the PC. Check in Windows Security that Microsoft Defender's real-time protection is on.
- Run the upgrade, then reinstall your security program in Windows 11.
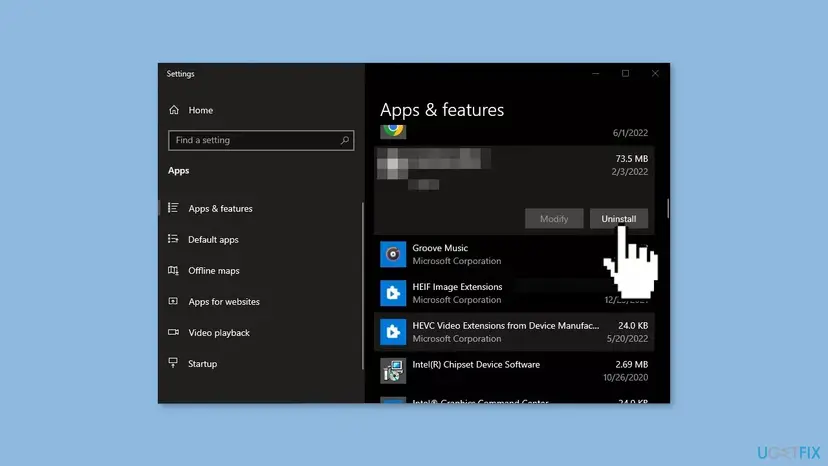
It worked if: Windows Security shows Microsoft Defender as active, and the upgrade completes without 0x8007007f.
If not: If nothing changed, reinstall your security program and read the next section.
If error 0x8007007f still stops the upgrade
When a clean drive, an administrator start, new drivers and a clean boot do not help, the log decides what comes next. In the Microsoft Q&A case, the next attempt crashed while moving Store apps, and the moderator offered two ways out: reset the Store app repository, or back up and install with fewer things kept.
| What you find | What to do |
|---|---|
| The PC has an Arm processor | The assistant does not run on Arm PCs. Use the Arm64 ISO from Microsoft's separate page or wait for Windows Update. |
| Windows 10 older than version 2004 | Microsoft requires version 2004 or later for the assistant. Update Windows 10 first in Settings > Update & Security > Windows Update. |
The rollback code changes to 0xC1900101 | That is a driver or crash code with its own causes. Keep the logs and treat it as a new error. |
| Setup from the ISO fails at the same step every time | Run setup.exe again and choose Keep personal files only under Choose what to keep. Apps and settings are removed, your files stay. Back up first. |
| A work or school PC | Policies may block the upgrade on purpose. Ask the IT department. |
- What to send to support: the exact message, your Windows version from
winver, and which fixes you tried. - Add
setupact.log,setuperr.logand theRollbackfolder fromC:\$WINDOWS.~BT, zipped. - Microsoft's SetupDiag tool reads those logs and names the failing phase, as it did with
0x8007007F-0x2000Ain the Q&A case.
0x8007007f is about a missing function in a file, not about failing hardware. Suspect the hardware only when the PC also crashes outside Setup, for example a graphics card that freezes in games, or chkdsk reports bad sectors: Check a disk for errors (chkdsk).
How to keep error 0x8007007f away on the next upgrade
- Download the assistant or the ISO fresh from Microsoft's page and start it with Run as administrator.
- Keep at least 9 GB free on drive C before a feature update.
- Update the graphics driver and check Memory integrity for incompatible drivers before you start.
- Keep the ISO: you can run
setup.exeagain without a new 5 GB download.
- Do not run two upgrade tools at once, such as the assistant and Setup from an ISO.
- Do not delete DLL files from
C:\Windows\system32, and keep User Account Control on. - Do not run fix scripts written for someone else's PC: in the Q&A case one led to a boot loop.
- Do not delete
C:\Windows.oldwhile an upgrade waits for a restart.
Windows 10 left support on 14 October 2025. If your PC meets the Windows 11 requirements, finish the upgrade with Fix 3 if the assistant keeps failing. The current release on Microsoft's page is Windows 11 version 26H2.
If the assistant shows a different message before anything downloads, see our guide to the Installation Assistant's "Can't create files" error, which covers the tool's own folder and permissions.
Frequently asked questions
What does error code 0x8007007f mean?
It means Windows could not find a function it tried to call in a DLL file. The last part, 7F, is Windows error 127, which Microsoft names ERROR_PROC_NOT_FOUND: "The specified procedure could not be found." In the Windows 11 upgrade it usually means Setup loaded a damaged, wrong or blocked copy of one of its files. The fix is to give Setup full rights, a clean start without old setup files, or a complete Setup from the ISO.
How do I fix error code 0x8007007f on Windows 10?
Most readers on Windows 10 see it while upgrading to Windows 11. Download the Windows 11 Installation Assistant again, right-click it and select Run as administrator from an administrator account. If it fails, run Disk Cleanup with Clean up system files, remove Temporary Windows installation files, delete the C:\$WINDOWS.~BT folder and make sure 9 GB is free. If the assistant still fails, mount the Windows 11 ISO and run setup.exe. Windows 10 left support on 14 October 2025, so finishing the upgrade matters.
Can I get 0x8007007f on Windows 11 too?
Yes. On Windows 11 it appears when you move to a newer version with the Installation Assistant or the ISO, for example from 24H2 to 25H2 or 26H2. The cause and the fixes are the same as on Windows 10: run the tool as administrator, clear the files of earlier attempts, update drivers and start Setup from a clean boot. Your installed Windows 11 keeps working while you try, because a failed upgrade rolls back to the version you had.
Will I lose my files because of error 0x8007007f?
No. When the upgrade fails with this code, Setup rolls back and your current Windows, files and apps stay as they were. Data is at risk only in the steps you choose later: an upgrade with Keep personal files only removes apps and settings, and a clean install removes everything on drive C. Back up your files before any further attempt, whichever tool you use, and keep the backup on another drive or in the cloud.
Is running the Installation Assistant as administrator really enough?
Often, but not always. Microsoft's download page says you need to be an administrator to run the tool, and many users report that Run as administrator removed 0x8007007f at once. It does not help when the error comes from old setup files, a driver or a third-party program that loads into Setup. If the error returns after an administrator start, go on to Fix 2, which clears the files of earlier attempts, and then to the ISO in Fix 3.
Is it safe to delete $WINDOWS.~BT, $WINDOWS.~WS and ESD?
Yes, when no upgrade is running or waiting for a restart. A Microsoft Q&A volunteer moderator advises deleting these three folders before running Windows 11 Setup again, and explains that C:\ESD is created only for the time of the in-place upgrade. Copy the logs from C:\$WINDOWS.~BT\Sources\Panther first if you may need them for support. Do not delete C:\Windows.old in the same step, because it lets you go back after a finished upgrade.
What does 0x8007007F-0x2000A mean in SetupDiag?
The first part is the error, a missing function. The second part, 0x2000A, tells you when it happened. In the Microsoft Q&A case SetupDiag reported the last phase as Safe OS and the last operation as running sysprep specialization on the new Windows. That phase runs after the first restart, when drivers and system plugins of the new Windows load. Start with Fix 4 for drivers and Fix 5 for a clean boot.
What is code erreur 0x8007007f or Fehlercode 0x8007007f?
It is the same error in French and German Windows. "Code erreur" and "Fehlercode" only mean error code, so 0x8007007f has the same meaning and the same fixes in every language of Windows. This page is in English. The menus are named the same way in translation: look for Run as administrator, Disk Cleanup and Clean up system files in your language, and choose your own language when you download the Windows 11 ISO from Microsoft.
Should I remove my antivirus or change UAC to get past 0x8007007f?
Keep User Account Control on, because the administrator start in Fix 1 depends on it. Do not leave the PC without protection either. If you use a third-party security program, the Q&A moderator advises uninstalling it for the upgrade and reinstalling it after. Microsoft Defender switches itself on when no other antivirus is installed, so the PC stays protected while you upgrade. Pausing or removing protection is the last test, not the first fix.
It still fails after every fix. What now?
Keep the logs, setuperr.log, setupact.log and the Rollback folder from C:\$WINDOWS.~BT, and read which DLL or phase they name. If Setup keeps failing at the same step, run setup.exe from the ISO and choose Keep personal files only: apps and settings go, but your files stay. Back up first. A clean install is the last option. On a work or school PC, ask the IT department, because policies may block the upgrade on purpose.
Sources
- Microsoft: Download Windows 11 (Installation Assistant requirements, current release 26H2, mounting the ISO) (microsoft.com)
- Microsoft Learn: System Error Codes (0-499), ERROR_PROC_NOT_FOUND 127 (0x7F) (learn.microsoft.com)
- Microsoft Q&A: Trouble upgrading to W11 from W10, error 0x8007007f (learn.microsoft.com)
Did this fix work?
One click, no account. It tells the next reader which guides are worth their time.
Questions and experiences: fix Windows upgrade error 0x8007007f
Still broken, or found a fix we did not cover? Ask here: members and our editors answer. Reading is open; writing needs a free account.
…