
How to take high resolution screenshots in Windows 10/11?

Prefer to fix it yourself? The manual steps follow.
- 8methods
- 2 to 15 minutes
- Easy
Applies to Windows 11 and Windows 10 PCs and laptops, Snipping Tool, Print Screen, Windows logo key + Shift + S, Paint
8 methods in this guide
Hello. I wanted to know if it is possible to take better quality screenshots on my Windows PC. They turn out blurry and low resolution. I would appreciate any ideas on how to fix this.
A Windows screenshot is an exact copy of the pixels on your screen, so it can never be sharper than your display resolution. Blurry screenshots almost always come from a display set below its native resolution, a JPEG save, or an app that shrinks or compresses the picture afterwards. Set the display to its (Recommended) resolution first, then save every capture as PNG.
Windows has no screenshot quality setting: a capture always has exactly as many pixels as your screen. Open Settings > System > Display and pick the resolution marked (Recommended) (Fix 1). Save captures as PNG, never JPEG (Fix 2). For sharper text, make the content bigger before you capture it (Fix 3). If a fresh snip looks smaller after pasting into Paint, open the saved file instead (Fix 5).
| Error | No error message. Screenshots look blurry, soft or low resolution, or text in them is hard to read when zoomed. |
|---|---|
| Where it appears | In captures from Print Screen, Windows logo key + Shift + S and the Snipping Tool, or only after the picture is pasted, edited or sent. |
| Main cause | The display runs below its native resolution, the capture was saved as JPEG, or an app scaled or compressed it after the capture. |
| Fastest fix | Set Display resolution to the value marked (Recommended) and save as PNG (Fix 1 and Fix 2). |
| Screenshot resolution | Always equal to the display resolution: a 1920 x 1080 screen gives a 1920 x 1080 full screen capture. A snip of part of the screen has fewer pixels. |
| Quality setting | None. Windows does not offer a 2x or 4x capture. Microsoft's support staff confirm this and point to a higher resolution display or GPU super resolution. |
| Affects | Windows 11 and Windows 10. Windows 10 left support on 14 October 2025, but the steps still work there. |
| Known issue | Since mid 2026, users of Windows 11 25H2 report that a region snip pasted straight into Paint appears at about 65 % of its size. The saved PNG is full size. |
| Time to fix | 2 minutes for resolution and format. Up to 15 minutes if a display driver must be installed. |
Facts checked on 15 October 2026. Steps written for Windows 11 (25H2 and 26H2) and Windows 10 22H2, with the Snipping Tool, Print Screen and Paint that ship with them.
What screenshot resolution means in Windows
Every capture tool in Windows copies the picture that the graphics card sends to the monitor, pixel for pixel. A full screen capture on a 1920 x 1080 display is a 1920 x 1080 image. On a 2560 x 1440 display it is 2560 x 1440. No hidden setting raises that number.
Microsoft's support staff say the same in a reply about sharper screenshots: the quality depends on the resolution of the device, and there is no way to capture at 2x, 4x, 6x or 8x. A snip of a small area is just a crop of that same grid, so it holds fewer pixels and looks soft when it is enlarged.
| Keys or tool | What it captures | Where the picture goes |
|---|---|---|
| Windows logo key + Shift + S | A rectangle, a window, the full screen or a freeform area | Clipboard, and in Windows 11 also the Screenshots folder |
| Print Screen (PrtSc) | The whole screen, or it opens the Snipping Tool overlay, depending on a setting | Clipboard |
| Alt + Print Screen | The active window | Clipboard |
| Windows logo key + Print Screen | The whole screen | Pictures > Screenshots as a PNG file |
| Snipping Tool app, New | Rectangle, Window, Full screen or Freeform | The Snipping Tool window, then Save as |
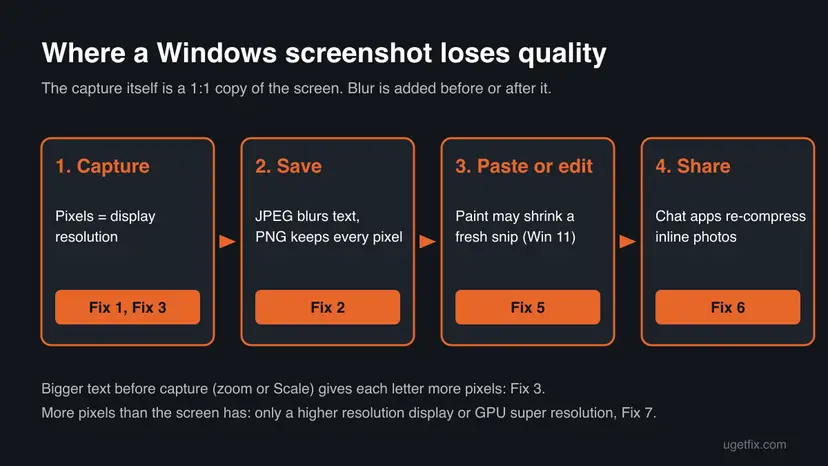
Why your screenshots are low quality or blurry, from most to least common
Most often the display is set to a lower resolution than the panel has, so everything on screen is already stretched before you capture it. Next comes the file format: JPEG throws away detail around letters and thin lines. Less often an app shrinks or compresses the picture after the capture. Rarely the program you capture is itself blurry because Windows scales it.
| Cause | How often | How to tell | Fix |
|---|---|---|---|
| The display runs below its native resolution. | Most often | The Display resolution value is not the one marked (Recommended). The whole desktop looks soft. | Fix 1 |
| The capture was saved as JPEG. | Often | The file ends in .jpg. Text has grey or coloured noise around it. | Fix 2 |
| The content was too small on screen. | Often | The full screen capture is sharp, but the text you need is tiny and turns soft when you zoom in. | Fix 3 |
| The program itself is blurry on screen. | Sometimes | Only one older program looks fuzzy, and it looks the same in the capture. | Fix 4 |
| Paint shrinks a fresh snip when you paste it. | Sometimes, Windows 11 | The saved PNG is full size, but the pasted copy in Paint is smaller. | Fix 5 |
| A chat or email app compressed it. | Sometimes | The picture is sharp on your PC and blurry for the person who got it. | Fix 6 |
| The display simply has few pixels. | Rarely the fix you want | Everything above is right, and you still need more detail. | Fix 7 |
The Snipping Tool copies the screen exactly like Print Screen does. If a snip looks worse than the screen, the loss happened after the capture: the format, the paste or the app you sent it with. Fix 8 repairs the tool only when it misbehaves in other ways.
How to take high quality screenshots in Windows 11 and Windows 10
Fix 1 and Fix 2 solve most cases and take two minutes. Fix 3 makes text in the capture sharper. Fixes 4 to 6 deal with blur that comes from a program, from Paint or from a chat app. Fix 7 is for readers who need more pixels than their screen has.
| What you see or have | Start with |
|---|---|
| The whole desktop looks soft, not only the screenshots. | Fix 1 |
| Your screenshots are .jpg files, or a tool saved them as JPEG. | Fix 2 |
| The capture is sharp, but the text in it is too small to read when zoomed. | Fix 3 |
| One older program looks fuzzy on screen and in the capture. | Fix 4 |
| A region snip pasted into Paint is smaller than the screen area you selected. | Fix 5 |
| The picture is sharp on your PC but blurry for the person who got it. | Fix 6 |
| You need a bigger image than your screen can show. | Fix 7 |
Fix 1. Set the display to its native resolution
2 minutesNo riskEveryone, first, and especially when the whole desktop looks soft.
A screenshot holds exactly the pixels the display shows. When Windows runs a 1920 x 1080 panel at a lower resolution, the image is stretched before you capture it, and every screenshot carries that blur.
- Press Windows logo key + I to open Settings.
- Select System, then Display.
- Under Scale & layout (Windows 11) or Scale and layout (Windows 10), open the Display resolution list.
- Pick the value that ends with (Recommended). It is the panel's native resolution.
- Select Keep changes when Windows asks.
- Take a new screenshot with Windows logo key + Shift + S and compare it with an old one.
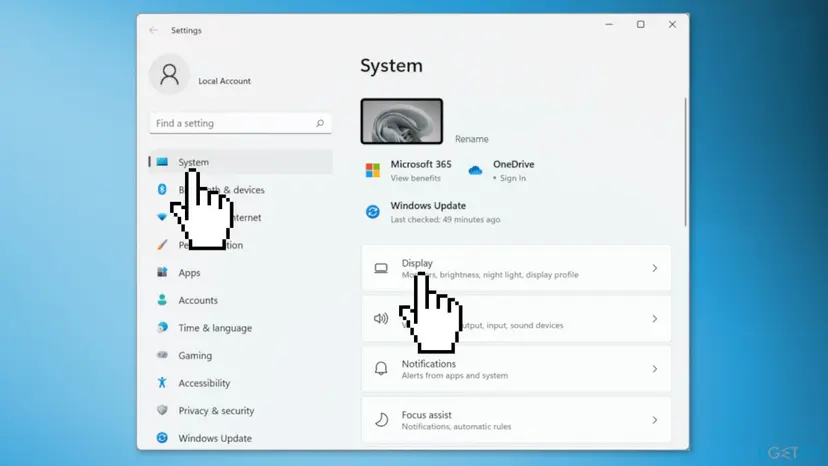
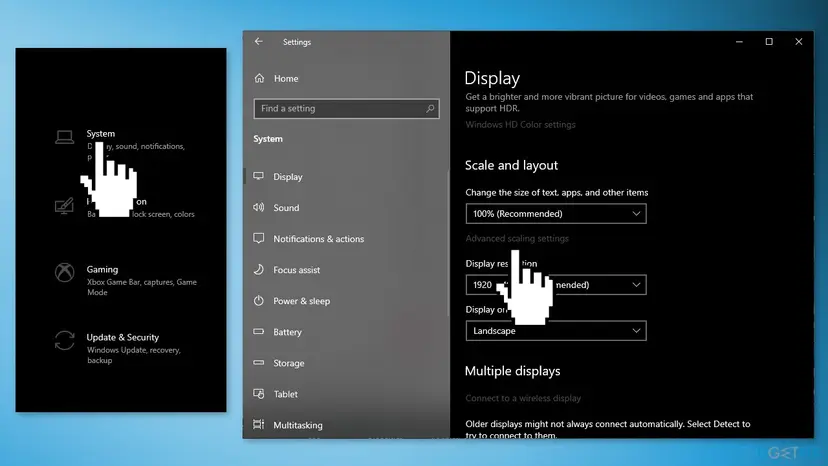
Select the monitor at the top of the Display page first. Each screen has its own resolution, and a capture of a window takes the pixels of the screen it sits on.
It worked if: The desktop text looks crisp and a new full screen capture has the same size as the (Recommended) resolution.
If not: If no value is marked (Recommended), or the highest value is far below your monitor's, the display driver is missing. Install it: Update, roll back or reinstall a driver. Then go to Fix 2.
Fix 2. Save screenshots as PNG, not JPEG
1 minuteNo riskAnyone whose screenshots are .jpg files, or who saves from Paint or another editor.
PNG is lossless: every pixel of the capture is kept. JPEG is built for photos and smears the sharp edges of letters, lines and icons, which is exactly what a screenshot is made of.
- Capture with Windows logo key + Shift + S. In Windows 11 the Snipping Tool also saves the snip to your Screenshots folder automatically.
- To save a copy yourself, open the snip in the Snipping Tool and press Ctrl + S, or select Save as.
- In Save as type, choose PNG and select Save.
- For a Print Screen capture, open Paint, press Ctrl + V, then select File > Save as > PNG picture.
- To change the automatic save folder in Windows 11, select See More (the three dots) in the Snipping Tool, then Settings.
Windows logo key + Print Screen saves the whole screen as a PNG file in Pictures > Screenshots with no extra step. It is the simplest lossless full screen capture in both Windows 11 and Windows 10.
It worked if: The saved file ends in .png and text in it stays sharp when you zoom to 200 % in the Photos app.
If not: If the PNG is sharp but looks smaller than expected after pasting, go to Fix 5. If the text is simply too small, go to Fix 3.
Fix 3. Make the content bigger before you capture it
2 minutesLow riskYour capture is sharp, but small text in it is hard to read when someone zooms in.
Windows cannot add pixels after the capture, but it can draw text with more pixels before it. At 150 % scale a letter uses about one and a half times as many pixels in each direction, so it stays readable when the image is enlarged.
- Maximize the window you want to capture, so it fills the screen. Microsoft's support staff give this as their first tip.
- Zoom the content in the program itself, for example Ctrl + plus in a browser, Word or a PDF reader.
- Or raise the scale for the whole desktop: Settings > System > Display > Scale, and pick 125 % or 150 %.
- Take the screenshot, then set the zoom or scale back.
- Custom scaling between 100 % and 500 % is under Scale in Windows 11 and Advanced scaling settings in Windows 10. Windows asks you to sign out to apply it.
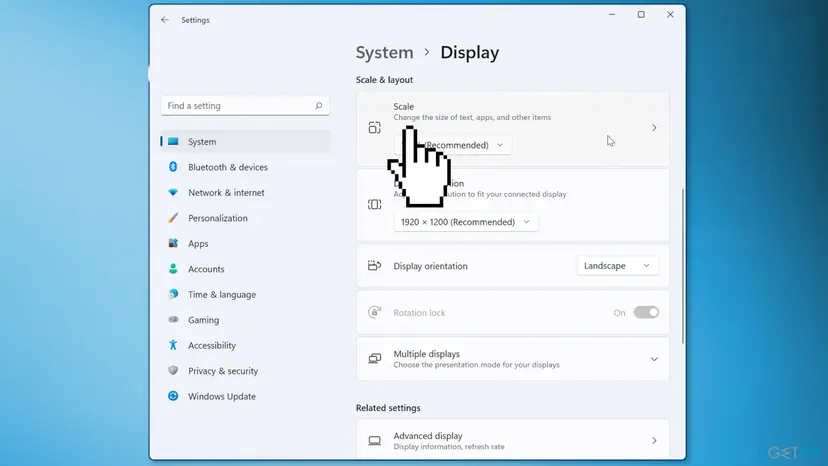
Windows itself warns that a custom size can make some text, apps and items unreadable if the display does not support that size, and that it can be hard to go back. Prefer the preset values. Write down your old value before you change it.
It worked if: Text in the new capture uses more pixels and stays readable when the image is shown on a phone or zoomed.
If not: If one program stays fuzzy at every scale, it is not scaling properly by itself: go to Fix 4.
Fix 4. Stop Windows from blurring an older program
3 minutesLow riskOne older desktop program looks fuzzy on screen and in every capture of it.
Some older programs do not support display scaling, so Windows enlarges them as a picture, which blurs them. A screenshot copies that blurred picture. Letting the program draw itself at full size removes the blur at the source.
- Close the program.
- Right-click its shortcut or its .exe file and select Properties.
- Open the Compatibility tab and select Change high DPI settings.
- Tick Override high DPI scaling behavior and set Scaling performed by to Application.
- Select OK twice, start the program again and capture it.
The Compatibility tab and its other options are shown step by step here: How to run a program as administrator or in compatibility mode.
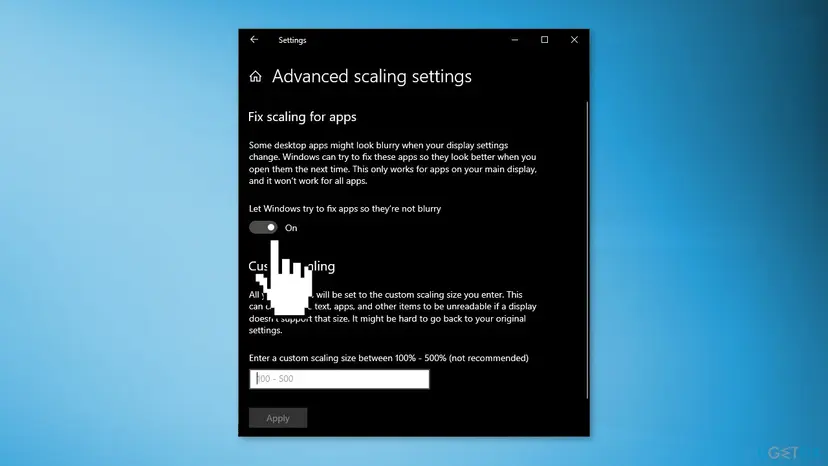
In Windows 10, Settings > System > Display > Advanced scaling settings has Let Windows try to fix apps so they're not blurry. Windows says it works only on the main display and not for all apps. We could not confirm where this switch sits in current Windows 11 builds, so use the per program setting above there.
It worked if: The program's text is as crisp as the rest of Windows, though its buttons may look smaller.
If not: Untick the box to undo it. If the program is sharp on screen but not in the saved file, go back to Fix 2.
Fix 5. Open the saved file when Paint shrinks a pasted snip
1 minuteNo riskWindows 11 users whose region snip looks smaller after pasting into Paint.
Users on Windows 11 25H2 report that a region snip made with Windows logo key + Shift + S pastes into Paint at about 65 % of its size, while the saved PNG is full size. The loss happens on the clipboard, not in the capture.
- Take the snip as usual with Windows logo key + Shift + S.
- Open File Explorer and go to Pictures > Screenshots.
- Right-click the newest file and select Open with > Paint. This copy has the full resolution.
- Or open the Snipping Tool app directly and select New. Users report that snips made this way paste at full size.
- Or capture the window with Alt + Print Screen, paste it and crop it in Paint.
- Another reported workaround: take a second, throwaway snip, press Windows logo key + V and paste the older item from clipboard history.
- Users also report: setting every monitor to 100 % scale stops the shrinking, and pasting into other apps is not affected.
It worked if: The picture in Paint has the same width and height as the area you selected on screen.
If not: If the saved PNG in the Screenshots folder is small too, the cause is earlier: check Fix 1 and Fix 3.
Fix 6. Send screenshots as files so apps do not compress them
1 minuteNo riskThe picture is sharp on your PC but blurry for the person who received it.
Many chat and social apps shrink and recompress pictures that are dropped into a conversation. Microsoft's support staff advise sending a screenshot as a file instead of dragging it into a messenger.
- Save the capture as PNG (Fix 2).
- In the chat or email app, use Attach file, Send as file or Document rather than Photo.
- For email, attach the PNG instead of pasting the picture into the message body.
- For a long series, put the PNG files in a OneDrive or other cloud folder and share the link.
It worked if: The person receiving it opens a .png file with the same width and height as your original.
If not: If the file arrives small, the app limits file size. Send a zipped folder or a cloud link.
Fix 7. Capture more pixels than your screen shows
10 minutesLow riskYou need a bigger image than your display resolution, for print or a large tutorial.
A capture cannot be larger than the desktop. Microsoft's support staff note that some graphics card makers offer a virtual super resolution, which renders the desktop at a higher resolution than the panel. Windows then lists that higher value, and captures use it.
- Make sure the graphics card's own driver is installed, not the basic display driver: Update, roll back or reinstall a driver.
- Open your graphics card's control app from the Start menu and look for its super resolution or virtual resolution option, then turn it on.
- Go back to Settings > System > Display > Display resolution and pick the new, higher value.
- Raise Scale so text stays a normal size on screen (Fix 3), then capture.
- Set the resolution back to (Recommended) when you are done.
The name and place of this option differ between graphics card makers and driver versions, and it is not available on every card. We do not give a menu path for it. A higher resolution monitor is the other way to get more pixels per capture.
It worked if: A full screen capture now has the higher width and height you chose.
If not: If no higher value appears, your card does not offer it. Use Fix 3 to make the content larger instead.
Fix 8. Repair or reset the Snipping Tool
3 minutesLow riskThe Snipping Tool does not save, saves the wrong area or crashes.
The Snipping Tool is a Store app. Repair keeps its settings and fixes its own files. Reset clears its settings, including a changed save folder, and helps when it saves files in an odd way.
- Open Settings > Apps > Installed apps (Windows 11) or Apps & features (Windows 10).
- Find Snipping Tool, open Advanced options and select Repair, then Reset if Repair does not help.
Full steps with screenshots: How to repair or reset an app in Windows.
It worked if: The Snipping Tool opens, captures the area you select and saves a full size PNG.
If not: Use Windows logo key + Print Screen, which works without the Snipping Tool window, and read the section below.
If screenshots are still low quality: what to check
Measure the picture before you change anything else. Its size tells you which step lost the quality. Right-click the file in File Explorer, select Properties and open the Details tab to read its Dimensions.
| What you find | What it means | Go to |
|---|---|---|
| Full screen capture smaller than the (Recommended) resolution | Windows runs the display below native | Fix 1 |
| Right size, file ends in .jpg | Detail was lost in the JPEG save | Fix 2 |
| Right size, PNG, text tiny | The content was too small on screen | Fix 3 |
| Saved PNG right, pasted copy smaller | Paint or the clipboard scaled it | Fix 5 |
| Your copy right, received copy smaller | The chat or mail app compressed it | Fix 6 |
When the screen itself flickers, shows lines or colour blotches, or the highest resolution is far below the monitor's, the problem is the cable, the port or the monitor. Try another cable and port before you look for software fixes.
How to keep every screenshot sharp from now on
- Keep the display at its (Recommended) resolution.
- Save and send PNG files.
- Maximize or zoom the content before you capture it.
- Use Windows logo key + Print Screen for a full screen file you never have to save by hand.
- Send pictures as files, not as photos in a chat.
- Enlarge a small snip afterwards and expect more detail.
- Save screenshots of text as JPEG.
- Run the display at a lower resolution to make text bigger: use Scale instead.
- Paste a fresh region snip into Paint on Windows 11 25H2 when size matters: open the saved file.
- Use upscaling tools for text: they guess pixels and can change letters.
Frequently asked questions
How do I take high quality screenshots in Windows 11?
Set the display to its native resolution in Settings > System > Display, choosing the value marked (Recommended). Then capture with Windows logo key + Shift + S or Windows logo key + Print Screen and keep the PNG file the Snipping Tool saves in Pictures > Screenshots. Maximize or zoom the content first so text uses more pixels. Send the PNG as a file, not as a photo in a chat app. These steps give the sharpest capture your screen can produce.
Why are my screenshots blurry in Windows 11?
The capture itself copies the screen exactly, so blur comes from somewhere else. The most common reasons are a display set below its native resolution, a screenshot saved as JPEG, and a chat or email app that compressed the picture. On Windows 11 25H2, users also report that region snips pasted straight into Paint shrink to about 65 % of their size. Check the file's dimensions in its Properties to see which step lost the detail, then use the table in the section above.
Can I change the screenshot resolution in Windows 11?
Not directly. Windows has no screenshot resolution or quality setting, and Microsoft's support staff confirm there is no 2x or 4x capture mode. The capture always matches the display resolution. To get a larger image you must change the display resolution itself, either to the native value, to a higher value from a monitor with more pixels, or to a virtual resolution offered by some graphics card drivers. To get sharper text without more pixels, raise Scale before capturing.
How do I make the Snipping Tool capture in high resolution?
The Snipping Tool already captures at full screen resolution, so there is no setting to raise. What you can control is what surrounds the capture. Keep the display at its (Recommended) resolution, make the content larger before you snip, and save as PNG. Select a large area rather than a tiny one, because a small rectangle holds few pixels. If a fresh snip looks smaller after pasting into Paint, open the PNG from Pictures > Screenshots instead.
Why is the Snipping Tool low quality compared with my screen?
It usually is not. A snip has the same pixels as the area on screen. It looks worse when it is shown larger than it was captured, for example a small rectangle enlarged in a document, or when it was saved as JPEG. Since mid 2026, Windows 11 25H2 users also report that region snips pasted into Paint appear at about 65 % of their size. The automatically saved PNG keeps the full size.
Does display scaling change the screenshot resolution?
No. Scale changes how big text and items are drawn, not how many pixels the screen has. A 1920 x 1080 display gives a 1920 x 1080 capture at 100 % and at 150 %. What changes is how many of those pixels each letter uses. At 150 % a letter is larger and sharper in the capture, but less content fits on screen. That is why raising Scale before a capture helps readability.
How do I take a 4K screenshot on a PC?
You need a desktop running at 3840 x 2160. On a 4K monitor, set Display resolution to that value, which is usually the (Recommended) one, and capture with Windows logo key + Print Screen. On a lower resolution monitor, some graphics card drivers can render the desktop at a higher virtual resolution, as Microsoft's support staff point out. Not every card offers this. Enlarging a 1080p screenshot afterwards does not add real detail.
Is PNG or JPEG better for screenshots?
PNG. It is lossless, so every pixel of the capture is kept, which keeps text, lines and icons sharp. JPEG is made for photos and blurs sharp edges, leaving noise around letters. Microsoft's support staff also recommend saving screenshots as PNG to preserve quality. A PNG file is often larger, but for screenshots of text and windows it is usually still small. Use JPEG only for a capture of a photo or video frame.
How do I take a high resolution screenshot in Windows 10?
The steps are the same as in Windows 11. Open Settings > System > Display, choose the (Recommended) resolution, capture with Windows logo key + Shift + S or Windows logo key + Print Screen, and save as PNG. For a blurry older program, Windows 10 also has Advanced scaling settings with a switch that lets Windows try to fix blurry apps. Windows 10 left support on 14 October 2025, so it no longer gets security updates.
Sources
- Microsoft Support: Use Snipping Tool to capture screenshots (Windows 11 and Windows 10) (support.microsoft.com)
- Microsoft Q&A: Sharper Screenshots, answer by Microsoft Community Support (resolution, PNG, no 2x capture, GPU super resolution) (learn.microsoft.com)
- Super User: Why do screenshots pasted into Paint appear scaled down in Windows 11? (user reports, 25H2) (superuser.com)
Did this fix work?
One click, no account. It tells the next reader which guides are worth their time.
Questions and experiences: take high resolution screenshots in Windows 10/11
Still broken, or found a fix we did not cover? Ask here: members and our editors answer. Reading is open; writing needs a free account.
…