
How to fix "The timestamp signature and/or certificate could not be verified or is malformed"

Prefer to fix it yourself? The manual steps follow.
- 6methods
- 5 to 40 minutes
- Medium
Applies to Windows 11, Windows 10 and Windows 7: .NET Framework, Visual Studio and SQL Server setups, driver packages and other signed installers
6 methods in this guide
Hello. I tried to install .NET Framework on my Windows laptop, but I received the "The timestamp signature and/or certificate could not be verified or is malformed" error. How do I fix this?
This message is Windows error 0x80096005: the installer is signed, but Windows could not check the timestamp attached to that signature. Most often the PC lacks the root certificate behind the timestamp, or it is Windows 7 without SHA-2 support. Refresh the root certificates first, then run the installer again.
The message is TRUST_E_TIME_STAMP (0x80096005). The installer's signature carries a timestamp, and Windows could not verify that timestamp or its certificate. On a PC with internet, refresh the trusted roots with certutil -generateSSTFromWU and run the setup again (Fix 1). On an offline PC, import the roots from a connected one (Fix 2). On Windows 7, install the SHA-2 code signing updates first (Fix 3).
| Error | The timestamp signature and/or certificate could not be verified or is malformed. Microsoft's code is 0x80096005, named TRUST_E_TIME_STAMP. |
|---|---|
| Where it appears | In a setup window of the .NET Framework, Visual Studio, SQL Server tools or a driver package; in setup logs as failed with error 0x80096005; on the Digital Signatures tab of a file; in PowerShell's Get-AuthenticodeSignature. |
| Main cause | Windows cannot build a trusted chain for the timestamp's certificate: the root behind it is missing, or the PC (often Windows 7) cannot read the SHA-2 signature. |
| Fastest fix | Run certutil -generateSSTFromWU WURoots.sst in an admin terminal to test and refresh the root download, restart, and run the setup again (Fix 1). |
| Also written as | 0x80096005, error 0x80096005, TRUST_E_TIME_STAMP, the decimal -2146869243, and "the timestamp signature and or certificate could not be verified" without the slash. |
| Affects | Windows 11 and Windows 10 rarely; most reports come from Windows 7 and from PCs that have not been online for a long time. |
| Microsoft's status | Not a bug of one product. It is the result of a trust check that works as designed; the fix is on the PC, in its root list or its updates. |
| Close relatives | 0x800B010A (chain to a trusted root could not be built), 0x80096004 (certificate signature cannot be verified), 0x80096010 (the digital signature of the object did not verify). |
| Time to fix | 5 minutes for Fix 1, 15 minutes for Fix 2, 20 to 40 minutes for the Windows 7 updates. |
Facts checked on 16 October 2026. Steps written for Windows 11 (25H2 and 26H2) and Windows 10 22H2.
What "the timestamp signature and/or certificate could not be verified or is malformed" means
Microsoft's list of security and setup error codes (Winerror.h) gives this exact text to 0x80096005, TRUST_E_TIME_STAMP. Windows raises it while it checks the digital signature of a file, usually an installer, a .msi or .cab package or a driver.
A signed installer carries two signatures. The first is the publisher's. The second is a timestamp countersignature from a timestamp service, which proves when the file was signed, so the signature stays valid after the publisher's certificate expires. Both need a certificate chain that ends in a root Windows trusts. With 0x80096005 the publisher part can be fine; the timestamp part fails.
| What you see | Where | What it tells you |
|---|---|---|
| A setup window that says the product was not installed, followed by The timestamp signature and/or certificate could not be verified or is malformed. | .NET Framework, Visual Studio, SQL Server tools and other Microsoft setups | The setup checked its own packages and rejected one at the timestamp. |
A log line such as failed with error 0x80096005 (The timestamp signature and/or certificate could not be verified or is malformed.) | Setup logs in %TEMP%, written by the installer | The same failure, with the name of the package that was rejected on the line before. |
| The text under Digital Signature Information | Right-click the file > Properties > Digital Signatures > Details | Windows itself cannot verify the timestamp on this file, on this PC. |
A Status other than Valid and this text in StatusMessage | PowerShell Get-AuthenticodeSignature | The script or file check failed at the timestamp, not at the publisher's certificate. |
The message covers two cases in one sentence: the timestamp could not be verified, or it is damaged. In practice the first case is far more common. A damaged download is possible, so a fresh copy from the publisher is one of the fixes, but it is not the first one.
Why the timestamp signature cannot be verified
What stops the timestamp check decides the fix. From the most likely to the least likely:
| Cause | How often | How to tell | Fix |
|---|---|---|---|
The root certificate behind the timestamp is missing, because Windows has not refreshed its root list (a proxy or filter blocks ctldl.windowsupdate.com). | Most often | The PC is online, but a proxy, a work network or a web filter is in the way. | Fix 1 |
| The PC has no internet, so it never received the newer Microsoft roots. | Common on offline and lab PCs | The error shows on a PC that is not connected, often with the offline .NET installer. | Fix 2 |
| Windows 7 cannot verify SHA-2 signatures, which newer Microsoft timestamps use. | Common on Windows 7 | Windows 7 SP1 without the SHA-2 code signing update in the installed updates list. | Fix 3 |
| The installer is damaged, or so old that its own timestamp certificate is no longer accepted. | Sometimes | Only one installer fails; other signed setups install fine. | Fix 4 |
| A clock far from the real time, or Cryptographic Services not running. | Sometimes | The taskbar clock is wrong, or several signature checks fail at once. | Fix 5 |
| Damaged system files. | Rarely | Several signed programs fail and Fixes 1 to 5 did not help. | Fix 6 |
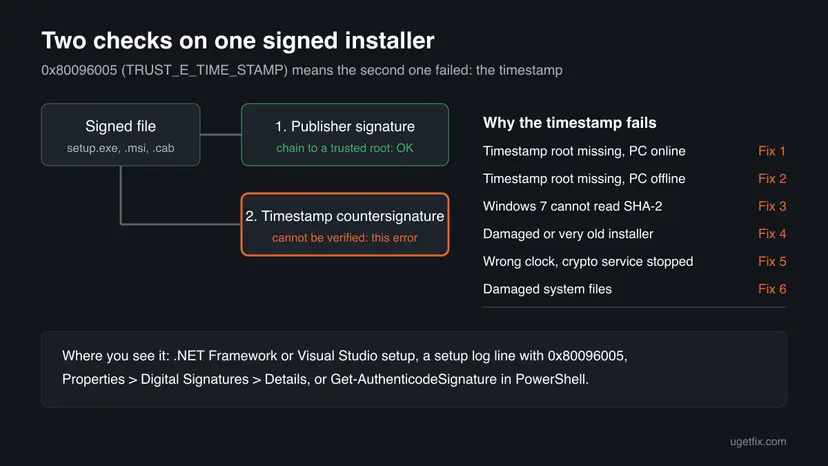
If the same setup also shows A certificate chain could not be built to a trusted root authority (0x800B010A), the cause is the same missing root. Our guide How to fix Windows Update error 0x800B010A covers that code in depth.
How to fix "The timestamp signature and/or certificate could not be verified or is malformed"
Fixes 1 and 2 give Windows the root certificates the timestamp needs, which solves most cases. Fix 3 is for Windows 7 only. Fixes 4 to 6 cover a damaged installer, the clock and damaged system files.
| What you see or have | Start with |
|---|---|
| Windows 10 or 11 with internet, a .NET or other Microsoft setup fails. | Fix 1 |
| A PC without internet, or an offline installer. | Fix 2 |
| Windows 7, any installer fails with this text. | Fix 3, then Fix 1 |
| Only one old or downloaded installer fails, others work. | Fix 4 |
| The clock is wrong, or several signed programs fail at once. | Fix 5, then Fix 6 |
Fix 1. Refresh the trusted root certificates so Windows can check the timestamp
5 minutesLow riskEveryone with internet, first. Especially when a proxy is set or a security suite filters web traffic.
Windows does not ship every Microsoft root. It fetches a missing one from ctldl.windowsupdate.com when a signature needs it. If that download is blocked, the timestamp's chain cannot be built and the check fails with 0x80096005.
- Open Settings > Network & internet > Proxy. On Windows 10 open Settings > Network & Internet > Proxy.
- Turn off Use a proxy server and Use setup script unless your work or school requires them.
- Right-click Start and select Terminal (Admin). On Windows 10 select Windows PowerShell (Admin).
- Run
cd $env:TEMPto work in a folder you can write to. - Run
certutil -generateSSTFromWU WURoots.sst. This downloads Microsoft's current trusted root list. - If it ends with CertUtil: -generateSSTFromWU command completed successfully., the path is open. Restart the PC and run the installer again.
If certutil reports a network error, something blocks ctldl.windowsupdate.com. On a home PC check the security suite's web filter and the router's parental controls. On a work PC send the result to IT: the host must be reachable on port 80.
It worked if: certutil completes, and after a restart the setup runs past its signature check.
If not: If the PC has no internet at all, go to Fix 2. On Windows 7 go to Fix 3.
Fix 2. Import the root certificates on an offline PC from a connected one
15 minutesLow riskThe PC has no internet, or has not been online for a long time, and an offline installer fails.
Microsoft's setup team explains that computers not connected to the internet never download the newer root certificates, so installers signed under them fail the trust check. The same list can be made on another PC and imported by hand.
- On a PC with internet, open Terminal (Admin) and run
certutil -generateSSTFromWU WURoots.sstin a folder you can find again. - Copy
WURoots.sstto a USB drive and plug it into the offline PC. - On the offline PC press Win + R, type
certlm.mscand select OK. Select Yes in the User Account Control prompt. - Expand Trusted Root Certification Authorities, right-click Certificates and select All Tasks > Import.
- Select Next and Browse. Set the file type to **Microsoft Serialized Certificate Store (*.sst)** and open
WURoots.sst. - Keep Place all certificates in the following store set to Trusted Root Certification Authorities, then select Next and Finish.
- Run the installer again.
Import roots made by certutil from Microsoft's own list, never a root certificate file from a forum, a video or a download site. A rogue root lets an attacker sign anything as trusted on your PC.
It worked if: The wizard says The import was successful. and the setup passes its signature check.
If not: On Windows 7 add SHA-2 support with Fix 3. If the setup still fails, try a fresh copy of the installer, Fix 4.
Fix 3. Install the SHA-2 code signing updates on Windows 7
20 to 40 minutesLow riskThe PC runs Windows 7 SP1, the most common place this message is reported.
Newer Microsoft installers and their timestamps are signed with SHA-2. A Windows 7 PC without SHA-2 code signing support cannot verify those signatures, so the timestamp check fails however good the root list is.
- Open Control Panel > Programs and Features > View installed updates.
- Look for KB4474419 (SHA-2 code signing support) and KB4490628 (servicing stack update).
- If one is missing, download it from the Microsoft Update Catalog for Windows 7 for x64-based Systems or x86, to match your PC.
- Install both and restart the PC.
- Run Fix 1 so Windows also refreshes its roots, then run the installer again.
Users also report that the older 2015 SHA-2 update for Windows 7, KB3033929, was enough to install .NET Framework 4.8. Microsoft's 2019 requirement names KB4474419 and KB4490628, so install those first.
Windows 7 support ended on 14 January 2020 and its paid security updates have ended too. A working installer does not make Windows 7 safe online.
It worked if: Both KB numbers show under View installed updates, and the setup no longer stops at the timestamp.
If not: If the same installer still fails, get a fresh copy, Fix 4.
Fix 4. Download a fresh, current installer and check its signature
10 minutesLow riskOnly one installer fails, it came from a mirror or an old disc, or it is several years old.
A cut or altered download makes the signature data unreadable, which is the "malformed" half of the message. Users also report old installers whose timestamp certificate is no longer accepted; the publisher's current build is signed and timestamped again.
- Delete the installer you have.
- Download the current version from the publisher's own site. For the .NET Framework, that is the .NET Framework download page on dotnet.microsoft.com.
- Right-click the new file, select Properties and open the Digital Signatures tab.
- Select the signature and select Details. Digital Signature Information should say This digital signature is OK.
- Check the Countersignatures list in the same window: it names the timestamp service and the signing time.
- Run the installer again.
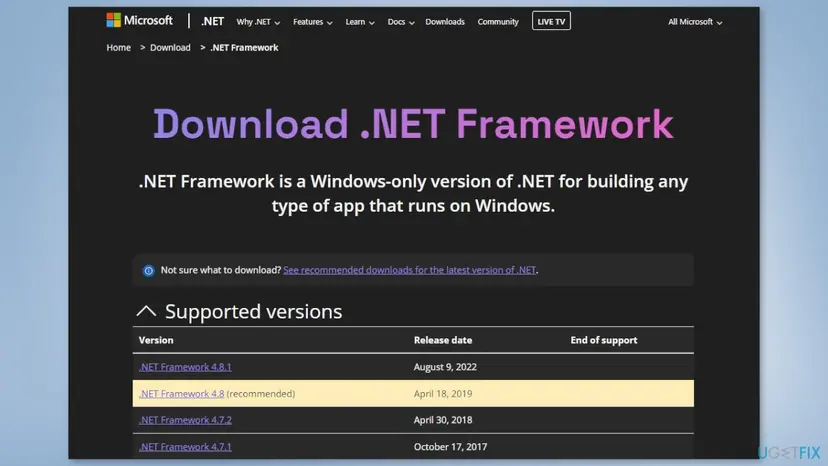
Forum answers suggest setting the PC clock to a date before the certificate expired. That bypasses a security check, breaks other sign-ins while it lasts and is easy to forget. Ask the publisher for a current build instead.
It worked if: The Details window says This digital signature is OK. and the setup installs.
If not: If even a fresh file shows the timestamp error in Details, the problem is on the PC: go back to Fix 1 or Fix 2, then try Fix 5.
Fix 5. Check the clock and restart Cryptographic Services
5 minutesLow riskThe taskbar clock is wrong, or several signed files fail at the same time.
Signature checks compare certificate dates with the PC's clock, and they run through the Cryptographic Services service. A clock far off or a stuck service makes good signatures fail.
- Compare the taskbar clock with your phone. If it is off, turn on Set time automatically and select Sync now. Step by step: How to fix the date and time in Windows
- Press Win + R, type
services.mscand select OK. - Double-click Cryptographic Services and make sure Startup type is Automatic.
- Select Stop, then Start, and OK. More detail: Check and restart Windows services
- Run the installer again.
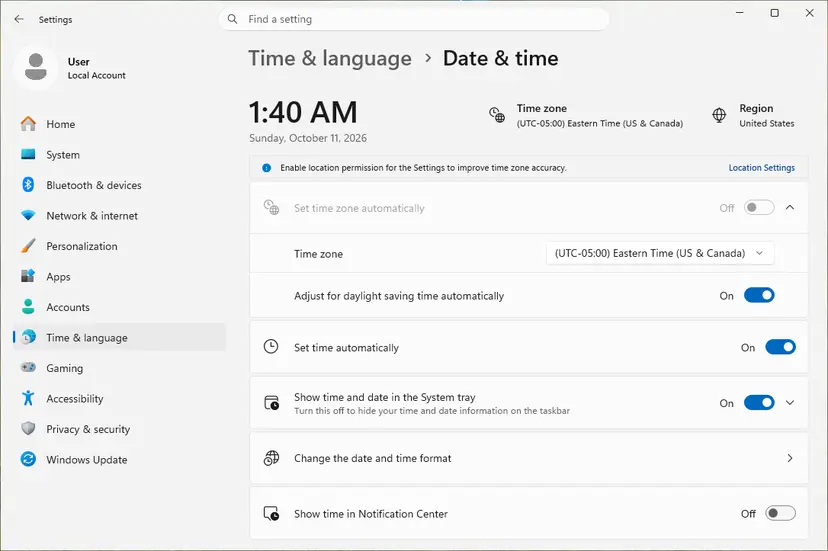
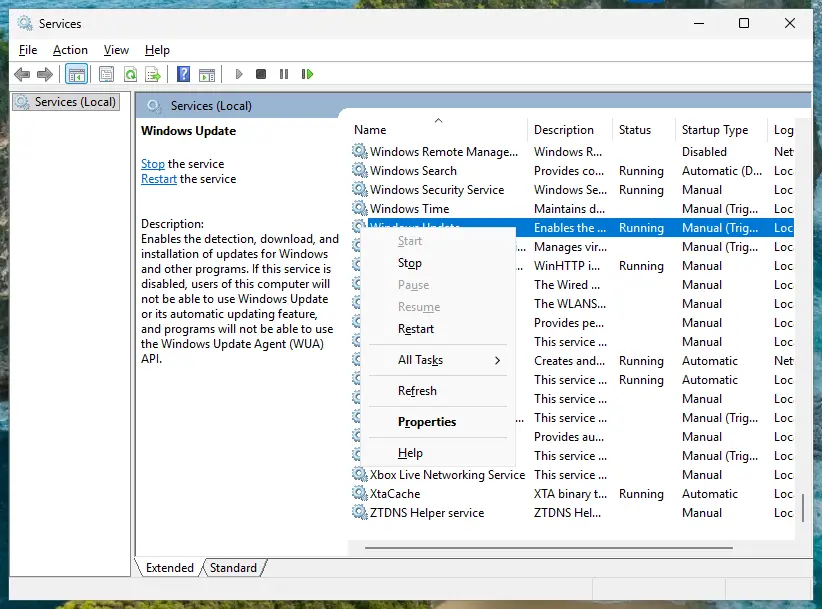
It worked if: The clock matches your phone, Cryptographic Services shows Running, and the installer passes its check.
If not: Repair the system files, Fix 6.
Fix 6. Repair system files with DISM and SFC
20 to 30 minutesLow riskSeveral signed programs fail, or Fixes 1 to 5 did not help.
In rare cases a damaged crypto component makes every signature or timestamp check fail. DISM repairs the component store and SFC then restores damaged system files from it.
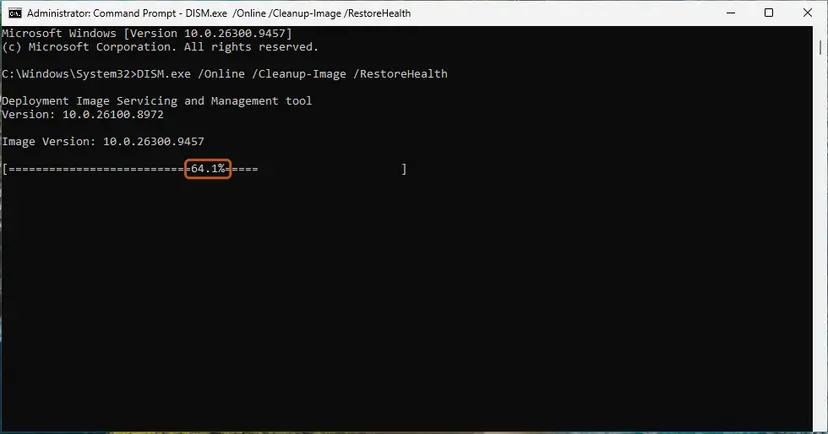
- Open an elevated command window. Right-click Start and select Terminal (Admin), or type cmd in the search box, right-click Command Prompt and select Run as administrator. Select Yes when Windows asks for permission.
- Run DISM first. Type the command below and press Enter. DISM downloads clean copies of damaged components from Windows Update, so it can take several minutes. Wait until it says The operation completed successfully.
DISM.exe /Online /Cleanup-Image /RestoreHealth - Run System File Checker. In the same window, type the command below and press Enter. Do not close the window until the verification reaches 100%.
sfc /scannow - Read the result and restart. Compare the last message with the table below this guide, then restart the PC so that repaired files are loaded.
These steps were written for Windows 11 24H2 and 25H2. The full page with the other versions and what each result means: Run DISM and SFC to repair Windows system files
It worked if: SFC finds no problems or repairs them, and the installer runs after a restart.
If not: Read the logs as shown in "If the error is still there".
If the timestamp error is still there
The logs and the signature details show which file fails and whose timestamp it carries. That tells you whether the PC lacks a root or the file itself is the problem.
| Where the error showed | What to read | What to look for |
|---|---|---|
| .NET Framework, Visual Studio or SQL Server setup | The setup log the error window links to, usually in %TEMP% | The line with 0x80096005 and the package name just before it. |
| Any signed file | Properties > Digital Signatures > Details > View Certificate on the timestamp under Countersignatures | Which certificate in the timestamp's Certification Path has a red cross or a warning. |
| PowerShell | Get-AuthenticodeSignature .\setup.exe | Format-List Status, StatusMessage, SignerCertificate, TimeStamperCertificate | TimeStamperCertificate names the timestamp's certificate and issuer; StatusMessage repeats the error. |
- Repair the .NET Framework itself when its setup still fails after the roots are in place: How to repair Microsoft Visual C++ Redistributable and .NET Framework
- Work or school PC: send IT the code 0x80096005, the file name and the
certutilresult. Root updates and proxies are set by policy there. - Another vendor's installer (a driver, a security agent): send the vendor the file name and the timestamp details; they may need to re-sign it.
- Home PC, nothing helped: reinstall Windows over itself and keep files and apps: Reinstall Windows without losing files
- Windows 10: support ended on 14 October 2025. Check that the PC is in Extended Security Updates or plan the move to Windows 11.
How to keep the timestamp error from coming back
- Keep automatic root certificate updates on, which is the Windows default.
- Allow
ctldl.windowsupdate.comthrough your firewall or filtering proxy. - On offline PCs, import a fresh root list each time you bring in new installers.
- Download installers from the publisher, not from mirrors.
- Do not turn off driver signature enforcement or other signature checks to get a setup through.
- Do not import root certificates from sites other than Microsoft.
- Do not set the clock back to install an old program.
Frequently asked questions
What does "the timestamp signature and/or certificate could not be verified or is malformed" mean?
It means Windows checked a signed file and could not verify the timestamp attached to its signature. Microsoft's code for it is 0x80096005, TRUST_E_TIME_STAMP. The timestamp proves when the file was signed, and it has its own certificate chain. When the root behind that chain is missing, or Windows cannot read the signature type, the check fails. The file is usually fine; the PC is missing something. Start with Fix 1.
How do I fix it on Windows 7?
Install the SHA-2 code signing update KB4474419 and the servicing stack update KB4490628 from the Microsoft Update Catalog, restart, then refresh the roots with Fix 1. Most reports of this message come from Windows 7, where newer SHA-2 timestamps cannot be verified without those updates. Keep in mind that Windows 7 support ended on 14 January 2020, so a working installer does not make the PC safe to use online.
Why does the .NET Framework installer show this error?
The .NET Framework setup checks the signatures of its own packages before it installs them. On a PC that is offline, or has not refreshed its root certificates for years, the root behind the newer Microsoft timestamp is missing, and the check stops with this message. Refresh the roots (Fix 1) or import them on an offline PC (Fix 2), then run the setup again. On Windows 7 add SHA-2 support first (Fix 3).
Is it the same as "the timestamp signature and/or certificate" error in Visual Studio or SQL Server setup?
Yes, the text and the code 0x80096005 are the same wherever they appear. Visual Studio and SQL Server setups list each package they reject, often next to the related message about a certificate chain that could not be built to a trusted root authority. Both come from missing roots in most cases. Refresh the roots, then repair or rerun the setup. Very old builds may need a current installer from Microsoft (Fix 4).
What is TimeStamperCertificate in Get-AuthenticodeSignature?
Get-AuthenticodeSignature in PowerShell returns a signature object for a file. Its SignerCertificate property is the publisher's certificate, and TimeStamperCertificate is the certificate of the timestamp service that countersigned it. When the timestamp check fails, Status is not Valid and StatusMessage repeats the timestamp error text. Run the command with Format-List to see both certificates and find which issuer your PC does not trust. Microsoft documents the cmdlet on Microsoft Learn.
What does "signature verification failed: timestamp too old" mean?
That is a different message from a different place. It comes from web services and libraries that sign requests with the current time and reject a request whose time is too far in the past. It is not the Windows code 0x80096005. The usual cause is a client clock that is off or a request sent late. Sync the clock on the machine that sends the request (Fix 5 shows how on Windows) and send it again.
What is "error while getting signaturetimestamp"?
That phrase is not a Windows signature error, and we could not confirm which program prints it. It does not come from the Windows trust check this page covers, so the fixes here will not help with it. If you see it in a downloader, media tool or browser extension, update that program to its latest version and check its own support page. This page is about the Windows message with code 0x80096005.
Should I disable driver signature enforcement or code signing checks?
No. Turning off signature checks does not repair the timestamp; it only stops Windows from checking anything, which lets tampered drivers and files load. The old advice to disable code signing of driver packages is not a fix for this message. The cause is a missing root or missing SHA-2 support, and Fixes 1 to 3 add what is missing while all protections stay on.
I searched in another language. Is this the right page?
Yes, if the code 0x80096005 or this message was on your screen. Some readers arrive with searches such as o que fazer?, which is Portuguese for what should I do. The meaning is the same in every language of Windows: the timestamp on a signed installer could not be verified. The fixes work the same on a Windows set to Portuguese, Spanish or any other language; only the menu names are translated.
Sources
- Microsoft Learn: COM Error Codes (Security and Setup), Winerror.h (learn.microsoft.com)
- Microsoft Setup blog: A certificate chain could not be built to a trusted root authority (devblogs.microsoft.com)
- Microsoft Learn: Visual Studio installation problems caused by missing certificate (learn.microsoft.com)
Did this fix work?
One click, no account. It tells the next reader which guides are worth their time.
Questions and experiences: fix "The timestamp signature and/or certificate could not be verified or is malformed"
Still broken, or found a fix we did not cover? Ask here: members and our editors answer. Reading is open; writing needs a free account.
…