How to fix
Remove autofill data in Google Chrome
on Windows
Easily clear autofill data in Google Chrome on Windows 10 or 11. Boost your privacy with expert-tested tips and tricks for a cleaner browsing experience.
Why does How to remove autofill data in Google Chrome occur?
- Autofill data can accumulate from browsing history.
- Users may share devices and want to maintain privacy.
- Autofill can store sensitive information like passwords.
- Inadvertent saving of unwanted entries during browsing.
- Intrusive data gathering practices by the browser.
Repairs Windows system files, removes malware, and restores a clean OS state — without reinstalling.
Hello. When I type something into Chrome's search bar or URL or search bar, there are plenty of suggestions that seem to come from my browsing history. Is there any way to remove them? Tips are much appreciated.
Chrome has been one of the most used browsers in the world, with the popularity that the competitors could only dream of. With more than 60% of users choosing this browser,[ref en-3] it is evident that most prefer it over anything else. Indeed, it provides excellent usability features and can help users browse conveniently. Although, it is important to note that the browser has also got some criticisms over the years, mainly due to intrusive data gathering practices.[ref en-1]
Google Chrome autofill data exists on every device - a desktop computer, phone, or tablet. Without a doubt, the feature is useful, as it can help users find the most commonly or recently visited websites quicker. It can also help people to log in to all their accounts without them requiring to enter their account details such as passwords and account names.
While the autofill feature works great for convenience, it is not so great for privacy. In many cases, users share the same device and would not like to disclose their visited websites and personal accounts. This is particularly important when dealing with a publicly shared computer, as anybody who would use it would be able to access one's accounts if they would wish to do so.

Thus, we would like to present the instructions on how to remove individual and all autofill entries on Google Chrome. We also provide a bonus tip on how to disable autofill data altogether if that suits your situation better. Along with that, we would like to recommend a maintenance utility [d1], which could take care of your privacy automatically by removing all types of data and entries from the local machine quickly. It is also very useful when dealing with PC issues such as BSODs,[ref en-2] system file corruption, malware-caused damage, and more.
1. Remove individual Chrome autofill entries
If you simply want to remove one particular URL from the autofill list, it is rather easy to do. Here's how:
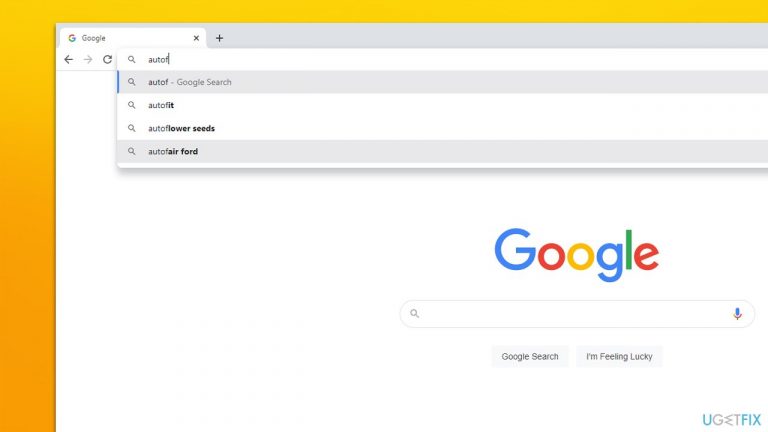
- Open Google Chrome and begin typing the web address into the URL bar
- Use the ↓ arrow button on your keyboard to reach the entry you want to delete
- Press Shift + Del on your keyboard to delete it.

How to remove autofill data in google chrome delete individual entries
Note: if you are using a laptop and the combination does not work, try pressing Shift + Fn + Del on your keyboard instead.
2. Remove personal passwords
When you enter your account information into the required fields, there is usually a checkmark that allows the browser to save your login data. Once you enter your account with this feature on, anyone else using the computer will be logged in automatically without having to enter your credentials. Thus, use the following steps in order to remove saved passwords from Google Chrome:
- Open the browsers and go to Menu > Settings
- Type Passwords into the search box

How to remove autofill data in google chrome delete passwords - Under Autofill, click Passwords entry
- Here, you will find the list of all accounts that have your login data saved
- Find that account you would like Chrome to forget your password for
- Click More actions and select Remove.

How to remove autofill data in google chrome delete passwords2
3. Remove all entries
If you want to get rid of all the data that shows your browsing habits, you can easily do so by deleting all autofill data in Chrome settings. Proceed with the following steps:
- Go to Menu > Settings
- Select Security and Privacy from the left menu
- Pick Clear browsing data

How to remove autofill data in google chrome clear all data - Go to the Advanced tab, select Autofill form data, and pick Clear data.

How to remove autofill data in google chrome clear all data2
Note: make sure that under All time option under Time range is picked.
Bonus: Disable Google Chrome autofill function
If you want, you can stop Chrome from remembering your passwords, locations, payment methods, and other personal data. Here's how:
- Go back to Settings and select the Autofill option on the left
- Expand the section you would like to disable Autofill for, for example, Passwords

How to remove autofill data in google chrome disable passwords autofill - Here, turn off the Offer to save passwords and Auto Sign-in options.
If you would like Chrome not to show you any autofill suggestions, you can do so by following these steps:
- Go to Settings and select Sync and Google Services

How to remove autofill data in google chrome stop syncing autocomplete url - Locate the Other Google services section
- Here, disable the Autocomplete searches and URLs option.

How to remove autofill data in google chrome stop syncing autocomplete url2
Bottom line
To remove autofill data in Google Chrome, you can delete individual entries or clear all autofill data. Additionally, you can disable the autofill feature altogether for enhanced privacy. If these methods do not resolve the issue, consider using a maintenance utility to manage your data.
Frequently asked questions
Open Chrome, click on the three dots in the top right corner, select 'Settings', then under 'Privacy and security', click 'Clear browsing data' and choose 'Autofill form data' to remove it.
Yes, you can click on the autofill suggestion while typing in a form, then use the 'Shift + Delete' keys to remove that specific entry.
Go to Chrome's 'Settings', select 'Privacy and security', then click on 'Site settings' and disable 'Autofill' options to stop saving new entries.


Report an issue
What's wrong with this guide? We review every report and update or remove content.
Report received — thank you. We'll review and fix it.
You need a free account to submit a report.
Be the first to comment