
How to Fix the Missing “Safely Remove Hardware” Icon on Windows10?
Prefer to fix it yourself? The manual steps follow.
4 methods in this guide
Hello. I have recently upgraded Windows 10 to Fall Creators Update (build 16299) and noticed a strange thing happening with my USB port. When I plug it into my laptop, it’s successfully recognized in File Explorer, so I can write and delete files to and from it.
However, when I finish the work with USB and want to unplug it, it doesn’t appear in the “Safely Remove Hardware Icon” in the system tray. When I insert or remove the drive, I don’t get the “USB connect/disconnect” chime either. Well, I suppose that’s not a big problem, but I don’t want my USB to get broken by simply unplugging it each time. Please help.
“Safely Remove Hardware” is an icon, which can be found in the System Tray when a USB stick or hard drive is connected to the PC/laptop. Specialists highly recommend clicking on this icon and waiting for the pop-up confirming that it's safe to unplug the device.
While most of the Windows users already got accustomed to this procedure, most of them still don’t know why this is important. Actually, if the USB or external hard drive is disconnected while data is being written to it - all files that are currently moving may get corrupted.
Besides, many people reported that the USB drive totally crashed after unplugging it without clicking on the “Safely Remove Hardware” icon for several times. In this case, the only solution is to format the USB or external hard drive, which will result in the loss of all data stored on it.
PRO TIP: If you have been unplugging the USB in an unsafe way and it eventually crashed causing a complete data loss, you should format the external drive and then use a data recovery software to restore lost data, at least most of it.
Even if the USB stick does not seem to be in-use, it may, actually, be in use by system’s background programs. Therefore, specialists recommend ejecting the device in a safe manner to make sure that none of the programs are having contact with it.
We are telling about the possible consequences of the unsafe USB unplugging due to the fact that Windows 10 feature updates - Anniversary Update, Creators Update, and the latest Fall Creators Update, sometimes cause the “Safely Remove Hardware Icon” disappear.
Few people submitted questions in the official Microsoft’s discussion forum about missing “Safely Remove Hardware” icon in the System Tray, but the support did not provide a working solution yet. For some people the icon appears in its place, but it’s grayed out and does not respond.
In contrast, the others see the “Safely Remove Hardware” icon even if the USB is not connected or the pop-up saying that the device has successfully been ejected gets stuck on the desktop. Therefore, we’ll provide you a couple of fixes that may help to solve this problem out.
Restoring the Missing “Safely Remove Hardware” Icon after Windows 10 Update
If the “Safely Remove Hardware” error is harassing you for some time, try the fixes provided below and we are pretty sure that one of them will work:
Fix 1. Update/Reinstall Device Driver
- Right-click on Windows key and select Device Manager.
- Open View tab at the top of the window and check the Show hidden devices.
- Then expand the Universal Serial Bus controller section and update USB controllers.
- For this purpose, click on the USB controller’s entry and select Update driver.
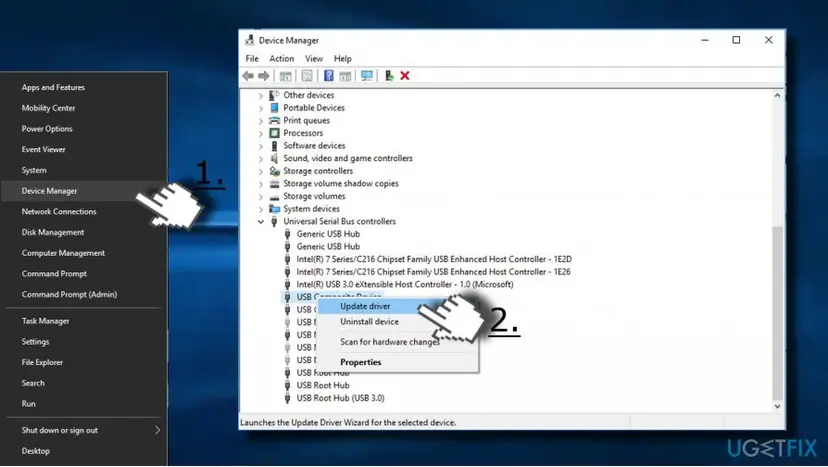
- After that, reboot your PC and check if the problem was resolved.
If updating drivers did not help, try reinstalling them:
- Navigate to Device Manager -> Universal Serial Bus controller as explained above.
- Click on the USB controllers and select Uninstall.
- Click Uninstall on the confirmation dialog. Remove all USB controllers.
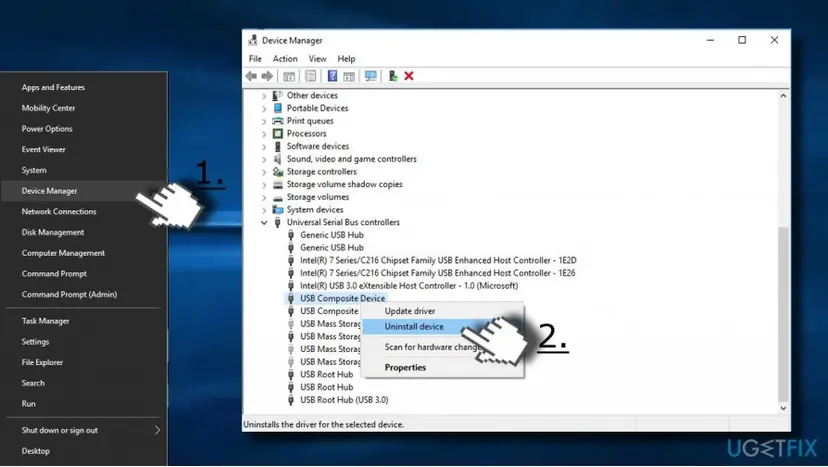
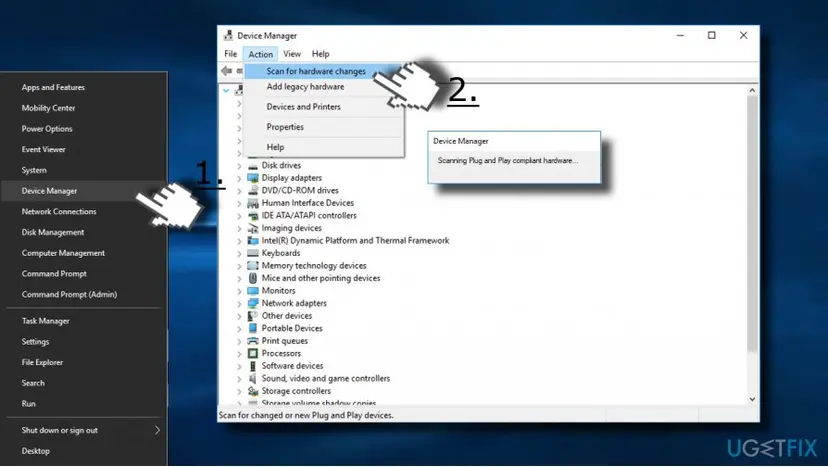
- Then open Actions tab and select Scan for hardware changes.
- The system should automatically reinstall the missing drivers. Then connect your USB and check if the Safely Remove Hardware icon appears in the System Tray.
Fix 2. Restart Windows Explorer Process
Resetting Windows Explorer process can help to fix various issues related to Windows Start, taskbar, and System Tray. Thus, to fix the missing “Safely Remove Hardware” icon, try to do the following:
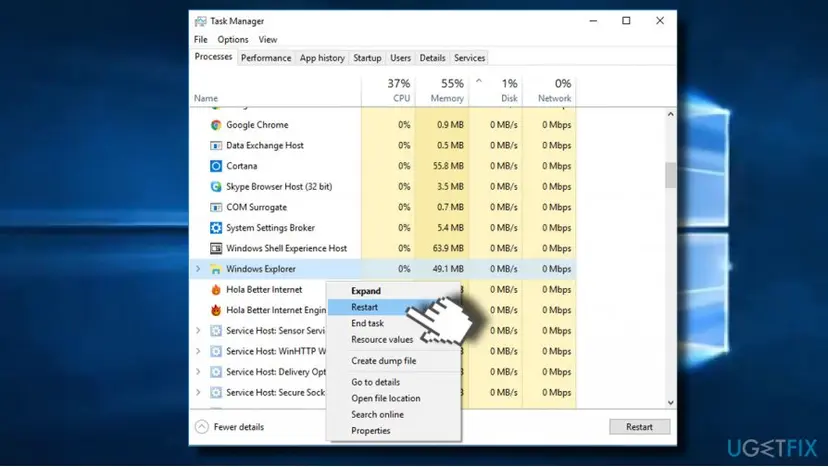
- Press Ctrl + Alt + Del and select Task Manager.
- Alternatively, Windows 10 users can click Ctrl + Shift + Del to access Task Manager directly.
- Find Windows Explorer process, right-click on it, and select Restart.
Fix 3. Change Notifications Settings
If the “Safely Remove Hardware” icon got missing after installation of Windows 10 feature update, it might be that the upgrade forcefully changed some of the Notifications settings and hide the icon in the Taskbar. To re-enable it, please follow these steps:
- Connect your USB or an external hard drive.
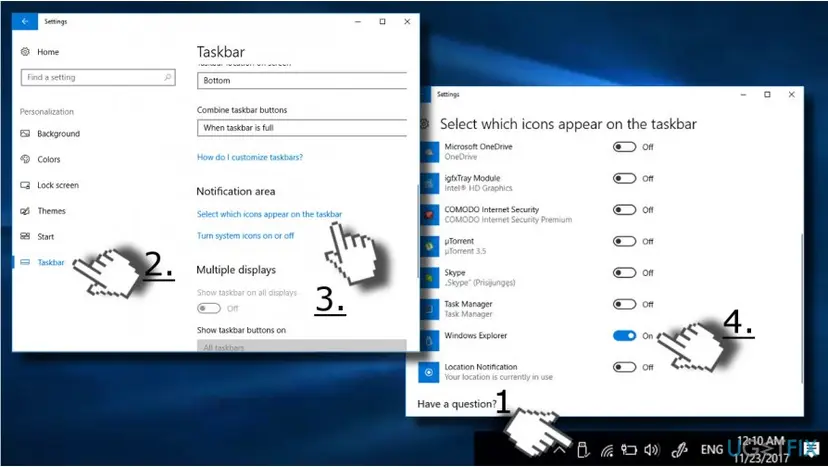
- Expand the System Bar section by clicking on the arrow at the bottom-right corner of the screen.
- Find the “Safely Remove Hardware” icon and drag it to the Taskbar.
- Then press Windows key + I and open Personalization section.
- Click Taskbar on the left side.
- Find the Notifications area and click on the Select which icons appear on the taskbar option.
- Find the Safely Remove Hardware and enable it.
Fix 4. Eject the Device via Safely Remove Hardware dialog
If your USB stick or external hard drive is successfully recognized by the system and works just fine, except that the “Safely Remove Hardware” icon is missing, you can disable the device via Safely Remove Hardware dialog:
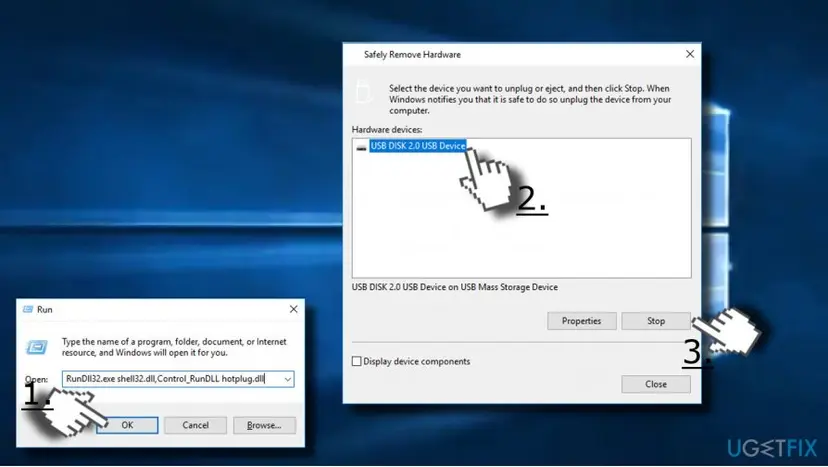
- Press Windows key + R and paste the RunDll32.exe shell32.dll,Control_RunDLL hotplug.dll command in the Run.
- Press OK button or hit Enter to execute the command.
- In the Safely Remove Hardware dialog, select the device that you want to eject and click Stop.
If the icon was not recovered after installing Windows Updates or rebooting the system, you can create a shortcut with the “Safely Remove Hardware” dialog, so that you could access any time needed:
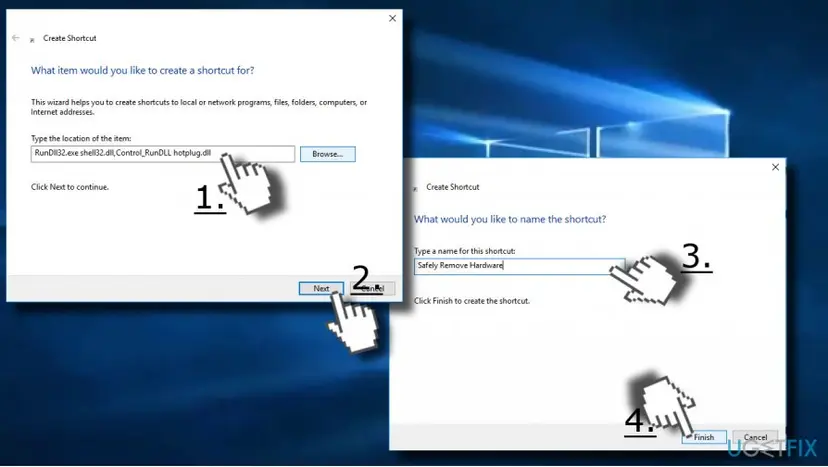
- Right-click on an empty space on the Desktop and select New -> Shortcut.
- In the shortcut box, enter the RunDll32.exe shell32.dll,Control_RunDLL hotplug.dll location.
- Now click Next and name the shortcut as Safely Remove Hardware.
- Finally, click Finish and check if the shortcut works.
TIP: If none of the methods listed above helped to fix frozen “Safely Remove Hardware” icon, we would strongly recommend you to check for the latest Windows Updates and install all of them without a delay. Besides, check the system for corrupted files, cache, malware, and similar programs.
Did this fix work?
One click, no account. It tells the next reader which guides are worth their time.
Questions and experiences: Fix the Missing “Safely Remove Hardware” Icon on Windows10
Still broken, or found a fix we did not cover? Ask here: members and our editors answer. Reading is open; writing needs a free account.
…