
Core isolation "Page not available" in Windows 11 and 10: how to bring Memory integrity back

Prefer to fix it yourself? The manual steps follow.
- 7methods
- 5 to 20 minutes
- Medium
Applies to Windows 11 and Windows 10 PCs where the Core isolation page in Windows Security says Page not available
7 methods in this guide
There's a notification from Windows Security indicating recommended actions. When accessing Windows Security, it alerts that Memory Integrity is turned off. However, attempting to navigate to the relevant settings results in a "Page not available" message. Any tips on this would be appreciated.
Windows Security shows "Page not available" for Core isolation when it finds no feature it can offer on this PC. In most cases hardware virtualization is switched off in the UEFI or BIOS. Check it in Task Manager, turn it on in the firmware and the page with the Memory integrity switch comes back.
The message means Windows sees nothing to show on the Core isolation page, almost always because CPU virtualization (Intel VT-x or AMD SVM) is off in the firmware. Check the Virtualization line in Task Manager (Fix 1), then enable it in UEFI settings (Fix 2). If it is already on, check UEFI mode and Secure Boot (Fix 3), remove old antivirus leftovers and repair Windows Security (Fix 4 and 5).
| Error | Page not available: "The page you are trying to access has no supported features and is not available." |
|---|---|
| Where it appears | Windows Security > Device security > Core isolation details, often after the warning "Memory integrity is off. Your device may be vulnerable." |
| Main cause | Hardware virtualization (Intel VT-x, AMD SVM) is off in the UEFI or BIOS, so Windows cannot run Memory integrity at all |
| Fastest fix | Check Virtualization in Task Manager (Fix 1), then enable it in UEFI Firmware Settings (Fix 2) |
| Also written as | core isolation not available, core isolation page not found, memory integrity page not available, core isolation not showing |
| Affects | Windows 11 (25H2, 26H2) and Windows 10 22H2; the page and the message are the same on both |
| Vendor status | Not a bug Microsoft lists. Microsoft states that Memory integrity needs hardware virtualization enabled in UEFI or BIOS |
| Time to fix | 5 to 20 minutes, including one or two restarts |
Facts checked on 15 October 2026. Steps written for Windows 11 (25H2 and 26H2) and Windows 10 22H2.
What "Page not available" on the Core isolation page means
Core isolation is the part of Windows Security that runs core Windows processes in a separate, virtualized space. Its best known switch is Memory integrity, also called Hypervisor-protected Code Integrity (HVCI). It checks kernel drivers inside that isolated space before they may run.
Microsoft notes that the features on the Core isolation page depend on the Windows version and the hardware. When Windows finds none it can offer, it does not draw an empty page. It shows a small dialog with one OK button instead:
- Window
- Windows Security, Device security
- Title
- Page not available
- Text
- The page you are trying to access has no supported features and is not available.
- Often next to it
- Memory integrity is off. Your device may be vulnerable.
- Windows 10 22H2
- The same message, on the same Device security page
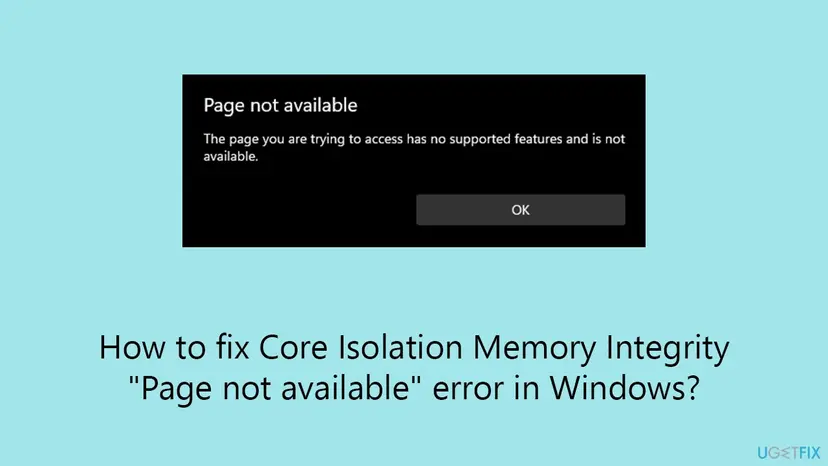
The message is Windows saying it cannot offer Core isolation with the current hardware settings. Microsoft states that Memory integrity needs hardware virtualization turned on in the UEFI or BIOS. Fix that requirement first, and the page usually comes back without any repair.
Why Core isolation is not available, from the most to the least common cause
Most often CPU virtualization is off in the firmware. Many desktop boards ship with it off, and a BIOS update or a reset to defaults can switch it off again. Less often Windows runs in legacy BIOS mode or the Windows Security app is damaged. Rarely the PC or virtual machine cannot run it at all.
| Cause | How common | What you see | Fix |
|---|---|---|---|
| Virtualization (VT-x, SVM) off in UEFI or BIOS | Most cases | Task Manager shows Virtualization: Disabled | Fix 1, Fix 2 |
| Windows started in legacy BIOS mode, or Secure Boot off | Common on older or upgraded PCs | System Information shows BIOS Mode: Legacy or Secure Boot State: Off | Fix 3 |
| Leftovers of a removed third-party antivirus | Less common | Started after Norton, McAfee or similar was removed | Fix 4 |
| Windows Security app damaged | Less common | Other Windows Security pages also fail or look blank | Fix 5 |
| Settings stuck in the registry or set by policy | Rare | Everything above is fine, the page still does not open | Fix 6 |
| Damaged system files or a missing update | Rare | Other Windows features also misbehave | Fix 7 |
| Hardware or virtual machine without support | Rare | No virtualization option in the firmware at all | Still not working |
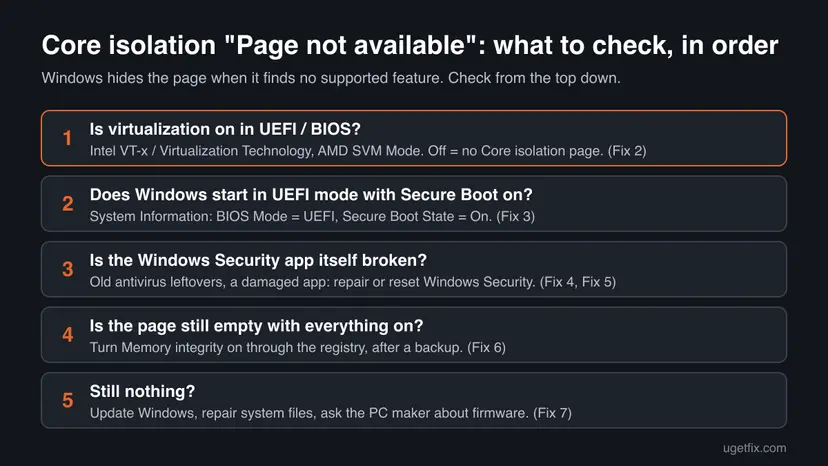
How to fix Core isolation "Page not available" on Windows 11 and Windows 10
Start with Fix 1: it takes two minutes and tells you whether the cause is in the firmware or in Windows. You need an administrator account. After each fix, open Windows Security > Device security and select Core isolation details again.
| What you see or have | Start with |
|---|---|
| You do not know yet why the page is missing | Fix 1 |
| Task Manager shows Virtualization: Disabled | Fix 2 |
| System Information shows BIOS Mode: Legacy or Secure Boot State: Off | Fix 3 |
| The message started after you removed Norton, McAfee or another antivirus | Fix 4 |
| Other Windows Security pages also fail or open blank | Fix 5 |
| Virtualization, UEFI and Secure Boot are all on, the page still fails | Fix 6 |
Fix 1. Check whether Windows sees hardware virtualization
2 minutesNo riskEveryone, before changing anything in the firmware or the registry.
Memory integrity runs inside a space that the Windows hypervisor creates with the CPU's virtualization features. If Windows cannot use them, the Core isolation page has nothing to show, so this one line tells you where the cause is.
- Press Ctrl + Shift + Esc to open Task Manager and select Performance, then CPU.
- Look at the line Virtualization under the graph. Disabled means the firmware setting is off: go to Fix 2.
- For more detail, press Win + R, type
msinfo32and press Enter. - In System Summary, scroll to the bottom and read the lines about Virtualization-based security.
- Also note BIOS Mode and Secure Boot State on the same page. You need them for Fix 3.
The same check in Windows PowerShell (Admin), as Microsoft documents it:
Get-CimInstance -ClassName Win32_DeviceGuard -Namespace root\Microsoft\Windows\DeviceGuardIn the output, AvailableSecurityProperties should contain 1 (hypervisor support) and 2 (Secure Boot). VirtualizationBasedSecurityStatus 0 means VBS is not enabled, 1 enabled but not running, 2 enabled and running.
It worked if: You know whether virtualization is enabled and whether Windows runs in UEFI mode with Secure Boot on.
If not: If Virtualization is Disabled, go to Fix 2. If it says Enabled, go to Fix 3.
Fix 2. Turn on CPU virtualization (Intel VT-x or AMD SVM) in UEFI settings
10 minutesLow riskReaders whose Task Manager shows Virtualization: Disabled. This is the fix that works for most people.
Microsoft states that Memory integrity needs hardware virtualization enabled in the UEFI or BIOS. Once it is on, Windows finds a supported feature again and draws the Core isolation page with its switch.
- Save your work. Windows 11: open Settings > System > Recovery. Windows 10: open Settings > Update & Security > Recovery.
- Next to Advanced startup, select Restart now.
- Choose Troubleshoot > Advanced options > UEFI Firmware Settings and select Restart.
- Find the CPU setting. It is often under Advanced, CPU Configuration or Configuration.
- Set Intel Virtualization Technology (VT-x) or SVM Mode (AMD) to Enabled.
- Save and exit, usually with F10, and let Windows start.
- Open Windows Security > Device security > Core isolation details and set Memory integrity to On, then restart.
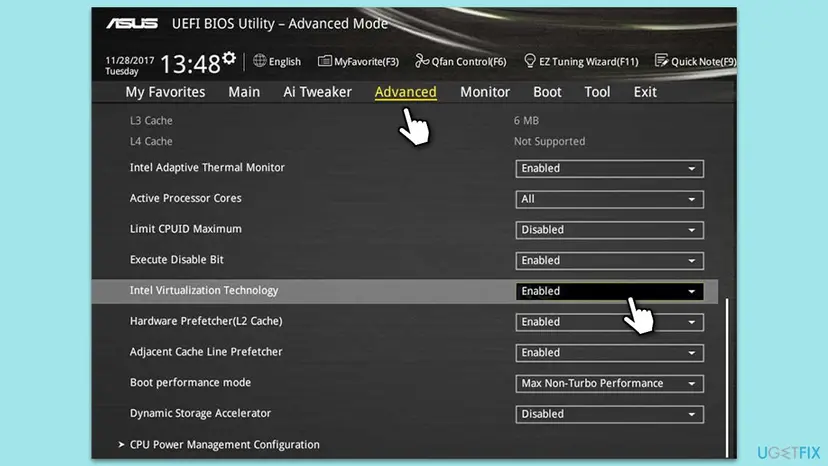
Names differ by maker: Virtualization Technology, VT-x, Intel VT, SVM Mode or AMD-V. Search the PC or motherboard maker's manual for your model. Do not change other settings you are unsure about. If you change something by mistake, choose the firmware's option to discard changes.
It worked if: Task Manager now shows Virtualization: Enabled, and Core isolation details opens with the Memory integrity switch.
If not: If the page still says Page not available, check UEFI mode and Secure Boot in Fix 3.
Fix 3. Check that Windows starts in UEFI mode with Secure Boot on
10 minutesLow riskReaders with virtualization enabled but BIOS Mode Legacy or Secure Boot State Off in System Information.
Microsoft's standard hardware security for Core isolation includes Secure Boot, and its recommended VBS setting requires it. A PC that starts in legacy mode cannot use Secure Boot, so Windows may treat the page as unsupported.
- Press Win + R, type
msinfo32and press Enter. - Read BIOS Mode and Secure Boot State in System Summary.
- If BIOS Mode is UEFI but Secure Boot State is Off, open UEFI Firmware Settings as in Fix 2.
- Open the Boot or Security tab and set Secure Boot to Enabled. Save and exit.
- Restart and open Core isolation details again.
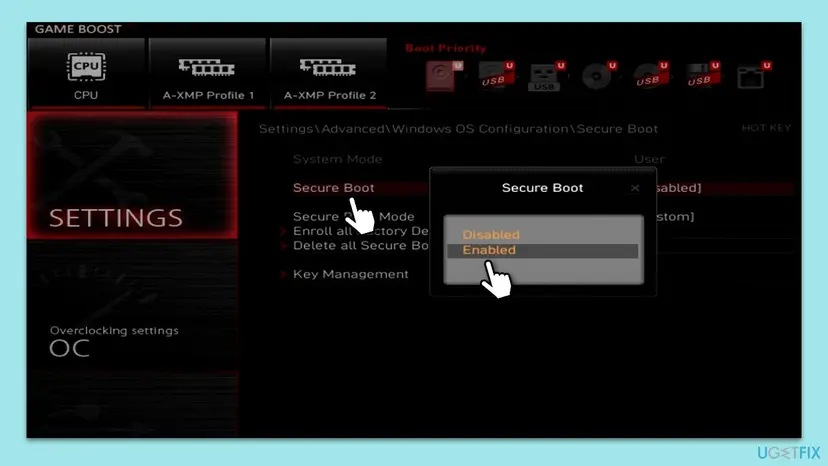
If Windows was installed in legacy mode, switching the firmware to UEFI alone can leave the PC unable to start, because the disk layout must be converted first. Back up your files before any such change: Back up your files (Windows Backup, File History, Time Machine). Ask the PC maker or a technician if you are unsure.
It worked if: System Information shows BIOS Mode: UEFI and Secure Boot State: On, and Core isolation details opens.
If not: If both are fine and the message stays, look for antivirus leftovers in Fix 4.
Fix 4. Remove the leftovers of a third-party antivirus
10 minutesLow riskReaders whose message started after a preinstalled or bought antivirus was removed or expired.
Users on Microsoft Q&A report the message after removing a preinstalled Norton suite. A half-removed antivirus can leave services and drivers that keep parts of Windows Security handed over to it.
- Windows 11: open Settings > Apps > Installed apps. Windows 10: open Settings > Apps > Apps & features.
- Look for any antivirus or security suite you no longer use, including trial versions that came with the PC.
- Select ... next to it, choose Uninstall and follow the prompts.
- If the vendor offers its own removal tool, run it from the vendor's website to clear what is left.
- Restart the PC and open Windows Security > Device security again.
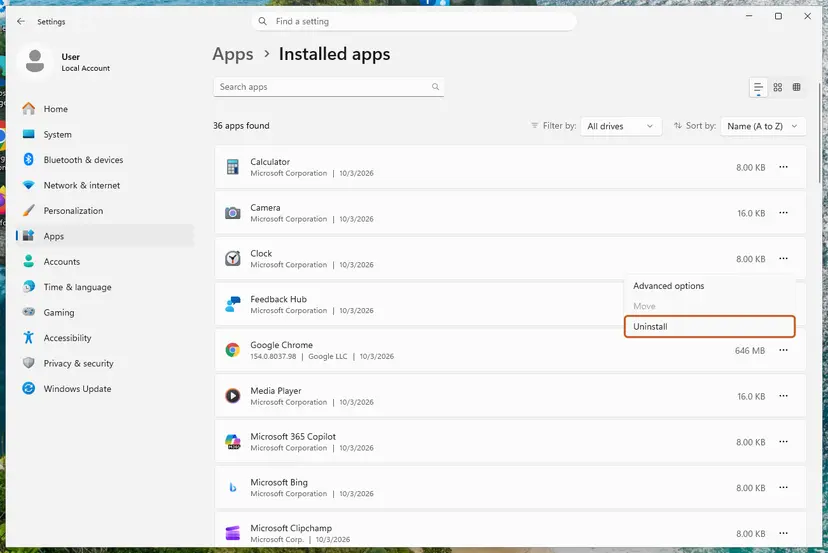
General steps for both Windows versions: Uninstall a program or app in Windows.
It worked if: Windows Security shows Microsoft Defender as the active protection and Core isolation details opens.
If not: If no other antivirus is left and the page still fails, repair the Windows Security app in Fix 5.
Fix 5. Repair or reset the Windows Security app
5 minutesLow riskReaders whose other Windows Security pages also fail, open blank or close at once.
Windows Security is a Store-type app. If its own files or settings are damaged, it can fail to load pages even when the hardware supports every feature. Repair and reset rebuild the app without touching your protection settings in the firmware.
- Open Start, type
Windows Security, right-click the result and choose App settings. - Select Repair if it is there, then open Windows Security and try Core isolation details.
- If it still fails, select Reset on the same page.
- Restart the PC and try again.
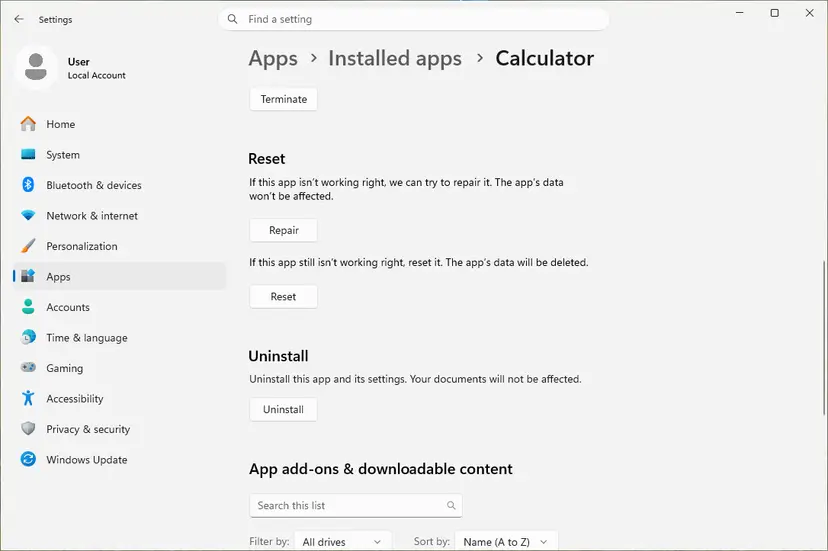
Step by step, with what Reset removes: How to repair or reset an app in Windows.
It worked if: Windows Security opens all its pages again and Core isolation details shows the Memory integrity switch.
If not: If the app works but this one page still fails, set Memory integrity through the registry in Fix 6.
Fix 6. Turn Memory integrity on through the registry
10 minutesRead the warningAdvanced readers with virtualization, UEFI mode and Secure Boot on, whose page still says Page not available.
Microsoft documents registry values that switch on VBS and Memory integrity without the Windows Security page. When the page is the only thing broken, these values turn the protection on, and the page often returns after the restart.
Microsoft warns that some drivers are incompatible with Memory integrity, and in rare cases the PC fails to boot with a blue screen. Create a restore point and a registry backup first: Back up the registry before editing it. Keep the recovery command below at hand.
- Right-click Start, choose Terminal (Admin) on Windows 11 or Windows PowerShell (Admin) on Windows 10, and select Yes.
- Run the five commands below one by one. They are Microsoft's recommended settings, without the UEFI lock.
- Restart the PC.
- Run the
Get-CimInstancecheck from Fix 1. SecurityServicesRunning should now contain 2 (Memory integrity running). - Open Core isolation details and check the switch.
Microsoft's recommended values (Memory integrity on, no UEFI lock):
reg add "HKLM\SYSTEM\CurrentControlSet\Control\DeviceGuard" /v "EnableVirtualizationBasedSecurity" /t REG_DWORD /d 1 /f
reg add "HKLM\SYSTEM\CurrentControlSet\Control\DeviceGuard" /v "RequirePlatformSecurityFeatures" /t REG_DWORD /d 1 /f
reg add "HKLM\SYSTEM\CurrentControlSet\Control\DeviceGuard" /v "Locked" /t REG_DWORD /d 0 /f
reg add "HKLM\SYSTEM\CurrentControlSet\Control\DeviceGuard\Scenarios\HypervisorEnforcedCodeIntegrity" /v "Enabled" /t REG_DWORD /d 1 /f
reg add "HKLM\SYSTEM\CurrentControlSet\Control\DeviceGuard\Scenarios\HypervisorEnforcedCodeIntegrity" /v "Locked" /t REG_DWORD /d 0 /f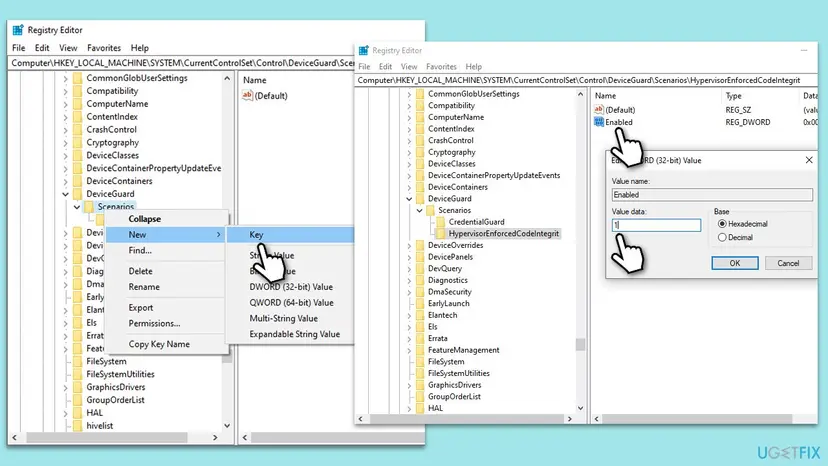
If Windows does not start afterwards, run this from the Command Prompt in Windows Recovery Environment, then restart:
reg add "HKLM\SYSTEM\CurrentControlSet\Control\DeviceGuard\Scenarios\HypervisorEnforcedCodeIntegrity" /v "Enabled" /t REG_DWORD /d 0 /fIt worked if: After the restart SecurityServicesRunning contains 2 and the Memory integrity warning in Windows Security is gone.
If not: If Windows reports incompatible drivers, remove them as in the still not working section. Otherwise go to Fix 7.
Fix 7. Install Windows updates and repair system files
20 minutesLow riskReaders for whom Fix 1 to 6 changed nothing, or whose other Windows features misbehave too.
Windows Security gets its pages through Windows updates, and damaged system files can stop it from reading the device's security state. This is a general repair, so it comes last.
- Windows 11: open Settings > Windows Update. Windows 10: open Settings > Update & Security > Windows Update.
- Select Check for updates, install everything offered, including optional quality updates, and restart.
- Run DISM and SFC as described in the library steps below, then restart.
- Open Core isolation details again.
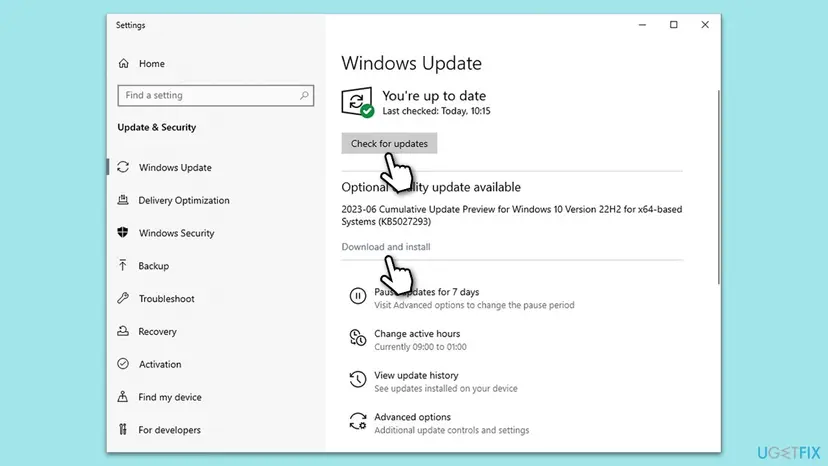
- Open an elevated command window. Right-click Start and select Terminal (Admin), or type cmd in the search box, right-click Command Prompt and select Run as administrator. Select Yes when Windows asks for permission.
- Run DISM first. Type the command below and press Enter. DISM downloads clean copies of damaged components from Windows Update, so it can take several minutes. Wait until it says The operation completed successfully.
DISM.exe /Online /Cleanup-Image /RestoreHealth - Run System File Checker. In the same window, type the command below and press Enter. Do not close the window until the verification reaches 100%.
sfc /scannow - Read the result and restart. Compare the last message with the table below this guide, then restart the PC so that repaired files are loaded.
These steps were written for Windows 11 24H2 and 25H2. The full page with the other versions and what each result means: Run DISM and SFC to repair Windows system files
It worked if: Windows is up to date, SFC reports no integrity violations left, and the Core isolation page opens.
If not: Read the still not working section below: the PC may not support the feature.
Core isolation is still not available: what to check next
The best log is the Get-CimInstance output from Fix 1, or the bottom of System Information. It says whether the hypervisor, Secure Boot and Memory integrity are available, configured and running. Save it as a screenshot before you ask the PC maker or Microsoft for help.
- No virtualization option in the firmware: some older or low-end CPUs and locked-down boards do not offer it. Ask the maker for a firmware update; without virtualization, Memory integrity cannot run.
- A virtual machine: Microsoft lists a Generation 2 Hyper-V VM as a requirement, and other hypervisors must pass virtualization through to the guest.
- The switch turns itself off or is greyed out: an organisation policy may manage it, or an incompatible driver blocks it. Select Review incompatible drivers and remove or update each driver listed.
- The switch says it is managed by your administrator on a home PC: Microsoft documents the
WasEnabledByvalue under the HypervisorEnforcedCodeIntegrity key with data 2 to let the switch behave normally.
Drivers that block the switch are covered in our HtcVComV64.sys guide: the same pnputil steps work for any name in the list.
Keep Core isolation and Memory integrity available
- Check Virtualization in Task Manager after every BIOS update or reset to defaults.
- Keep Secure Boot on and Windows in UEFI mode.
- Remove trial security suites with their own uninstaller or removal tool.
- Keep Memory integrity on once it works.
- Leave Memory integrity off to silence the warning.
- Install old drivers from download sites.
- Turn on the UEFI lock unless you manage the PC for an organisation.
Since Windows 11 22H2, Windows Security warns you when Memory integrity is off, both in the app and on its taskbar icon. That warning is useful: when it comes back, run Fix 1 again. Windows 10 left support on 14 October 2025, so a PC that stays on it no longer gets security fixes.
Frequently asked questions
Why is Core isolation not available on my PC?
Usually because hardware virtualization is off in the UEFI or BIOS. Windows needs it to create the isolated space that Memory integrity runs in, and without it the Core isolation page has no supported feature to show. Less often Windows starts in legacy BIOS mode, Secure Boot is off, an old antivirus left pieces behind or the Windows Security app is damaged. Fix 1 tells you which case you have in two minutes.
Is Core isolation not available on Windows 10?
It is available. Windows 10 22H2 has the same Core isolation page under Windows Security > Device security, and the same "Page not available" message when a requirement is missing. The fixes on this page work on Windows 10 too; only the Settings paths differ, and each step gives both. Note that Windows 10 left support on 14 October 2025, so it no longer gets security updates.
Why is Core isolation not showing in Windows 10 Device security?
When Windows finds no supported feature, it hides the Core isolation details link or replaces the page with the Page not available dialog. Check whether virtualization is enabled in Task Manager on the Performance tab, and enable VT-x or SVM in UEFI settings if it says Disabled (Fix 2). On some older PCs Windows 10 also runs in legacy BIOS mode, which Fix 3 explains.
What does "Memory integrity must be enabled to use this feature" mean?
It belongs to Kernel-mode Hardware-enforced Stack Protection, the switch below Memory integrity on the Core isolation page. Microsoft states that this feature needs Memory integrity turned on and a CPU with Intel Control-Flow Enforcement Technology or AMD Shadow Stack. Turn Memory integrity on first and restart. If the CPU lacks these features, the second switch stays unavailable, which is normal.
Is it safe to turn on virtualization in the BIOS?
Yes. VT-x and SVM are standard CPU features, and Windows uses them for Memory integrity, Hyper-V, Windows Sandbox and WSL. The setting only lets Windows use a feature the CPU already has, and you can switch it back in the same menu. Microsoft notes that Memory integrity costs more performance on older processors without Mode-Based Execution Control, which applies to Intel before Kaby Lake and AMD before Zen 2.
Does Core isolation need a TPM?
Not for Memory integrity itself. Microsoft lists hardware virtualization in the UEFI or BIOS as its requirement. TPM 2.0 is part of what Windows Security calls standard hardware security, together with Secure Boot, DEP and UEFI MAT, and Windows 11 needs it to install. A TPM switched off in the firmware shows its own message under Security processor, not on the Core isolation page.
What does "Standard hardware security not supported" mean?
It is the last line on the Device security page. Microsoft says it means the PC misses at least one requirement of standard hardware security: TPM 2.0, Secure Boot, DEP or UEFI MAT, plus support for Memory integrity and Core isolation. It often appears together with Page not available. The checks in Fix 1 to 3 show which requirement is missing.
Should I just leave Memory integrity off?
No, if your PC can run it. Microsoft describes Memory integrity as the feature that makes it hard for malicious programs to use low-level drivers to take over the PC. With it on, the vulnerable driver blocklist is on too. On a PC without virtualization support you cannot turn it on, and then only a newer PC or firmware changes that.
Why does Core isolation keep turning off by itself?
Most often an incompatible driver is installed again, or a BIOS update reset virtualization to Disabled. Open Core isolation details and select Review incompatible drivers to see which driver blocks it. Check the Virtualization line in Task Manager after every firmware update. On a work PC, an organisation policy can also switch it, and then only the IT team can change it.
Sources
- Microsoft Learn: Enable memory integrity (requirements, registry values, Win32_DeviceGuard check, recovery) (learn.microsoft.com)
- Microsoft Support: Device Security in the Windows Security app (Core isolation, hardware virtualization, standard hardware security) (support.microsoft.com)
- Microsoft Q&A: Windows 11 Core isolation page not available (user reports) (learn.microsoft.com)
Did this fix work?
One click, no account. It tells the next reader which guides are worth their time.
Questions and experiences: Core isolation "Page not available" in Windows 11 and 10: how to bring Memory integrity back
Still broken, or found a fix we did not cover? Ask here: members and our editors answer. Reading is open; writing needs a free account.
…