
HyperX Cloud Stinger mic not working on Windows: how to fix it

Prefer to fix it yourself? The manual steps follow.
- 8methods
- 5 to 20 minutes
- Easy
Applies to The original wired HyperX Cloud Stinger (3.5mm, 4 pole plug) on a Windows 11 or Windows 10 PC. Cloud Stinger 2, Core and Wireless models are different headsets.
8 methods in this guide
Hello. I just bought the HyperX Cloud Stinger gaming headset but when I try to use the built-in microphone, it is not detected. What should I do?
When the HyperX Cloud Stinger microphone is not detected, the cause is usually the boom position, the wrong jack or the wrong default input in Windows. Start with the boom and the plug, then check Windows settings and the audio driver.
The most common reasons are a muted boom, a plug in the wrong socket, or another input chosen in Windows or in the app. Start with Fix 1: turn the microphone boom on the left earcup down to the horizontal position until it clicks. Then check the plug and extension cable (Fix 2) and set the headset as the default recording device (Fix 4).
| Error | No error code. The microphone is missing from the Recording tab, or it is listed but the level bar stays flat when you speak. |
|---|---|
| Where it appears | The Recording tab of the Sound window (mmsys.cpl), Discord, Teams, Zoom, in-game voice chat and Settings > System > Sound. |
| Main cause | The boom is muted, the plug is in the wrong socket, or Windows or the app records from another microphone. |
| Fastest fix | Turn the boom down to the horizontal position until it clicks (Fix 1), then check the plugs (Fix 2). |
| Mute control | HyperX says the mute is the boom: vertical (up) is muted, horizontal (down) is active. It sits on the left earcup. |
| Connection | A 3.5mm plug with 4 poles, plus a 1.7 m PC extension cable that ends in a stereo plug and a mic plug (HyperX specifications). |
| Also searched as | HyperX Stinger mic not working, Cloud Stinger microphone not working, Stinger 2 and Stinger Core mic not working. |
| Time to fix | 1 minute for Fix 1 and Fix 2, up to 20 minutes if you need the driver steps. |
Facts checked on 16 October 2026. Steps written for Windows 11 25H2 and 26H2 and Windows 10 22H2, with the wired HyperX Cloud Stinger and its PC extension cable.
What "HyperX Cloud Stinger mic not working" looks like on a PC
There is no error code for this problem. The headphones usually play sound, but the microphone does not show up, or nobody hears you in a game or call. Readers describe one of these four signs.
- The microphone is missing from the Recording tab. Only the webcam or laptop microphone is listed, or the list is empty.
- The microphone is listed but the green bar does not move. Windows sees an input, yet it gets no signal when you speak.
- Only some apps fail. The Sound window shows a moving bar, but Discord, Teams or a game keeps using another microphone.
- The sound is fine and the microphone is silent after you changed sockets or computers. This points to the plug, not to the headset.
This guide covers the original wired HyperX Cloud Stinger. HyperX lists it with a 3.5mm plug with 4 poles and a PC extension cable with a separate stereo plug and mic plug. The Cloud Stinger 2, Stinger 2 Core, Stinger Core and the wireless Stinger headsets are different products, so a fix that works on one may not apply to another.
| Part | What HyperX lists |
|---|---|
| Headset cable | 1.3 m, with one 3.5mm plug with 4 poles. |
| PC extension cable | 1.7 m, ending in a 3.5mm stereo plug and a 3.5mm mic plug. |
| Microphone | Electret condenser, uni-directional and noise-cancelling. |
| Mute | Turn the boom up (vertical) to mute, down (horizontal) to switch on. |
What stops the Cloud Stinger microphone from being detected, from most to least common
The microphone itself rarely fails on a headset that was bought recently. The fault is usually in one of the links between the boom and your app. Here they are, in the order we suggest you check them.
| Cause | How common | Fix |
|---|---|---|
| The boom is turned up, which is the mute position. | Very often on a new headset. | Fix 1. |
| The plug is not fully in, or the 4 pole plug is in a socket that has no microphone input. | Often. | Fix 2. |
| The cable, plug or boom is damaged. | Sometimes, on an older headset. | Fix 3. |
| Windows or the app records from another microphone, or the headset is not the default. | Often. | Fix 4. |
| A privacy switch blocks microphone access for apps. | Sometimes, after an update or a new PC setup. | Fix 5. |
| The audio driver is old or damaged. | Sometimes. | Fix 6. |
| The Windows audio services are stuck. | Rarely. | Fix 7. |
| The system is out of date or an update left audio half set up. | Rarely. | Fix 8. |
Plug the headset into a phone or a game controller that has a 3.5mm headset jack and speak. If the other side hears you, the microphone works and the fault is on the PC side. If not, go straight to Fix 3.
How to fix the HyperX Cloud Stinger microphone on Windows 11 and 10
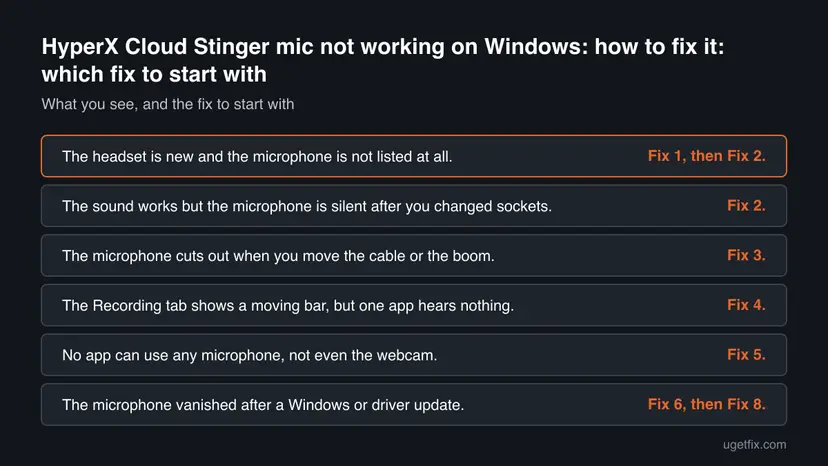
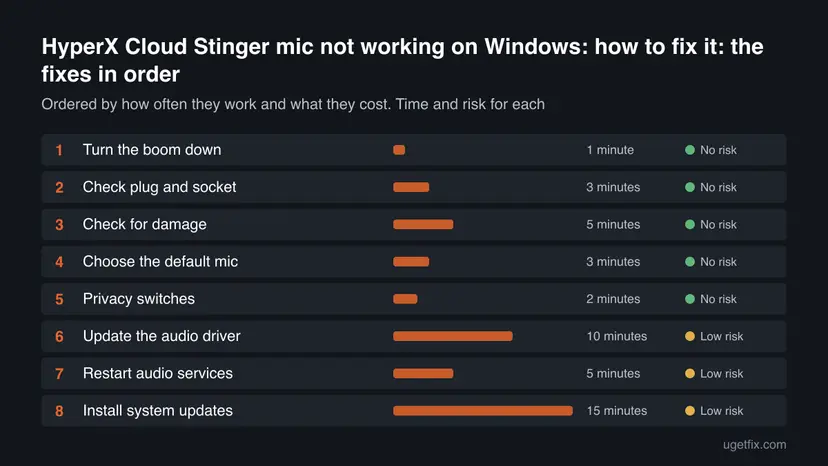
Go through the fixes in order and test after each one. Fix 1 and Fix 2 take a minute and solve most cases. Steps are given for Windows 11 and for Windows 10 22H2, which left support on 14 October 2025.
| What you see | Start with |
|---|---|
| The headset is new and the microphone is not listed at all. | Fix 1, then Fix 2. |
| The sound works but the microphone is silent after you changed sockets. | Fix 2. |
| The microphone cuts out when you move the cable or the boom. | Fix 3. |
| The Recording tab shows a moving bar, but one app hears nothing. | Fix 4. |
| No app can use any microphone, not even the webcam. | Fix 5. |
| The microphone vanished after a Windows or driver update. | Fix 6, then Fix 8. |
Fix 1. Turn the microphone boom down until it clicks
1 minuteNo riskThe headset is new, or the microphone worked before and stopped for no clear reason.
HyperX states that the Cloud Stinger microphone is muted by the boom itself. When the boom is vertical (up) the microphone is switched off, and Windows may show a silent input or none at all.
- Find the microphone boom on the left earcup of the headset.
- If the boom points up, turn it down to the horizontal position. You should hear a click.
- Turn the boom up and down once to confirm that it clicks at both ends.
- Open Settings > System > Sound and look at the Input section while you speak.
- Watch the input level bar. It should move when you speak.
The old advice on this page said the volume knob on the right ear mutes the microphone. HyperX describes the boom as the mute control, and we found no HyperX text that gives the volume control a microphone function.
It worked if: The input level bar moves when you speak and the headset appears as an input device.
If not: If the boom clicks and the bar stays flat, check the plug and the extension cable with Fix 2.
Fix 2. Use the right plug and socket, and push the plug in fully
3 minutesNo riskThe microphone is missing right after you connected the headset, or it stopped after you changed sockets or computers.
The headset cable has one 3.5mm plug with 4 poles that carries sound and microphone together. A PC with separate headphone and microphone sockets needs the PC extension cable, because only that cable splits the signals into a stereo plug and a mic plug.
- If your PC has two separate sockets, one for headphones and one for a microphone, connect the headset to the PC extension cable first.
- Plug the stereo end of the extension cable into the headphone or speaker socket and the mic end into the microphone socket. Push both until they stop.
- If your laptop, phone or controller has a single headset socket, plug the headset in directly and leave the extension cable out of the chain.
- Check that the plug between the headset cable and the extension cable is also pushed in all the way.
- Move to another socket on the PC, for example the one on the other side of the case or on the laptop, and test again.
Look for the small symbols next to the sockets. A headphone symbol marks the sound output and a microphone symbol marks the input. Some desktop cases label only the rear sockets, so the front panel may need a quick test.
It worked if: Windows lists a microphone input and the level bar moves when you speak.
If not: If the sockets are right and nothing changes, test the cable and the headset with Fix 3.
Fix 3. Check for damage and test the headset on a second device
5 minutesNo riskThe microphone cuts out when you move the cable, or Fixes 1 and 2 changed nothing.
Physical damage can cause several audio problems at once, and a bent plug or a damaged cable wire can drop the microphone while the sound keeps playing. A second device shows whether the fault is in the headset or in the PC.
- Look along the whole cable, including the extension cable, for kinks, cuts or bare wire.
- Check each plug for bent or loose parts, and the boom for cracks near the earcup.
- Plug the headset into a phone or controller with a headset socket and speak to a friend or record a voice note.
- Wiggle the cable gently near each plug while you speak and listen for crackle or dropouts.
- Try the extension cable and the headset separately if you have another cable to compare.
If the microphone fails on a second device too, the headset or its cable is at fault. Contact HyperX support through the page linked in the sources, because we found no repair steps for the Cloud Stinger in the HyperX articles we read.
It worked if: You know whether the fault is in the headset or in the PC.
If not: If the headset works on the second device, the cause is in Windows settings. Continue with Fix 4.
Fix 4. Set the Cloud Stinger as the default recording device
3 minutesNo riskThe headset is in the Recording tab but an app still uses another microphone, or the bar there stays flat.
A PC often has several microphones, such as a webcam and a built-in one. Windows and each app pick one on their own, so naming the Cloud Stinger as the default input removes the guesswork.
- Connect the headset and turn the boom down.
- Press Win + R, type
mmsys.cpland press Enter to open the Sound window. - Open the Recording tab and speak. A microphone whose bar moves is the one that hears you.
- Right-click the headset microphone and select Set as Default Device, then select Set as Default Communication Device.
- If the microphone is disabled, right-click it and select Enable. If the Recording tab is empty, right-click an empty area and tick Show Disabled Devices.
- In Discord, Teams or your game, open the audio settings and select the headset microphone by name instead of Default.
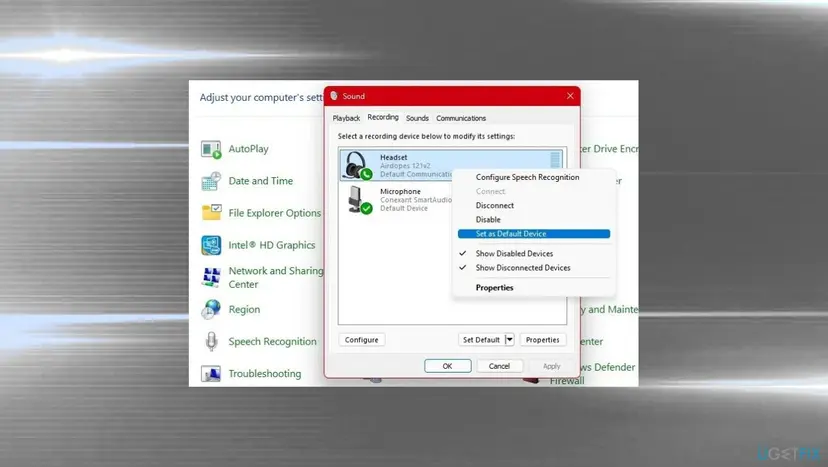
It worked if: The bar of the headset microphone moves when you speak and the app records from it.
If not: If the microphone is not listed even with disabled devices shown, go back to Fix 2. If no app can use any microphone, go to Fix 5.
Fix 5. Allow microphone access in the Windows privacy settings
2 minutesNo riskNo app can use any microphone, or one app never asks for the microphone.
Windows checks a set of privacy switches before an app may record. One switch off blocks the headset microphone as well as the built-in one, while sound playback keeps working.
- Press Win + I to open Settings.
- On Windows 11 open Privacy & security, then Microphone. On Windows 10 open Privacy, then Microphone.
- Turn on Microphone access (Windows 10: Microphone access for this device, changed with Change).
- Turn on Let apps access your microphone (Windows 10: Allow apps to access your microphone).
- Turn on the switch of your app in the list, and turn on Let desktop apps access your microphone if it is shown.
- Close the app completely and open it again.
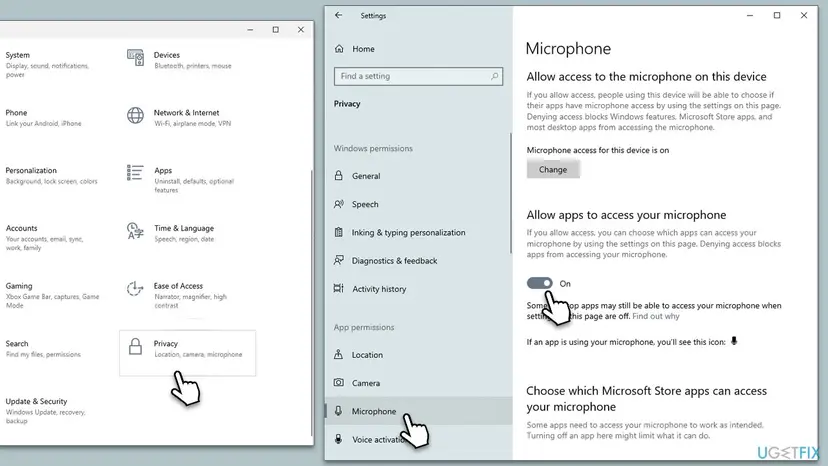
It worked if: The app lists microphones and records from the one you picked in Fix 4.
If not: If the switches were already on, the driver is the next suspect. Go to Fix 6.
Fix 6. Update or reinstall the audio driver
10 minutesLow riskThe microphone disappeared after a Windows update, or Device Manager shows a warning sign next to an audio device.
An old or damaged audio driver can hide the microphone input even when the headset is wired correctly. The headset has no driver of its own, because it plugs into the PC sound card, so the PC audio driver is the one that matters.
- Open Device Manager. Right-click Start and select Device Manager.

Device Manager lists devices by category; a yellow warning sign marks a device with a problem. Screenshot: Windows 11 26H2. - Open the device's Driver tab. Expand the category (for example Display adapters), right-click the device, select Properties and open the Driver tab. Driver Date and Driver Version show what is installed now.
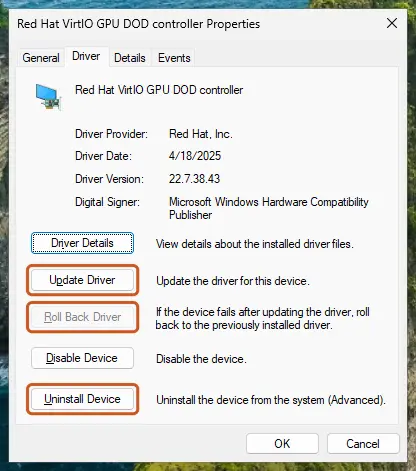
The Driver tab holds all three actions: update, roll back, uninstall. Screenshot: Windows 11 26H2. - Update the driver. Select Update Driver and let Windows search automatically. To use a driver you downloaded from the device maker, select Browse my computer for drivers instead and point to the unpacked folder.
- Or roll back the driver. If the problem started after a driver update, select Roll Back Driver, choose a reason and select Yes. The button is greyed out when Windows has no earlier driver to return to.
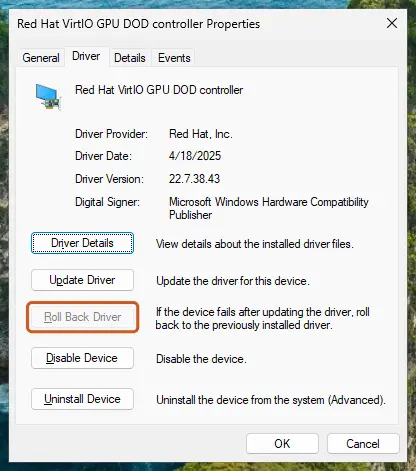
Roll Back Driver is greyed out here because there is no earlier driver. Screenshot: Windows 11 26H2. - Or reinstall the driver. Select Uninstall Device. Tick Attempt to remove the driver for this device only if you want Windows to delete the driver package too, then select Uninstall.
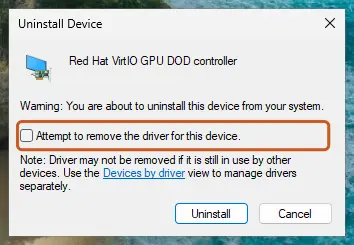
Tick the checkbox only to delete the driver package as well. Screenshot: Windows 11 26H2. - Restart. Restart the PC. Windows detects the device again and installs a driver for it.
- Check optional driver updates. Open Settings > Windows Update > Advanced options > Optional updates. If driver updates are listed, tick the ones you need and select Download & install.
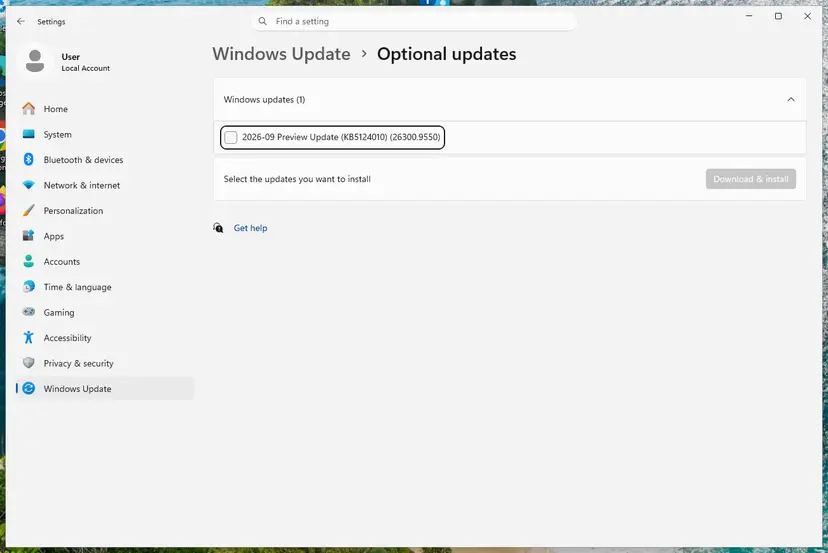
Optional updates on our test PC; driver updates appear here when Windows Update has any for your hardware. Screenshot: Windows 11 26H2.
These steps were written for Windows 11 24H2 and later. The full page with the other versions and what each result means: Update, roll back or reinstall a driver
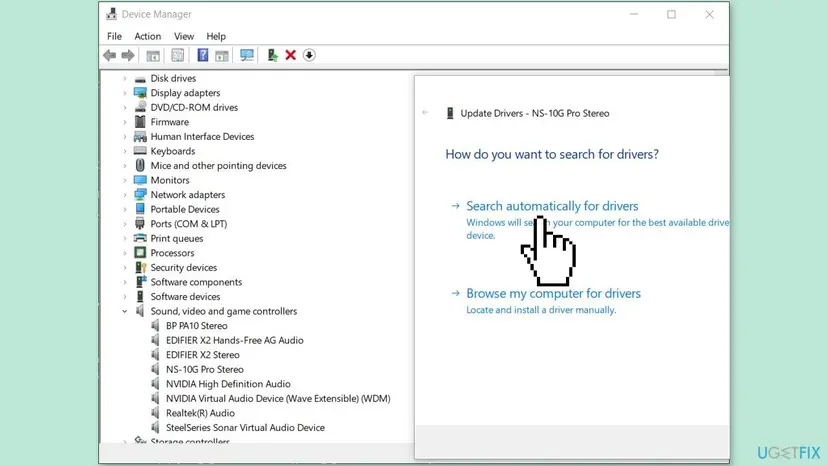
Under Sound, video and game controllers choose the device that is your PC sound card, for example the one marked High Definition Audio. Restart the PC when the update finishes.
It worked if: After the restart the microphone appears in the Recording tab and the bar moves.
If not: If the driver is current and the microphone is still missing, restart the audio services with Fix 7.
Fix 7. Restart the Windows audio services
5 minutesLow riskThe headset sound works but the microphone input is missing or frozen, and the driver steps changed nothing.
Windows Audio and Windows Audio Endpoint Builder build the list of sound devices. When one of them is stuck, a microphone can be missing from that list until the service restarts.
- Open Services. Press Windows+R, type the command below and press Enter. You can also type Services in the search box on the taskbar and open the app.
services.msc - Find the service. The list is sorted by Name. Click any row and type the first letter of the service to jump to it. Check the Status column (Running or empty) and the Startup Type column.
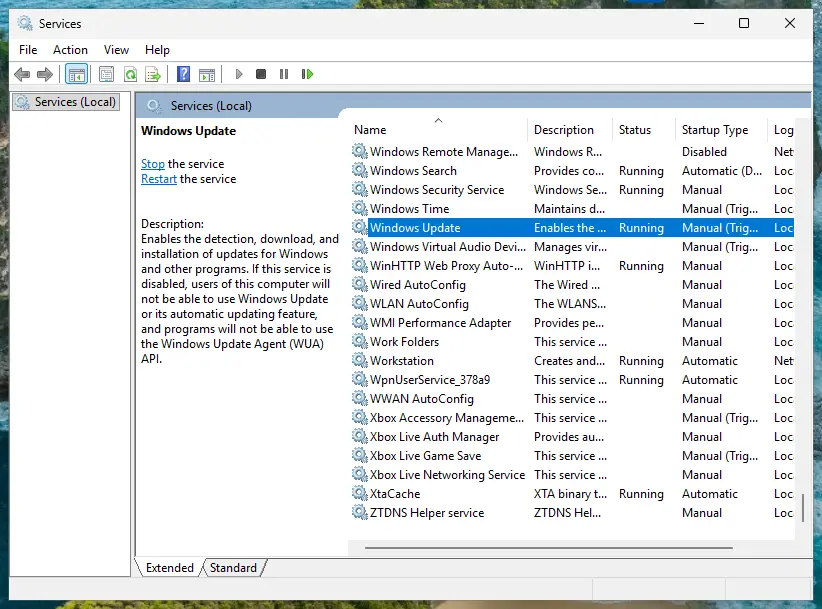
Status and Startup Type of each service are shown in the list. Screenshot: Windows 11 26H2. - Restart the service. Right-click the service and select Restart. If the service is not running, select Start instead. Wait until the progress window closes.
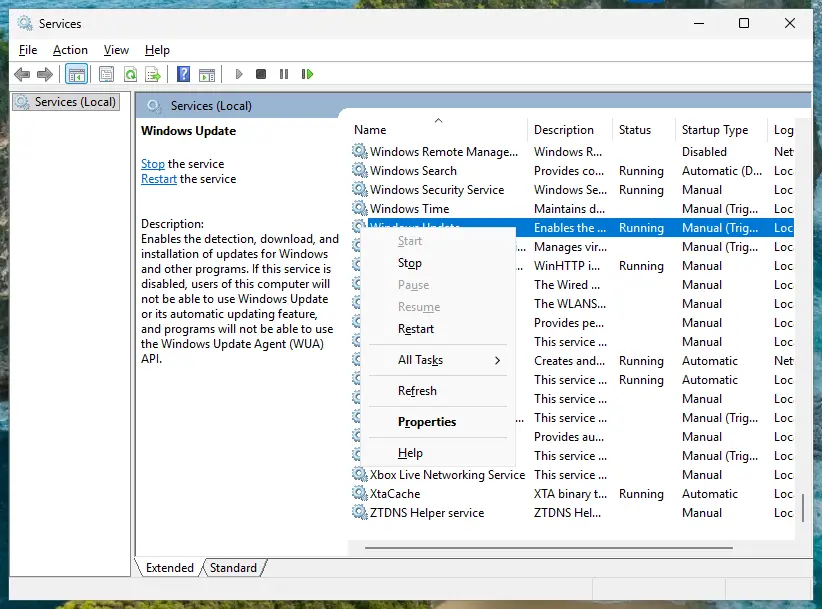
Right-click a service to start, stop or restart it. Screenshot: Windows 11 26H2. - Open its properties to change the startup type. Only if your guide says so: double-click the service. The General tab shows the Service name (used in commands), the Startup type and the Service status.
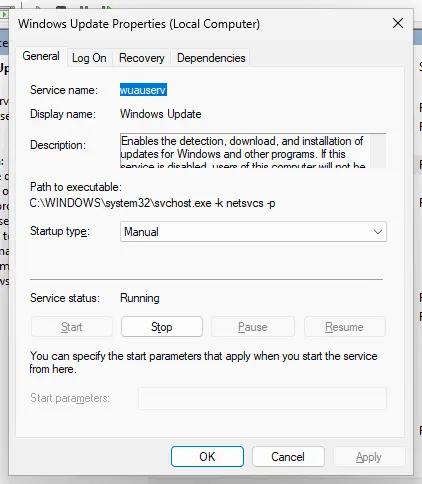
Properties show the service name, startup type and status. Screenshot: Windows 11 26H2. - Set the startup type and apply. Choose the type from the Startup type list (Automatic, Automatic (Delayed Start), Manual or Disabled), select Apply, then Start if the service should run now, and OK.
These steps were written for Windows 11 and Windows 10 (the steps are the same). The full page with the other versions and what each result means: Check and restart Windows services
Restart Windows Audio and Windows Audio Endpoint Builder. Then unplug the headset, plug it in again and open the Recording tab.
It worked if: The microphone appears again after you plug the headset back in.
If not: If it is still missing, install the pending system updates with Fix 8.
Fix 8. Install the pending system updates
15 minutesLow riskThe problem started after a Windows update, or your PC has not been updated for a long time.
A pending update can complete a half installed audio component, and a newer build can include a corrected audio stack. Installing it also removes an out of date system as a cause.
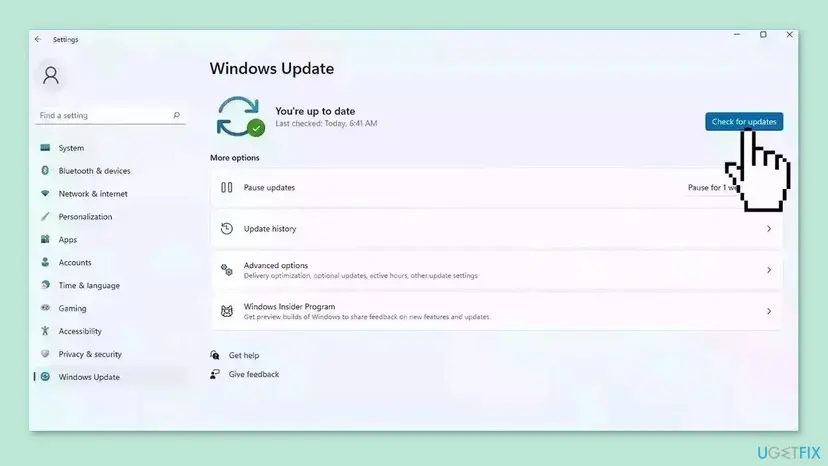
- Press Win + I to open Settings.
- On Windows 11 open Windows Update. On Windows 10 open Update & Security, then Windows Update.
- Select Check for updates.
- If an update is offered, select Download and install.
- Wait for the update to finish, then restart the PC.
The old page listed update steps for Xbox, PlayStation and Nintendo Switch. We found no HyperX text that links a console update to this fault. If you play on a console, open the console's own Settings, find its system update option, install any update and plug the headset into the controller socket. Menu names vary by model, so we did not verify them.
It worked if: After the restart the microphone appears in the Recording tab.
If not: If nothing changed, work through the checks in the next section to find where the chain breaks.
If the Cloud Stinger microphone still does not work
Narrow it down with three short tests before you spend more time. Each one rules out one part of the chain and tells you whether to look at the PC, the cable or the headset.
| Test | Result | What it means |
|---|---|---|
| Plug the headset into a phone or controller with a headset socket and speak. | The other side cannot hear you. | The headset or its cable is at fault: Fix 3. |
| Plug another headset with a microphone into the same PC socket. | That microphone fails too. | The socket, the driver or the Windows settings are the cause: Fixes 4 to 7. |
| Record a short clip in the Voice Recorder app. | It records, but Discord or a game does not. | The app picks another microphone or is blocked: Fixes 4 and 5. |
If the microphone fails on a second device, the warranty is the next step. HyperX support is linked in the sources. Give them your order date and the result of the tests above.
One search asked about a HyperX message that says a device needs an important firmware update. The HyperX specifications of the wired Cloud Stinger list no USB, software or firmware feature. A firmware message therefore names a different HyperX device, so read which product it shows.
How to keep the Cloud Stinger microphone working
- Leave the boom down when you want to talk. Up is the mute position, so it is the first thing to check when a call goes quiet.
- Do not bend the cable at the plugs. A kink next to a plug is the usual place a wire breaks. Coil the cable loosely.
- Name the headset in each app. Selecting the microphone by name, not Default, stops an app from jumping to the webcam when the default changes.
- Keep the plugs for one setup. Use the PC extension cable only on a PC with separate sockets and plug the headset straight into a single headset socket.
- Test after big updates. After a major Windows update, open the Recording tab once and speak, so you notice a missing microphone before a match or a call.
Frequently asked questions
Why is my HyperX Cloud Stinger mic not working?
Start with the boom. HyperX says the microphone is muted by turning the boom on the left earcup up to the vertical position, so turn it down until it clicks (Fix 1). Next check the plug and the PC extension cable (Fix 2), then the default recording device in the Sound window (Fix 4). If the microphone also fails on a phone, the headset or cable is damaged (Fix 3).
Why is my HyperX Cloud Stinger microphone not detected on my PC?
Windows lists a microphone only when a signal path exists. On a PC with two separate sockets, the headset needs the PC extension cable, with the stereo plug in the headphone socket and the mic plug in the microphone socket. On a laptop with one headset socket, plug the headset in directly. Then open the Recording tab and tick Show Disabled Devices, because a disabled input is hidden (Fix 4).
How do I mute and unmute the Cloud Stinger microphone?
The mute is the boom on the left earcup. Turn it up to the vertical position and you hear a click: the microphone is muted. Turn it down to the horizontal position and you hear a click: the microphone is active. This is the HyperX description, and it means a boom left pointing up is the most common reason a new headset seems to have no microphone.
Does the Cloud Stinger need a driver or software?
No. The HyperX specifications for the wired Cloud Stinger list a 3.5mm plug with 4 poles and a PC extension cable with a stereo plug and a mic plug. It has no USB connector and no software. Windows treats it as an input and an output of your sound card, so the driver that matters is the PC audio driver (Fix 6).
Why is my HyperX Cloud Stinger 2 mic not working?
The Cloud Stinger 2 is a different headset from the one this guide covers, so its microphone fix may differ. The HyperX Support Center has separate pages for the Cloud Stinger 2 series, including the wireless models with an adapter. Fix 4, Fix 5 and Fix 6 apply to any microphone in Windows, but check the Stinger 2 pages for its own mute control and connection steps.
Why is my HyperX Stinger 2 Core or Cloud Stinger Core mic not working?
The Core models are separate products with their own HyperX support pages. HyperX lists the Stinger 2 Core with a 3.5mm cable for a controller socket. Windows checks such as Fix 4 (default device) and Fix 5 (privacy switches) apply to any wired headset on a PC. Boom and cable steps depend on the model, so use the HyperX page of your headset.
Why does my Cloud Stinger 2 wireless mic not work on a PC?
The wireless Stinger models use a USB adapter or Bluetooth instead of a 3.5mm plug, so the plug fixes in this guide do not apply. In Windows the headset appears as a USB headset, and the Recording tab check in Fix 4 and the privacy check in Fix 5 still apply. Follow the pairing and adapter pages in the HyperX Support Center for your exact model.
Can I use the Cloud Stinger on a laptop with one headset socket?
Yes, in most cases. The headset has one 3.5mm plug with 4 poles, which carries sound and microphone together, so a combined headset socket takes it directly. Leave the PC extension cable out of the chain. The extension cable ends in two plugs and is made for a PC with separate headphone and microphone sockets.
The microphone works on my phone but not on my PC. What now?
Then the headset is fine and the fault is on the PC. Check which socket you used (Fix 2), set the headset as the default recording device (Fix 4), and make sure Microphone access is on in the Windows privacy settings (Fix 5). If Windows still shows no microphone, update or reinstall the audio driver (Fix 6).
Sources
- HyperX Support Center: Cloud Stinger Microphone mute operation (supportcenter.hyperx.com)
- HyperX Support Center: HyperX Cloud Stinger Specifications (supportcenter.hyperx.com)
Did this fix work?
One click, no account. It tells the next reader which guides are worth their time.
Questions and experiences: HyperX Cloud Stinger mic not working on Windows: how to fix it
Still broken, or found a fix we did not cover? Ask here: members and our editors answer. Reading is open; writing needs a free account.
…