
How to fix Windows update error 0x80888002?

Prefer to fix it yourself? The manual steps follow.
- 6methods
- 5 minutes to 1 hour
- Intermediate
Applies to Upgrades to Windows 11 from Windows 10 or an older Windows 11 version through Windows Update, the Installation Assistant, the Media Creation Tool or setup.exe from an ISO
6 methods in this guide
Hi, I keep getting the 0x80888002 Windows update error, no matter how many times I try. This has happened since I tried to upgrade to Windows 11 version 22H2. Please advise.
Error 0x80888002 stops a Windows 11 upgrade when Setup cannot finish its check of whether your PC may run Windows 11. In most reported cases an old TPM bypass left a registry key or a WMI filter behind that breaks the check. Remove those leftovers first, then check the PC against Microsoft's requirements.
Open Command Prompt as administrator and delete the leftovers of the old "Skip TPM Check on Dynamic Update" bypass: the vdsldr.exe key under Image File Execution Options and the WMI filter of the same name (Fix 1). Restart and run the upgrade again. If no bypass was ever used, run PC Health Check (Fix 2): the PC may not meet Microsoft's requirements, and then no fix makes the upgrade supported.
| Error | Setup has encountered a critical error, with the text Sorry, we're having trouble determining if your PC can run Windows 11. Please close Setup and try again. and Error code: 0x80888002 - 0x40008 in the Windows 11 Setup window. |
|---|---|
| Where it appears | In Windows 11 Setup a few seconds after you start an upgrade from an ISO, the Media Creation Tool or the Installation Assistant. In Windows Update as a failed feature update at a low percentage. |
| Main cause | Setup's compatibility scan, which decides if the PC may run Windows 11, cannot finish. Most often an old TPM bypass blocks it. Less often the PC does not meet the requirements, or the install media was modified. |
| Fastest fix | Delete the vdsldr.exe key and the Skip TPM Check on Dynamic Update WMI filter (Fix 1), restart and try again. |
| Also written as | 0x80888002-0x40008, 0x80888002 0x40008, error code 0x80888002 - 0x40008, and in Windows Update We couldn't install this update, but you can try again (0x80888002). |
| Affects | Upgrades to Windows 11 22H2 and every later version, from Windows 10 or from an earlier Windows 11. The current version on Microsoft's download page is Windows 11 26H2. |
| Microsoft's status | Microsoft does not document 0x80888002 in its upgrade error lists. Its support pages say Windows 11 is not recommended on PCs that miss the requirements, and that such PCs are not guaranteed updates. |
| Where the cause is written | C:\$WINDOWS.~BT\Sources\Panther\setupact.log, in the lines of the compatibility appraiser (CONX) and the system requirements scan (MOUPG). |
| Time to fix | 5 minutes for Fix 1 and Fix 2. 15 minutes for the firmware settings in Fix 3. One to two hours for the upgrade itself. |
Facts checked on 15 October 2026. Steps written for Windows 11 25H2 and 26H2 and Windows 10 22H2 as the starting system, with Windows 11 26H2 Setup from Microsoft's download page.
What error code 0x80888002 - 0x40008 means
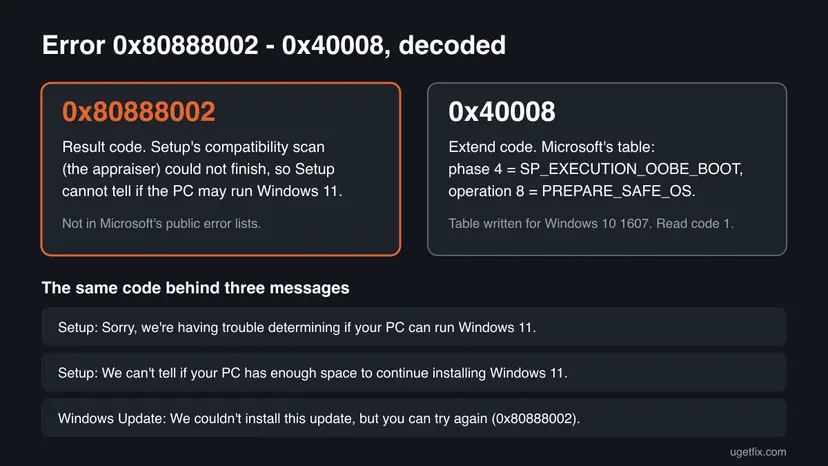
Windows Setup reports a failure as two codes joined by a dash. Microsoft calls the first one the result code, which says what went wrong, and the second one the extend code, which says in which phase and operation it happened. The full window reads: Setup has encountered a critical error. Sorry, we're having trouble determining if your PC can run Windows 11. Please close Setup and try again. Error code: 0x80888002 - 0x40008.
| Part | What the sources say | What it tells you |
|---|---|---|
| 0x80888002 | Not in Microsoft's public lists. Setup logs from affected PCs show it in the lines of the compatibility appraiser and of CDlpActionCompat::ExecuteSysReqScan, the system requirements scan. | Setup could not finish the check that decides whether the PC may run Windows 11. It is not a download or disk error. |
| 0x40008 | In Microsoft's table, phase 4 is SP_EXECUTION_OOBE_BOOT and operation 8 is SP_EXECUTION_OP_PREPARE_SAFE_OS. | Microsoft says the table was written for Windows 10 version 1607 and might change. The error appears before any restart, so the phase name does not match what you see. |
| We can't tell if your PC has enough space to continue installing Windows 11. Try restarting Setup. | Another Setup message reported with the same 0x80888002 on PCs with plenty of free space. | The same failed scan. Free space is not the problem, so do not start by deleting files. |
| We couldn't install this update, but you can try again (0x80888002) | The Windows Update version of the error, often at a low download percentage. | Windows Update runs the same Setup behind the scenes, so the same fixes apply. |
We found no Microsoft text that explains 0x40008 for Windows 11. Read the first code, 0x80888002, and the log lines described below to choose the fix.
Why Windows 11 Setup stops with 0x80888002
Microsoft has not published a cause. The ranking below joins the Setup log lines with what users and volunteer moderators report on Microsoft Q&A and the ElevenForum. Each cause points to a fix.
| Cause | How often | How to tell | Fix |
|---|---|---|---|
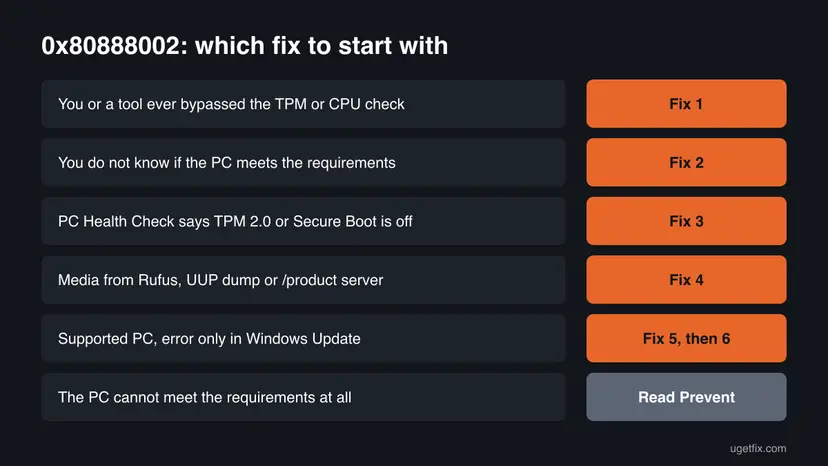
An old TPM bypass left a vdsldr.exe key under Image File Execution Options or a WMI filter named Skip TPM Check on Dynamic Update. | Most often reported | You, a script, a tool or a previous owner once made Windows 11 install on hardware it did not accept. The error appears even on PCs that pass PC Health Check. | Fix 1 |
| The PC does not meet the Windows 11 requirements, so the check cannot pass and a bypass is blocked. | Often | PC Health Check reports TPM 2.0, Secure Boot or the processor as not supported. | Fix 2, Fix 3 |
| TPM or Secure Boot exists but is turned off in the firmware. | Sometimes | tpm.msc says no compatible TPM is found, or System Information shows Secure Boot State as Off. | Fix 3 |
The install media was modified: a Rufus stick with bypass options, an image from UUP dump, or setup.exe /product server. | Sometimes | You did not get the ISO or the tool from Microsoft's download page. | Fix 4 |
| Damaged Windows Update files or system files on a supported PC. | Rarely | The PC passes every check, no bypass was ever used, and only Windows Update fails. | Fix 5, Fix 6 |
The reader above upgraded once and then hit the error on the next version. That fits the first cause: a bypass that let one upgrade through later stops Setup's own check from running, and Setup then reports that it cannot tell whether the PC qualifies.
Where setupact.log shows the real cause of 0x80888002
You do not need the log for Fix 1. Read it when Fix 1 and Fix 2 did not help. Microsoft names setupact.log the most important log for diagnosing Setup issues, and puts it in $Windows.~BT\Sources\Panther on the system drive during an upgrade.
- Press Win + R, type
%SystemDrive%\$WINDOWS.~BT\Sources\Pantherand press Enter. The folder is hidden, but the path opens it. - Copy
setupact.logandsetuperr.logto your desktop, so a later fix cannot delete them. - Open the copy of
setupact.login Notepad, press Ctrl + End, then Ctrl + F, choose Up and search for80888002. - Read the lines just above the last hit. Lines that start with CONX come from the compatibility appraiser, and MOUPG lines come from the upgrade engine.
| What you find near 80888002 | What it points to |
|---|---|
Failed to extract data file resource or Error initializing data in CONX lines | The appraiser could not load its data. This is the pattern reported on PCs with bypass leftovers: Fix 1. |
CDlpActionCompat::ExecuteSysReqScan with Result = 0x80888002 | The system requirements scan failed. Fix 1 first, then Fix 2. |
| Lines that name the TPM, Secure Boot or the processor | A hardware requirement is not met: Fix 2 and Fix 3. |
How to fix error 0x80888002 in Windows 11 Setup and Windows Update
Fix 1 removes the leftovers that cause most cases and takes five minutes. Fix 2 and Fix 3 check and turn on the hardware that Windows 11 needs. Fix 4 replaces modified media with Microsoft's own tools. Fix 5 and Fix 6 are generic repairs for a supported PC that fails only in Windows Update.
| What you see or have | Start with |
|---|---|
| You, a tool or a previous owner ever bypassed the TPM or processor check. | Fix 1 |
| You do not know if the PC meets the Windows 11 requirements. | Fix 2 |
| PC Health Check says TPM 2.0 or Secure Boot is not enabled. | Fix 3 |
You install from a Rufus stick with bypass options, an image from UUP dump or with /product server. | Fix 4 |
| The PC passes every check, no bypass was used, and only Windows Update fails. | Fix 5, then Fix 6 |
Fix 1. Remove the leftovers of the Skip TPM Check bypass
5 minutesRead the warningAnyone who ever used a script, a tool or a registry change to get Windows 11 past its hardware check, and anyone who bought the PC used.
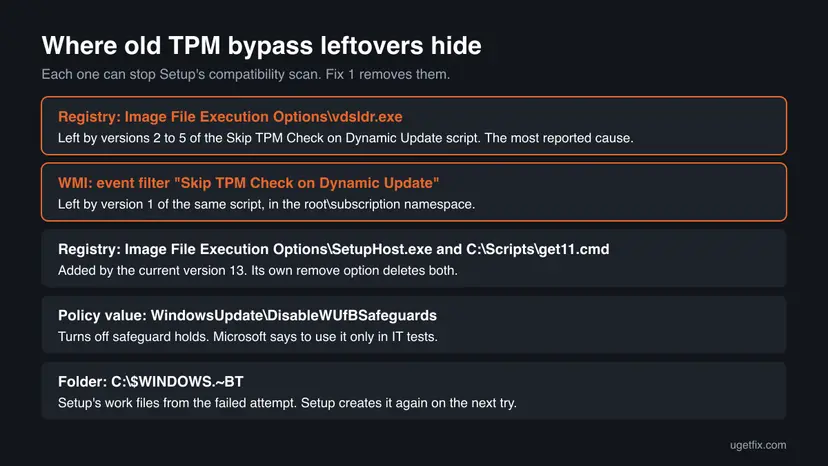
Old versions of the "Skip TPM Check on Dynamic Update" script blocked vdsldr.exe through Image File Execution Options or added a WMI event filter. Setup's compatibility scan then cannot finish and reports 0x80888002. A volunteer moderator's answer with these two commands is the accepted solution on Microsoft Q&A, marked helpful by more than 100 people.
These commands delete registry keys. Export HKEY_LOCAL_MACHINE\SOFTWARE\Microsoft\Windows NT\CurrentVersion\Image File Execution Options before you start: Back up the registry before editing it. Delete only the keys named here. The other keys in that folder belong to Windows and to your programs.
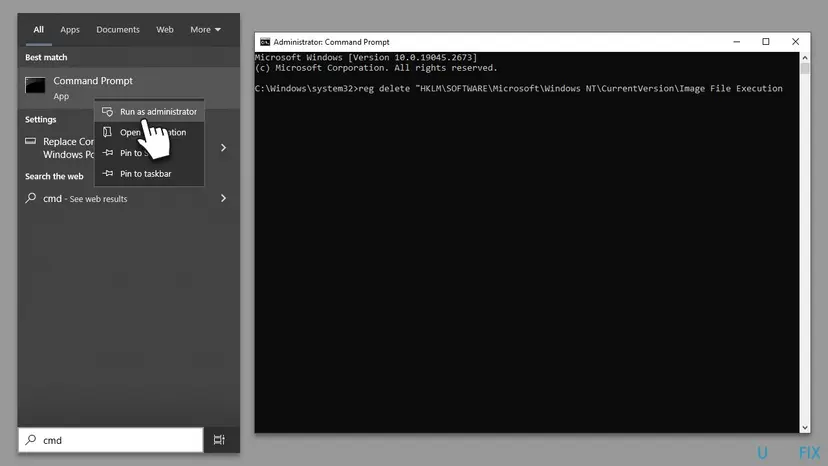
- Type
cmdin the search box, right-click Command Prompt, select Run as administrator and then Yes. - Delete the key that versions 2 to 5 of the script created:
reg delete "HKLM\SOFTWARE\Microsoft\Windows NT\CurrentVersion\Image File Execution Options\vdsldr.exe" /f - Delete the key and the helper file that version 13 creates. ERROR: The system was unable to find the specified registry key or value only means it was not there:
reg delete "HKLM\SOFTWARE\Microsoft\Windows NT\CurrentVersion\Image File Execution Options\SetupHost.exe" /f del /f /q C:\Scripts\get11.cmd - Remove the policy value that turns off safeguard holds, if a tool set it:
reg delete "HKLM\SOFTWARE\Policies\Microsoft\Windows\WindowsUpdate" /v DisableWUfBSafeguards /f - Type
powershelland press Enter. Then delete the WMI filter of version 1. If nothing is printed, the filter was not there:Get-CimInstance -Namespace root/subscription -ClassName __EventFilter -Filter "Name='Skip TPM Check on Dynamic Update'" | Remove-CimInstance - Type
exitto return to Command Prompt and delete Setup's work folder from the failed attempt. Copy the logs first if you want them:rd /s /q "%SystemDrive%\$WINDOWS.~BT" - Restart the PC and start the upgrade again in the same way as before.
Older guides use the wmic command for step 5. Microsoft has removed WMIC from supported versions of Windows 11, so the PowerShell line does the same job. Microsoft says WMI itself is not affected.
It worked if: Setup gets past Checking your PC and shows the license terms or Ready to install. In Windows Update the feature update downloads beyond the point where it stopped.
If not: If the error comes back, run PC Health Check in Fix 2. If the PC meets every requirement, go to Fix 4.
Fix 2. Check the PC with PC Health Check, tpm.msc and System Information
5 minutesNo riskEveryone after Fix 1, and anyone who does not know whether the PC meets the Windows 11 requirements.
0x80888002 means Setup could not decide whether the PC qualifies. Microsoft recommends PC Health Check to verify the requirements before an upgrade. Its answer tells you whether to turn on a setting (Fix 3) or whether the hardware itself is the limit.
- On Windows 10, download PC Health Check from Microsoft's Windows 11 page, install it and select Check now.
- Read each line. A green tick means the requirement is met. A red line names what is missing: TPM 2.0, Secure Boot, the processor, memory or storage.
- Press Win + R, type
tpm.mscand press Enter. Under TPM Manufacturer Information, Specification Version must be 2.0. - Press Win + R, type
msinfo32and press Enter. In System Summary, read BIOS Mode and Secure Boot State. - Compare your processor with Microsoft's list of supported processors, linked from the Windows 11 specifications page.
| Requirement | Microsoft's minimum |
|---|---|
| Processor | 1 GHz or faster with 2 or more cores on a compatible 64-bit processor or system on a chip |
| Memory and storage | 4 GB of RAM and a 64 GB or larger drive |
| Firmware | UEFI, Secure Boot capable |
| TPM | Trusted Platform Module version 2.0 |
| Graphics | DirectX 12 or later with a WDDM 2.0 driver |
It worked if: PC Health Check reports that the PC meets the Windows 11 requirements, or it names exactly what is missing.
If not: If only TPM or Secure Boot is missing, go to Fix 3. If the processor is not supported, read the section on prevention below before you try anything else.
Fix 3. Turn on TPM 2.0 and Secure Boot in the UEFI firmware
15 minutesRead the warningPC Health Check, tpm.msc or System Information says that TPM 2.0 or Secure Boot is off, and BIOS Mode shows UEFI.
Microsoft explains that many PCs have a TPM 2.0 that is simply turned off in the firmware. Once it is on, Setup's check can pass without any bypass, so the cause of 0x80888002 is gone for good.
If BitLocker or device encryption is on, have its recovery key ready, because changes to TPM or Secure Boot can make it ask for the key. Do not switch the boot mode from Legacy or CSM to UEFI when BIOS Mode shows Legacy: a drive set up for legacy boot will not start that way.
- On Windows 11, open Settings > System > Recovery and select Restart now next to Advanced startup. On Windows 10, open Settings > Update & Security > Recovery and select Restart now under Advanced startup.
- Select Troubleshoot > Advanced options > UEFI Firmware Settings > Restart.
- Find the TPM option. Microsoft lists these names: Security Device, Security Device Support, TPM State, AMD fTPM switch, AMD PSP fTPM, Intel PTT and Intel Platform Trust Technology.
- Set it to Enabled.
- Find Secure Boot, usually under Boot or Security, and set it to Enabled.
- Save the changes, usually with F10, and let Windows start.
- Run PC Health Check again, then the upgrade.
It worked if: tpm.msc shows Specification Version: 2.0, System Information shows Secure Boot State: On, and PC Health Check turns green for both.
If not: If the firmware has no TPM option at all, ask the PC maker whether an update adds one. Without TPM 2.0 the PC does not meet Microsoft's requirements.
Fix 4. Upgrade with Microsoft's own tools instead of modified media
1 to 2 hours, mostly waitingLow riskYou install from a Rufus stick with bypass options, an image built with UUP dump, or with setup.exe /product server, on a PC that meets the requirements.
Modified media skips or patches Setup's own checks, and users report the same 0x80888002 - 0x40008 with such media on Windows 11 24H2 and later. Microsoft's unmodified tools run the check as designed, which a supported PC passes.
- Back up the files you cannot lose: Back up your files (Windows Backup, File History, Time Machine).
- Open Settings > Windows Update (on Windows 10, Settings > Update & Security > Windows Update) and select Check for updates. Microsoft recommends this route first.
- If Windows 11 is not offered, open Microsoft's Download Windows 11 page and use Windows 11 Installation Assistant. It needs Windows 10 version 2004 or later and 9 GB of free space.
- Or download the ISO from the same page, right-click it, select Mount and double-click
setup.exewithout any extra switches. - On Ready to install, keep Keep personal files and apps unless you want a clean start, and select Install.
Throw away old installation sticks that were made with bypass options. Make a new one with the Media Creation Tool from the same Microsoft page when you need a USB stick. The current release there is Windows 11 version 26H2.
It worked if: Setup checks the PC, shows the license terms and restarts a few times. The PC ends on the Windows 11 sign-in screen with the new version.
If not: If Microsoft's own tool still shows 0x80888002, go back to Fix 1 and repeat it, then read setupact.log as described above.
Fix 5. Reset the Windows Update components
10 minutesLow riskThe PC passes PC Health Check, no bypass was ever used, and the error appears only as a failed feature update in Windows Update.
Windows Update downloads Setup and its compatibility data into its own cache. A damaged download in SoftwareDistribution can make the scan fail the same way each time, and a reset makes Windows download everything again.
The reset stops the update services, renames the update cache folders and starts the services again. Step by step: Reset Windows Update components.
- Open Command Prompt as administrator. Type cmd in the search box, right-click Command Prompt and select Run as administrator. Select Yes when Windows asks for permission.
- Stop the update services. Type the commands below and press Enter after each one. If Windows says that other services depend on Cryptographic Services, it stops them too. A message that a service is not started is fine.
net stop wuauserv net stop bits net stop cryptsvc - Delete the download queue files. This clears the list of downloads that the Background Intelligent Transfer Service keeps. If Windows says it cannot find the files, continue.
del "%ALLUSERSPROFILE%\Application Data\Microsoft\Network\Downloader\qmgr*.dat" - Rename the update cache folders. Renaming keeps a copy in case you need it; Windows creates new, empty folders when the services start again. If you get Access is denied, a service is still running: repeat the previous step.
ren %systemroot%\SoftwareDistribution SoftwareDistribution.old ren %systemroot%\System32\catroot2 catroot2.old - Start the services again. Type the commands below and press Enter after each one. The requested service has already been started is fine: Windows started it on its own.
net start cryptsvc net start bits net start wuauserv - Restart and check for updates. Restart the PC. Then select Start > Settings > Windows Update > Check for updates. The first check can take longer than usual because everything is downloaded again.
These steps were written for Windows 11 and Windows 10 (the steps are the same). The full page with the other versions and what each result means: Reset Windows Update components
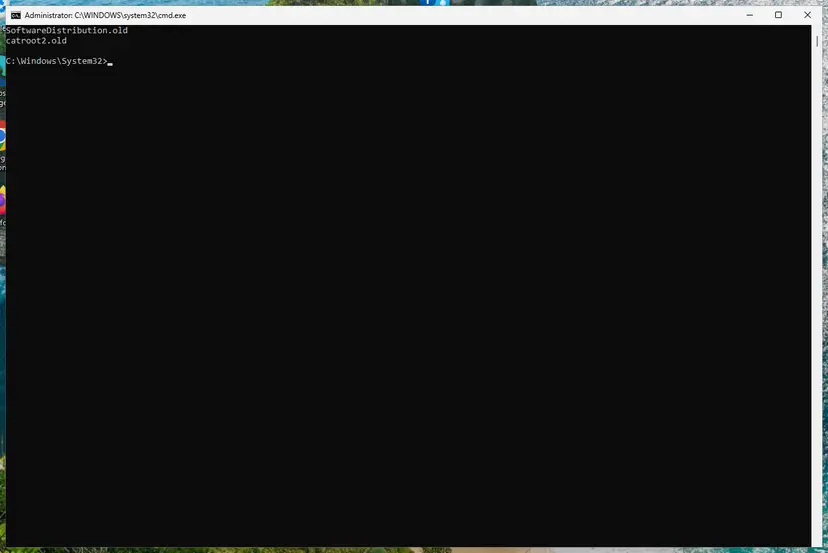
It worked if: After the restart, Check for updates finds the feature update again and it downloads past the point where it failed before.
If not: If the update fails again with 0x80888002, run Fix 6. Then try the Installation Assistant from Fix 4.
Fix 6. Repair Windows system files with DISM and SFC
15 to 30 minutesLow riskFix 5 did not help on a supported PC, or SFC finds problems on its own.
The compatibility scan runs from the Windows you are upgrading. If its system files are damaged, Setup can fail before it decides anything. DISM repairs the component store, and SFC then replaces damaged files from it.
Run DISM first, then SFC, from an administrator Command Prompt. Step by step: Run DISM and SFC to repair Windows system files.
- Open an elevated command window. Right-click Start and select Terminal (Admin), or type cmd in the search box, right-click Command Prompt and select Run as administrator. Select Yes when Windows asks for permission.
- Run DISM first. Type the command below and press Enter. DISM downloads clean copies of damaged components from Windows Update, so it can take several minutes. Wait until it says The operation completed successfully.
DISM.exe /Online /Cleanup-Image /RestoreHealth - Run System File Checker. In the same window, type the command below and press Enter. Do not close the window until the verification reaches 100%.
sfc /scannow - Read the result and restart. Compare the last message with the table below this guide, then restart the PC so that repaired files are loaded.
These steps were written for Windows 11 24H2 and 25H2. The full page with the other versions and what each result means: Run DISM and SFC to repair Windows system files
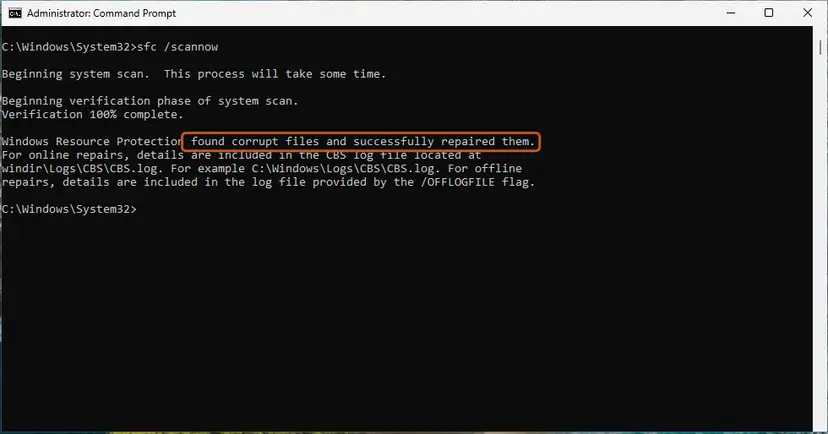
It worked if: DISM reports that the restore operation completed successfully, and SFC reports no integrity violations or that it repaired them.
If not: If SFC cannot repair some files, or the upgrade still fails, read the section below on what to do when the error stays.
If error 0x80888002 is still there
When all six fixes fail, the answer is in setupact.log. Copy it from C:\$WINDOWS.~BT\Sources\Panther right after the next failed attempt, because Fix 1 and Disk Cleanup delete that folder.
| What you find | What to do |
|---|---|
CONX lines with Failed to extract data file resource before 80888002 | Something still blocks the appraiser. Open regedit, go to Image File Execution Options and look for keys named after Setup files, such as vdsldr.exe or SetupHost.exe. Back up, then delete them. |
| Lines that name the TPM, Secure Boot or the processor | The PC does not meet a requirement. Go back to Fix 2 and Fix 3. |
| A work or school PC | Ask the IT department. Upgrade policies and safeguard holds may be set centrally. |
| You want Microsoft to look at it | Open Feedback Hub, choose Install and Update, and attach the codes and the copied logs. |
0x80888002 is a failed check, not a hardware fault. The hardware limit is a processor that is not on Microsoft's list, or a board without TPM 2.0. No software fix changes that, and Microsoft says such PCs are not guaranteed updates.
- What to send to support: both codes, the exact message, how you started Setup, and the result of PC Health Check.
- Attach
setupact.logandsetuperr.log, and say whether a bypass tool was ever used on the PC. - Name the processor model, the Windows version you upgrade from and the version you upgrade to.
How to keep 0x80888002 from coming back
- Upgrade through Windows Update, the Installation Assistant or Microsoft's ISO, on a PC that passes PC Health Check.
- Turn on TPM 2.0 and Secure Boot in the firmware instead of skipping the check.
- Remove any bypass script with its own remove option before the next upgrade.
- Keep a copy of
setupact.logfrom a failed attempt before you clean up.
- Do not apply a new bypass on top of an old one. The leftovers stack up and break the next upgrade.
- Do not set Disable safeguards for Feature Updates on a home PC. Microsoft recommends it only in IT environments for validation.
- Do not delete keys in Image File Execution Options other than the ones named in Fix 1.
- Do not reuse an old modified USB stick for a new Windows version.
Microsoft does not recommend Windows 11 on such PCs, and its support page says they are not guaranteed updates, including security updates. Microsoft's page on ways to install Windows 11 no longer describes a registry way around the check. Windows 10 left support on 14 October 2025.
Once Windows 11 runs, keep it updated. If a monthly update later fails with its own code on a PC that was upgraded from an older version, read our guide to Windows update error 0x800f0993.
Frequently asked questions
What does error code 0x80888002 - 0x40008 mean?
It means Windows 11 Setup could not finish its check of whether your PC may run Windows 11. The full message reads "Sorry, we're having trouble determining if your PC can run Windows 11. Please close Setup and try again." Microsoft does not list 0x80888002 in its upgrade error documentation. Setup logs from affected PCs show it in the compatibility appraiser and the system requirements scan. The second code, 0x40008, maps to phase 4 and operation 8 in Microsoft's table, which was written for Windows 10 version 1607. Start with Fix 1, because old bypass leftovers are the most reported cause.
Is 0x80888002 a Windows Update error or a Setup error?
Both. Windows Update installs a new Windows version by running the same Setup in the background, so the same failed check shows up in two places. In Windows Update it reads "We couldn't install this update, but you can try again (0x80888002)", often at a low download percentage. In Setup started from an ISO, the Media Creation Tool or the Installation Assistant, it shows the critical error window with 0x80888002 - 0x40008. The fixes are the same, and Fix 1 comes first in both cases.
What is vdsldr.exe and why does deleting its registry key help?
vdsldr.exe is a Windows file of the Virtual Disk Service. Versions 2 to 5 of the "Skip TPM Check on Dynamic Update" script added a key for it under Image File Execution Options, so Windows ran something else instead of that file during the upgrade. Deleting the key lets the file run normally again. Setup's compatibility scan can then finish, and the 0x80888002 error is gone. The key is safe to delete, but back up Image File Execution Options first, as Fix 1 shows.
Can I still bypass the TPM check to install Windows 11?
We do not give bypass steps, and Microsoft does not support them. Microsoft's support page says installing Windows 11 on a PC that misses the requirements is not recommended. Such PCs are not guaranteed updates, including security updates, and Microsoft recommends going back to Windows 10 after such an install. Bypass tools are also the most reported cause of 0x80888002 itself. If the TPM is only turned off, Fix 3 turns it on and no bypass is needed.
Does the AllowUpgradesWithUnsupportedTPMOrCPU registry value still work?
We could not find it on Microsoft's current support page. The page "Ways to install Windows 11", updated on 4 February 2025, now says it describes only installs on PCs that meet the requirements, and it no longer describes a registry way around the check. A user on the ElevenForum had the value set and still got 0x80888002 - 0x40008 when upgrading to 24H2. Do not rely on it, and do not expect support for a PC upgraded this way.
My PC passes PC Health Check. Why do I still get 0x80888002?
Because the check is blocked, not failed. A bypass left on the PC from an earlier upgrade, or by a previous owner, stops Setup's compatibility scan even when the hardware is fine. The original Microsoft Q&A thread came from such a case: an 11th generation Intel laptop that could not install 22H2 through Windows Update. Run Fix 1, restart and try again. If no leftover is found, reset Windows Update (Fix 5) and use the Installation Assistant (Fix 4).
I get the same error again after every fix. What now?
Read setupact.log right after the next failed attempt, as the section on the log shows. It names what the scan tripped over. Look in Image File Execution Options for any other key named after a Setup file. Check the PC once more with PC Health Check. If the processor or the board is the limit, no fix will make the upgrade supported. This page is written in English, but the commands and menu names work the same way in every language of Windows.
Will removing the bypass leftovers delete my files or apps?
No. Fix 1 deletes two registry keys, one policy value, one WMI filter, one script file in C:\Scripts and Setup's temporary folder $WINDOWS.~BT. None of them hold your documents, photos or programs. The $WINDOWS.~BT folder contains only Setup's work files and logs from the failed attempt, and Setup creates it again on the next try. Copy the logs out first if you want to keep them. Back up the registry key as the fix says, so you can undo the change.
How do I upgrade from Windows 11 22H2 now?
Do not look for 22H2 any more. Microsoft's download page now offers Windows 11 version 26H2, and an upgrade from 22H2 goes straight to the current version. Run Fix 1 if a bypass was ever used, then open Settings and Windows Update and select Check for updates. If the new version is not offered, use the Installation Assistant from Microsoft's Download Windows 11 page. A PC that meets the requirements can take this route without any extra steps.
Can I still use the wmic command to delete the WMI filter?
Usually not. Microsoft has removed the WMIC utility from currently supported versions of Windows 11, and it is no longer available as an optional feature. That is why the old command with wmic fails on many PCs. WMI itself still works, so Fix 1 uses PowerShell instead: Get-CimInstance with the filter name, piped to Remove-CimInstance. On Windows 10, wmic may still be present, but the PowerShell line works there too.
Sources
- Microsoft Learn: Windows upgrade error codes (result codes and extend codes) (learn.microsoft.com)
- Microsoft Learn: Log files and resolving upgrade errors (setupact.log location) (learn.microsoft.com)
- Microsoft Support: Ways to install Windows 11 (support.microsoft.com)
Did this fix work?
One click, no account. It tells the next reader which guides are worth their time.
Questions and experiences: fix Windows update error 0x80888002
Still broken, or found a fix we did not cover? Ask here: members and our editors answer. Reading is open; writing needs a free account.
…