
[Solved] Cannot shrink a volume beyond the point where any unmovable files are located

Prefer to fix it yourself? The manual steps follow.
- 7methods
- 15 to 40 minutes
- Medium
Applies to Windows 11 and Windows 10 NTFS volumes, mostly the Windows drive C:, shrunk in Disk Management or with diskpart
7 methods in this guide
I have a relatively large (2TB) hard drive, which I would like to divide into separate volumes. However, every time I try, I receive an error that says that the drive cannot shrink beyond the point where any unmovable files are located. What does that mean? Help is appreciated.
"You cannot shrink a volume beyond the point where any unmovable files are located" means Disk Management can only cut free space off the end of the volume, up to the last file Windows cannot move. Usually that is the paging file, the hibernation file or System Restore's shadow copies. Find the blocking file in event 259 first, turn that feature off for the shrink, then turn it back on.
Windows shrinks a volume only from its end and stops at the last file it cannot move. Microsoft names the paging file and the shadow copy storage area as such files, and the hibernation file behaves the same way. Read event 259 in the Application log to see which file blocks you (Fix 1), turn off that feature for the shrink (Fixes 2 to 4), restart, shrink, and turn it back on.
| Error | "You cannot shrink a volume beyond the point where any unmovable files are located." |
|---|---|
| Where it appears | In the Shrink C: dialog of Disk Management, under the size boxes, when the space Windows offers is much smaller than the free space on the drive. |
| Main cause | A file Windows cannot relocate sits near the end of the volume: most often pagefile.sys, hiberfil.sys or restore point data in System Volume Information. |
| Fastest fix | Read event ID 259 in the Application log to find the file (Fix 1), then turn off only that feature and restart. |
| Also written as | "cannot shrink a volume beyond the point", "can't shrink volume because of unmovable files", "windows cannot shrink volume unmovable files". |
| Affects | Windows 11 and Windows 10, NTFS and raw partitions. Disk Management and diskpart use the same rule. |
| Vendor status | Not a bug. Microsoft documents it as a limit of shrinking: files like the paging file or shadow copy storage area cannot be relocated automatically. |
| Time to fix | About 15 minutes plus two restarts. Optimizing a large hard disk first can take longer. |
| Where the cause is logged | Event Viewer, Windows Logs > Application, source Defrag, event ID 259: it names the last unmovable file. |
Facts checked on 16 October 2026. Steps written for Windows 11 (25H2 and 26H2) and Windows 10 22H2.
What "You cannot shrink a volume beyond the point where any unmovable files are located" means
The full text in the Shrink dialog reads: "You cannot shrink a volume beyond the point where any unmovable files are located. See the "defrag" event in the application log for detailed information about the operation when it has completed." The old version of this page said you see it only in Event Viewer. In fact it is the note in the dialog itself, and the details go to the log.
Microsoft explains the rule: when you shrink a partition, ordinary files are moved automatically to make new unallocated space at the end of the volume. Certain files, such as the paging file or the shadow copy storage area, cannot be moved, and you cannot shrink past the point where they sit. So a 2 TB drive with 1.5 TB free may still offer only a few gigabytes.
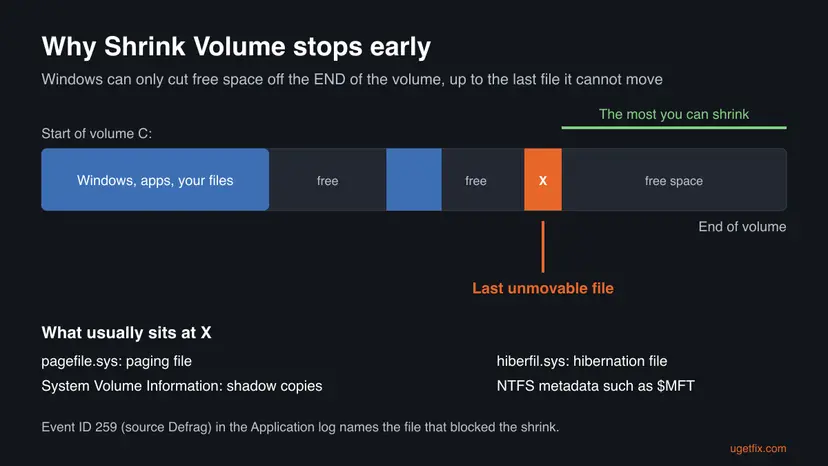
The message does not mean your disk or Windows is broken. It tells you how far the shrink can go right now. Moving or turning off the file that sits near the end raises that limit.
What prevents a volume from shrinking in Windows 11 and 10: causes in order
Most often the paging file pagefile.sys sits near the end of C:. Often the shadow copies of System Restore, stored in System Volume Information, or the hibernation file hiberfil.sys do. Less often NTFS's own files such as $MFT are the last ones. Rarely the disk has too many bad clusters, and then Microsoft says it cannot be shrunk at all.
| What blocks the shrink | How often | How to tell | Fix |
|---|---|---|---|
Paging file pagefile.sys | Most often | Event 259 names \pagefile.sys. | Fix 3 |
| Restore points and shadow copies | Often | Event 259 names a file in \System Volume Information. | Fix 4 |
Hibernation file hiberfil.sys | Often on laptops | Event 259 names \hiberfil.sys. | Fix 2 |
| Movable files that Windows did not move | Sometimes | The shrink size changes after a restart or after Optimize. | Fix 5, Fix 6 |
NTFS metadata such as $MFT or $LogFile | Rarely | Event 259 names a file that starts with $. | Fix 7 |
| Too many bad clusters | Rarely, but serious | Shrink offers nothing, chkdsk reports bad sectors. | Fix 7 |
Microsoft says shrinking an NTFS volume does not lose data, but a power cut or a disk error during a partition change can. Copy files you cannot lose to another disk first: Back up your files (Windows Backup, File History, Time Machine).
How to fix "You cannot shrink a volume beyond the point where any unmovable files are located"
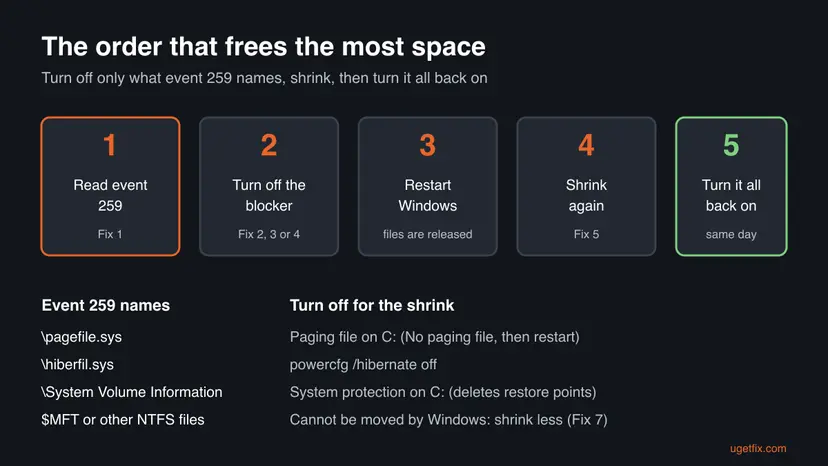
Fix 1 tells you which file stops the shrink, so you change only what you must. Fixes 2 to 4 turn off the three usual blockers for a short time. Fix 5 runs the shrink and turns everything back on. Fixes 6 and 7 are for when the limit stays low.
| What you see or have | Start with |
|---|---|
| You do not know what blocks the shrink. | Fix 1 |
Event 259 names \hiberfil.sys. | Fix 2 |
Event 259 names \pagefile.sys. | Fix 3 |
Event 259 names \System Volume Information. | Fix 4 |
| You turned off the blocker and want to shrink now. | Fix 5 |
| A hard disk, and the offer grows a little each time. | Fix 6 |
Event 259 names $MFT or another $ file, or the disk has bad sectors. | Fix 7 |
Fix 1. Find the unmovable file in event 259 of the Application log
5 minutesNo riskEveryone, before changing any setting.
Microsoft's own advice when a shrink stops early is to check the Application log for event ID 259, which gives information about the unmovable file. It tells you which of Fixes 2, 3 or 4 you need, so you do not switch off features for nothing.
- Try the shrink once: right-click Start, open Disk Management, right-click the volume and select Shrink Volume. Close the dialog when it shows the size.
- Right-click Start and open Event Viewer.
- Go to Windows Logs > Application.
- Select Filter Current Log in the right pane, type
259in the event ID box and select OK. - Open the newest event with the source Defrag and read the file it names as the last unmovable file, and the cluster number.
- Match the file to the chooser table above and go to that fix.
If the event gives a cluster number but you want to check which file uses it, Microsoft's fsutil tool answers that. Run it in Terminal (Admin) with your drive letter and the cluster number from the event.
Find the file that uses a cluster (Command Prompt or Terminal as administrator)
fsutil volume querycluster C: 0x2000It worked if: You know the name of the file that stops the shrink, for example \pagefile.sys.
If not: If there is no event 259, run Shrink Volume again, wait until the dialog shows the sizes, and filter the log again. Then go through Fixes 2 to 4 in order.
Fix 2. Turn off hibernation for the shrink
2 minutesLow riskEvent 259 names \hiberfil.sys, or you use a laptop with hibernation on.
The hibernation file hiberfil.sys is a large file on C: that Windows keeps open, so it does not move. Microsoft's powercfg /hibernate off command disables the hibernate feature, and the file goes away with it.
- Select Start, type
cmd, right-click Command Prompt and select Run as administrator. Select Yes in User Account Control. - Run the command below.
- Restart the PC before you shrink.
Turn off hibernation (Command Prompt as administrator)
powercfg /hibernate off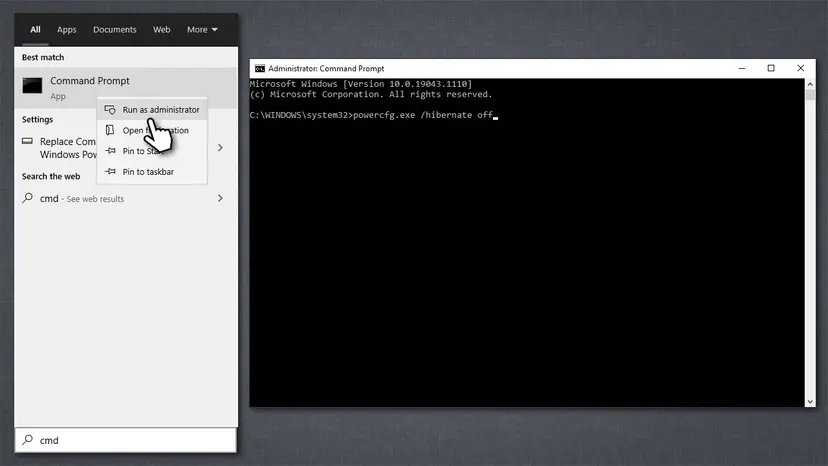
Fast startup needs hibernation, so it is off too until you run powercfg /hibernate on after the shrink (Fix 5).
It worked if: After the restart, Shutdown options no longer list Hibernate, and Shrink Volume offers more space.
If not: If event 259 now names another file, turn that one off with Fix 3 or Fix 4.
Fix 3. Set no paging file on the volume and restart
5 minutes plus a restartLow riskEvent 259 names \pagefile.sys. This is the most common case on C:.
Microsoft names the paging file as one of the files a shrink cannot relocate. It also suggests moving it to another disk for the shrink and moving it back afterwards, which removes pagefile.sys from the volume.
- Press Win + R, type
SystemPropertiesAdvanced.exeand press Enter. - Under Performance, select Settings, open the Advanced tab, and under Virtual memory select Change.
- Clear Automatically manage paging file size for all drives.
- Select the drive you want to shrink, select No paging file and select Set. Confirm the warning with Yes.
- If you have a second internal drive, select it, choose System managed size and select Set, so Windows still has a paging file.
- Select OK in each window and restart the PC.
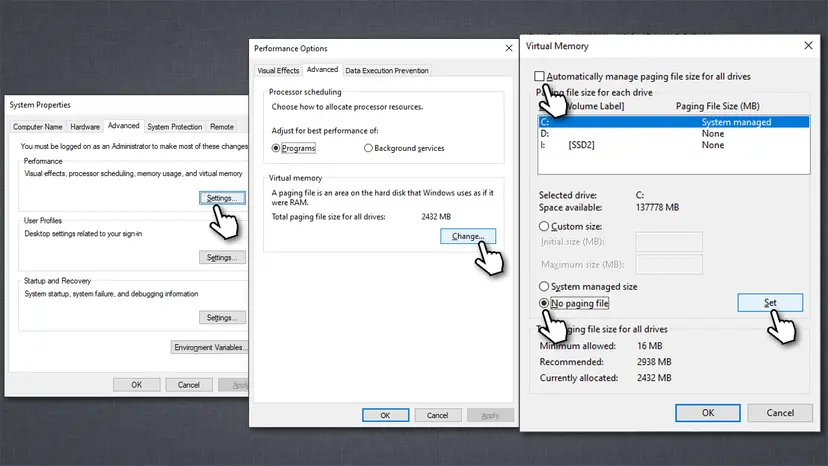
Close large programs while the paging file is off. With little memory and no paging file, apps can close or warn that memory is low until you turn it back on.
It worked if: After the restart the event no longer names \pagefile.sys, and the Shrink dialog offers more space.
If not: If the offer is still small, read event 259 again (Fix 1). It now names the next unmovable file.
Fix 4. Turn off System Protection on the volume to remove shadow copies
5 minutesRead the warningEvent 259 names a file in \System Volume Information.
Restore points are kept as shadow copies, and Microsoft names the shadow copy storage area as unmovable. Microsoft's way out is to delete the stored shadow copies before the shrink, and turning off System Protection does that.
Turning off System Protection deletes every restore point of that drive, and you cannot get them back. If Windows misbehaves now, fix that first. Create a fresh restore point after the shrink (Fix 5): Undo recent changes with System Restore.
- Press Win + R, type
SystemPropertiesProtection.exeand press Enter. On Windows 11 you can also open Settings > System > About > System protection. - Under Protection Settings, select the drive you want to shrink and select Configure.
- Select Disable system protection, then Apply, and confirm with Yes.
- Select OK twice.
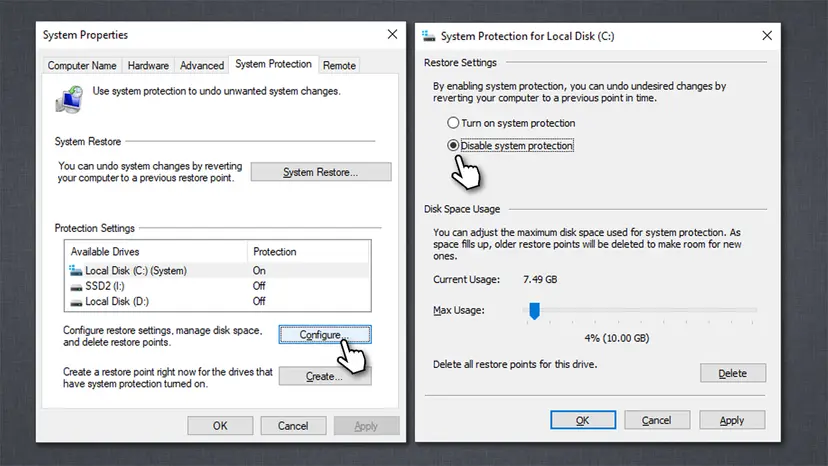
It worked if: The Protection column shows Off for the drive, and event 259 no longer names System Volume Information.
If not: If other backup software also keeps shadow copies on the drive, pause it for the shrink. Then read event 259 again.
Fix 5. Restart, shrink the volume, then turn every feature back on
10 minutes plus a restartLow riskYou turned off the blocker in Fix 2, 3 or 4.
The paging and hibernation files are released only after a restart. Once they are gone, Windows can move the ordinary files and offer the space up to the next unmovable file.
- Restart the PC.
- Open Disk Management, right-click the volume and select Shrink Volume.
- Enter the amount in MB in Enter the amount of space to shrink in MB and select Shrink.
- Turn hibernation back on with
powercfg /hibernate onif you turned it off. - Set the paging file back to Automatically manage paging file size for all drives if you changed it.
- Turn System protection back on for the drive and create a restore point.
- Restart once more.
You can also shrink from the command line. Microsoft's diskpart shrink takes a desired and a minimum size in MB and never loses data. It stops at the unmovable files on its own.
Shrink with diskpart (Command Prompt as administrator)
diskpart
list volume
select volume 2
shrink desired=200000 minimum=100000
It worked if: Unallocated space appears after the volume in Disk Management, and you can create a new volume in it.
If not: If the offer is still too small, run Fix 1 again to see the next blocker, or go to Fix 6.
Fix 6. Optimize the drive and try the shrink again
10 minutes to a few hoursNo riskA hard disk, and the offer grows a little each time you try.
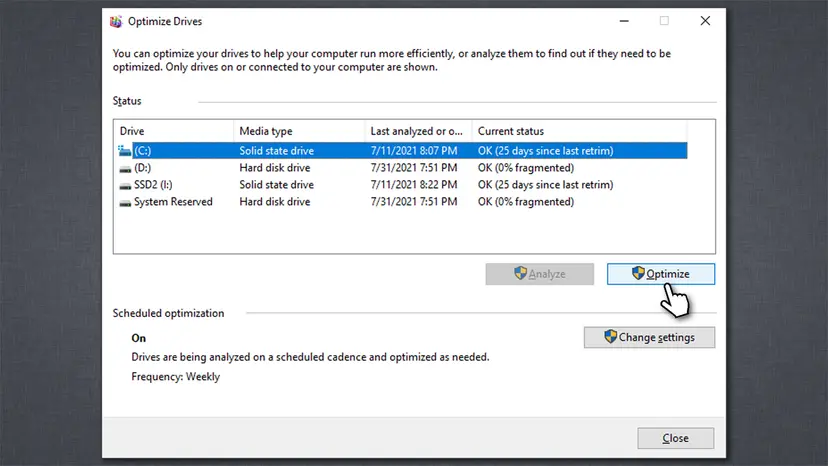
Shrink moves ordinary files on its own, but on a crowded hard disk a full optimize first leaves fewer files near the end. On an SSD, Optimize runs a retrim instead, so it rarely changes the shrink size.
- Select Start, type
defragand open Defragment and Optimize Drives. - Select the drive and select Optimize.
- Wait until Current status shows OK, then try Shrink Volume again.
It worked if: The Shrink dialog offers more space than before.
If not: If the size does not change, the limit is a file Windows cannot move. Go back to Fix 1 or to Fix 7.
Fix 7. When NTFS files or bad clusters block the shrink
30 minutes or moreRead the warningEvent 259 names $MFT or another $ file, or the disk has bad sectors.
Files whose names start with $ belong to NTFS itself, and no Windows setting moves them. Microsoft also says that when dynamic bad cluster remapping has found too many bad clusters, the partition cannot be shrunk.
Repartitioning a disk with bad sectors can lose data. Copy everything you need to another disk before you continue: Back up your files (Windows Backup, File History, Time Machine).
- Accept a smaller shrink: use the size Disk Management offers now, and plan the new volume around it.
- Check the disk for errors with chkdsk. Step by step: Check a disk for errors (chkdsk).
- If chkdsk reports bad sectors, follow Microsoft's advice: copy your files to a new disk and replace the old one.
- Copy files file by file, not with a sector by sector clone. Microsoft warns that a block level copy also copies the bad sector table to the new disk.
- To split a drive that cannot shrink enough, back up, delete the volume, and create new volumes of the sizes you want.
It worked if: You have a backup and either the smaller volume you can get, or a healthy disk you can split freely.
If not: If chkdsk shows the disk is failing, stop changing its partitions and move your data off it.
If you still cannot shrink the volume
Collect these facts before you ask for help on Microsoft Q&A or from a technician. They show which file blocks the shrink and whether the disk is healthy.
- The text of the newest event 259 (source Defrag) from Windows Logs > Application, with the file name and cluster.
- The size Disk Management offers in Total size available for shrink space in MB, and the free space on the drive.
- Which features you turned off: hibernation, paging file, System Protection.
- Whether the drive is a hard disk or an SSD, from Defragment and Optimize Drives.
- The result of
chkdsk C: /scan. - Your Windows version: press Win + R and type
winver. - When it is hardware: chkdsk reports bad sectors or the shrink offers nothing at all. Microsoft's advice then is to move the data and replace the disk.
How to avoid the unmovable files limit next time
- Plan partitions when you set up a new drive, before it fills up.
- Read event 259 first and turn off only the feature it names.
- Turn hibernation, the paging file and System Protection back on right after the shrink.
- Back up before every partition change.
- Make a new restore point after you turn System Protection back on.
- Leave the paging file off for good on a PC with little memory.
- Shrink a disk that chkdsk reports with bad sectors.
- Clone a failing disk sector by sector to a new one.
- Cut the power or force a restart while a shrink runs.
Frequently asked questions
What does "You cannot shrink a volume beyond the point where any unmovable files are located" mean?
It means Disk Management can only remove free space from the end of the volume, up to the last file it cannot move. Microsoft lists the paging file and the shadow copy storage area as such files. The space Windows offers is therefore the free space after that file, not all the free space on the drive. Event 259 in the Application log names the file, and Fixes 2 to 4 on this page turn the usual ones off for the shrink.
What is the "defrag" event in the application log?
It is event ID 259 from the source Defrag in Event Viewer, under Windows Logs > Application. Shrink uses the same engine as the drive optimizer, so the result of the shrink analysis is logged under that name. Microsoft says the event gives information about the unmovable file that is blocking the shrink. Open it after you try a shrink and read the file name and cluster it gives. Fix 1 shows how to filter the log.
Is this different on Windows 11?
No. Windows 11 and Windows 10 use the same Disk Management, the same diskpart and the same rule, and Microsoft's page on shrinking a basic volume applies to both. Only the way to System Protection differs a little: on Windows 11 it is under Settings > System > About > System protection. The SystemPropertiesProtection.exe and SystemPropertiesAdvanced.exe shortcuts in Fixes 3 and 4 open the same windows on both. Windows 10 left support on 14 October 2025.
Which files can prevent a volume from shrinking in Windows 11?
The usual ones are the paging file pagefile.sys, the hibernation file hiberfil.sys and the restore points stored as shadow copies in System Volume Information. Less often NTFS metadata such as $MFT sits near the end of the volume, and Windows cannot move it. Microsoft adds a rarer case: too many bad clusters found by bad cluster remapping stop the shrink altogether. Event 259 tells you which one it is on your PC.
Is it safe to turn off the paging file, hibernation and System Protection?
For the short time of a shrink, yes, with one cost. Turning off System Protection deletes all restore points of that drive. Turning off the paging file can make apps close when memory runs out, so keep large programs closed. Turning off hibernation also turns off fast startup. Turn all three back on as soon as the shrink is done (Fix 5) and create a new restore point.
Can shrinking a volume delete my files?
Microsoft says the shrink operation in diskpart causes no data loss on NTFS volumes, because ordinary files are moved and not deleted. The risk is in what can go wrong during the change, such as a power cut or a failing disk. Microsoft also warns that shrinking a raw partition with data in it, such as a database file, can destroy that data. Back up before any partition change.
Do I need to show hidden files or defragment first?
No. The old version of this page told you to show hidden and protected system files first, but none of the fixes needs that. Event 259 names the file without it. Defragmenting is only worth trying on a hard disk when the shrink size grows a little each time (Fix 6). On an SSD, Optimize runs a retrim and usually does not change the size Windows offers.
Can a third-party partition tool move unmovable files?
Some partition tools work outside of Windows, for example from a boot disk, where the paging and hibernation files are not in use. We did not test them for this guide, so we cannot say which one handles which file. If Windows cannot shrink enough even after Fixes 2 to 4, the safe way without extra tools is to back up, delete the volume and create new volumes of the sizes you want (Fix 7).
What if the search was about Word being unable to shrink something?
This page is about Windows Disk Management and the Shrink Volume dialog. A message such as "after several attempts Word was unable to shrink" most likely comes from Microsoft Word, when it tries to fit a document on fewer pages with Shrink One Page, and has nothing to do with disk partitions. Search for that exact Word message instead. The fixes on this page will not change how Word fits text on a page.
Sources
- Microsoft Learn: Shrink a basic volume (learn.microsoft.com)
- Microsoft Learn: fsutil volume (learn.microsoft.com)
- Microsoft Learn: Powercfg command-line options (learn.microsoft.com)
Did this fix work?
One click, no account. It tells the next reader which guides are worth their time.
Questions and experiences: [Solved] Cannot shrink a volume beyond the point where any unmovable files are located
Still broken, or found a fix we did not cover? Ask here: members and our editors answer. Reading is open; writing needs a free account.
…