
How to fix Windows update error 0xC1900200?

Prefer to fix it yourself? The manual steps follow.
- 7methods
- 10 minutes to 1 hour
- Intermediate
Applies to Windows 10 22H2 and Windows 11 (24H2, 25H2, 26H2) upgrades through Windows Update, the Installation Assistant or setup.exe from an ISO
7 methods in this guide
I keep getting Windows update error 0xC1900200, which means I can't install the latest security updates. This is rather concerning, and I'd like to resolve it as soon as possible.
Error 0xC1900200 is not a broken update. Microsoft documents it as a block: Windows Setup checked your PC and found that it does not meet the minimum system requirements for the version you are installing. Run PC Health Check first to see which requirement fails, then fix that one.
0xC1900200 means the PC failed Windows Setup's minimum requirements check, so the upgrade stopped before it started. Run PC Health Check to see which requirement fails (Fix 1). Most often TPM 2.0 or Secure Boot is simply turned off in the UEFI settings (Fix 2, Fix 3). If the processor itself is not on Microsoft's list, no update repair will remove this error.
| Error | 0xC1900200, Microsoft's MOSETUP_E_COMPAT_SYSREQ_BLOCK: "The system does not pass the minimum requirements to install the update." |
|---|---|
| Where it appears | In Settings > Windows Update as Install error - 0xc1900200 next to a Windows 11 upgrade or feature update, or when Setup, the Installation Assistant or a deployment tool checks the PC. |
| Main cause | One hard requirement is not met: TPM 2.0 or Secure Boot turned off, a processor that is not on Microsoft's list, too little storage or memory. |
| Fastest fix | Run PC Health Check to name the requirement (Fix 1), then turn on TPM 2.0 in the UEFI settings if that is the one (Fix 2). |
| Also written as | 0xc1900200, oxc1900200, 0x1900200, 0xC1900200 - 0x20008, or -1047526912 when a tool shows the code as a decimal number. |
| Not the same as | 0xC190020E and 0xC190020F (not enough free space to install) and 0xC1900208 (an app or driver blocks the upgrade). |
| Windows 11 minimum | Approved CPU with 2 or more cores at 1 GHz, 4 GB RAM, 64 GB storage, UEFI and Secure Boot capable, TPM 2.0, DirectX 12 graphics with WDDM 2.0. |
| Upgrade path | Windows 10 must be version 2004 or later to upgrade through Windows Update. Windows 10 left support on 14 October 2025. |
| Microsoft's status | Documented behaviour, not a bug. Microsoft's mitigation is to make sure the PC meets the minimum requirements. |
| Time to fix | 10 minutes when a setting is off, up to an hour for a disk conversion. No fix when the CPU is not supported. |
Facts checked on 15 October 2026. Steps written for Upgrades from Windows 10 22H2 to Windows 11, and Windows 11 feature updates to 25H2 and 26H2.
What error 0xC1900200 means on Windows 10 and Windows 11
Before Windows Setup copies a single file, it runs a compatibility check. Microsoft's table of upgrade result codes lists 0xC1900200 as MOSETUP_E_COMPAT_SYSREQ_BLOCK, and its troubleshooting page says Setup "has detected that the machine doesn't meet the minimum system requirements". In plain words: the update is fine, and your PC was turned away at the door.
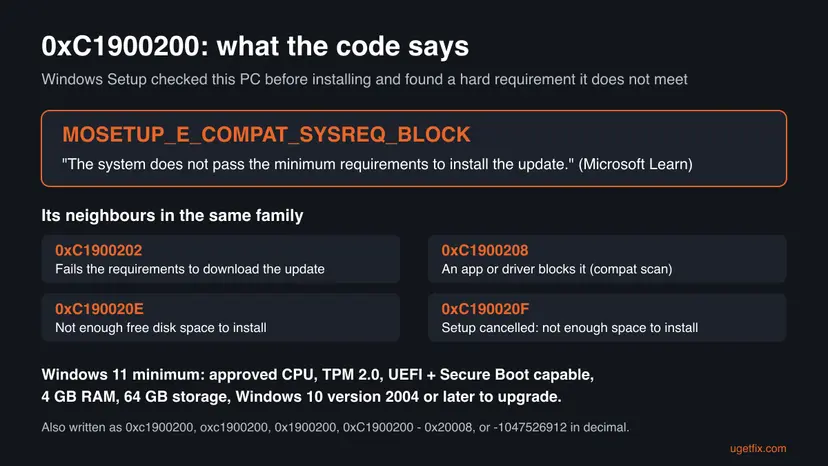
In Windows Update the line usually reads Install error - 0xc1900200 under the upgrade or feature update. Setup from an ISO says the PC does not meet the requirements. Logs may add an extend code, as in 0xC1900200 - 0x20008. Microsoft describes that pair the same way: the computer does not meet the minimum requirements to download or upgrade.
| Code | Microsoft's name | What it means for you |
|---|---|---|
| 0xC1900200 | MOSETUP_E_COMPAT_SYSREQ_BLOCK | A minimum requirement fails. This guide. |
| 0xC1900201 | MOSETUP_E_COMPAT_SYSREQ_CANCEL | The same check failed and the user cancelled Setup. |
| 0xC1900202 | MOSETUP_E_COMPAT_DOWNLOADREQ_BLOCK | The PC fails the requirements to download the update. Same fixes. |
| 0xC1900208 | MOSETUP_E_COMPAT_INSTALLREQ_BLOCK | The requirements pass, but an app or driver blocks the upgrade. |
| 0xC190020E | MOSETUP_E_INSTALLDISKSPACE_BLOCK | Not enough free space to install. Fix 4. |
| 0xC190020F | MOSETUP_E_INSTALLDISKSPACE_CANCEL | Setup was cancelled because there is not enough space to install. Fix 4. |
Resetting the update cache, the troubleshooter and SFC repair a broken download or broken files. 0xC1900200 is a yes or no answer from the requirements check. Until the failing requirement changes, every attempt gets the same answer.
Why Windows update error 0xC1900200 appears
The requirements are Microsoft's published Windows 11 minimums. The ranking below is ours: settings that are switched off are far more common than missing hardware, and they are the only causes you can fix in minutes.
| Cause | How often | How to tell | Fix |
|---|---|---|---|
| TPM 2.0 exists on the board or in the processor but is turned off in the UEFI settings (Intel PTT, AMD fTPM). | Most often | PC Health Check says TPM 2.0 must be supported and enabled; tpm.msc says no compatible TPM was found. | Fix 2 |
| The PC starts in Legacy (BIOS) mode, or Secure Boot is off. | Often | System Information shows BIOS Mode: Legacy or Secure Boot State: Unsupported. | Fix 3 |
| Storage under 64 GB, or too little free space for Setup. | Sometimes | A small eMMC or SSD drive; code 0xC190020E or 0xC190020F appears too. | Fix 4 |
| Windows 10 is older than version 2004, or the firmware is very old. | Less often | winver shows a version older than 22H2; the BIOS date is years old. | Fix 5 |
| Windows Update still holds an old result after you fixed the requirement. | Less often | PC Health Check now passes, Windows Update still shows the error. | Fix 6, Fix 7 |
| The processor is not on Microsoft's list, or RAM is under 4 GB. | Common on PCs from before about 2018 | PC Health Check names the processor or the memory. | No software fix; see below |
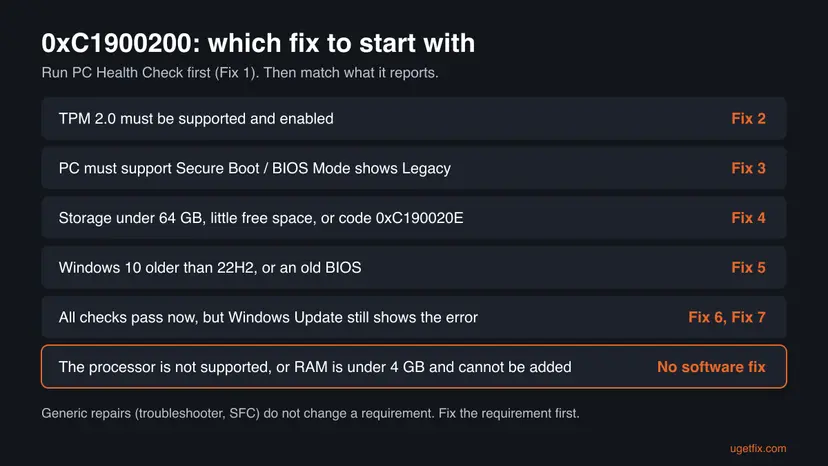
Microsoft's approved list is per processor model, not per year. Check your exact model in Fix 1 rather than going by the age of the PC.
How to fix Windows update error 0xC1900200
Fix 1 tells you which requirement fails, so you do only the fix you need. Fix 2 and Fix 3 switch on settings most PCs already have. Fix 4 and Fix 5 cover space and old versions. Fix 6 and Fix 7 are for the case where everything now passes but the error stays.
| What you see or have | Start with |
|---|---|
| You do not know which requirement fails. | Fix 1 |
| PC Health Check says TPM 2.0 must be supported and enabled. | Fix 2 |
| PC Health Check says the PC must support Secure Boot, or BIOS Mode shows Legacy. | Fix 3 |
| A small drive, little free space, or code 0xC190020E or 0xC190020F. | Fix 4 |
| Windows 10 older than 22H2, or a BIOS from many years ago. | Fix 5 |
| Every check passes now, but Windows Update still shows 0xc1900200. | Fix 6, then Fix 7 |
| The processor is not supported. | Read the section on unsupported hardware below |
Fix 1. Find out which requirement fails with PC Health Check
5 minutesNo riskEveryone. It takes two minutes and decides which fix you need.
0xC1900200 only says that some requirement failed. Microsoft provides the PC Health Check app for exactly this question, and it names the requirement that blocks the upgrade, so you do not change settings you do not need to.
- On Windows 10, open Start and search for PC Health Check. If it is not installed, download it from Microsoft's Windows 11 page.
- Open the app and select Check now under the Windows 11 box.
- If it says the PC does not meet the requirements, select See all results.
- Note every line with a red mark: TPM, Secure Boot, processor, storage or memory.
- On Windows 11, open Settings > Windows Update: the page shows whether the feature update is offered to this PC.
- Press Win + R, type
msinfo32and press Enter. Note Processor, BIOS Mode and Secure Boot State.
For a second opinion straight from Setup, mount the Windows 11 ISO, open Terminal (Admin) in the mounted drive and run setup.exe /compat scanonly. Setup runs only the check. A pass ends with code 0xC1900210 (no compat issue found); a fail shows the same block as before. The details are written to C:\$Windows.~BT\Sources\Panther.
It worked if: You have the name of the failing requirement, for example TPM 2.0 or Secure Boot.
If not: If every line passes, go to Fix 6. If the processor fails, read the section on unsupported hardware below.
Fix 2. Turn on TPM 2.0 in the UEFI settings
10 minutesLow riskPC Health Check says TPM 2.0 must be supported and enabled.
Most PCs sold in recent years have a firmware TPM 2.0 built into the processor, but some makers ship it switched off. Microsoft's requirements page points PCs that fail on TPM to its article on enabling TPM 2.0, because a setting, not new hardware, is often all that is missing.
- Press Win + R, type
tpm.mscand press Enter. If it shows Specification Version: 2.0 and The TPM is ready for use, TPM is not your problem. - If it says Compatible TPM cannot be found, open Settings > System > Recovery (Windows 10: Settings > Update & Security > Recovery).
- Next to Advanced startup, select Restart now.
- Select Troubleshoot > Advanced options > UEFI Firmware Settings > Restart.
- In the firmware menu, look under Security, Advanced or Trusted Computing for TPM, Intel PTT or AMD fTPM, and set it to Enabled.
- Save and exit, usually with F10.
- In Windows, run
tpm.mscagain, then select Check now in PC Health Check.
Turning on a TPM does not touch your files. Clearing or resetting an existing TPM is different: it can lock a drive encrypted with BitLocker. If the menu offers Clear TPM, do not select it, and make sure you have your BitLocker recovery key before you change anything else.
It worked if: tpm.msc shows Specification Version 2.0 and PC Health Check passes the TPM line.
If not: If the firmware has no TPM option at all, check the PC maker's support page for a BIOS update that adds it (Fix 5). If the board has a TPM header but no chip, a separate TPM module is needed.
Fix 3. Switch the PC to UEFI and turn on Secure Boot
20 to 40 minutesRead the warningSystem Information shows BIOS Mode: Legacy, or PC Health Check says the PC must support Secure Boot.
Windows 11 needs firmware that is UEFI and Secure Boot capable. Secure Boot works only in UEFI mode, and UEFI starts Windows only from a GPT disk. A PC installed years ago in Legacy mode on an MBR disk fails this check even when the hardware supports it.
If the steps below are done in the wrong order, Windows will not boot until you switch the firmware back. Back up your files first: Back up your files (Windows Backup, File History, Time Machine). Suspend BitLocker if it is on, and keep a Windows installation USB at hand.
- Press Win + R, type
msinfo32and press Enter. If BIOS Mode says UEFI, skip to step 6. - Right-click Start and open Terminal (Admin) or Command Prompt (Admin).
- Run
mbr2gpt /validate /allowFullOS. Continue only if it reports that validation completed successfully. - Run
mbr2gpt /convert /allowFullOSand wait until it reports that the conversion completed. - Restart into the firmware settings (as in Fix 2) and change the boot mode from Legacy or CSM to UEFI.
- In the Boot or Security menu, set Secure Boot to Enabled. Save and exit.
- In Windows, open
msinfo32again: BIOS Mode should say UEFI and Secure Boot State should say On.
It worked if: System Information shows BIOS Mode UEFI and Secure Boot State On, and PC Health Check passes the Secure Boot line.
If not: If Windows does not start after step 5, go back into the firmware and switch back to Legacy or CSM, then check that step 4 really completed. If validation in step 3 fails, the disk layout needs more work than this guide covers.
Fix 4. Make room: 64 GB of storage and enough free space for Setup
10 to 20 minutesLow riskThe PC has a small drive, drive C is almost full, or you also saw 0xC190020E or 0xC190020F.
Microsoft's minimum is a storage device of 64 GB or larger. A drive that is large enough but full stops Setup with the neighbour codes 0xC190020E and 0xC190020F, which Microsoft lists as not passing the disk space requirements to install.
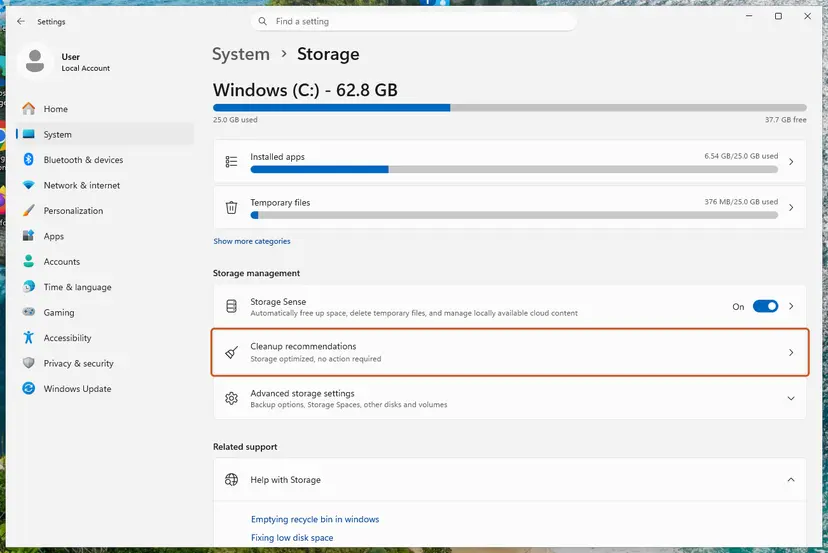
- Open File Explorer > This PC and note the size and free space of drive C.
- If the whole drive is smaller than 64 GB, no cleanup meets the requirement: the drive has to be replaced or the PC stays on its current version.
- If the drive is large enough but full, open Settings > System > Storage and use Cleanup recommendations.
- Open Disk Cleanup, select Clean up system files, then tick Windows Update Cleanup and Temporary files and select OK.
- Move large personal folders such as videos to another drive, then run the upgrade again.
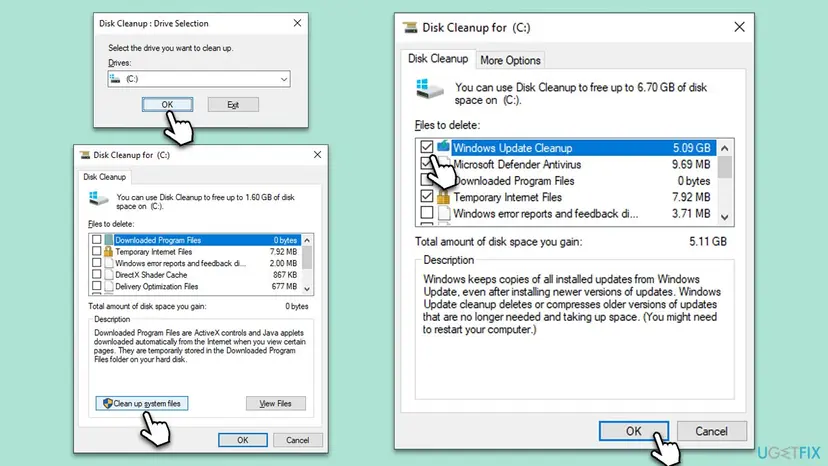
Step by step with Windows 11 screenshots: Free up disk space and delete temporary files.
It worked if: Drive C shows several gigabytes more free space, and PC Health Check passes the storage line.
If not: If storage passes but the error stays, check the Windows version in Fix 5.
Fix 5. Bring Windows 10 to 22H2 and update the BIOS
20 to 60 minutesRead the warningwinver shows a Windows 10 version older than 22H2, or the firmware has no TPM or Secure Boot option.
Microsoft says a PC must run Windows 10 version 2004 or later to upgrade to Windows 11 through Windows Update. Old firmware is the other gap: on some boards a BIOS update is what adds the firmware TPM or the Secure Boot option Fix 2 and Fix 3 need.
- Press Win + R, type
winverand press Enter. Note the version. - If it is older than 22H2, open Settings > Update & Security > Windows Update and install the offered feature update to Windows 10 22H2.
- Press Win + R, type
msinfo32and note System Model, BaseBoard Product and BIOS Version/Date. - On the PC or motherboard maker's support page for that model, compare the newest BIOS with yours and read its notes for TPM or Secure Boot.
- If a newer BIOS exists, install it exactly as the maker describes, then repeat Fix 1.
Do not turn the PC off during the update, keep a laptop on its charger and use only the file for your exact model from the maker's site. Back up your files first: Back up your files (Windows Backup, File History, Time Machine).
It worked if: winver shows 22H2, System Information shows the new BIOS date, and PC Health Check passes more lines than before.
If not: If PC Health Check now passes everything, go to Fix 6.
Fix 6. Run the upgrade again from the Installation Assistant or the ISO
10 minutes, plus the upgradeLow riskPC Health Check now passes, but Windows Update has not offered the upgrade again or still shows the old error.
Windows Update does not re-check eligibility at once. Microsoft asks you to wait until Windows Update says Windows 11 is ready after you change the PC. The Installation Assistant and setup.exe from the ISO run the check fresh, so you see the result today.
- Open Microsoft's Download Windows 11 page.
- Under Windows 11 Installation Assistant, select Download Now and run the file, or download the ISO further down the page.
- For the ISO: right-click it, select Mount and double-click
setup.exeon the new drive. - Choose to keep personal files and apps, and let Setup run.
- If it stops again, note the code: a different code means a different problem.
For a Windows 11 feature update such as 25H2 or 26H2, the same ISO path works. Our guide to Windows 11 24H2 update fails to install covers feature updates that fail for other reasons.
It worked if: Setup passes the requirements check and starts copying files.
If not: If Setup now passes but Windows Update keeps showing 0xc1900200, reset its cache in Fix 7.
Fix 7. Reset Windows Update components so it forgets the old result
10 minutesLow riskEvery requirement passes and the upgrade worked from the ISO, or you prefer Windows Update, but it still lists the old error.
This does not change any requirement. It clears the download cache and the update database, so Windows Update scans the PC again instead of showing the result it stored before your fix. That is the only case where this old method helps with 0xC1900200.
- Open Command Prompt as administrator. Type cmd in the search box, right-click Command Prompt and select Run as administrator. Select Yes when Windows asks for permission.
- Stop the update services. Type the commands below and press Enter after each one. If Windows says that other services depend on Cryptographic Services, it stops them too. A message that a service is not started is fine.
net stop wuauserv
net stop bits
net stop cryptsvc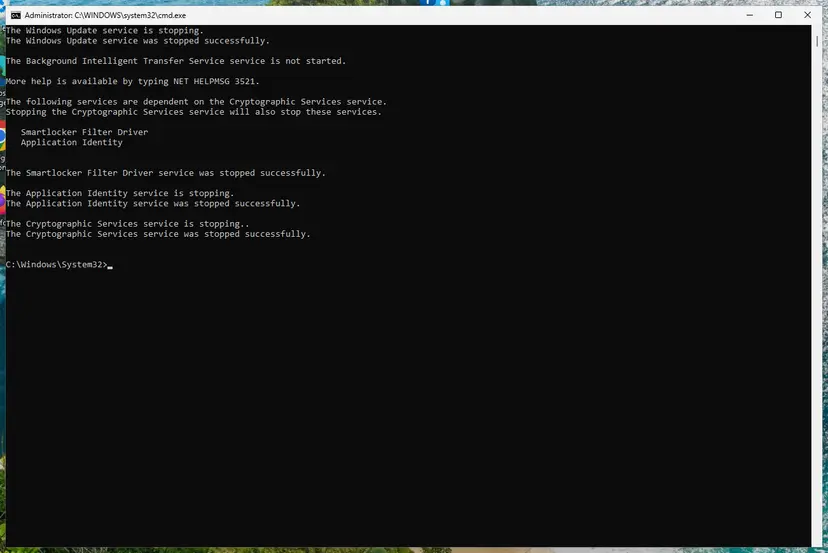
The update services are stopped. Screenshot: Windows 11 26H2. - Delete the download queue files. This clears the list of downloads that the Background Intelligent Transfer Service keeps. If Windows says it cannot find the files, continue.
del "%ALLUSERSPROFILE%\Application Data\Microsoft\Network\Downloader\qmgr*.dat" - Rename the update cache folders. Renaming keeps a copy in case you need it; Windows creates new, empty folders when the services start again. If you get Access is denied, a service is still running: repeat the previous step.
ren %systemroot%\SoftwareDistribution SoftwareDistribution.old
ren %systemroot%\System32\catroot2 catroot2.old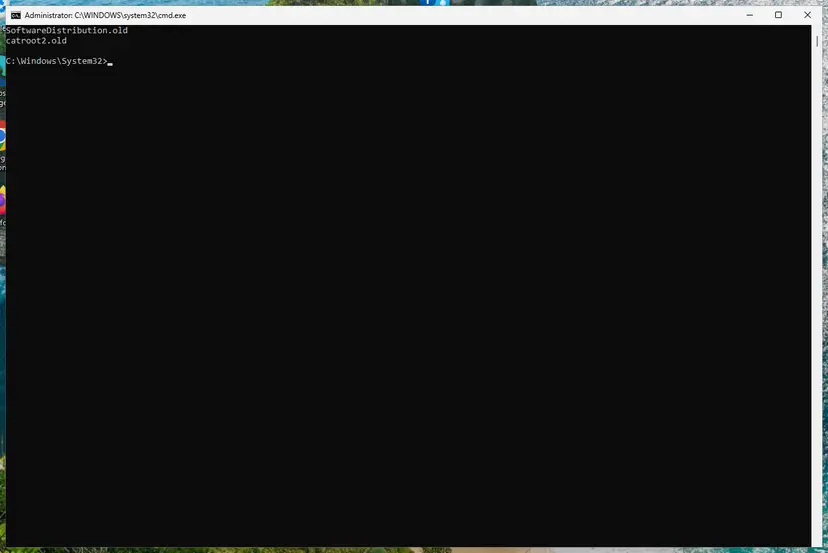
Both folders now end in .old. Screenshot: Windows 11 26H2. - Start the services again. Type the commands below and press Enter after each one. The requested service has already been started is fine: Windows started it on its own.
net start cryptsvc
net start bits
net start wuauserv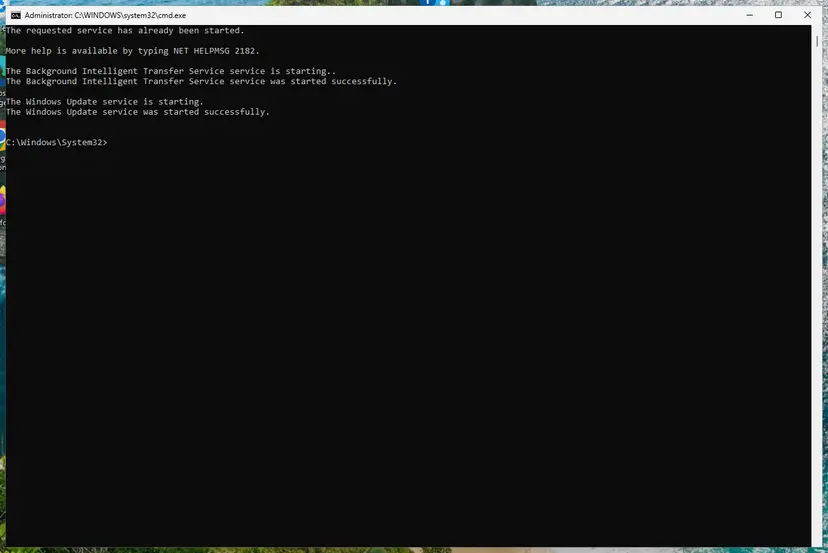
BITS and Windows Update are running again. Screenshot: Windows 11 26H2. - Restart and check for updates. Restart the PC. Then select Start > Settings > Windows Update > Check for updates. The first check can take longer than usual because everything is downloaded again.
These steps were written for Windows 11 and Windows 10 (the steps are the same). The full page with the other versions and what each result means: Reset Windows Update components
It worked if: After a restart, Check for updates offers the upgrade again without the error.
If not: If the error comes back and PC Health Check passes, read the next section.
If error 0xC1900200 is still there
When the code comes back after Fix 2 to Fix 5, one requirement still fails. Setup writes what it checked to its logs, and those decide the next step.
| What you find | What to do |
|---|---|
| PC Health Check names the processor | The CPU is not on Microsoft's approved list. Clock speed and core count are fixed in the chip, so no setting changes this. |
| PC Health Check names the memory | Under 4 GB. Some PCs take more RAM; the PC maker's site says which modules fit. |
| Everything passes, Setup still blocks | Open C:\$Windows.~BT\Sources\Panther and look at setupact.log and the CompatData files for the item marked as blocking. |
| A work or school PC | Ask the IT department. Managed PCs may be held back on purpose, and Microsoft says they should check with the administrator. |
If the processor fails, the honest options are to stay on your current Windows or to replace the PC. Windows 10 left support on 14 October 2025 and no longer gets free security fixes, so staying is a risk that grows with time.
- What to send to support: the full code, the version you upgrade from and to, and how you started the upgrade.
- Attach a screenshot of PC Health Check's results and the
setupact.logfile from the Panther folder. - Name the hardware: PC model, processor, BIOS version and TPM version from
tpm.msc.
How to keep 0xC1900200 from coming back
- Leave TPM 2.0 and Secure Boot turned on after the upgrade.
- Keep at least 20 GB free on drive C before feature updates.
- Check a new or used PC with PC Health Check before you buy it.
- Do not reset the BIOS to defaults without checking that TPM and Secure Boot are still on afterwards.
- Do not use tools that remove the requirement checks: an unsupported install may not get updates.
- Do not clear the TPM on a BitLocker drive without the recovery key.
A firmware reset or a BIOS update can switch TPM or Secure Boot off again. If the error returns after such a change, start again with Fix 1.
Frequently asked questions
What does error 0xC1900200 mean?
It means Windows Setup checked your PC and found that it does not meet the minimum system requirements for the update. Microsoft names the code MOSETUP_E_COMPAT_SYSREQ_BLOCK. Nothing was installed and nothing on your PC was changed. On Windows 10 it usually appears when Windows Update offers Windows 11; on Windows 11 it can appear with a feature update. Run PC Health Check to see which requirement fails, then fix that one.
Why does Windows 11 show 0xC1900200 when my PC already runs Windows 11?
Feature updates such as 25H2 run the same requirements check as a first upgrade. A PC that got Windows 11 earlier with the checks bypassed, or one where a BIOS reset turned TPM or Secure Boot off, fails it again. Open tpm.msc and System Information to see whether TPM 2.0 and Secure Boot are still on, and turn them back on with Fix 2 and Fix 3.
What is error 0xC190020E?
It is a neighbour of 0xC1900200 in the same family of Setup codes. Microsoft names it MOSETUP_E_INSTALLDISKSPACE_BLOCK: the system does not pass the disk space requirements to install the update. The PC may meet every other requirement; drive C simply has too little free space. Free up space as in Fix 4, ideally to 20 GB or more, and run the upgrade again.
What is error 0xC190020F?
Microsoft names it MOSETUP_E_INSTALLDISKSPACE_CANCEL: Setup was cancelled because the device does not have enough disk space to install. It is the cancelled version of 0xC190020E, so the cause and the fix are the same. Make room on drive C as in Fix 4, then start the upgrade again from Windows Update or the ISO.
What does 0xC1900200 (-1047526912) mean?
It is the same error. Some tools and logs show the code as a signed decimal number, and 0xC1900200 written that way is -1047526912. You may see both in a deployment report or a script's output. The meaning does not change: the PC failed the minimum requirements check. Searching for oxc1900200 or 0x1900200 also leads here, since those are typing variants of the same code.
What does "Windows Setup failed with hexadecimal exit code 0xC1900200" mean?
This wording comes from tools that run Windows Setup for you, such as a company's upgrade task, and report its exit code. The code inside is what matters, and it means the same as in Windows Update: the PC does not meet the minimum requirements. On a managed PC, tell the IT department which requirement PC Health Check reports. On your own PC, follow Fix 1 to Fix 5.
Can I bypass 0xC1900200 and install Windows 11 anyway?
Tools and registry tricks that skip the checks exist, but this guide does not cover them. Microsoft does not guarantee updates for Windows 11 on hardware below the minimum, and turning off TPM or Secure Boot to get through weakens the protection those features give. If only a setting is off, turning it on (Fix 2, Fix 3) is the clean way past this error.
Will the Windows Update troubleshooter or SFC fix 0xC1900200?
Usually not. Both repair broken update files or system files, and 0xC1900200 is not a broken file: it is the result of a requirements check. The old version of this guide suggested them first, but they do not change TPM, Secure Boot, the processor or the drive size. Use them only for other errors, or reset the update cache (Fix 7) after the requirement is fixed.
Is my PC safe if I cannot get past 0xC1900200?
On Windows 11, a blocked feature update leaves you on your current version, which still gets monthly security updates until that version's support ends. On Windows 10, support ended on 14 October 2025, so the PC no longer receives free security fixes. Keep Microsoft Defender on, back up your files, and plan to replace a PC whose processor is not supported.
Sources
- Microsoft Learn: Windows 10 upgrade resolution procedures (0xC1900200 cause and mitigation, 0xC1900200 - 0x20008, result code table) (learn.microsoft.com)
- Microsoft Learn: Windows 10 upgrade error codes (MOSETUP_E_COMPAT_SYSREQ_BLOCK, 0xC190020E, 0xC1900210) (learn.microsoft.com)
- Microsoft Support: Windows 11 system requirements (CPU, RAM, storage, UEFI and Secure Boot, TPM 2.0, upgrade path) (support.microsoft.com)
Did this fix work?
One click, no account. It tells the next reader which guides are worth their time.
Questions and experiences: fix Windows update error 0xC1900200
Still broken, or found a fix we did not cover? Ask here: members and our editors answer. Reading is open; writing needs a free account.
…