
How to fix Event ID 161 Volmgr error in Windows 11 and 10

Prefer to fix it yourself? The manual steps follow.
- 9methods
- 10 to 60 minutes
- Advanced
Applies to Windows 11 and Windows 10 PCs that crash, freeze or restart on their own and log Event ID 161 from source volmgr in the System log
9 methods in this guide
Hello. My Windows system keeps crashing because of an Event ID 161 Volmgr error. What is it and how can I fix it?
Volmgr Event ID 161 is a symptom, not the crash itself: Windows tried to save a memory dump after a crash and could not. Two things are wrong at once, the crash and the failed dump. Start by making sure a dump can be written, then look for what crashes the PC.
Event 161 means Windows could not write the crash dump. First open the events around it (Fix 1) to see what crashed the PC. Then check Startup and Recovery and the page file, and free space on the system drive (Fixes 2 and 3). Only after that look for the cause of the crash: system files, the drive, drivers and memory (Fixes 4 to 9).
| Error | Event ID 161, source volmgr: "Dump file creation failed due to error during dump creation." |
|---|---|
| Where it appears | Event Viewer > Windows Logs > System, usually next to a Kernel-Power Event 41 ("The system has rebooted without cleanly shutting down first"). On screen you see a blue screen, a black screen, a freeze or a sudden restart. |
| Main cause | The dump could not be saved: no page file or dedicated dump file big enough, or too little free space. The crash behind it is a separate cause: system files, the drive, a driver, memory or power. |
| Fastest fix | Check the dump type and page file in Startup and Recovery, and free space on the system drive (Fixes 2 and 3). Then repair system files (Fix 4). |
| Also written as | "volmgr error", "volmgr error 161", "volmgr 161", "volmgr event id 161", "event 161 volmgr", "volmgr 161 error", "event id 161", "event id 161 volmgr", "event 161", "windows event id 161", "error volmgr 161", "volmgr". |
| Affects | Windows 11 and Windows 10; any PC that writes crash dumps, most often reported on gaming PCs and after a Windows reinstall. |
| Vendor status | We found no Microsoft page that explains Event 161. Microsoft does document what a crash dump needs: a large enough page file or dedicated dump file. |
| Time to fix | 10 minutes for the dump settings; up to an hour when you also have to hunt the crash itself. |
Facts checked on 16 October 2026. Steps written for Windows 11 25H2 and 26H2 and Windows 10 22H2, Event Viewer and System Properties > Startup and Recovery.
What Volmgr Event ID 161 means
Event ID 161 is written to the System log by volmgr, the Windows volume manager driver. The text is short: Dump file creation failed due to error during dump creation. A dump file is the copy of memory Windows saves when it crashes, so that you or a technician can read what went wrong. Event 161 says that copy could not be made.
That makes it a second problem on top of the first. The PC crashed or lost power, and then the dump failed as well. Reports in the Microsoft Q&A forum show the event next to Kernel-Power Event 41, which says the system rebooted without cleanly shutting down. We found no Microsoft page that explains Event 161 itself, so what follows rests on Microsoft's pages about crash dumps and page files.
- Spellings people search: "volmgr error", "volmgr 161", "event id 161 volmgr", "event 161" and "windows event id 161". They all point to this one event.
- What you see on screen: a blue screen, a black screen, a freeze or a restart with no warning. Event 161 itself shows nothing on screen; it is only in Event Viewer.
- Not this event: the Win32 error number 161 ("The specified path is invalid") has nothing to do with it. Here 161 is only the event number of the volmgr source.
Why Event 161 appears: the dump and the crash
Microsoft says that for a crash dump to be written, a page file or a dedicated dump file must exist and be large enough for the selected dump type. Otherwise no dump is created. So the first layer is the dump: settings, page file and free disk space. The second layer is whatever crashed the PC. Users in the Microsoft Q&A thread on this event report a failing drive, damaged system files, a graphics driver, memory and even a power supply.
| Layer | Cause | Sign | Fix |
|---|---|---|---|
| Dump | Dump type needs more space than the page file or disk offers, for example Complete memory dump. | Startup and Recovery shows Complete memory dump; the system drive is nearly full. | Fixes 2 and 3 |
| Dump | Page file removed or set to a small fixed size. | Performance settings show no paging file on the system drive. | Fix 2 |
| Crash | Damaged Windows system files (users report). | Crashes began after a failed update or an unclean shutdown. | Fix 4 |
| Crash | File system errors or a failing drive (users report). | Slow disk, file errors, crashes during heavy disk use. | Fix 5 |
| Crash | A graphics or storage driver (users report). | Crashes while gaming or after a driver update. | Fix 6 |
| Crash | Faulty memory, power supply or other hardware (users report). | Crashes continue after a clean Windows install. | Fixes 7 and 8 |
| Crash | Malware that damaged files. | Other odd behaviour, unknown programs. | Fix 9 |
Fixing the dump settings makes the next crash leave a dump file behind. It does not stop the crash. Once a dump exists, it is the best evidence of what is wrong, so keep it and read the later methods in order.
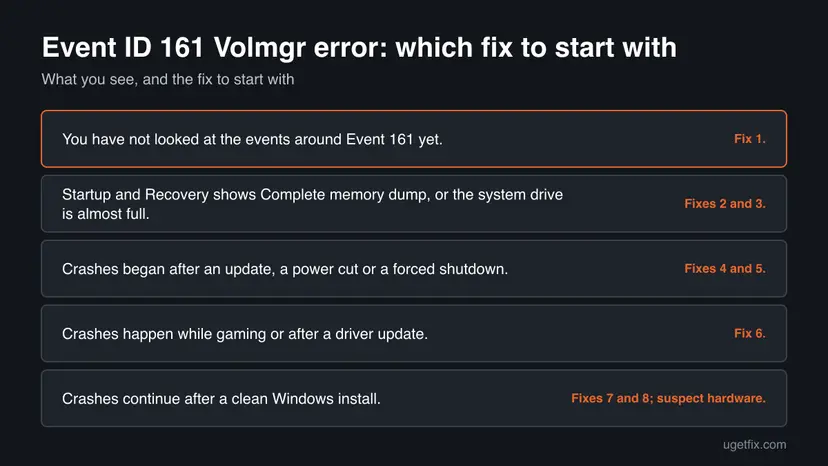
How to fix Event ID 161 Volmgr error in Windows, dump first and crash second
Fix 1 shows what crashed the PC. Fixes 2 and 3 let Windows save a dump. Fixes 4 to 9 look for the crash itself, from the most common cause to the least. Restart after each fix and watch whether a new Event 161 appears. Paths are for Windows 11 and Windows 10 22H2, which left support on 14 October 2025.
| What you see | Start with |
|---|---|
| You have not looked at the events around Event 161 yet. | Fix 1. |
| Startup and Recovery shows Complete memory dump, or the system drive is almost full. | Fixes 2 and 3. |
| Crashes began after an update, a power cut or a forced shutdown. | Fixes 4 and 5. |
| Crashes happen while gaming or after a driver update. | Fix 6. |
| Crashes continue after a clean Windows install. | Fixes 7 and 8; suspect hardware. |
Fix 1. Read the events around Event 161 and find the crash
5 minutesNo riskEveryone, before any other fix. It takes five minutes and shows what happened just before the dump failed.
Event 161 is a result. The entries logged just before it, such as Kernel-Power 41, show whether Windows crashed, froze or lost power, and the time tells you what you were doing.
- Press Win + R, type
eventvwr.mscand press Enter. - Open Windows Logs > System.
- Select Filter Current Log, tick Error and Critical, and select OK.
- Find the newest volmgr Event 161 and note its time.
- Look at the entries within a minute before it. Open any Kernel-Power Event 41 and any entry from source BugCheck, if Windows wrote one.
- Write down the times and the program or game you were using.
If Event 161 always follows a game, the graphics driver is the first suspect (Fix 6). If it follows idle time or sleep, think of power and drivers. If it comes at random, think of the drive and memory (Fixes 5 and 7).
It worked if: You know the time of each crash and what you were doing, and whether Windows wrote any stop information.
If not: If you find no crash entries at all, the PC may be losing power before Windows can log anything. Go to Fix 2 and then Fix 8.
Fix 2. Check the dump type and the page file in Startup and Recovery
10 minutesLow riskAny PC with Event 161. This is the direct fix for the failed dump, and it also shows whether the dump type is too large.
Microsoft says a crash dump needs a page file or dedicated dump file large enough for the chosen dump type, and a Complete memory dump needs the size of your RAM plus 257 MB. If the setting asks for more than the disk offers, no dump is written.
- Press Win + R, type
sysdm.cpland press Enter. - Open the Advanced tab.
- Under Startup and Recovery, select Settings.
- Under Write debugging information, check the type. Microsoft says Automatic memory dump is on by default; select it if you changed it to Complete memory dump.
- Under System failure, remove the tick next to Automatically restart if you want to read the stop code on screen at the next crash.
- Select OK, then open Settings under Performance, the Advanced tab and Change under Virtual memory.
- Tick Automatically manage paging file size for all drives, select OK and restart the PC.
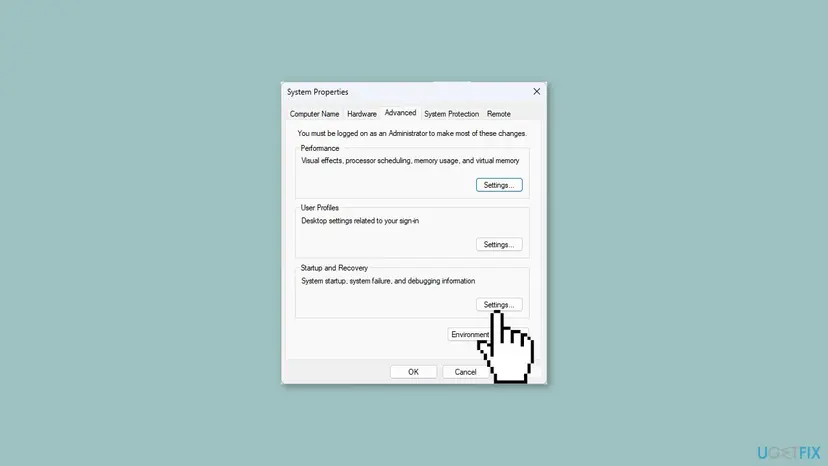
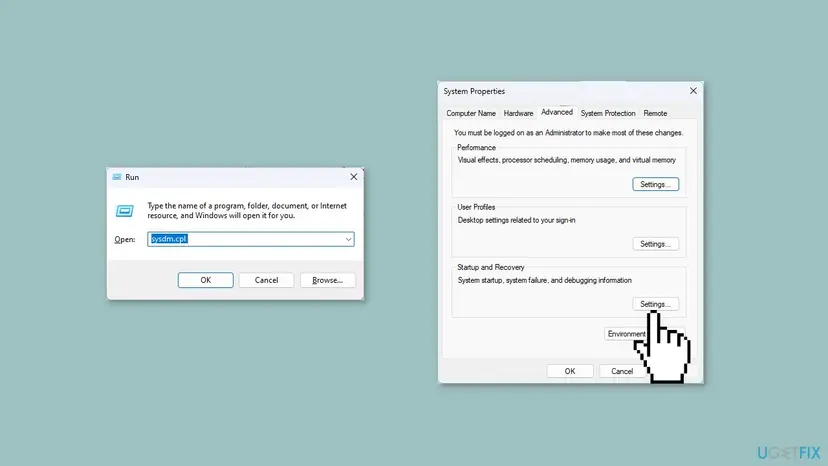
An older version of this guide told readers to pick Complete memory dump. Microsoft's table needs a page file of 1 x RAM plus 257 MB for it, which a small or nearly full system drive cannot give. Automatic memory dump picks a smaller page file size and raises it if the PC crashes again within four weeks.
It worked if: The dump type is Automatic memory dump, the page file is system managed, and the next crash leaves a file in C:\Windows\Minidump or C:\Windows\Memory.dmp.
If not: If Event 161 still appears at the next crash, free space on the system drive (Fix 3). If the box was already set this way, go on to Fix 4.
Fix 3. Free space on the system drive
10 minutesLow riskThe system drive is almost full, or the page file cannot grow because of low space.
Microsoft says system managed page files are sized to the crash dump setting, and may grow to within 1 GB of free space on the volume for that purpose. With less room than that, the page file cannot back a dump.
- Open Storage settings. Select Start > Settings > System > Storage. The top of the page shows how full the drive is and what uses the space.
- Open Cleanup recommendations. Under Storage management, select Cleanup recommendations.
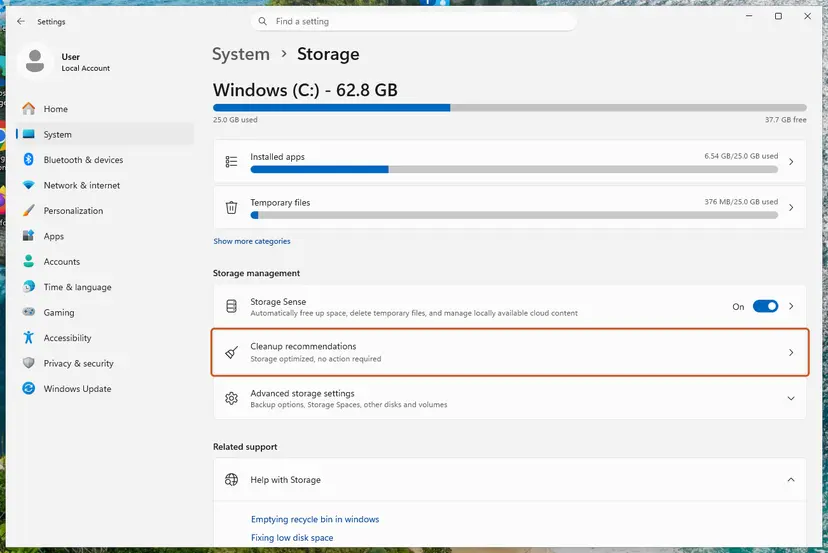
Settings, System, Storage: Cleanup recommendations is under Storage management. Screenshot: Windows 11 26H2. - Clean up what Windows suggests. Open each group (Temporary files, Large or unused files, Files synced to the cloud, Unused apps), check the items you do not need and select Clean up in that group.
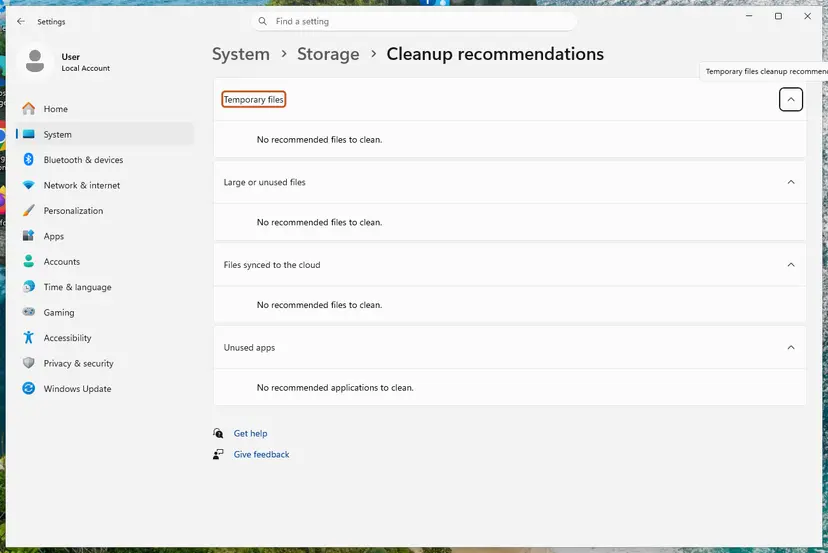
Cleanup recommendations groups the suggestions; on our test PC there was nothing to clean yet. Screenshot: Windows 11 26H2. - Delete more temporary files. Go back to Storage and select Temporary files. Windows lists the types it can remove with their size. Check the ones you do not need and remove them. Leave Downloads unchecked unless you have checked that folder.
- Turn on Storage Sense. Back on Storage, turn the Storage Sense switch on. Windows then deletes temporary files on its own when the drive runs low.
- Choose what Storage Sense cleans. Select Storage Sense to open its page. Check the box for cleaning temporary files, then choose when it runs and how long files may stay in the Recycle Bin and Downloads before they are deleted.
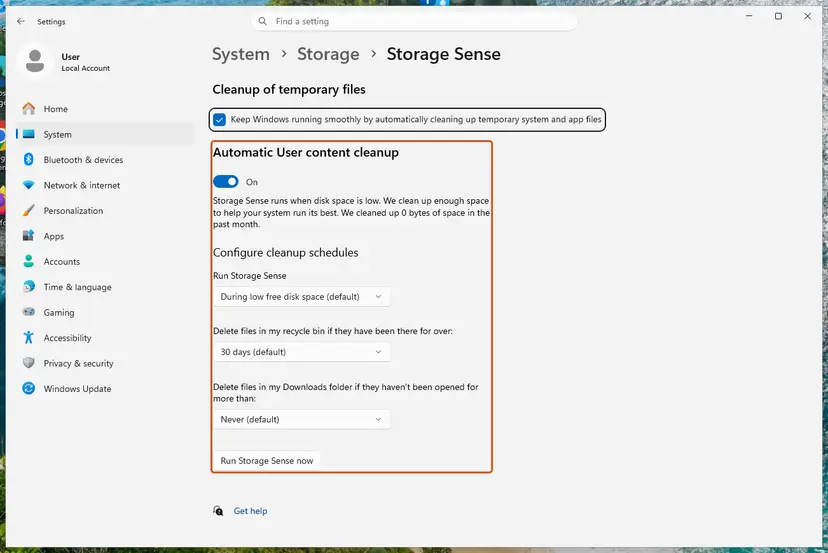
Storage Sense: schedules for the Recycle Bin and Downloads, and Run Storage Sense now. Screenshot: Windows 11 26H2. - Run it now. Select Run Storage Sense now at the bottom of the page.
- Clean up system files with Disk Cleanup. Type disk cleanup in the search box on the taskbar and open Disk Cleanup. Choose drive C: and select OK, then select Clean up system files and choose C: again.
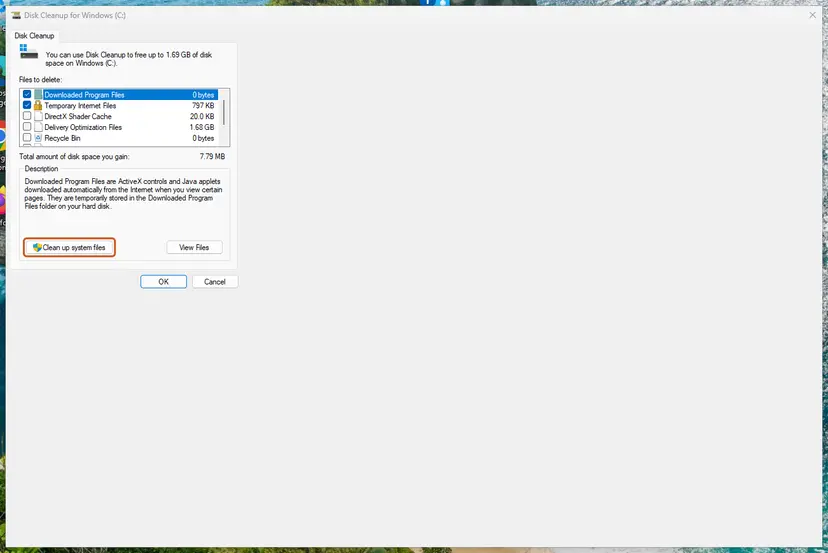
Disk Cleanup: Clean up system files adds Windows Update and other system files to the list. Screenshot: Windows 11 26H2. - Delete the files. Check the types of files you want to remove (select a name to see what it is), select OK, then Delete files.
These steps were written for Windows 11 (screenshots: 26H2). The full page with the other versions and what each result means: Free up disk space and delete temporary files
After clearing space, repeat the page file check from Fix 2 and restart. The full cleanup steps are in Free up disk space and delete temporary files.
It worked if: The system drive has several gigabytes free and the page file shows as system managed.
If not: If the drive was not short of space, the dump failed for another reason. Go to Fix 4.
Fix 4. Repair damaged Windows system files
20 minutesNo riskCrashes began after a failed update, a power cut or a forced shutdown, or the dump settings were already correct.
Damaged system files can crash Windows, and users in the Microsoft Q&A thread on this event ran these commands first. DISM repairs the component store and SFC replaces damaged protected files from it.
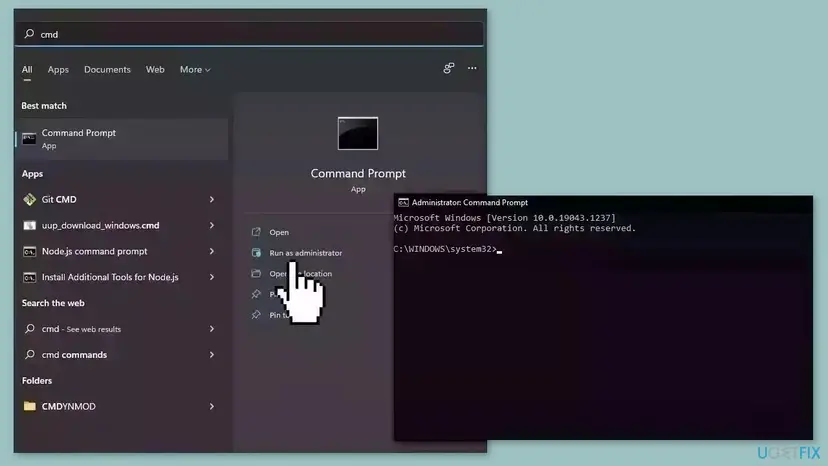
- Open an elevated command window. Right-click Start and select Terminal (Admin), or type cmd in the search box, right-click Command Prompt and select Run as administrator. Select Yes when Windows asks for permission.
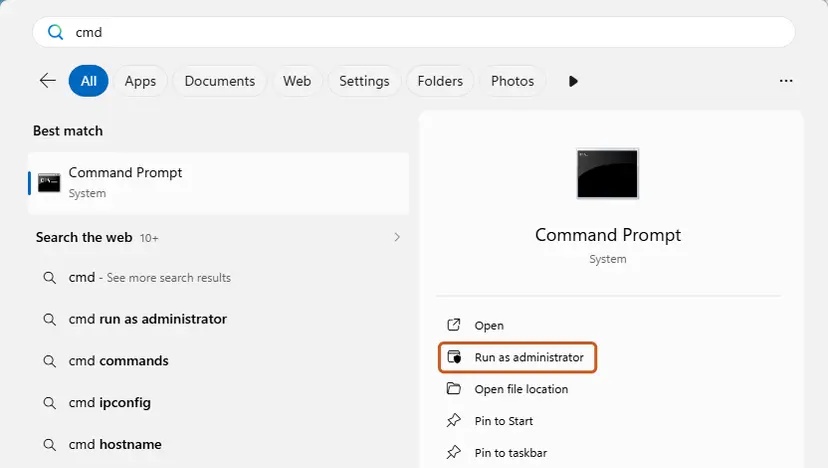
Search for cmd and choose Run as administrator. Screenshot: Windows 11 26H2. - Run DISM first. Type the command below and press Enter. DISM downloads clean copies of damaged components from Windows Update, so it can take several minutes. Wait until it says The operation completed successfully.
DISM.exe /Online /Cleanup-Image /RestoreHealth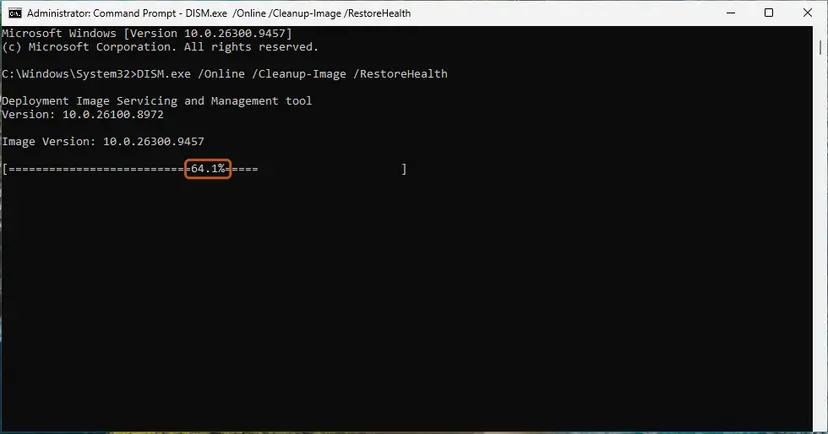
DISM /RestoreHealth running. Screenshot: Windows 11 26H2. - Run System File Checker. In the same window, type the command below and press Enter. Do not close the window until the verification reaches 100%.
sfc /scannow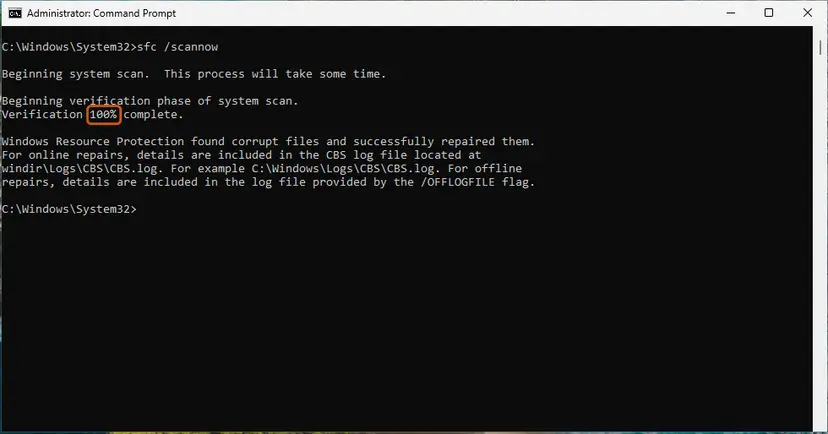
sfc /scannow at 100%. Screenshot: Windows 11 26H2. - Read the result and restart. Compare the last message with the table below this guide, then restart the PC so that repaired files are loaded.
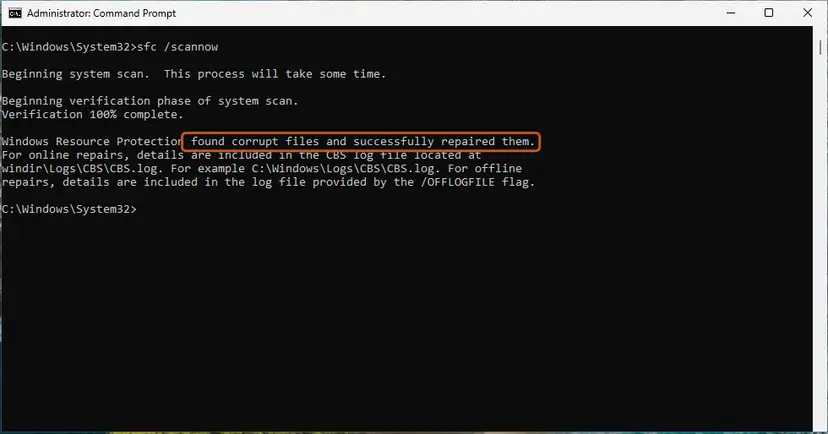
The result line tells you what SFC did. Screenshot: Windows 11 26H2.
These steps were written for Windows 11 24H2 and 25H2. The full page with the other versions and what each result means: Run DISM and SFC to repair Windows system files
It worked if: SFC reports that it found no integrity violations or that it repaired the files, and the PC restarts normally.
If not: If SFC or DISM reports errors that it cannot fix, note the message and go to Fix 5, then consider a repair install with Reinstall Windows without losing files.
Fix 5. Check the drive for file system errors
30 minutesLow riskCrashes come with slow disk use, file errors or after a forced shutdown. Users in the Microsoft Q&A thread were also told to run it.
Volmgr manages drive volumes. File system errors or bad sectors on the system drive can stop a dump from being written or crash the PC during disk use. Check Disk finds and marks such errors.
- Open Command Prompt as administrator. Type cmd in the search box on the taskbar, right-click Command Prompt and select Run as administrator. Select Yes when Windows asks for permission.
- Scan the drive without changing anything. Type the command below and press Enter. Replace C: with another drive letter to check that drive. This scan only reports; it does not fix anything.
chkdsk C: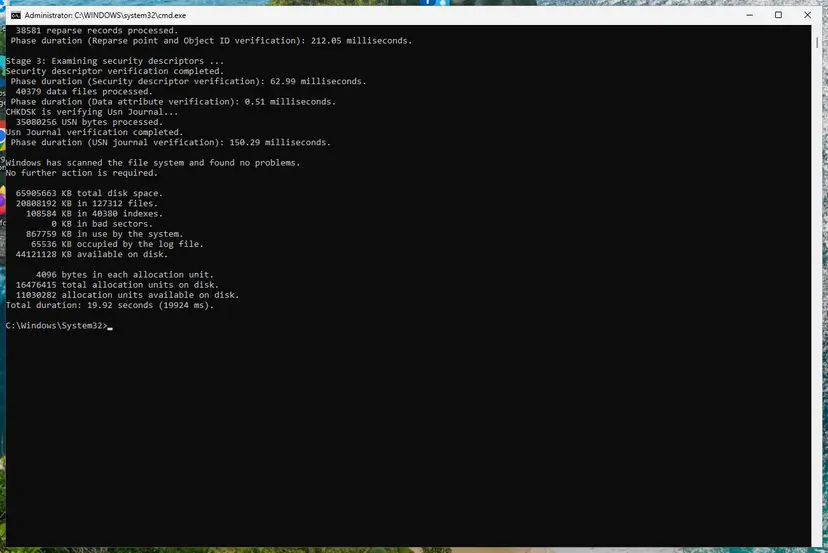
A clean result: no problems found and 0 KB in bad sectors. Screenshot: Windows 11 26H2. - If errors were found, run the repair. Run chkdsk with /f to fix file system errors. On the Windows drive (C:) chkdsk cannot lock the drive while Windows is running, so it offers to check it at the next restart.
chkdsk C: /f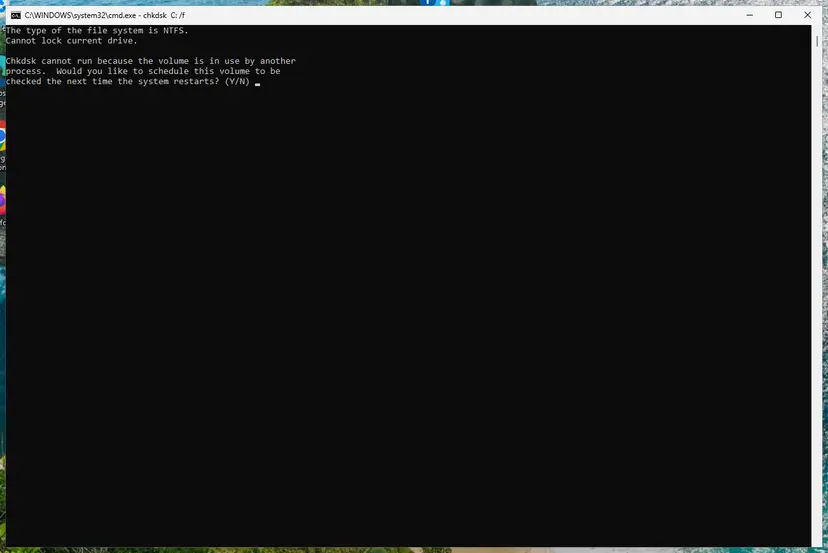
On the system drive chkdsk /f asks to run at the next restart. Screenshot: Windows 11 26H2. - Schedule the check and restart. Type Y and press Enter, then restart the PC. chkdsk runs before Windows starts. Do not turn the PC off while it runs.
- Read the result after the restart. The report of a check made at startup is not shown on the desktop. Open PowerShell and run the command below to see it, or open Event Viewer (eventvwr.msc) > Windows Logs > Application and filter by the sources Chkdsk and Wininit.
Get-WinEvent -FilterHashtable @{LogName='Application'} | Where-Object { $_.ProviderName -match 'wininit' } | Select-Object -First 1 | Format-List TimeCreated, Message
These steps were written for Windows 11 and Windows 10 (the steps are the same). The full page with the other versions and what each result means: Check a disk for errors (chkdsk)
It worked if: Check Disk finishes without errors, or fixes the ones it found, and the next restart is clean.
If not: If it reports bad sectors or the PC freezes during the scan, back up your files now with Back up your files (Windows Backup, File History, Time Machine) and treat the drive as failing.
Fix 6. Update or roll back the drivers
20 minutesLow riskCrashes happen while gaming or right after a driver update, or the drivers are old.
Drivers run in the core of Windows, and a faulty one can crash the whole PC. Users in the Microsoft Q&A thread report that a different graphics driver version ended crashes that came with this event.
- Open Device Manager. Right-click Start and select Device Manager.

Device Manager lists devices by category; a yellow warning sign marks a device with a problem. Screenshot: Windows 11 26H2. - Open the device's Driver tab. Expand the category (for example Display adapters), right-click the device, select Properties and open the Driver tab. Driver Date and Driver Version show what is installed now.
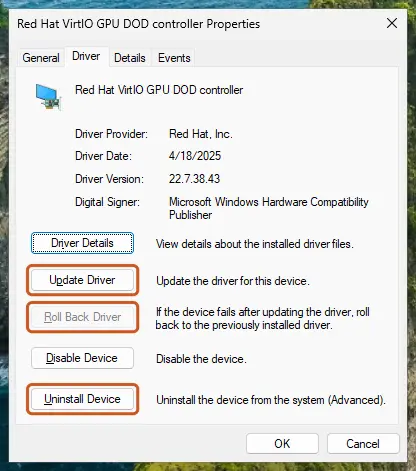
The Driver tab holds all three actions: update, roll back, uninstall. Screenshot: Windows 11 26H2. - Update the driver. Select Update Driver and let Windows search automatically. To use a driver you downloaded from the device maker, select Browse my computer for drivers instead and point to the unpacked folder.
- Or roll back the driver. If the problem started after a driver update, select Roll Back Driver, choose a reason and select Yes. The button is greyed out when Windows has no earlier driver to return to.
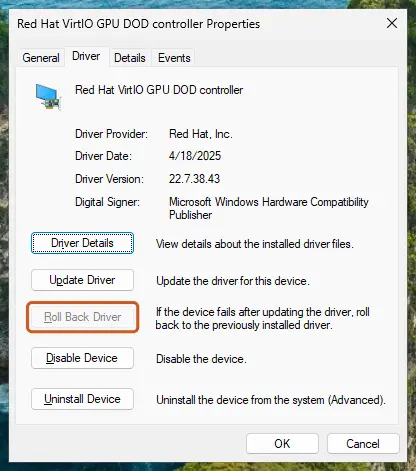
Roll Back Driver is greyed out here because there is no earlier driver. Screenshot: Windows 11 26H2. - Or reinstall the driver. Select Uninstall Device. Tick Attempt to remove the driver for this device only if you want Windows to delete the driver package too, then select Uninstall.
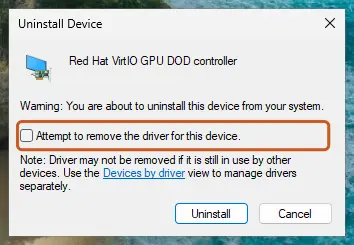
Tick the checkbox only to delete the driver package as well. Screenshot: Windows 11 26H2. - Restart. Restart the PC. Windows detects the device again and installs a driver for it.
- Check optional driver updates. Open Settings > Windows Update > Advanced options > Optional updates. If driver updates are listed, tick the ones you need and select Download & install.
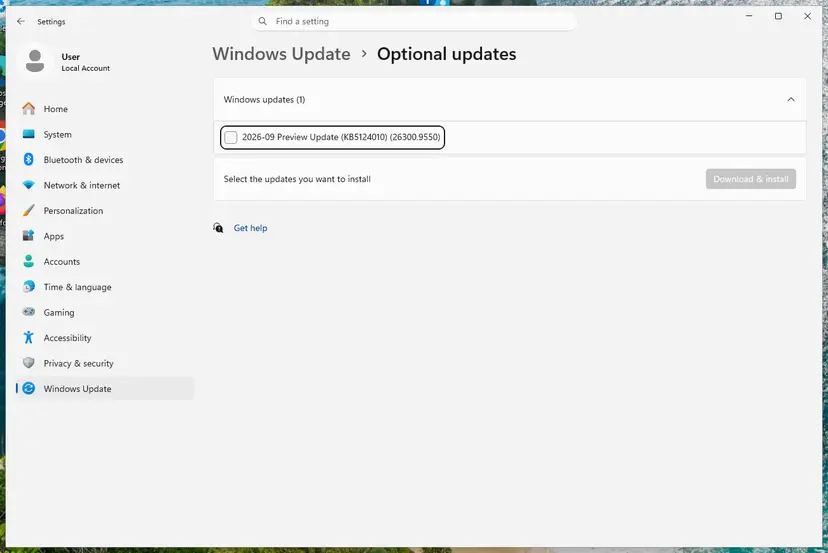
Optional updates on our test PC; driver updates appear here when Windows Update has any for your hardware. Screenshot: Windows 11 26H2.
These steps were written for Windows 11 24H2 and later. The full page with the other versions and what each result means: Update, roll back or reinstall a driver
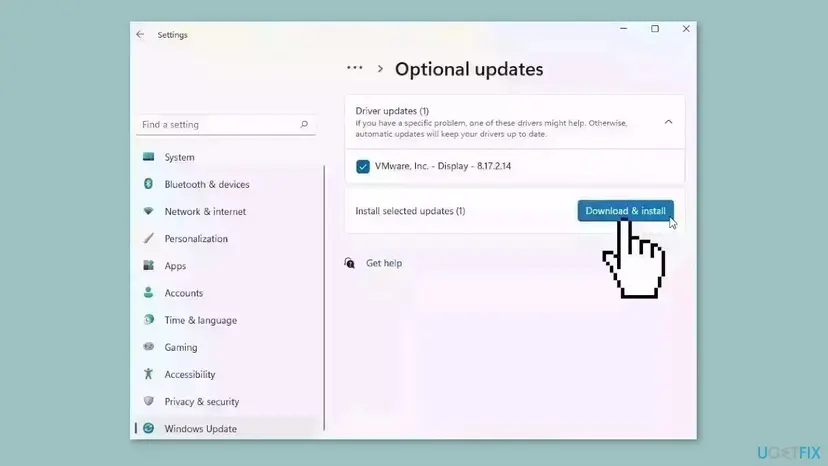
Roll the graphics driver back to the previous version instead of installing a newer one. The roll back button is in the driver's properties in Device Manager.
It worked if: The driver is current or rolled back, and the PC runs the game that crashed without a new Event 161.
If not: If a new driver makes it worse, roll it back. If nothing changes, test memory (Fix 7).
Fix 7. Test the memory
30 minutesNo riskCrashes are random, happen under load, or continue after drivers and system files were repaired.
Faulty RAM crashes a PC without any pattern. an adviser in the Q&A thread on this event suggested the Windows Memory Diagnostic, which tests RAM for faults.
- Open Windows Memory Diagnostic. Press Windows + R, type mdsched.exe and select OK. You can also search for Windows Memory Diagnostic and open it from the results.
- Choose when to test. Select Restart now and check for problems (recommended) to test right away. Select Check for problems the next time I start my computer if you want to finish your work first: the test then runs at the next start.
- Let the test run. The PC restarts into a blue screen that shows the progress of the test. You do not have to do anything. When the test ends, the PC restarts by itself and Windows loads.
- Look for the notification. Sign in. After a short while Windows shows a notification with the result, also when no errors were found. If you missed it, read the result in Event Viewer.
- Open the System log. Press Windows + R, type eventvwr and select OK. In Event Viewer, expand Windows Logs and select System.
- Find the result. Right-click System and select Find. Type MemoryDiagnostics-Results and press Enter. Select the event that is found: its text says whether the test detected errors.
These steps were written for Windows 11 25H2 and 26H2, Windows 10 22H2. The full page with the other versions and what each result means: How to test your RAM with Windows Memory Diagnostic
It worked if: The test reports no memory problems after the restart.
If not: If it reports errors, remove all but one memory stick and test each stick alone. A stick that fails must be replaced.
Fix 8. Look for hardware and power problems
30 minutesNo riskCrashes continue after a clean Windows install, or the PC restarts or goes black without a blue screen.
A user in the Microsoft Q&A thread saw the same crashes after a reinstall and an adviser in the thread wrote that a clean install that does not help points to hardware. Power supply, overheating and a failing drive are the usual suspects.
- Shut the PC down and unplug it. Open the case on a desktop PC and remove dust from fans and heatsinks.
- Reseat the memory sticks, the graphics card and the power connectors.
- Remove extra devices: unplug USB devices and extra drives that you do not need to boot.
- Look in the PC maker's tool or in the BIOS for temperatures and fan speeds.
- If you have a known good power supply or another power cable, try it; one Q&A user reported that a power supply swap changed the behaviour for a while.
- Run your usual game or program again and watch Event Viewer for new entries.
It worked if: The PC runs the load that crashed it without a restart or a new Event 161.
If not: If the crashes continue, note which part you changed, collect the dump file from C:\Windows\Minidump, and take the PC to a technician.
Fix 9. Scan the PC for malware
30 minutesNo riskThe PC also shows other odd behaviour, or the earlier fixes found nothing wrong.
Malware can damage or replace system files and drivers, and the old guide for this event listed a scan. It is the least likely cause here, but a scan with Microsoft Defender costs nothing.
- Open Windows Security. Select Start, type Windows Security and open the app.
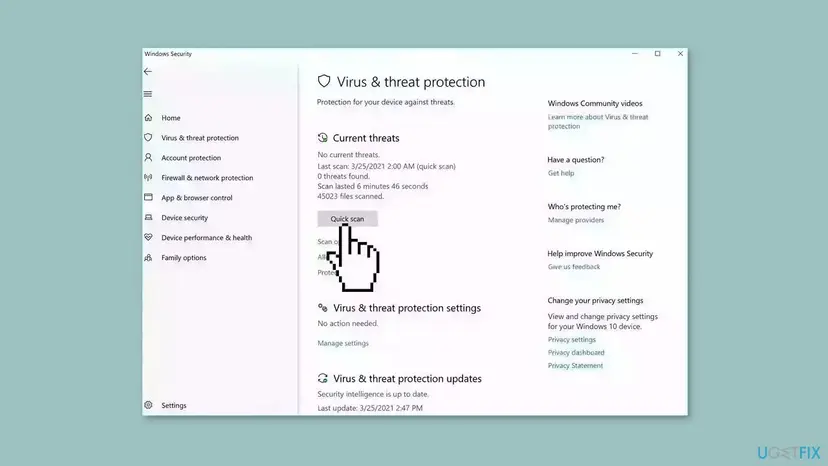
- Open Virus & threat protection. Select Virus & threat protection. Under Current threats you see when the last scan ran, how long it took and how many files it checked.
- Run a quick scan. Select Quick scan. If Windows Security thinks a deeper scan is needed, it tells you when the quick scan is done.
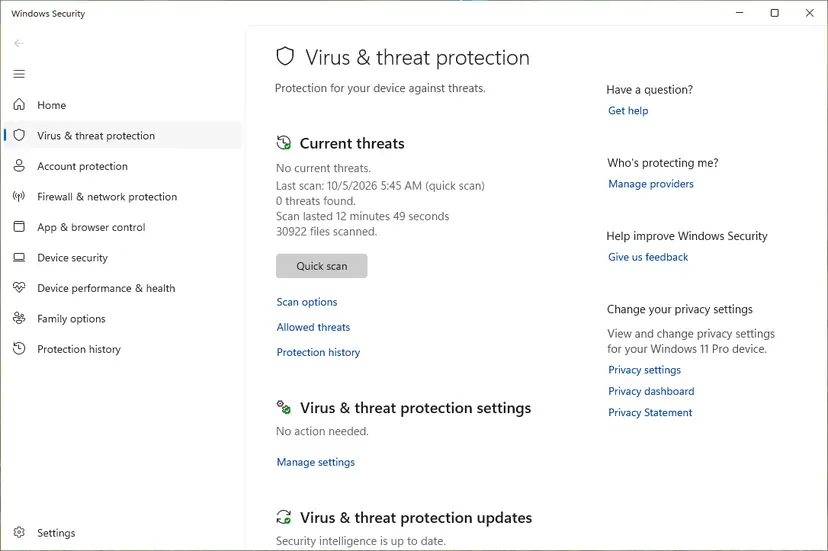
Quick scan and Scan options sit under Current threats. Screenshot: Windows 11 26H2. - Open Scan options. If the quick scan finds nothing and you still suspect an infection, select Scan options under Current threats.
- Run a full scan. Select Full scan and start it. It checks every file and program on the device, so it takes much longer than a quick scan. Leave the PC on until it ends.
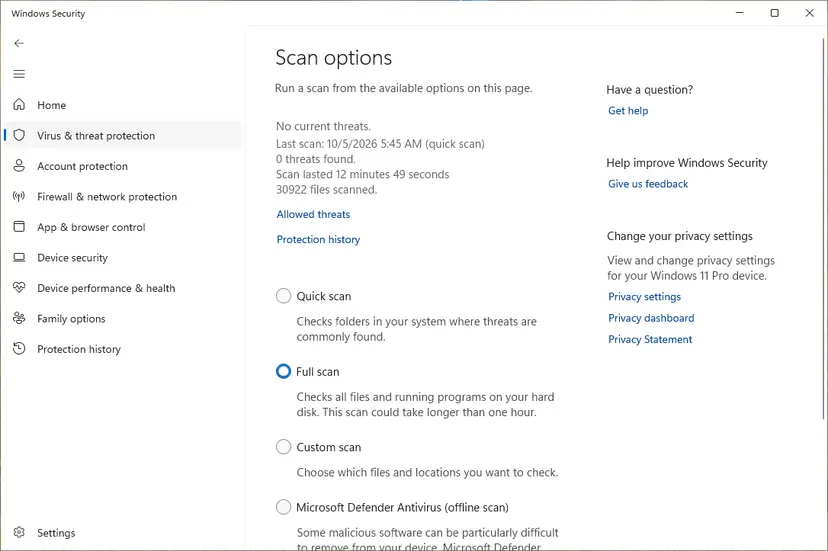
Scan options: Quick scan, Full scan, Custom scan and the offline scan. Screenshot: Windows 11 26H2. - Or scan one folder. To check only a download or a USB drive, select Custom scan in Scan options and choose the folder. You can also right-click a file or folder in File Explorer and select Scan with Microsoft Defender. On Windows 11 you may have to select Show more options first.
- Read Protection history. Go back to the first page of Windows Security and select Protection history. Select a card to expand it and see the details.
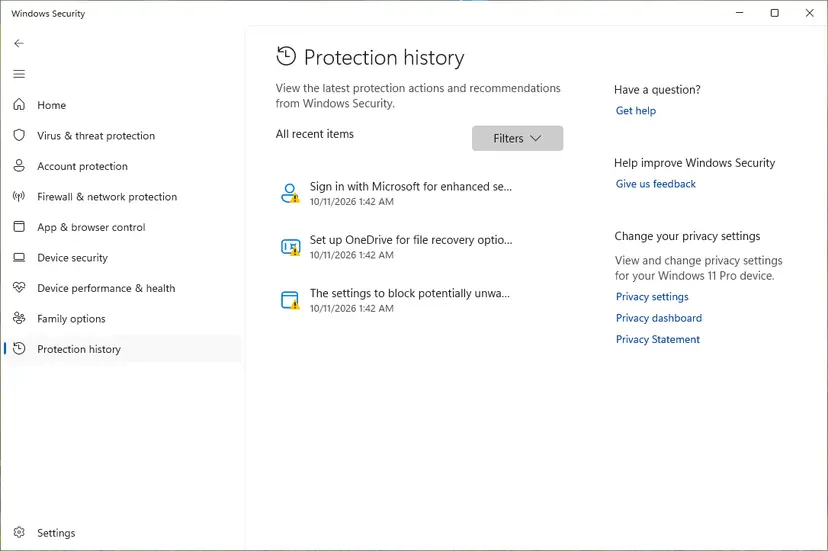
Protection history lists what Defender found and did. Screenshot: Windows 11 26H2.
These steps were written for Windows 11 25H2 and 26H2, Windows 10 22H2. The full page with the other versions and what each result means: How to scan for malware with Microsoft Defender
It worked if: The scan finishes and reports no threats, or removes what it found.
If not: If threats come back after removal, run a Microsoft Defender Offline scan and restore from a clean point with Undo recent changes with System Restore.
If Event 161 still appears after every fix
If a dump file is now written but the PC keeps crashing, the problem is the crash, not Event 161. Read the dump or hand it to someone who can. Microsoft's Windows debugger loads complete and kernel dumps, and small dumps are listed in the Minidump folder.
| Result | What it means | Next step |
|---|---|---|
| A new .dmp file appears in C:\Windows\Minidump after each crash. | The dump works now. The crash is still there. | Keep the file and continue with Fixes 4 to 8. |
| No dump file appears and Event 161 returns. | The dump still fails, so the page file or the drive is the problem. | Repeat Fixes 2 and 3, then check the drive (Fix 5). |
| Crashes continue after a clean Windows install. | Hardware is the likely cause. | Test memory and power (Fixes 7 and 8), then ask a technician. |
| The drive reports bad sectors. | The drive is failing. | Back up with Back up your files (Windows Backup, File History, Time Machine) and replace the drive. |
- What to send to a technician: the times of the crashes, the Event 161 and Kernel-Power 41 entries, your Windows version (Win + R,
winver) and the dump files. - Last resort: a repair install that keeps your files, with Reinstall Windows without losing files. Back up first.
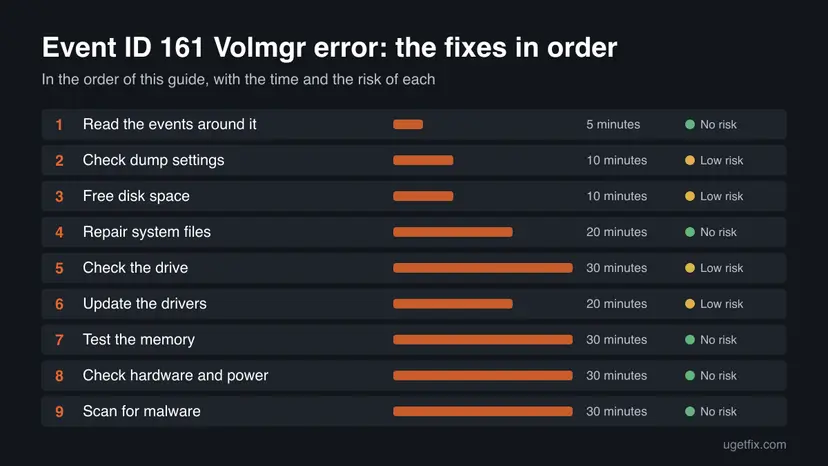
How to keep dump failures from coming back
- Keep Automatic memory dump and a system managed page file unless a technician asks for something else.
- Keep several gigabytes free on the system drive.
- Install graphics and storage drivers from the maker, and roll back a driver that starts crashes.
- Run Windows Update and shut the PC down normally; hard power cuts leave file system errors.
- Keep the PC cool and dust free, and check memory and power supply when crashes are random.
Frequently asked questions
What does Event ID 161 Volmgr mean?
Event ID 161 from source volmgr says "Dump file creation failed due to error during dump creation." Windows tried to save a memory dump after a crash and could not. It is a symptom of a crash that left no dump, not the crash itself. We found no Microsoft page that explains this event, so the practical meaning comes from Microsoft's pages on dump files and page files: check the dump setting, the page file and the free space first, then look for what crashed the PC.
What is volmgr in Windows?
Volmgr is the name of the event source. It is the Windows volume manager driver, which handles disk volumes. When it logs Event 161, it reports that the crash dump could not be written. We did not find a Microsoft page that documents Event 161 itself, so treat the event text as the fact and the rest as a guide: fix the dump settings, then find the cause of the crash.
Is Event 161 the cause of my crashes?
Usually not. The event is logged because a dump failed, and that only happens after the system has already crashed, frozen or lost power. Reports in the Microsoft Q&A thread show it next to Kernel-Power Event 41, which says the system rebooted without cleanly shutting down. Look at the entries before it (Fix 1) to see what happened first, then work from Fix 4 onward to find the real cause.
Why can Windows not write a dump file?
Microsoft says a page file or a dedicated dump file must exist and be large enough for the selected dump type. If it is missing, too small or has no room to grow, no dump is created. A Complete memory dump needs a page file of 1 x RAM plus 257 MB. Check Startup and Recovery and the paging file (Fix 2) and free space on the system drive (Fix 3).
Should I set the dump type to Complete memory dump?
No, not as a first step. A Complete memory dump needs the most space, so on a small or full drive it is the setting most likely to fail. Microsoft says Automatic memory dump is on by default and picks a page file size to match, raising it if the system crashes again within four weeks. Use Complete memory dump only when a technician asks for it and the drive has room.
Does Event 161 mean my drive is failing?
Not by itself. A full drive, a missing page file or a bad dump setting is more common. Still, users in the Microsoft Q&A thread were told to check the drive with Check Disk, and a failing drive can crash a PC. Run Fix 5. If it reports bad sectors, or the PC freezes during the scan, back up your files first and plan to replace the drive.
Can I ignore Event 161?
Only if the PC never crashes. If it does crash, ignoring the event means that Windows keeps losing the best evidence of the cause. Fixing the dump costs ten minutes, and the next crash then leaves a file behind. If the PC runs for weeks without a restart and the event is old, it may be a one-off from a power cut and can be left alone.
Is Event ID 161 the same as error code 161?
No. The Win32 error number 161 means "The specified path is invalid" and has nothing to do with the volmgr event. Here 161 is only the event number used by the volmgr source. Searching for "error 161" may bring up pages about path problems, which will not help with a failed crash dump.
Why does Event 161 appear together with Kernel-Power 41?
Kernel-Power Event 41 says the system rebooted without cleanly shutting down first. That is what happens after a crash, a freeze or a power loss. Windows then also logs that the dump could not be created. The pair tells you the crash came first. Use the time of both entries to find what the PC was doing, and see Fix 1.
When should I take the PC to a technician?
Take it in when crashes continue after a clean Windows install, after the memory test shows errors you cannot fix, or when the drive reports bad sectors. Bring the times of the crashes, the Event 161 and Kernel-Power 41 entries and the dump files from the Minidump folder. They help a technician find the cause much faster.
Sources
- Microsoft Learn: How to determine the appropriate page file size for 64-bit versions of Windows (learn.microsoft.com)
- Microsoft Learn: Overview of memory dump file options for Windows (learn.microsoft.com)
- Microsoft Q&A: Dump file creation failed due to error during dump creation (volmgr Event 161) (learn.microsoft.com)
Did this fix work?
One click, no account. It tells the next reader which guides are worth their time.
Questions and experiences: fix Event ID 161 Volmgr error in Windows 11 and 10
Still broken, or found a fix we did not cover? Ask here: members and our editors answer. Reading is open; writing needs a free account.
…