
How to fix Windows installation error 0x80070002 - 0x20009?

Prefer to fix it yourself? The manual steps follow.
- 7methods
- 10 minutes to 2 hours
- Intermediate
Applies to Upgrades to Windows 11 (25H2 and 26H2, and earlier versions) from Windows 10 22H2 or an older Windows 11 version, on PCs with more than one internal or external drive
7 methods in this guide
Hello. I tried to upgrade from Windows 10 to Windows 11, but I got the 0x80070002 - 0x20009 error code. Is there a way to fix this?
Error 0x80070002 - 0x20009 means Windows Setup could not pin down the system partition while it prepared its way back, so it rolled the PC back. Microsoft names the usual cause: a second drive with its own system partition. Unplug or disable every drive except the Windows drive and run the upgrade again.
Yes. Microsoft lists 0x80070002 - 0x20009 as a partition problem: Setup found more than one system partition, often on an old drive left connected after a new SSD went in. Shut down, unplug every drive except the one with Windows (Fix 1), or disable it in the UEFI setup (Fix 2), and run the upgrade again. Reconnect the drive afterwards.
| Error | 0x80070002 - 0x20009 with the line The installation failed in the SAFE_OS phase with an error during PREPARE_ROLLBACK operation. |
|---|---|
| Where it appears | In the Windows Setup window after the first restart of an upgrade, once Setup has set the PC back. It also shows in Windows Update history when the upgrade came as a feature update. |
| Main cause | More than one system partition: an EFI System Partition or System Reserved partition on a second drive. Microsoft lists this exact code under partition analysis and validation. |
| Fastest fix | Unplug every drive except the Windows drive, including USB drives and memory cards, then run Setup again (Fix 1). |
| Also written as | 0x80070002-0x20009, 0x80070002 0x20009, 0X80070002 - 0x20009, and the phase line in lower case: the installation failed in the safe_os phase with an error during prepare_rollback operation. |
| Related codes | Microsoft puts 0x80073BC3 - 0x20009 and 0x80073B92 - 0x20009 in the same row, with the same cause and fix. |
| Affects | Windows 10 to Windows 11 upgrades and feature updates between Windows 11 versions, on desktops and laptops with two or more drives. |
| Microsoft's status | Documented with a fix on Microsoft Learn. Not a bug that an update will solve. Windows 10 left support on 14 October 2025. |
| Time to fix | 10 minutes to unplug or disable a drive. One to two hours for the upgrade itself. |
Facts checked on 15 October 2026. Steps written for Windows 11 25H2 and 26H2 Setup run from Windows Update, the Installation Assistant and a mounted ISO, with Windows 11 23H2 and 24H2 and Windows 10 22H2 as the starting system.
What 0x80070002 - 0x20009 means
Windows Setup reports a failed upgrade with two codes joined by a dash. Microsoft calls the first one the result code, which says what went wrong, and the second one the extend code, which says in which phase and during which operation it went wrong. The full message reads like this:
We've set your PC back to the way it was right before you started installing Windows 11. 0x80070002 - 0x20009. The installation failed in the SAFE_OS phase with an error during PREPARE_ROLLBACK operation
| Part | How Microsoft decodes it | What it tells you |
|---|---|---|
| 0x80070002 | The 8 marks a Win32 error code. The last four digits, 0002, are error 2: ERROR_FILE_NOT_FOUND. | Setup looked for something and did not find it. |
| 0x20009, first digit 2 | Phase 2 is SP_EXECUTION_SAFE_OS. | The PC had restarted into the small setup environment that prepares the new Windows. |
| 0x20009, last digits 09 | Operation 09 is SP_EXECUTION_OP_PREPARE_ROLLBACK. | Setup was preparing the way back to your old Windows, which needs the right system partition. |
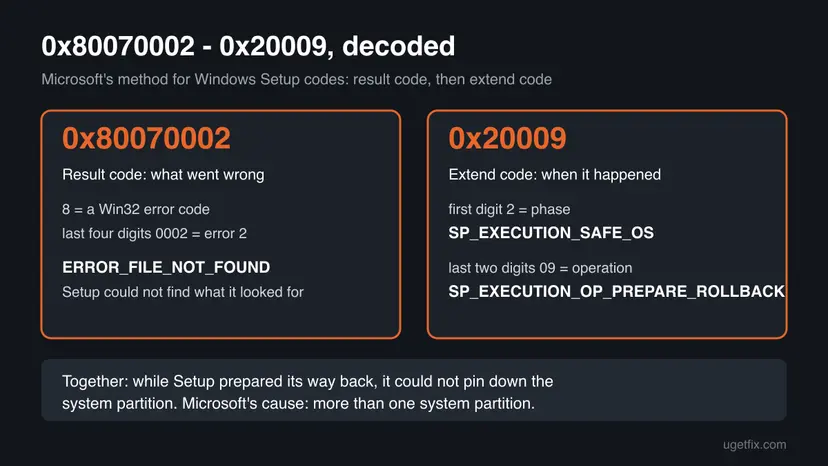
Microsoft's troubleshooting page describes the cause in its own words: the requested system device cannot be found, there is a sharing violation, or there are multiple devices that match the identification criteria. In practice that is a second system partition. If you see this message and ask why, or what it is in another language, the answer is the same: Setup is confused about which drive holds the boot files.
Why Windows installation fails with 0x80070002 - 0x20009
Microsoft names one cause for this code and one fix: remove the conflict between system partitions. The other rows below come from what users report and from what the code means. Each cause points to a fix.
| Cause | How often | How to tell | Fix |
|---|---|---|---|
| A second internal drive with its own system partition, for example the old system drive left connected after a new SSD went in. | Most often | Disk Management shows an EFI System Partition or System Reserved on two disks. | Fix 1, Fix 2 |
| A USB drive, an external disk or a memory card with a bootable or old Windows partition on it. | Often | Anything is plugged into USB or the card reader during Setup. | Fix 1 |
| Leftover system partitions from earlier installs on the same or the second drive. | Sometimes | Two system partitions show even with one drive, or the second drive cannot be removed. | Fix 3 |
| The PC starts Windows from the old drive's system partition, so that drive cannot simply go. | Sometimes | Windows does not start when the old drive is unplugged. | Fix 5 |
| A broken upgrade download or damaged system files. | Rarely | Only one drive and one system partition, and the log points elsewhere. | Fix 4, Fix 6, Fix 7 |
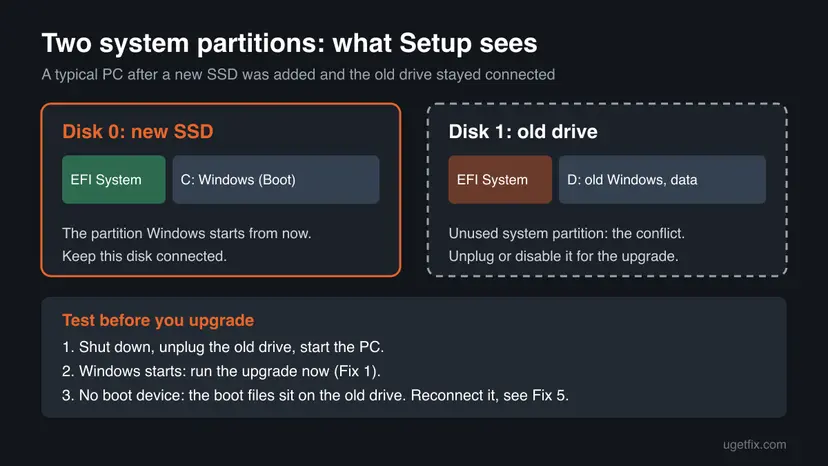
Your drives are not broken. Setup only needs one clear system partition while it works. Once Windows 11 is installed, you can connect the other drive again and use it as before.
How to see if your PC has two system partitions
Before you open the case, check what Windows sees. Disk Management shows every disk and its partitions in one window, and it changes nothing until you choose an action.
- Right-click Start and select Disk Management.
- Look at the lower half of the window. Each row is one disk: Disk 0, Disk 1 and so on.
- Find the disk that holds C:. Its system partition is usually a small one of a few hundred MB marked EFI System Partition, or System Reserved on older PCs.
- Look at the other disks. A second EFI System Partition or System Reserved on another disk is the conflict Microsoft describes.
- Note the size, model and disk number of that second disk, so you know which one to unplug or disable.
| What Disk Management shows | What it means | Start with |
|---|---|---|
| One disk, one system partition | This is not the usual cause. Read the log below. | Fix 4 |
| Two disks, each with a system partition | The textbook case for this code. | Fix 1 |
| One disk with two system partitions | Leftovers from an earlier install. | Fix 3 |
| A USB or card reader disk listed | Removable media can take part in partition analysis. | Fix 1 |
Setup also writes what happened to setupact.log in the hidden folder C:\$WINDOWS.~BT\Sources\Panther. On Microsoft Q&A a volunteer moderator asks every reader with this code for that file. Press Win + R, paste the path and press Enter, then copy the log to your Desktop before you read it.
How to fix error 0x80070002 - 0x20009 in Windows Setup
Fix 1 and Fix 2 are Microsoft's own fix: keep only the Windows drive in the PC while Setup runs. Fix 3 removes leftover system partitions. Fix 4 runs the upgrade from the ISO. Fix 5 is for PCs that start from the old drive. Fix 6 and Fix 7 are general repairs for when only one drive is present.
| What you see or have | Start with |
|---|---|
| A desktop with two or more internal drives, or anything plugged into USB. | Fix 1 |
| A laptop or a PC you cannot open easily. | Fix 2 |
| Two system partitions on one disk, or a second drive you want to keep connected. | Fix 3 |
| One drive only, or the drives are already unplugged. | Fix 4 |
| Windows does not start when the old drive is unplugged. | Fix 5 |
| Only the Windows Update route fails, or nothing above matches. | Fix 6, then Fix 7 |
Fix 1. Unplug every drive except the one with Windows
10 minutes, plus the upgradeLow riskEveryone with a second internal SSD or hard drive, an external disk, a USB stick or a memory card in the PC.
Microsoft's fix for this exact code is to disconnect the drives that hold the unused system partition. With one drive left, Setup finds only one system partition and can prepare its rollback.
- Remove every USB stick, external disk and memory card. Keep the mouse, keyboard and screen.
- Shut down the PC with Start > Power > Shut down, switch off the power supply and unplug the power cable.
- Open the case and unplug the data cable or remove the second drive you noted in Disk Management. On an M.2 drive, take it out of its slot.
- Close the case, plug in power and start the PC.
- If Windows starts normally, run the upgrade again, preferably as in Fix 4.
- After Windows 11 is installed and you have signed in, shut down and connect the drive again.
If Windows does not start with the old drive unplugged, nothing is lost. Shut down, connect the drive again, and go to Fix 5: your PC starts from the old drive's system partition.
If you are not sure which cable belongs to which drive, ask someone who has opened a PC before, or ask the PC maker's support. Microsoft also allows a drive to be disabled instead, which is Fix 2.
It worked if: Setup restarts a few times and ends at the sign-in screen of Windows 11 instead of the message that it set your PC back.
If not: If it rolls back with the same code, check Disk Management again. If one disk still has two system partitions, use Fix 3.
Fix 2. Disable the second drive in the UEFI setup
10 minutesLow riskA laptop, a small PC or any case you would rather not open, when the firmware lets you switch off a drive or an M.2 or SATA port.
Microsoft's text says to disconnect or temporarily disable the drive. A drive switched off in the firmware is invisible to Setup, the same as an unplugged one.
- Press Win + I and open System > Recovery in Windows 11, or Update & Security > Recovery in Windows 10.
- Next to Advanced startup, select Restart now.
- Select Troubleshoot > Advanced options > UEFI Firmware Settings and then Restart.
- Find the storage settings. The names differ by maker, for example SATA Configuration, NVMe Configuration or Storage.
- Switch off the port of the second drive only. Do not change the boot drive or the SATA mode, such as AHCI or RAID.
- Save and exit, start Windows and run the upgrade.
- Afterwards, open the firmware setup the same way and switch the port back on.
Not every firmware can disable a single port. If you do not find such an option, use Fix 1 or Fix 3. We could not confirm the menu names for every maker, so check the manual of your motherboard or laptop.
It worked if: Disk Management lists only the Windows disk, and Setup passes the restart where it used to roll back.
If not: If Windows does not start with the port disabled, switch it back on and go to Fix 5.
Fix 3. Delete the unused system partition
15 minutesRead the warningOne disk carries two system partitions from earlier installs, or you want to keep the second drive connected and its old system partition is no longer needed.
Microsoft offers this as the alternative to unplugging: delete the unused system partition. Then only one remains, and Setup has no choice to make.
Delete only a system partition on a disk that does not hold C:, and only after you have tested that Windows starts with that disk unplugged (Fix 1). Back up your files first: Back up your files (Windows Backup, File History, Time Machine). If you are unsure, use Fix 1 or Fix 2 instead; they change nothing on the disk.
- Test first: unplug the second disk as in Fix 1 and make sure Windows starts. Then connect it again.
- Type
cmdin Windows search, right-click Command Prompt and select Run as administrator. - Start the disk tool and list the disks:
diskpart list disk - Select the second disk by the number you noted in Disk Management, and list its partitions:
select disk 1 list partition - Select the small partition of type System and delete it.
overrideis needed because Windows protects system partitions:select partition 1 delete partition override - Type
exit, close the window and run the upgrade.
The disk and partition numbers above are examples. Use the numbers from your own list disk and list partition output. The space you free can be added to the next partition in Disk Management later.
It worked if: diskpart reports DiskPart successfully deleted the selected partition, Disk Management shows one system partition, and the upgrade goes through.
If not: If Windows no longer starts, the deleted partition was in use: reconnect only the Windows disk and repair start with Run Startup Repair, then see Fix 5.
Fix 4. Run the upgrade from a mounted ISO without Dynamic Update
1 to 2 hoursLow riskAfter Fix 1 to Fix 3, or when only one drive is present and Windows Update keeps failing.
Setup from the ISO uses a complete copy of Windows instead of the cached download, and turning off Dynamic Update keeps extra downloads out of the attempt. The language and edition of the ISO must match your Windows, or Setup cannot keep your files.
- Back up the files you cannot lose: Back up your files (Windows Backup, File History, Time Machine).
- Check your Windows language and edition in Settings > System > About.
- On Microsoft's Download Windows 11 page, choose the same language and download the ISO under Download Windows 11 Disk Image (ISO) for x64 devices.
- Right-click the ISO and select Mount. Note the new drive letter, for example
E:. - Open Command Prompt as administrator and start Setup without Dynamic Update:
E:\setup.exe /dynamicupdate disable - Choose Keep personal files and apps and follow the steps.
One user on Microsoft Q&A with this code reports that the message also said files and apps could not be kept because a different language was chosen. That points to an ISO that does not match the installed language or edition. Download the ISO again in the language shown under About.
It worked if: Setup restarts a few times and ends at the sign-in screen of the new Windows 11 version.
If not: If it rolls back with the same code, read setupact.log as in the section above and check Disk Management again for a second system partition.
Fix 5. When Windows only starts with the old drive connected
30 minutes to 2 hoursRead the warningWindows does not start, or says no boot device was found, when the second drive is unplugged or disabled.
This happens when Windows was installed on the new drive while the old one was still connected: the boot files went to the old drive's system partition. Setup then sees two system partitions, but the old one is the one in use.
On this PC it holds the boot files. Deleting it stops Windows from starting. Back up your files before you change anything: Back up your files (Windows Backup, File History, Time Machine).
- Shut down, connect the old drive again and start the PC. Windows starts as before; nothing was lost.
- Back up your files to a third place, such as an external disk you unplug afterwards: Back up your files (Windows Backup, File History, Time Machine).
- Choose one way. A clean install of Windows 11 from a USB stick, with only the Windows drive connected, creates a new system partition there; you then install your apps again. The other way is moving the boot files with Microsoft's
bcdboottool, an advanced repair we did not test for this guide. - For
bcdboot, follow Microsoft's documentation or ask a technician; a wrong target can leave the PC unable to start. - When Windows starts with only the Windows drive connected, run the upgrade as in Fix 1, then connect the old drive again for data.
It worked if: Windows starts with only the Windows drive connected. From then on, the upgrade runs as in Fix 1.
If not: If the PC still does not start from the Windows drive, run Run Startup Repair from the recovery environment with only that drive connected.
Fix 6. Reset Windows Update and clear the old upgrade files
15 minutesLow riskOnly one drive and one system partition are present, and the upgrade comes through Windows Update.
Error 2 means something was not found. When the partition cause is ruled out, an incomplete cached download is the next suspect, and a reset forces a clean download.
- Open Command Prompt as administrator. Type cmd in the search box, right-click Command Prompt and select Run as administrator. Select Yes when Windows asks for permission.
- Stop the update services. Type the commands below and press Enter after each one. If Windows says that other services depend on Cryptographic Services, it stops them too. A message that a service is not started is fine.
net stop wuauserv
net stop bits
net stop cryptsvc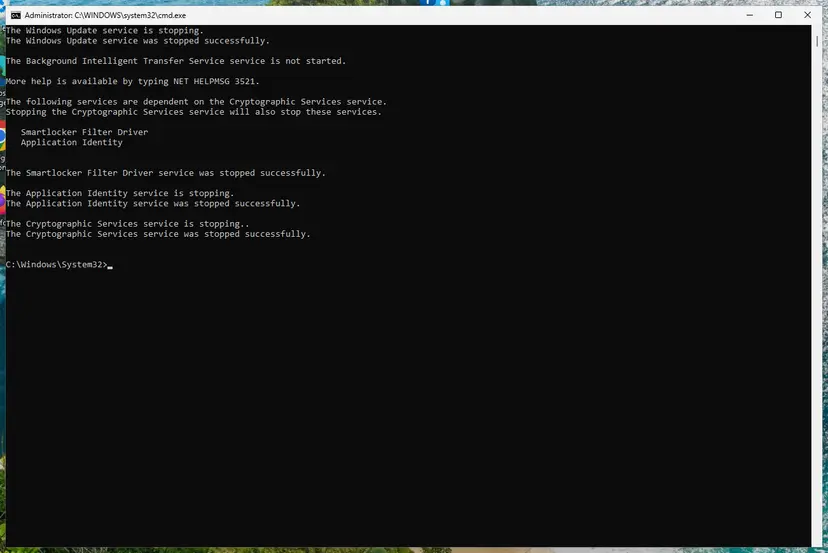
The update services are stopped. Screenshot: Windows 11 26H2. - Delete the download queue files. This clears the list of downloads that the Background Intelligent Transfer Service keeps. If Windows says it cannot find the files, continue.
del "%ALLUSERSPROFILE%\Application Data\Microsoft\Network\Downloader\qmgr*.dat" - Rename the update cache folders. Renaming keeps a copy in case you need it; Windows creates new, empty folders when the services start again. If you get Access is denied, a service is still running: repeat the previous step.
ren %systemroot%\SoftwareDistribution SoftwareDistribution.old
ren %systemroot%\System32\catroot2 catroot2.old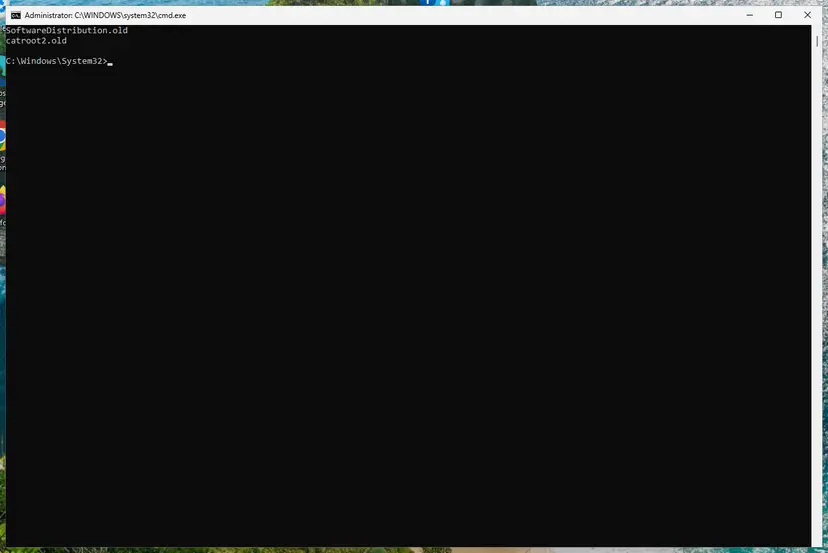
Both folders now end in .old. Screenshot: Windows 11 26H2. - Start the services again. Type the commands below and press Enter after each one. The requested service has already been started is fine: Windows started it on its own.
net start cryptsvc
net start bits
net start wuauserv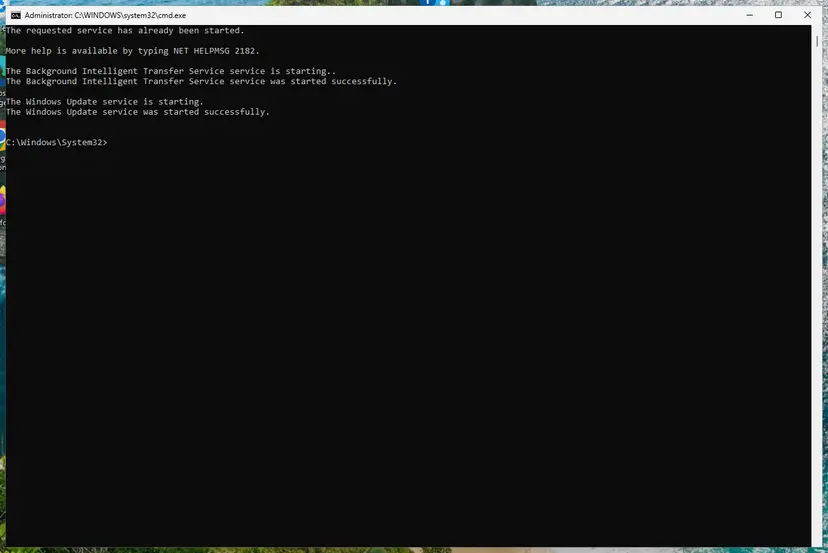
BITS and Windows Update are running again. Screenshot: Windows 11 26H2. - Restart and check for updates. Restart the PC. Then select Start > Settings > Windows Update > Check for updates. The first check can take longer than usual because everything is downloaded again.
These steps were written for Windows 11 and Windows 10 (the steps are the same). The full page with the other versions and what each result means: Reset Windows Update components
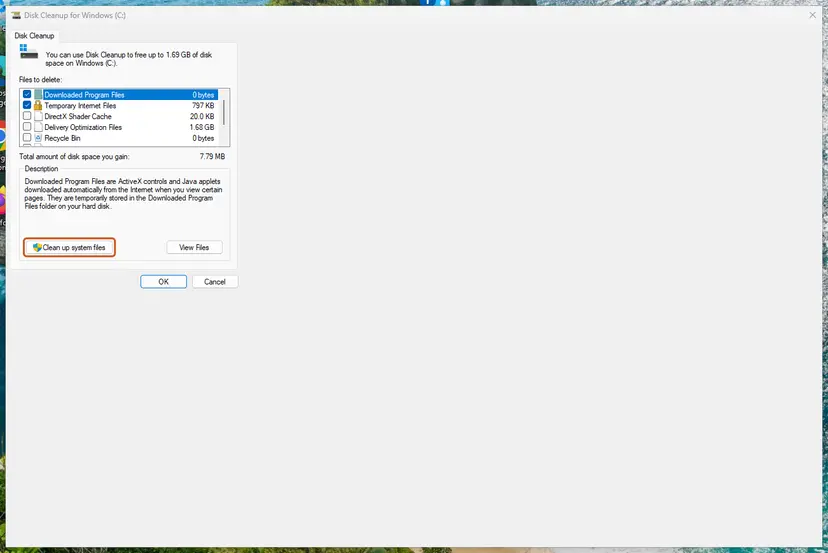
Then free space and clear what the failed attempts left: Free up disk space and delete temporary files. Copy setupact.log out of C:\$WINDOWS.~BT\Sources\Panther first, because Disk Cleanup removes that folder.
It worked if: Windows Update downloads the upgrade from the start instead of jumping to a cached percentage.
If not: If the new download fails the same way, run Fix 4 and check Disk Management once more.
Fix 7. Repair Windows system files with SFC and DISM
20 minutesNo riskEverything above is ruled out and the error comes back on a PC with one drive.
Setup reads parts of the current Windows to build the new one. An adviser on Microsoft Q&A suggested this repair for the code; it rules out damage on the source side, though it does not touch partitions.
- Open an elevated command window. Right-click Start and select Terminal (Admin), or type cmd in the search box, right-click Command Prompt and select Run as administrator. Select Yes when Windows asks for permission.
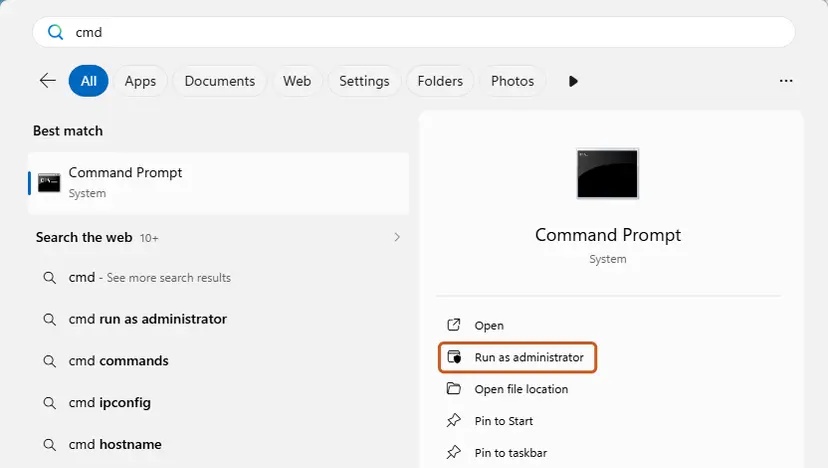
Search for cmd and choose Run as administrator. Screenshot: Windows 11 26H2. - Run DISM first. Type the command below and press Enter. DISM downloads clean copies of damaged components from Windows Update, so it can take several minutes. Wait until it says The operation completed successfully.
DISM.exe /Online /Cleanup-Image /RestoreHealth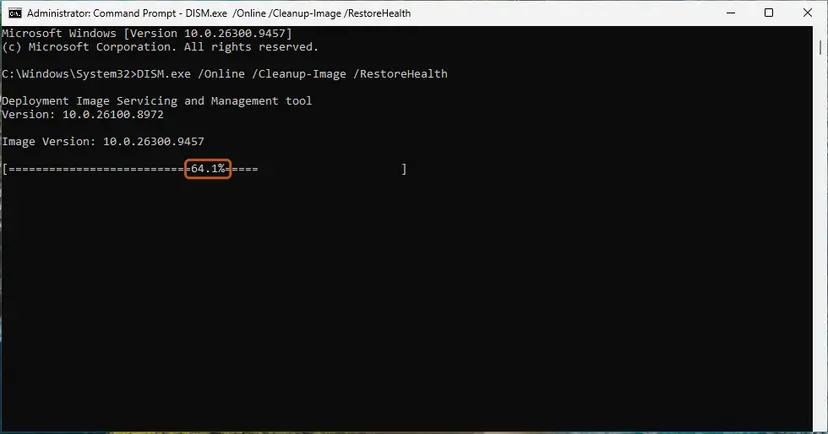
DISM /RestoreHealth running. Screenshot: Windows 11 26H2. - Run System File Checker. In the same window, type the command below and press Enter. Do not close the window until the verification reaches 100%.
sfc /scannow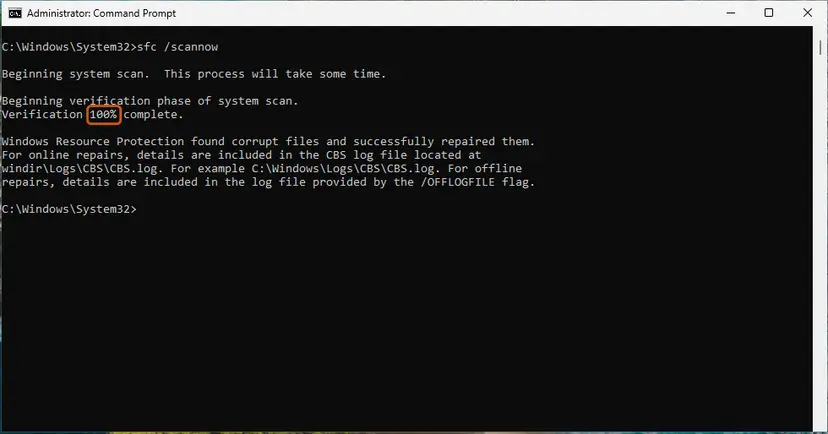
sfc /scannow at 100%. Screenshot: Windows 11 26H2. - Read the result and restart. Compare the last message with the table below this guide, then restart the PC so that repaired files are loaded.
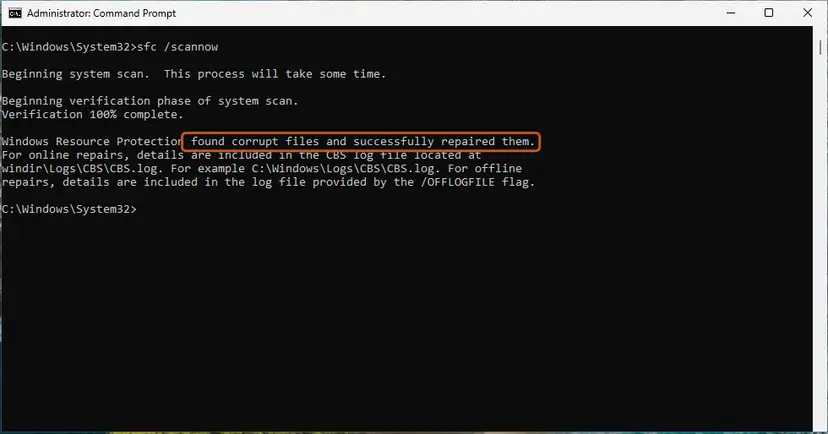
The result line tells you what SFC did. Screenshot: Windows 11 26H2.
These steps were written for Windows 11 24H2 and 25H2. The full page with the other versions and what each result means: Run DISM and SFC to repair Windows system files
It worked if: SFC reports that it found no integrity violations, or that it repaired files.
If not: Collect the logs as in the next section and ask for help with them.
If error 0x80070002 - 0x20009 is still there
When every fix fails, the answer is in the logs and in the disk layout. Each attempt writes a new setupact.log, so copy it out right after the rollback, before Windows Update or Disk Cleanup removes the folder.
| What you find | What to do |
|---|---|
| Still two system partitions in Disk Management | Something is still connected: a card reader, a USB disk or a drive you missed. Repeat Fix 1. |
| One partition, but the code stays | Run Microsoft's SetupDiag tool. It reads the Setup logs and names the failure rule. |
| A different extend code after the fix | The partition problem is gone; a new one appeared. Search for the new code. |
| A work or school PC | Ask the IT department. Their tools may control the disk layout and the upgrade. |
| The disk shows errors or the PC freezes | Check the drive with Check a disk for errors (chkdsk) and back up first. That is a hardware sign, not this error. |
- What to send to support: the full code, your Windows version and build, how you started the upgrade, and how many drives the PC has.
- Attach
setupact.logandsetuperr.logfromC:\$WINDOWS.~BT\Sources\Panther, and a screenshot of Disk Management. - Say which drive you unplugged or which partition you deleted, and what changed after that.
How to keep 0x80070002 - 0x20009 from coming back
- Install Windows on a new drive with only that drive connected, so the system partition lands on it.
- Unplug USB disks, sticks and memory cards before a big Windows upgrade.
- When you retire an old system drive, wipe it or remove its old system partition once the new one works.
- Keep 30 GB or more free on drive C before you start.
- Do not delete a system partition before you know which one Windows starts from.
- Do not retry the same upgrade again and again without checking Disk Management.
- Do not stay on Windows 10: it left support on 14 October 2025.
- Do not use partition tools you do not know on the Windows drive.
If the upgrade fails later in the same phase with a driver error instead, read our guide to error 0x80070002 - 0x20007: same first code, different operation, different cause.
Frequently asked questions
What does 0x80070002 - 0x20009 mean?
It means Windows Setup failed in the SAFE_OS phase while it prepared the rollback, because it could not settle on one system partition. Microsoft's guide to upgrade error codes splits the code in two. The result code 0x80070002 is the Win32 error ERROR_FILE_NOT_FOUND. The extend code 0x20009 is phase 2, SP_EXECUTION_SAFE_OS, with operation 09, SP_EXECUTION_OP_PREPARE_ROLLBACK. Microsoft lists the cause as more than one system partition, for example on a second drive, and the fix as disconnecting that drive.
Why does a second drive break the Windows upgrade?
Setup has to know which partition holds the boot files before it changes anything, so that it can roll back safely. Microsoft says the error appears during partition analysis and validation when there are multiple system partitions, for example after a new system drive was installed while the previous one stayed connected. Setup cannot decide which one is meant and stops. With the extra drive unplugged or disabled, only one system partition is left.
Will I lose my files or the data on the second drive?
No. The message says Setup set the PC back to the way it was right before the upgrade, and unplugging or disabling a drive does not touch its data. Connect the drive again after Windows 11 is installed and it shows up as before. Only Fix 3, deleting a system partition, changes a disk, and it removes only that small partition. Back up before Fix 3 or Fix 5 anyway.
Can I upgrade without opening the PC?
Often yes. Remove USB disks, sticks and memory cards first, since they can be part of the problem. For an internal drive, many UEFI setups let you disable a SATA or M.2 port, which Microsoft accepts as an alternative to unplugging (Fix 2). If your firmware has no such option, deleting the unused system partition (Fix 3) also works without opening the case, but it changes the disk.
What if Windows does not start without the old drive?
Then your PC starts from the system partition on the old drive, which happens when Windows was installed while both drives were connected. Connect the drive again and Windows starts as before. To upgrade, the boot files must first live on the Windows drive: either a clean install with only that drive connected, or moving the boot files with Microsoft's bcdboot tool. Fix 5 explains both. Do not delete the old drive's system partition in this case.
Does disabling the antivirus fix 0x80070002 - 0x20009?
We found nothing that ties this code to antivirus software. Microsoft names multiple system partitions as the cause, and the old version of this guide also called the second drive the most common cause. That is why this page does not ask you to turn protection off. If you have tried every fix and want to rule out a security program, pause it for one attempt with Turn off Microsoft Defender protection for a moment and turn it on again right after.
What about 0x8007000d - 0x20009?
It is the same phase and operation, SAFE_OS and PREPARE_ROLLBACK, with a different result code. By Microsoft's method, 0x8007000d is Win32 error 13, which means the data is invalid. We could not confirm a Microsoft cause for this exact pair. Because the operation is the same, check Disk Management for a second system partition and try Fix 1 first, then read setupact.log for the line with the code.
Is error 0x80020009 the same problem?
No. 0x80020009 has no extend code and is not one of the Windows Setup codes Microsoft lists. It is a different error that some programs and scripts report, and this page does not cover it. If your message mentions the SAFE_OS phase and PREPARE_ROLLBACK, look again at the code: it is probably 0x80070002 - 0x20009, with the two parts joined by a dash, and the fixes above apply.
Where is setupact.log after the upgrade fails?
It is in C:\$WINDOWS.~BT\Sources\Panther, next to setuperr.log. The $WINDOWS.~BT folder is hidden, so press Win + R, type the path and press Enter. Copy both files to your Desktop before you read them. If the folder is gone, Windows Update or Disk Cleanup removed it; start the upgrade once more and copy the logs right after the rollback. Search from the end for 0x80070002.
Does a clean install avoid this error?
Yes, if only the target drive is connected during the install, because Setup then creates a single system partition on that drive. With both drives connected, a clean install can repeat the problem. A clean install erases the target partition, so back up your files and have your apps ready to install again. Try Fix 1 to Fix 4 first; they keep your apps and settings.
Sources
- Microsoft Learn: Windows upgrade resolution procedures (0x80070002 - 0x20009, multiple system partitions) (learn.microsoft.com)
- Microsoft Learn: Windows upgrade error codes (result codes, extend code phases and operations) (learn.microsoft.com)
- Microsoft Q&A: Error 0x80070002 0x20009 while upgrading from W11 Pro 21H2 to 24H2 (user reports, setupact.log) (learn.microsoft.com)
Did this fix work?
One click, no account. It tells the next reader which guides are worth their time.
Questions and experiences: fix Windows installation error 0x80070002 - 0x20009
Still broken, or found a fix we did not cover? Ask here: members and our editors answer. Reading is open; writing needs a free account.
…