
How to fix Windows 11 upgrade error 0x80070002 - 0x20007?

Prefer to fix it yourself? The manual steps follow.
- 7methods
- 15 minutes to 2 hours
- Intermediate
Applies to Upgrades to Windows 11 (25H2 and 26H2, and earlier 22H2 to 24H2) from Windows 10 22H2 or an older Windows 11 version, through Windows Update, the Installation Assistant or setup.exe
7 methods in this guide
Hello, I was trying to install Windows 11 version 22H2, and it just keeps failing with the following error: "We couldn't install Windows 11. 0x80070002 - 0x20007 The installation failed in the SAFE_OS phase with an error during INSTALL_DRIVERS operation." Is there anything I can do apart from waiting?
Error 0x80070002 - 0x20007 means Windows 11 Setup could not find a file while it moved your drivers into the new Windows, so it rolled the PC back. In most cases one old or broken driver package is to blame. Open setupact.log, find the driver it names, remove it with pnputil and run the upgrade again.
Yes, you can do more than wait. The error points at one driver that Setup could not carry over. Open C:\$WINDOWS.~BT\Sources\Panther\setupact.log, look near the end for the driver file it names, then remove that driver with pnputil /delete-driver (Fix 1). If the log names a device, uninstall it in Device Manager instead (Fix 2). Then run the upgrade again from a mounted ISO (Fix 4).
| Error | We couldn't install Windows 11 with 0x80070002 - 0x20007 and the line The installation failed in the SAFE_OS phase with an error during INSTALL_DRIVERS operation. |
|---|---|
| Where it appears | In the Windows 11 Setup window after one or more restarts, once Setup has rolled the PC back. The same code shows in Windows Update history when the upgrade came as a feature update. |
| Main cause | A driver package Setup tried to move into the new Windows is missing a file. 0x80070002 is the Win32 error ERROR_FILE_NOT_FOUND, and 0x20007 is the SAFE_OS phase with the INSTALL_DRIVERS operation. |
| Fastest fix | Find the driver named at the end of setupact.log and remove it with pnputil (Fix 1). Then run Setup again (Fix 4). |
| Also written as | 0x80070002-0x20007, 0x80070002 0x20007, error code 0x80070002 - 0x20007, and the phase line in lower case: the installation failed in the safe_os phase with an error during install_drivers operation. |
| Affects | Upgrades from Windows 10 22H2 to Windows 11 and feature updates between Windows 11 versions. Users report it with 22H2, 23H2 and 24H2 targets. |
| Microsoft's status | Not a known issue with a fix in an update. Microsoft documents the code parts only. Windows 10 left support on 14 October 2025. |
| Where the cause is written | C:\$WINDOWS.~BT\Sources\Panther\setupact.log and setuperr.log, a hidden folder that stays after the rollback. |
| Time to fix | 15 to 30 minutes for Fix 1 to Fix 3. One to two hours for the upgrade itself. |
Facts checked on 15 October 2026. Steps written for Windows 11 25H2 and 26H2 Setup run from Windows Update, the Installation Assistant and a mounted ISO, with Windows 11 23H2 and 24H2 and Windows 10 22H2 as the starting system.
What 0x80070002 - 0x20007 means
Windows Setup reports a failed upgrade with two codes joined by a dash. Microsoft calls the first one the result code, which says what went wrong, and the second one the extend code, which says in which phase and during which operation it went wrong. This is the full message the reader above saw:
We've set your PC back to the way it was right before you started installing Windows 11. 0x80070002 - 0x20007. The installation failed in the SAFE_OS phase with an error during INSTALL_DRIVERS operation
| Part | How Microsoft decodes it | What it tells you |
|---|---|---|
| 0x80070002 | The 8 marks a Win32 error code. The last four digits, 0002, are error 2: ERROR_FILE_NOT_FOUND. | Setup asked for a file and it was not there. |
| 0x20007, first digit 2 | Phase 2 is SP_EXECUTION_SAFE_OS. | The PC had restarted into the small setup environment that prepares the new Windows. |
| 0x20007, last digits 07 | Operation 07 is SP_EXECUTION_OP_INSTALL_DRIVERS. | Setup was copying your current drivers into the new Windows. |
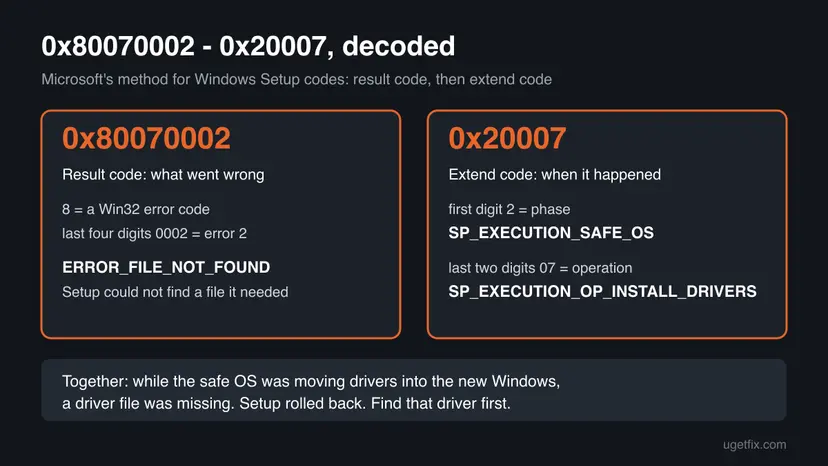
Microsoft notes that its table of extend codes was written for Windows 10 version 1607 and might change. For 0x20007 the text Setup prints matches the table word for word, so the reading still holds in Windows 11. People also search the parts on their own, such as 0x80070002 or the phrase about the SAFE_OS phase. Asked in other languages, the answer is the same: a missing driver file during the upgrade.
Why the Windows 11 upgrade fails with 0x80070002 - 0x20007
Microsoft has not published a cause list for this exact code. The ranking below joins what the code means with what users report on Microsoft Q&A, where the accepted answers all traced it to a single driver. Each cause points to a fix.
| Cause | How often | How to tell | Fix |
|---|---|---|---|
A third-party driver package in the driver store is incomplete: its .inf lists a file that is gone. | Most often | The end of setupact.log names an .inf or a driver file. | Fix 1 |
| A device driver that no longer matches the hardware, such as an old audio, card reader, network or USB adapter driver. | Often | The log names a device, or the PC has docks, adapters and card readers attached. | Fix 2 |
| A program installs its own filter or virtual driver, such as a VPN, a virtual drive, an old antivirus or an audio suite. | Sometimes | The driver in the log belongs to a program, not to hardware. | Fix 3 |
| A broken or half-downloaded upgrade payload, or Dynamic Update pulling a new driver that fails. | Sometimes | Only Windows Update fails, or the log names no driver at all. | Fix 4, Fix 5 |
| Damaged Windows system files or a startup program that holds files open. | Rarely | SFC finds errors, or the upgrade passes in a clean boot. | Fix 6, Fix 7 |
The reader asked if there is anything to do apart from waiting. Microsoft has no update that fixes this code. Setup will hit the same driver on every attempt until that driver is removed or repaired.
Where setupact.log names the driver behind 0x80070002 - 0x20007
Setup keeps its logs after the rollback in a hidden folder on drive C. A volunteer moderator on Microsoft Q&A asks every reader with this code for the same file, setupact.log, and the users who solved it found the driver name near its end.
| File | Where it is | What to look for |
|---|---|---|
setupact.log | C:\$WINDOWS.~BT\Sources\Panther | The last lines before the rollback. Search for 0x80070002 and for .inf. |
setuperr.log | Same folder | Only the errors. Read it first when setupact.log is very long. |
| Rollback logs | C:\$WINDOWS.~BT\Sources\Rollback | What Setup undid. Useful for support, rarely for you. |
- Press Win + R, type
C:\$WINDOWS.~BT\Sources\Pantherand press Enter. The folder is hidden, so it does not show in File Explorer by default. - Copy
setupact.logandsetuperr.logto your Desktop, so you read copies and not the files Setup uses. - Open the copy of
setupact.login Notepad and press Ctrl + End to jump to the end. - Press Ctrl + F, choose Up, and search for
0x80070002. Read the lines just above each hit. - Write down any file that ends in
.inf, or any driver or device name in those lines. That name is what Fix 1 removes.
If the folder is missing, the last attempt ran from Windows Update and was already cleaned up, or you used a USB stick. Start the upgrade once more and read the log right after the rollback. We could not confirm a fixed wording for the log line, so search for the code and read what is around it.
How to fix error 0x80070002 - 0x20007 in the Windows 11 upgrade
Fix 1 to Fix 3 remove the driver Setup could not move, which is the cause in most cases. Fix 4 runs the upgrade again in the way that skips extra downloads. Fix 5 to Fix 7 are general repairs for when the log names no driver.
| What you see or have | Start with |
|---|---|
setupact.log names an .inf file or a driver file. | Fix 1 |
The log names a device, or pnputil says the driver is in use. | Fix 2 |
| The driver belongs to a VPN, virtual drive, antivirus or audio program. | Fix 3 |
| You removed the driver, or only Windows Update fails. | Fix 4 |
The log names no driver and the $WINDOWS.~BT folder is large or half empty. | Fix 5 |
| Nothing above matches. | Fix 6, then Fix 7 |
Fix 1. Find the failing driver in setupact.log and remove it with pnputil
15 minutesRead the warningEveryone who can open setupact.log after the rollback and finds an .inf or driver file near the end.
The code says Setup could not find a file while it copied drivers. Removing the one broken package from the driver store means Setup no longer tries to carry it over. Users on Microsoft Q&A who solved the error did exactly this.
/uninstall removes the driver from any device that uses it. Make a restore point first and save the driver installer from the maker's site, so you can put it back. If something breaks, undo it with Undo recent changes with System Restore. Never remove a storage, chipset or display driver you cannot reinstall.
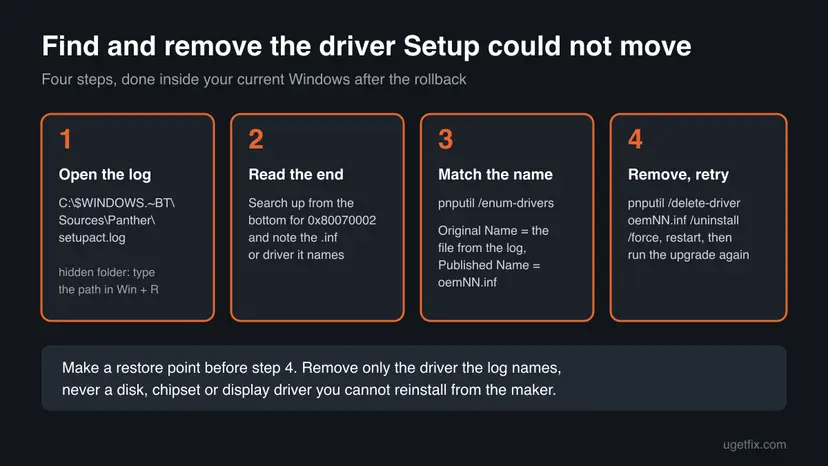
- Find the driver file name in
setupact.logas described in the section on logs above. - Type
cmdin Windows search, right-click Command Prompt and select Run as administrator. Select Yes. - List the third-party driver packages and save the list to a file you can search:
pnputil /enum-drivers > %USERPROFILE%\Desktop\drivers.txt - Open
drivers.txtand search for the file name from the log. Each entry shows a Published Name such asoem42.infand an Original Name such as the file in the log. - Remove that package, using its Published Name:
pnputil /delete-driver oem42.inf /uninstall /force - Restart the PC.
- Run the upgrade again, preferably as in Fix 4.
One user on Microsoft Q&A traced the error to a Realtek file, realtek_service.ini, and reports that audio kept working after removing it and that the 24H2 upgrade then went through. Treat this as a report: the driver on your PC can be any other one.
It worked if: pnputil reports Driver package deleted successfully, and the next upgrade passes the restart where it used to roll back.
If not: If pnputil says the package is in use, go to Fix 2. If it rolls back again, read the new setupact.log: a second driver can sit behind the first.
Fix 2. Uninstall the device and its driver in Device Manager
10 minutesLow riskThe log names a device, pnputil refuses because the driver is in use, or you prefer a window to a command.
Device Manager removes the device and, with the box ticked, its driver package in one go. Unplugged docks, card readers and USB adapters also keep their drivers out of the INSTALL_DRIVERS step.
- Unplug every device you do not need for the upgrade: docks, USB adapters, card readers, printers, drives and game controllers.
- Right-click Start and select Device Manager.
- Select View > Show hidden devices to see devices that are not plugged in now.
- Expand the category of the device from the log, for example Sound, video and game controllers or Network adapters.
- Right-click the device and select Uninstall device.
- Tick Delete the driver software for this device if it is shown, and select Uninstall.
- Restart and run the upgrade again. After Windows 11 is on, install the newest driver from the maker.
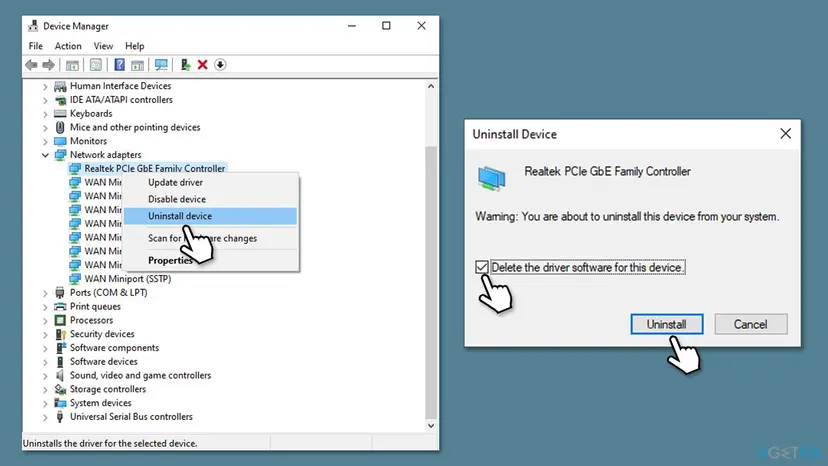
Full steps with Windows 11 screenshots: Update, roll back or reinstall a driver.
It worked if: The device disappears from the list, and the next upgrade gets past the restart in the SAFE_OS phase.
If not: If the device comes back at once, its program reinstalls it: remove that program in Fix 3.
Fix 3. Remove the program that installed the driver
10 minutesLow riskThe driver in the log belongs to software: a VPN, a virtual drive or disc tool, an old antivirus, a backup tool or an audio or RGB suite.
Such programs place filter or virtual drivers that Windows treats like hardware drivers, so Setup tries to carry them across. Uninstalling the program removes its driver properly, and you can install a current version after the upgrade.
- Look at the Provider Name of the driver in
drivers.txtfrom Fix 1. It names the maker. - Press Win + I and open Apps > Installed apps in Windows 11, or Apps > Apps & features in Windows 10.
- Find the program from that maker, select the three dots or the program, and select Uninstall.
- Restart the PC, check
pnputil /enum-driversagain, and make sure the package is gone. - Run the upgrade, then reinstall the newest version of the program.
Step by step: Uninstall a program or app in Windows. Do not just pause a security program: its driver stays loaded. If it is your only antivirus, Microsoft Defender turns on by itself after the uninstall.
It worked if: The driver no longer shows in pnputil /enum-drivers, and Setup does not stop in the SAFE_OS phase.
If not: If the program's uninstaller leaves the driver behind, remove it with Fix 1.
Fix 4. Run the upgrade from a mounted ISO without Dynamic Update
1 to 2 hoursLow riskAfter Fix 1 to Fix 3, or when only the Windows Update route fails.
Setup from the ISO uses a complete, freshly downloaded copy of Windows instead of the cached download. Turning off Dynamic Update stops Setup from pulling extra drivers and updates during the upgrade, so one more driver source drops out.
- Back up the files you cannot lose: Back up your files (Windows Backup, File History, Time Machine).
- On Microsoft's Download Windows 11 page, download the ISO under Download Windows 11 Disk Image (ISO) for x64 devices.
- Right-click the ISO and select Mount. Note the new drive letter, for example
E:. - Open Command Prompt as administrator and start Setup without Dynamic Update:
E:\setup.exe /dynamicupdate disable - Choose Keep personal files and apps when Setup asks, and follow the steps.
One user on Microsoft Q&A reports that after removing the bad driver, Microsoft's Installation Assistant on the same download page finished the upgrade. Either route works once the driver is gone.
It worked if: Setup restarts a few times and ends at the sign-in screen of the new Windows 11 version.
If not: If it rolls back with the same code, read the new setupact.log and go back to Fix 1 with the driver it names now.
Fix 5. Reset Windows Update and remove the old upgrade files
15 minutesLow riskThe log names no driver, only the Windows Update route fails, or earlier attempts left gigabytes of files on drive C.
Error 2 means a file was missing. A cached download that is incomplete can miss the very file Setup asks for, and a reset forces a clean download of the upgrade.
- Open Command Prompt as administrator. Type cmd in the search box, right-click Command Prompt and select Run as administrator. Select Yes when Windows asks for permission.
- Stop the update services. Type the commands below and press Enter after each one. If Windows says that other services depend on Cryptographic Services, it stops them too. A message that a service is not started is fine.
net stop wuauserv
net stop bits
net stop cryptsvc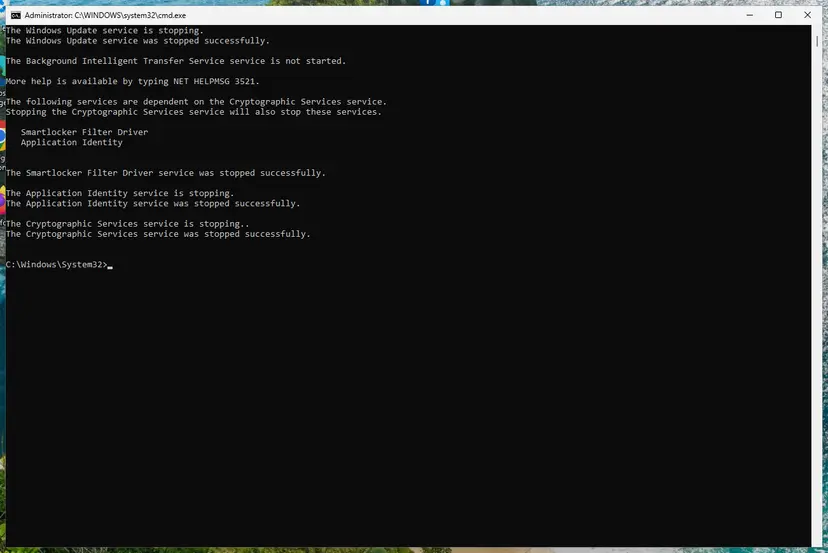
The update services are stopped. Screenshot: Windows 11 26H2. - Delete the download queue files. This clears the list of downloads that the Background Intelligent Transfer Service keeps. If Windows says it cannot find the files, continue.
del "%ALLUSERSPROFILE%\Application Data\Microsoft\Network\Downloader\qmgr*.dat" - Rename the update cache folders. Renaming keeps a copy in case you need it; Windows creates new, empty folders when the services start again. If you get Access is denied, a service is still running: repeat the previous step.
ren %systemroot%\SoftwareDistribution SoftwareDistribution.old
ren %systemroot%\System32\catroot2 catroot2.old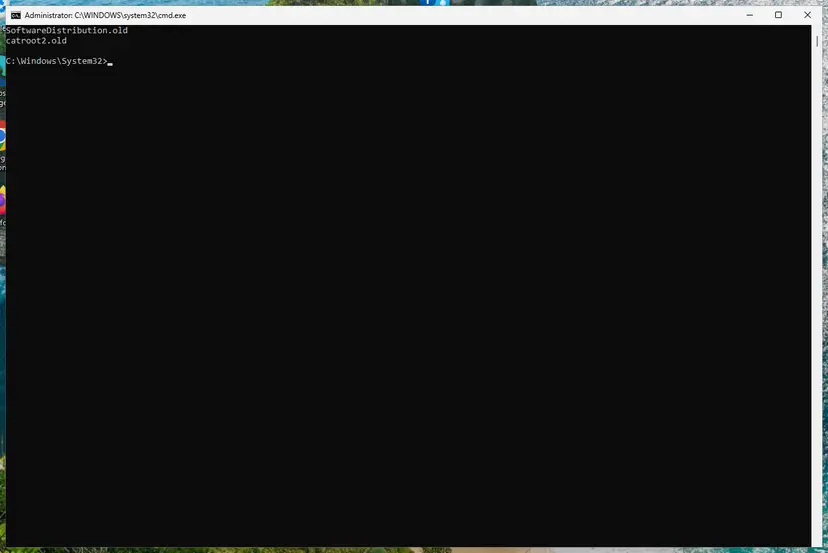
Both folders now end in .old. Screenshot: Windows 11 26H2. - Start the services again. Type the commands below and press Enter after each one. The requested service has already been started is fine: Windows started it on its own.
net start cryptsvc
net start bits
net start wuauserv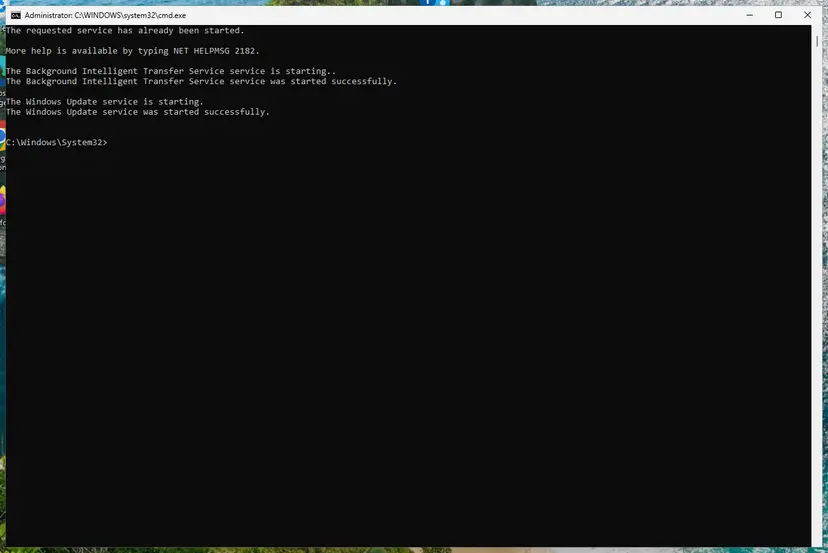
BITS and Windows Update are running again. Screenshot: Windows 11 26H2. - Restart and check for updates. Restart the PC. Then select Start > Settings > Windows Update > Check for updates. The first check can take longer than usual because everything is downloaded again.
These steps were written for Windows 11 and Windows 10 (the steps are the same). The full page with the other versions and what each result means: Reset Windows Update components
Then free space and clear what the failed attempts left: Free up disk space and delete temporary files. In Disk Cleanup, the item for temporary Windows installation files holds the old $WINDOWS.~BT content. Copy setupact.log out before you remove it.
It worked if: Windows Update downloads the upgrade from the start, and the progress no longer jumps to a cached percentage.
If not: If the new download fails the same way, the cause is a driver after all: use Fix 4 and read the log.
Fix 6. Repair Windows system files with SFC and DISM
20 minutesNo riskThe log names no driver and Fix 4 and Fix 5 did not help.
Setup reads parts of the current Windows to build the new one. DISM repairs the component store and SFC repairs protected files, which rules out damage on the source side.
- Open an elevated command window. Right-click Start and select Terminal (Admin), or type cmd in the search box, right-click Command Prompt and select Run as administrator. Select Yes when Windows asks for permission.
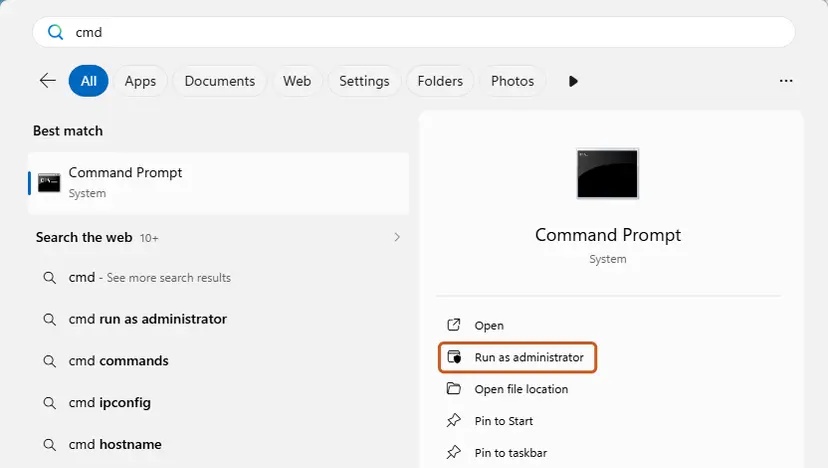
Search for cmd and choose Run as administrator. Screenshot: Windows 11 26H2. - Run DISM first. Type the command below and press Enter. DISM downloads clean copies of damaged components from Windows Update, so it can take several minutes. Wait until it says The operation completed successfully.
DISM.exe /Online /Cleanup-Image /RestoreHealth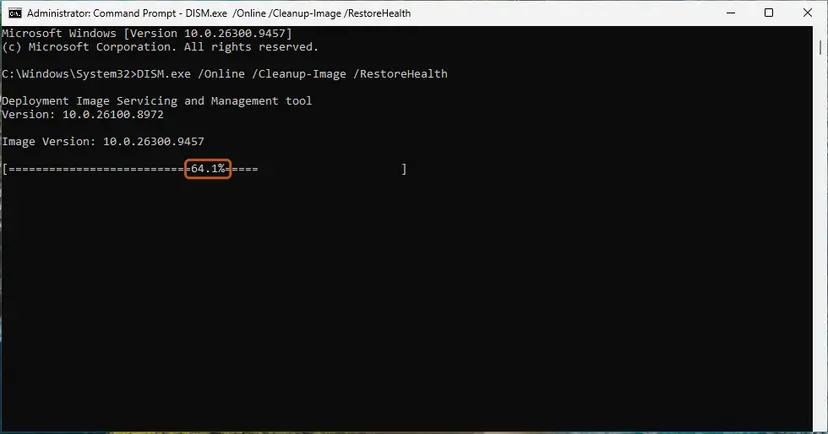
DISM /RestoreHealth running. Screenshot: Windows 11 26H2. - Run System File Checker. In the same window, type the command below and press Enter. Do not close the window until the verification reaches 100%.
sfc /scannow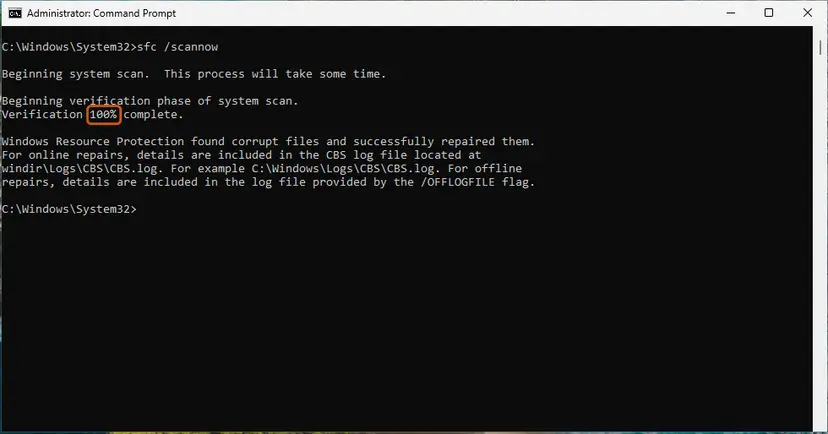
sfc /scannow at 100%. Screenshot: Windows 11 26H2. - Read the result and restart. Compare the last message with the table below this guide, then restart the PC so that repaired files are loaded.
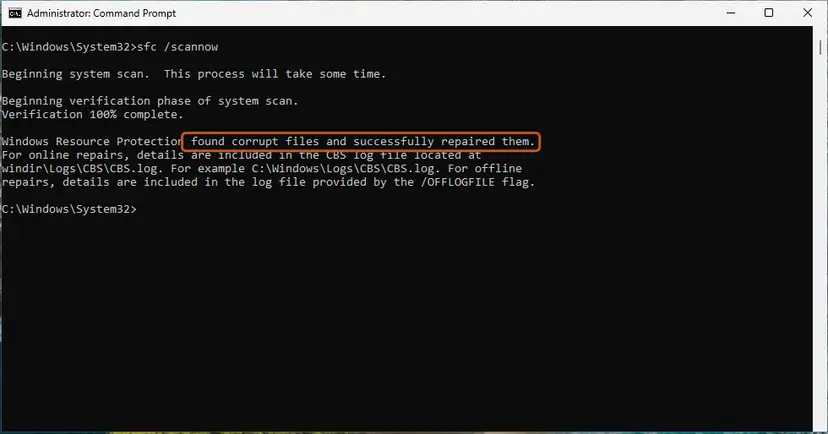
The result line tells you what SFC did. Screenshot: Windows 11 26H2.
These steps were written for Windows 11 24H2 and 25H2. The full page with the other versions and what each result means: Run DISM and SFC to repair Windows system files
It worked if: SFC reports that it found no integrity violations, or that it repaired files.
If not: If DISM fails, the copy of Windows is badly damaged: run Fix 4 from the ISO, which brings its own source files.
Fix 7. Upgrade in a clean boot
20 minutes, plus the upgradeLow riskEverything else failed, or the log points to a file held by a program that starts with Windows.
A clean boot starts Windows with Microsoft services only. Programs that lock files or load drivers at startup are then out of the way while Setup prepares the upgrade.
- Open System Configuration. Select Search on the taskbar, type msconfig and select System Configuration from the results.
- Hide Microsoft services. On the Services tab, select the Hide all Microsoft services check box. Only services from other companies stay in the list.
- Disable the remaining services. Select Disable all, then select Apply.
- Open Task Manager. On the Startup tab of System Configuration, select Open Task Manager.
- Disable the startup apps. On the Startup apps tab in Task Manager, select each item whose status is Enabled and select Disable. Write down or take a screenshot of the items you disable: you need the list to turn them back on.
- Confirm the changes. Close Task Manager. On the Startup tab of System Configuration, select OK.
- Restart and test. Restart the PC. Windows now starts in a clean boot environment: try again the thing that failed (run the app, install the update, uninstall the program).
These steps were written for Windows 11 25H2 and 26H2. The full page with the other versions and what each result means: How to perform a clean boot in Windows
Do not tick Safe boot for the upgrade, as some older guides say: Setup needs normal Windows to start. Undo the clean boot after Windows 11 is installed.
It worked if: The upgrade finishes in the clean boot. Turn startup items back on one at a time to find the program that stopped it.
If not: Collect the logs as in the next section and ask for help with them.
If error 0x80070002 - 0x20007 is still there
When every fix fails, the answer is still in the logs. Each attempt writes a new setupact.log, so copy it out right after the rollback, before Windows Update or Disk Cleanup removes the folder.
| What you find | What to do |
|---|---|
| A different driver name after you removed the first one | Repeat Fix 1 for that driver. Some PCs have two or three stale packages. |
| A storage, chipset or display driver | Do not delete it. Install the newest driver for your model from the PC maker, then run Fix 4. |
| No driver name at all | Run Microsoft's SetupDiag tool on the PC. It reads the logs and names the failure rule. |
| A work or school PC | Ask the IT department. Their management tools may install drivers again. |
| The disk shows errors or the PC freezes during the upgrade | Check the drive with Check a disk for errors (chkdsk) and back up first. That is a hardware sign, not this error. |
- What to send to support: the full code, your current Windows version and build, how you started the upgrade, and the PC model.
- Attach
setupact.logandsetuperr.logfromC:\$WINDOWS.~BT\Sources\Panther, and thedrivers.txtlist from Fix 1. - Say which driver you removed and what changed after that.
0x80070002 - 0x20007 is a driver file problem, not a hardware fault. If the code changes from one attempt to the next, or the PC crashes during the upgrade, look at the drive and memory instead.
How to keep 0x80070002 - 0x20007 from coming back
- Install drivers from the PC or device maker, and remove the old one first when you change hardware.
- Uninstall VPNs, virtual drive tools and old security suites you no longer use.
- Unplug docks, adapters and card readers before a big Windows upgrade.
- Keep 30 GB or more free on drive C before you start, so Setup does not run short mid-way.
- Do not use driver updater tools that install packages Windows did not ask for.
- Do not delete files inside
C:\Windows\System32\DriverStoreby hand. Usepnputilor Device Manager. - Do not stay on Windows 10: it left support on 14 October 2025.
- Do not retry the same upgrade again and again without reading the log.
Once Windows 11 runs, keep it updated. If you ever install from a USB stick and the new Setup stops at the disk step instead, read our guide to error 0x80042444 - 0x4002F, a different code with a different cause.
Frequently asked questions
What does 0x80070002 - 0x20007 mean?
It means Windows 11 Setup could not find a file while it installed drivers into the new Windows. Microsoft's guide to upgrade error codes splits the code in two. The result code 0x80070002 is the Win32 error ERROR_FILE_NOT_FOUND. The extend code 0x20007 is phase 2, SP_EXECUTION_SAFE_OS, with operation 07, SP_EXECUTION_OP_INSTALL_DRIVERS. Setup then rolls back to your old Windows. The file almost always belongs to one third-party driver package, which you can find in setupact.log.
What is the SAFE_OS phase in a Windows upgrade?
The SAFE_OS phase is the part of the upgrade after the first restart, when the PC runs a small setup environment instead of your Windows. In this phase Setup applies the new image and installs drivers into it. Microsoft's table names it SP_EXECUTION_SAFE_OS, phase 2. An error here does not touch your files, because Setup restores the old Windows. The message about the INSTALL_DRIVERS operation means it failed while copying drivers.
Can I just wait for Microsoft to fix it?
No. Microsoft does not list 0x80070002 - 0x20007 as a known issue, and no update is planned for it. The failure comes from a driver on your PC, so the upgrade will stop at the same point on every attempt. You can stay on your current version for now if it is still supported, but the fix is to find the driver in setupact.log and remove it (Fix 1). Windows 10 left support on 14 October 2025, so do not wait long there.
Where is setupact.log after the upgrade fails?
It is in C:\$WINDOWS.~BT\Sources\Panther, next to setuperr.log. The $WINDOWS.~BT folder is hidden, so press Win + R, type the path and press Enter. Copy both files to your Desktop before you read them. If the folder is gone, Windows Update or Disk Cleanup removed it; start the upgrade once more and copy the logs right after the rollback. Search the log from the end for 0x80070002 and read the lines above it.
Is it safe to delete a driver with pnputil /delete-driver?
It is safe for the one package the log names, if you prepare. The /uninstall switch also removes the driver from any device using it, so that device can stop working until you reinstall a driver. Make a restore point, download the newest driver from the maker, then delete the package. Never remove storage, chipset or display drivers you cannot get back. One user on Microsoft Q&A reports that audio kept working after removing an old Realtek file.
Does a clean install avoid 0x80070002 - 0x20007?
Usually yes, because a clean install from a USB stick does not carry your old drivers across, and the INSTALL_DRIVERS step works only with drivers on the media. The price is that you lose your apps and settings, and the target partition is erased. Try Fix 1 to Fix 4 first. If you choose a clean install, back up your files, make the stick with Microsoft's tool and have your network driver ready on a second stick.
Is this the same as Windows Update error 0x80070002?
Not exactly. 0x80070002 alone means a file was not found, and it appears in many places: monthly Windows Update, System Restore and app installers. With the extend code 0x20007 it belongs to a Windows 11 upgrade that failed while installing drivers. A plain update error 0x80070002 is usually fixed by resetting Windows Update (Fix 5). A System Restore error 0x80070002 is a different problem that this page does not cover.
What about 0x2005002, 0xC0E90002 or error d0000207?
These are different codes. Microsoft reads the first part of a Setup code like this. A result code that starts with 8 is a Win32 error. Its last four digits give the error number. 0xC0E90002 is another Windows 11 setup failure, and we found no Microsoft documentation for d0000207 or 0x2005002. This page covers only 0x80070002 - 0x20007. If your message names the SAFE_OS phase and INSTALL_DRIVERS with another result code, the log steps above still help.
Does the Windows Update troubleshooter fix this error?
It is unlikely. The troubleshooter checks the Windows Update service and its download cache, while 0x80070002 - 0x20007 happens after the download, inside the SAFE_OS phase, when a driver file is missing. That is why the old version of this guide listed it and this one does not. If you want to rule out the update service, the reset in Fix 5 does more than the troubleshooter. For the driver itself, use Fix 1 or Fix 2.
Will I lose my files when the upgrade rolls back?
No. The message says Setup set your PC back to the way it was right before you started installing Windows 11, and that includes your files, apps and settings. What stays behind is the hidden $WINDOWS.~BT folder and sometimes a large download on drive C. Keep it until you have copied setupact.log, then free the space. A backup before the next attempt is still a good idea, because Fix 1 changes drivers.
Sources
Did this fix work?
One click, no account. It tells the next reader which guides are worth their time.
Questions and experiences: fix Windows 11 upgrade error 0x80070002 - 0x20007
Still broken, or found a fix we did not cover? Ask here: members and our editors answer. Reading is open; writing needs a free account.
…