
How to fix Windows Update error 0x800f0985 in Windows?

Prefer to fix it yourself? The manual steps follow.
- 6methods
- 5 minutes to 2 hours
- Intermediate
Applies to Windows 11, Windows 10 22H2 and Windows Server 2019 (build 17763): monthly cumulative updates and servicing stack updates
6 methods in this guide
Hello, I was wondering if you could help me deal with a problem I have on Windows. I can't install the latest Windows update because of the error 0x800f0985.
Error 0x800f0985 means Windows could not rebuild a system file while installing a cumulative update, because the file version it builds from was missing or damaged. It hits Windows 10, Windows 11 and above all Windows Server 2019. Restart, install the newest update, and if it still fails, remove the last cumulative update that did install.
Restart the PC and install the newest cumulative update, not the old one that failed (Fix 1). If it fails again, uninstall the last cumulative update that did install, restart and install the new one (Fix 2): users on Microsoft Q&A report this cleared 0x800f0985 on Windows Server 2019. Microsoft treats this code as servicing stack damage, so when nothing else works, a repair reinstall that keeps apps and files is the reliable way out (Fix 6).
| Error | 0x800f0985 next to a cumulative update. In the logs its name is PSFX_E_APPLY_REVERSE_DELTA_FAILED. |
|---|---|
| Where it appears | Settings > Windows Update and Update history, as Install error - 0x800f0985 on Windows 11. With DISM it reads Error: 0x800f0985 and DISM failed. No operation was performed. |
| Main cause | The servicing stack could not apply a reverse delta: the base version of a system file was missing or did not match. Users report it often follows an earlier update that installed with damage. |
| Fastest fix | Restart and install the newest update (Fix 1). Then remove the last installed cumulative update and try again (Fix 2). |
| Also written as | 0x800F0985, 800f0985, error 0x800f0985, 0x800f0985(-2146498171). -2146498171 is the same code as a signed decimal number. |
| Affects | Windows Server 2019 most often in the reports, also Windows 10 and Windows 11. Server 2019 reports name KB5066586, KB5068791, KB5070883 and KB5075904. |
| Microsoft's status | Not a known issue of one update. Microsoft lists 0x800F0985 among the servicing stack errors for which an in-place upgrade is the only reliable resolution (article for Azure VMs, updated July 2026). |
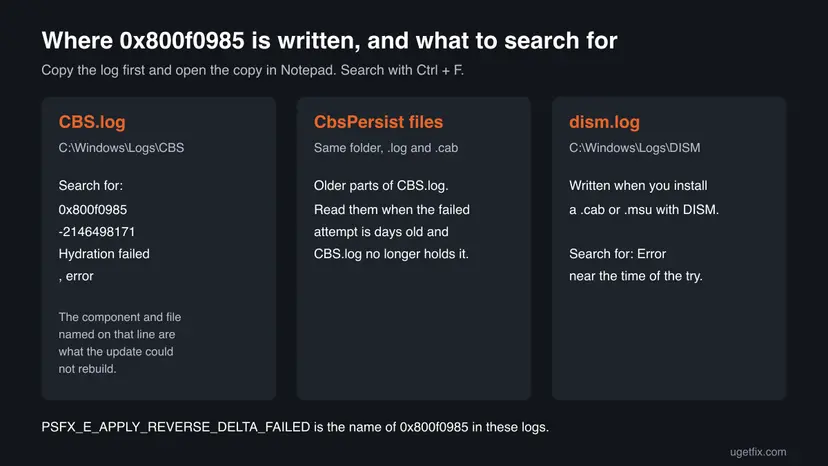
| Where the cause is written | C:\Windows\Logs\CBS\CBS.log and the CbsPersist_* files beside it. Search for 0x800f0985, -2146498171 and Hydration failed. |
| Time to fix | 5 to 20 minutes for Fix 1. 20 to 40 minutes for Fix 2 to Fix 5. One to two hours for the repair reinstall in Fix 6. |
Facts checked on 15 October 2026. Steps written for Windows 11 (25H2 and 26H2), Windows 10 22H2, Windows Server 2019.
What Windows Update error 0x800f0985 means
0x800f0985 is an error of the Windows servicing stack, the part of Windows that installs updates. The download is complete and your internet connection is not the cause. The failure happens while Windows puts the new versions of system files together, often late in the install, even at 100 percent.
Microsoft names the code in its list of servicing errors: 0x800F0985, PSFX_E_APPLY_REVERSE_DELTA_FAILED, "Possibly related to missing manifests or payloads." Read plainly, a monthly update ships small difference files instead of whole files. Windows first takes the file on the PC back to a base version (the reverse delta), then applies the new difference. When the file on the PC is not the version Windows expects, the first step fails and the whole update is rolled back.
| What you see | Where | What it tells you |
|---|---|---|
| Install error - 0x800f0985 | Settings > Windows Update, next to the update | The cumulative update downloaded, and the install failed. |
| A failed entry with 0x800f0985 | Update history | The same failure, with its date. The date tells you where to look in CBS.log. |
| Error: 0x800f0985 and DISM failed. No operation was performed. | Command Prompt, when you install a .cab or .msu with DISM | The same fault in a manual install. DISM points to C:\Windows\Logs\DISM\dism.log. |
| 0x800f0985(-2146498171) | Configuration Manager, WSUS reports, scripts | The same code, with its decimal form in brackets. |
| Hydration failed, with NTSTATUS -2146498171 | CBS.log | The line that names the component and the file Windows could not rebuild. |
Its neighbours in Microsoft's list help you place it. 0x800F0984 means "Matching component directory exists but binary is missing", 0x800F0986 is the forward step failing, and 0x800F0987 is a null delta hydration failure. All of them point to the component store (the WinSxS folder), not to Windows Update itself. If your log shows 0x800f0993 instead, see our guide on error 0x800f0993.
Microsoft's public list of common Windows Update errors does not include 0x800f0985. The code and its name are in Microsoft's article on errors that need an in-place upgrade, written for Azure virtual machines. The explanation of the reverse delta above is our reading of that name.
Why Windows Update error 0x800f0985 appears
Microsoft gives one cause for the whole group of codes: damage in the servicing stack, from missing files, an invalid configuration or damaged metadata. What damages it differs from PC to PC. The table orders the causes from what users report most often to the rarest.
| Cause | How often | How to tell | Fix |
|---|---|---|---|
| The PC was not restarted after an update, or an install is still pending. | Often | Windows asks for a restart, or the failed update is several months old. | Fix 1 |
| The previous cumulative update reported success but left files in the wrong version. | Most often on Server 2019 | Last month's update is listed as installed and every later update fails. CBS.log says that the hashes of a file member do not match. | Fix 2 |
| The component store is damaged in other places too. | Sometimes | DISM reports that the store is repairable, or SFC finds damaged files. | Fix 3 |
| The servicing stack update is older than the cumulative update needs. | Sometimes, on Server 2019 | The catalog lists a newer Servicing Stack Update for your system. | Fix 4 |
| A damaged download in the update cache. | Rarely | The update fails at once at the same percentage on every try. | Fix 5 |
| Damage that no tool can repair in place. | When all else failed | Every fix above ended with the same code. | Fix 6 |
The second row comes from Microsoft Q&A. On Windows Server 2019 one administrator could not install the October and November 2025 updates. He uninstalled the September cumulative update, restarted, and both installed. Another administrator wrote in February 2026 that the January update KB5073723 "installed 'successfully' but corrupted the Windows Update servicing stack", and that the February update KB5075904 installed only after he removed it.
Where CBS.log is and what to look for
You do not need the log for Fix 1. Read it when the update fails a second time, because it names the component that could not be rebuilt. Microsoft's own advice for reading CBS.log is to open the last log, search for , error and match the hit with the time of the failure.
- Press Win + R, type
%windir%\Logs\CBSand press Enter. - Copy
CBS.logto the Desktop and open the copy in Notepad, so the original stays untouched. - Press Ctrl + F and search for
0x800f0985, then for-2146498171. Note the time of the last hit. - Search for
Hydration failedand for, errornear that time. - Read the line. It names a component, a version and a file, for example a DLL that could not be rebuilt.
- If the attempt was days ago and CBS.log does not hold it, open the newest
CbsPersist_file in the same folder. A.cabfile opens like a folder in File Explorer.
Error  CSI  (F) Hydration failed for component Microsoft-Windows-IE-RuntimeUtilities, version 11.0.17763.8389, arch amd64, on file msIso.dll with NTSTATUS -2146498171
Info   CSI  Hashes for file member [l:9]'msIso.dll' do not match.
The two lines above are shortened from a Windows Server 2019 log posted on Microsoft Q&A. "Hashes do not match" means the file on the PC is not the version the update expects. That is the sign for Fix 2: the update before this one left the file behind.
How to fix Windows Update error 0x800f0985
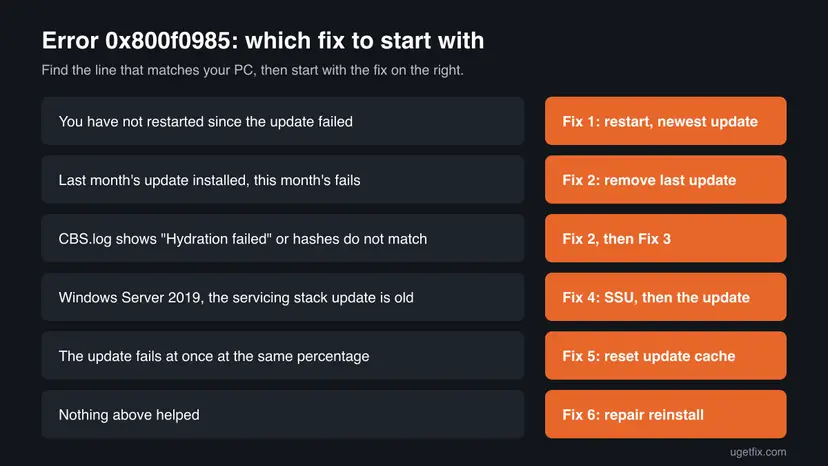
Fix 1 and Fix 2 are specific to this code and solve most cases users report. Fix 3 to Fix 5 are repairs of the component store and the update cache. Fix 6 reinstalls Windows over itself and keeps your apps and files: Microsoft names it as the reliable answer for this group of errors.
| What you see or have | Start with |
|---|---|
| The update failed once and you have not restarted since. | Fix 1 |
| Last month's update installed, and every update since fails. | Fix 2 |
| CBS.log shows Hydration failed or hashes that do not match. | Fix 2, then Fix 3 |
| Windows Server 2019, and you install updates by hand or from WSUS. | Fix 4 |
| The update fails at once at the same percentage every time. | Fix 5 |
| Nothing above helped. | Fix 6 |
Fix 1. Restart the PC and install the newest cumulative update
5 to 20 minutesNo riskAlways first, and above all when the failed update is from an earlier month.
A pending install that waits for a restart blocks the next one. Cumulative updates also replace each other, so the newest one may carry the file versions the old one could not build.
- Save your work and select Start > Power > Restart. Use Restart, not Shut down.
- On Windows 11 open Settings > Windows Update. On Windows 10 and Windows Server 2019 open Settings > Update & Security > Windows Update.
- Select Check for updates and install everything that is offered.
- If the failed update is still listed, select Retry next to it once.
- Open Update history and check whether the update is now listed as installed.
It worked if: The update installs, asks for a restart and appears as installed in Update history.
If not: Note the KB number of the last update that did install and go to Fix 2.
Fix 2. Uninstall the last cumulative update that did install, then install the new one
20 to 40 minutesRead the warningThe previous cumulative update is listed as installed and every later one fails with 0x800f0985, or CBS.log shows hashes that do not match.
The new update builds its files from the versions the previous update left. If that update left a file in the wrong version, removing it puts the older, intact base back. Two administrators on Microsoft Q&A cleared 0x800f0985 on Windows Server 2019 this way.
For a short time the PC loses the security fixes of the removed update, until the new one is installed. Install the new update straight after the restart. On a server, plan a maintenance window and take a backup or a snapshot first: Back up your files (Windows Backup, File History, Time Machine).
- Open Windows Update. Select Start > Settings > Windows Update.
- Open the update history. Under More options, select Update history. Note the KB number and the date of the update you suspect.
- Open the list of removable updates. Scroll down to Related settings and select Uninstall updates.
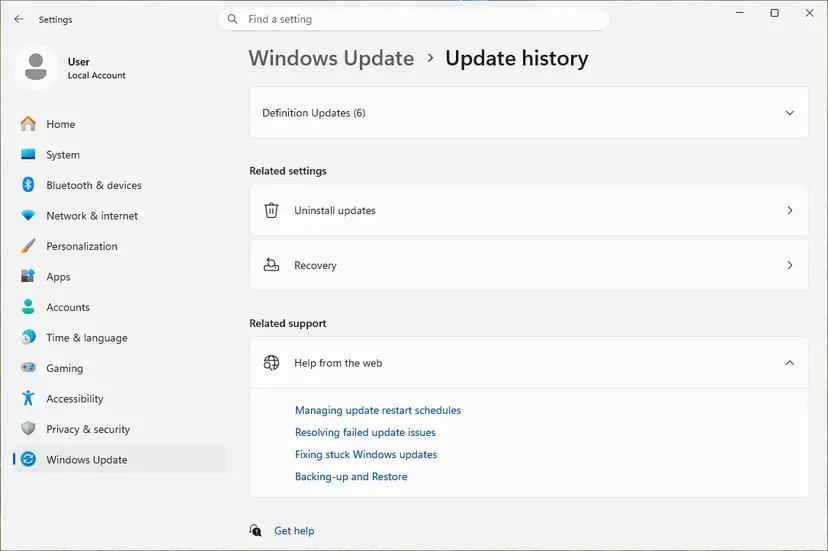
Uninstall updates is under Related settings. Screenshot: Windows 11 26H2. - Uninstall the update. Find the update in the list and select Uninstall next to it. If the update is not in the list, Windows does not allow it to be removed this way.
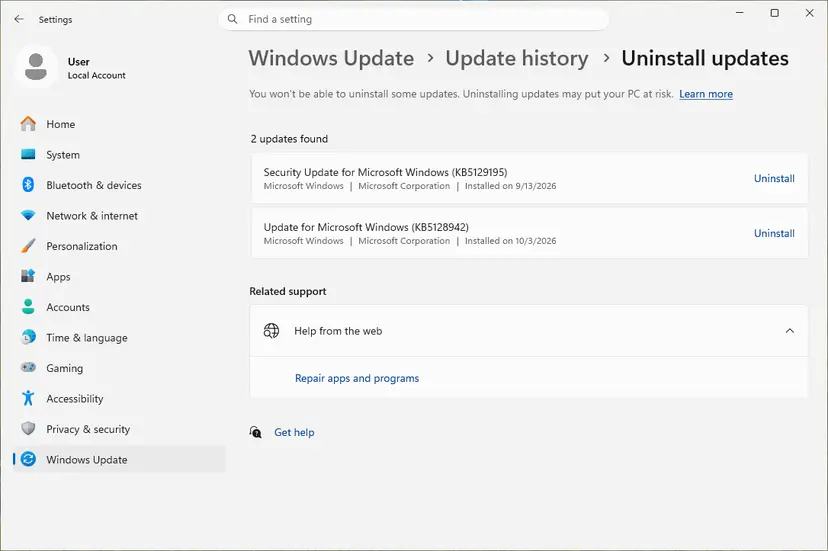
Each removable update has its own Uninstall link. Screenshot: Windows 11 26H2.
These steps were written for Windows 11 25H2 and 26H2. The full page with the other versions and what each result means: How to uninstall a Windows update
Do not pause updates afterwards as the procedure suggests for a bad update: here you want the new update straight away. Restart, then run Check for updates. On Windows Server 2019 the screens are those of the Windows 10 tab.
If Uninstall updates does not list the cumulative update, list the packages in an elevated Command Prompt and remove it with DISM. Copy the full name of the newest RollupFix package from the list.
dism /online /get-packages /format:table | findstr /i RollupFix
dism /online /remove-package /packagename:<full package name from the list>
It worked if: After the restart the new cumulative update installs, and Update history lists it as successfully installed.
If not: If the new update fails again with 0x800f0985, repair the component store with Fix 3.
Fix 3. Repair the component store with DISM and SFC, from installation media if needed
20 to 40 minutesNo riskFix 2 did not help, or DISM and SFC report damaged files.
Microsoft's answer for a component left in a partly installed state is DISM with RestoreHealth followed by SFC. DISM replaces damaged components with clean copies. When Windows Update itself is the broken part, DISM needs the files from installation media of the same version.
- Open an elevated command window. Right-click Start and select Terminal (Admin), or type cmd in the search box, right-click Command Prompt and select Run as administrator. Select Yes when Windows asks for permission.
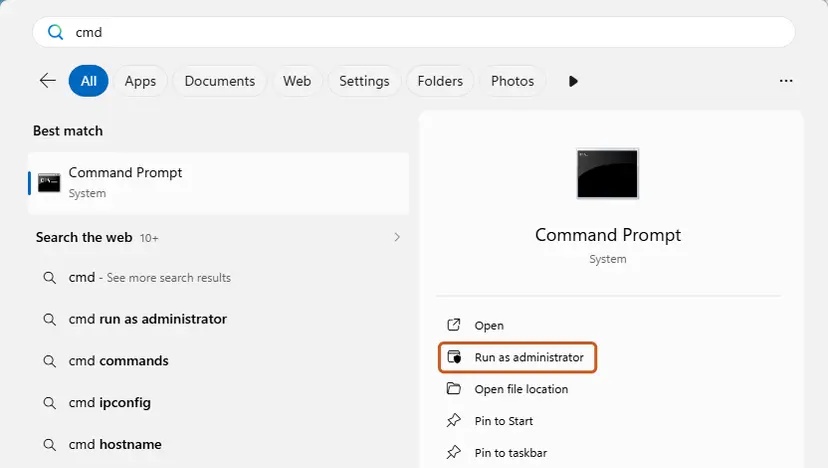
Search for cmd and choose Run as administrator. Screenshot: Windows 11 26H2. - Run DISM first. Type the command below and press Enter. DISM downloads clean copies of damaged components from Windows Update, so it can take several minutes. Wait until it says The operation completed successfully.
DISM.exe /Online /Cleanup-Image /RestoreHealth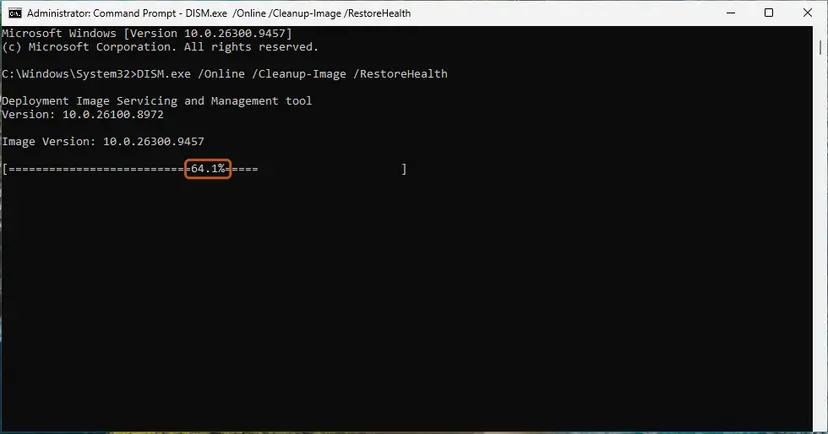
DISM /RestoreHealth running. Screenshot: Windows 11 26H2. - Run System File Checker. In the same window, type the command below and press Enter. Do not close the window until the verification reaches 100%.
sfc /scannow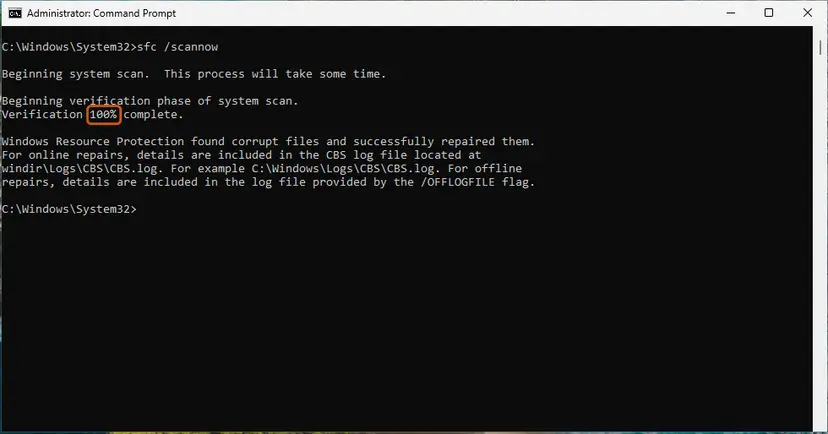
sfc /scannow at 100%. Screenshot: Windows 11 26H2. - Read the result and restart. Compare the last message with the table below this guide, then restart the PC so that repaired files are loaded.
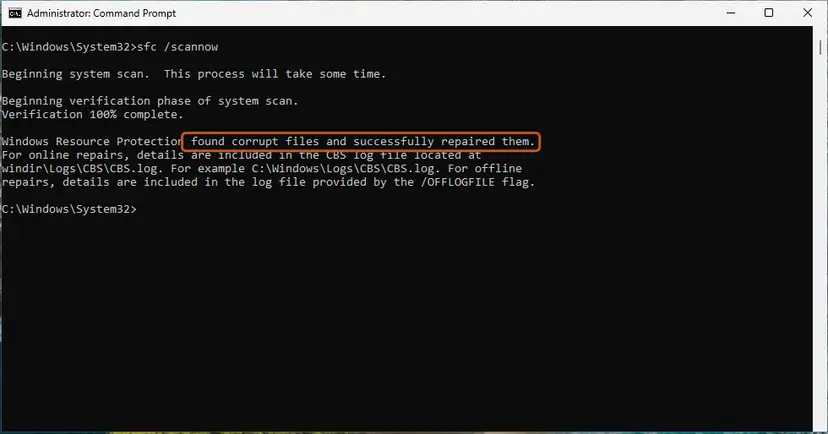
The result line tells you what SFC did. Screenshot: Windows 11 26H2.
These steps were written for Windows 11 24H2 and 25H2. The full page with the other versions and what each result means: Run DISM and SFC to repair Windows system files
If DISM fails or the update still fails, run it again with installation media as the source. On Windows Server 2019 this is the usual case, because DISM cannot fetch clean files through a servicing stack that is damaged.
- Download an ISO of the same Windows version and build family as the PC (for Server 2019, a Server 2019 ISO). Right-click it and select Mount. Note the drive letter, for example D:.
- In an elevated Command Prompt, list the editions in the image and note the index number of your edition:
dism /Get-WimInfo /WimFile:D:\sources\install.wim - Run the repair with that source. Replace D: and the last number with your drive letter and index:
DISM /Online /Cleanup-Image /RestoreHealth /Source:wim:D:\sources\install.wim:1 /LimitAccess - If the
sourcesfolder holdsinstall.esdinstead ofinstall.wim, use that file name and writeesd:in place ofwim:. - Run
sfc /scannow, restart, and check for updates.
It worked if: DISM ends with The operation completed successfully., SFC reports that it repaired files or found no violations, and the update installs after a restart.
If not: Install the update by hand, servicing stack first, with Fix 4.
Fix 4. Install the servicing stack update first, then the cumulative update by hand
20 to 40 minutesLow riskWindows Server 2019 or another system where the catalog lists a separate Servicing Stack Update, or one KB keeps failing in Windows Update.
The servicing stack is the installer of every other update. An older stack can fail to apply the differences in a newer cumulative update. The Microsoft Update Catalog gives both packages, so you control the order.
- Check your Windows version. Press Windows key + R, type winver and press Enter. Note the version (for example 25H2) and the OS build.
- Find the KB number. Open Settings > Windows Update. A failed or pending update is listed with its KB number; earlier ones are under Update history.
- Check the processor type. Open Settings > System > About and look at System type: an x64-based PC needs the x64 file, an ARM-based PC (for example Snapdragon) needs the arm64 file.
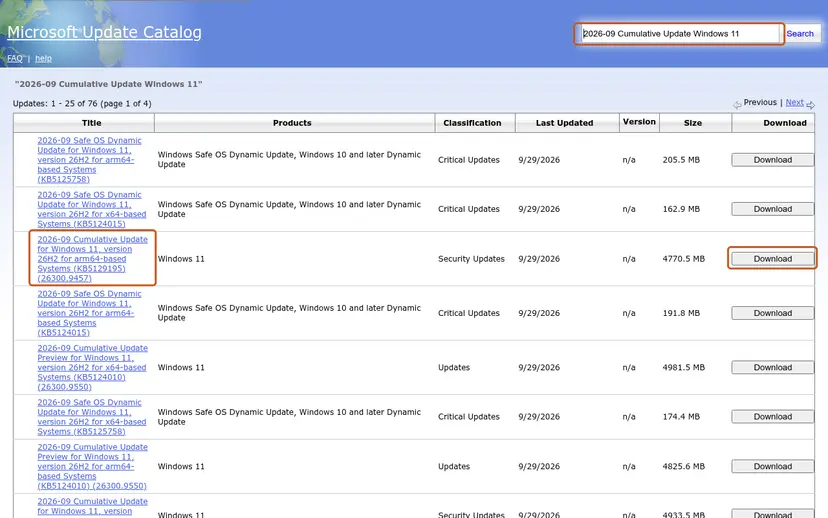
- Search the catalog. Open the Microsoft Update Catalog at catalog.update.microsoft.com in your browser, type the KB number (for example KB5124010) in the search box and press Enter.
- Pick the right row. Find the row whose title names your Windows version and your processor type (x64-based or arm64-based) and select Download on that row.
- Download every file listed. A window lists one or more .msu links. Download all of them into one empty folder, for example C:\packages. On Windows 11 24H2 and later the list can include earlier checkpoint updates that the new one needs.
- Install a single file. If there is only one file, double-click it and confirm the installation in the Windows Update Standalone Installer.
- Install several files with DISM. If there are several files, open an elevated Terminal or Command Prompt and run DISM with the newest file. DISM finds the other files in the same folder and installs them in the right order.
DISM /Online /Add-Package /PackagePath:C:\packages\<newest-file>.msu - Restart. Restart the PC when the installation finishes, then run winver again: the OS build should have changed.
These steps were written for Windows 11 24H2 and later; Windows 10 22H2. The full page with the other versions and what each result means: Install an update from the Microsoft Update Catalog
- If the catalog lists a Servicing Stack Update for your system, install it first and restart.
- Then install the cumulative update file. With a
.cabfile usedism /online /add-package /packagepath:"C:\packages\<file>.cab". - If the stack installs and the cumulative update still stops with Error: 0x800f0985, the damage is in the component store. A newer stack alone did not help the Server 2019 administrator on Microsoft Q&A either.
It worked if: The cumulative update installs and winver shows the new OS build after the restart.
If not: If it fails at once at the same point, clear the update cache with Fix 5. Otherwise go to Fix 6.
Fix 5. Reset the Windows Update components
10 minutesLow riskThe update fails at once at the same percentage on every try.
A damaged download in the SoftwareDistribution folder is used again at every retry. Renaming the folder makes Windows download the update from scratch. It does not repair the component store, so it helps only when the downloaded files were the problem.
- Open Command Prompt as administrator. Type cmd in the search box, right-click Command Prompt and select Run as administrator. Select Yes when Windows asks for permission.
- Stop the update services. Type the commands below and press Enter after each one. If Windows says that other services depend on Cryptographic Services, it stops them too. A message that a service is not started is fine.
net stop wuauserv net stop bits net stop cryptsvc - Delete the download queue files. This clears the list of downloads that the Background Intelligent Transfer Service keeps. If Windows says it cannot find the files, continue.
del "%ALLUSERSPROFILE%\Application Data\Microsoft\Network\Downloader\qmgr*.dat" - Rename the update cache folders. Renaming keeps a copy in case you need it; Windows creates new, empty folders when the services start again. If you get Access is denied, a service is still running: repeat the previous step.
ren %systemroot%\SoftwareDistribution SoftwareDistribution.old ren %systemroot%\System32\catroot2 catroot2.old - Start the services again. Type the commands below and press Enter after each one. The requested service has already been started is fine: Windows started it on its own.
net start cryptsvc net start bits net start wuauserv - Restart and check for updates. Restart the PC. Then select Start > Settings > Windows Update > Check for updates. The first check can take longer than usual because everything is downloaded again.
These steps were written for Windows 11 and Windows 10 (the steps are the same). The full page with the other versions and what each result means: Reset Windows Update components
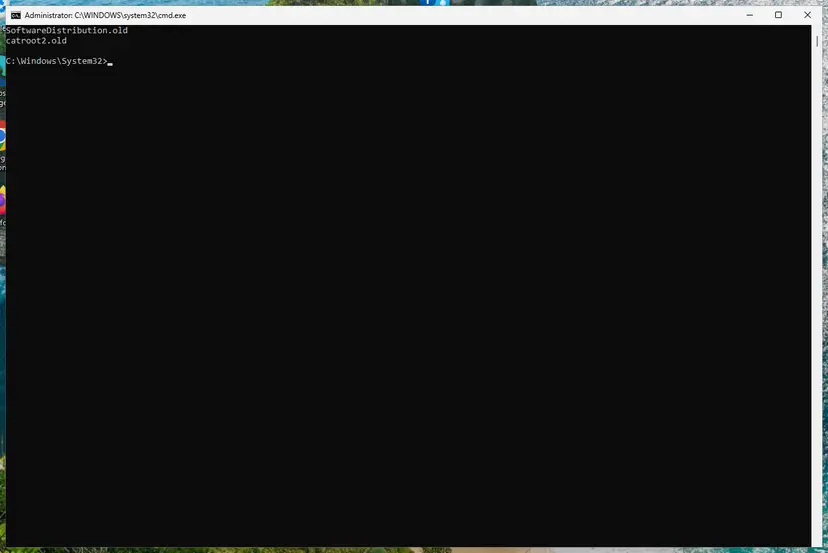
It worked if: Windows Update downloads the update again and installs it.
If not: The damage is inside Windows. Use the repair reinstall in Fix 6.
Fix 6. Reinstall Windows over itself and keep apps and files
1 to 2 hoursLow riskEvery fix above ended with 0x800f0985, or CBS.log shows damage that DISM could not repair.
For 0x800F0985 and the related servicing errors, Microsoft writes that "the only reliable resolution is an in-place upgrade", which "reinstalls the OS while preserving your data, applications, and settings". It gives the PC a clean component store, after which updates install again.
On Windows 11 the built-in way is Fix problems using Windows Update:
- Open Recovery in Settings. Open Settings > System > Recovery. Next to Fix problems using Windows Update, select Reinstall now. This keeps your apps, files and settings.
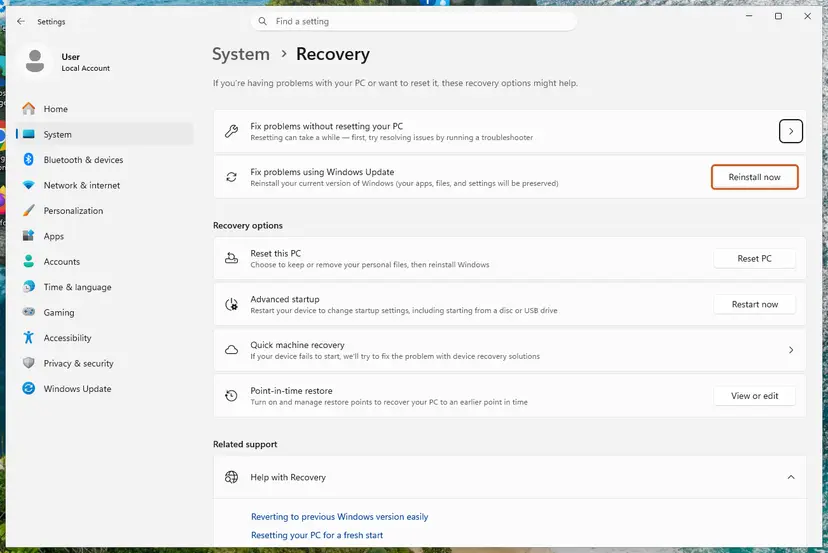
Fix problems using Windows Update reinstalls the current version and keeps apps, files and settings. Screenshot: Windows 11 26H2. - Start the reinstall. Choose whether the PC may restart on its own 15 minutes after the installation, then select OK.
- Wait and restart. Windows Update downloads and installs a repair copy of your current Windows version. Keep the PC plugged in and online, and restart it when asked.
These steps were written for Windows 11 22H2 and later. The full page with the other versions and what each result means: Reinstall Windows without losing files
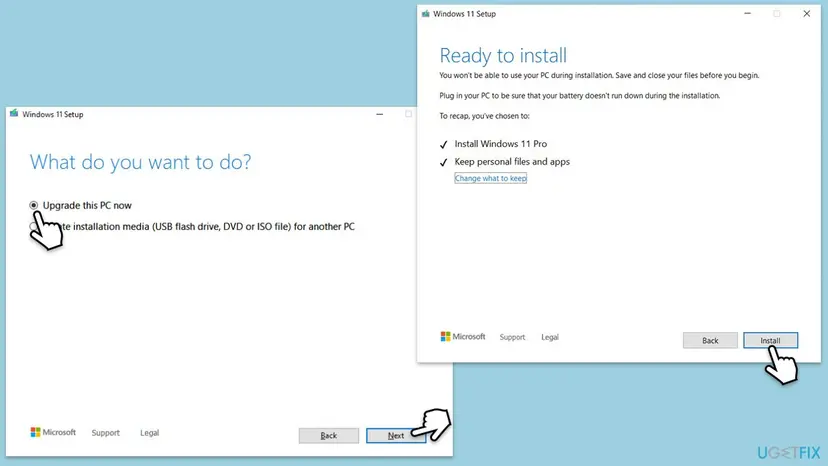
- Windows 10 22H2: run Microsoft's Media Creation Tool, select Upgrade this PC now and keep Keep personal files and apps. Windows 10 left support on 14 October 2025.
- Windows Server 2019: mount an ISO of Windows Server 2019, open an elevated Command Prompt on its drive, run
setup.exe /auto upgrade /dynamicupdate disableand select Keep personal files and apps when asked. Back up the server or take a snapshot first. - Keep the PC plugged in and online until the reinstall ends.
It worked if: Windows starts with your apps and files in place, and the cumulative update installs on the next check.
If not: Read the section below: on a server, collect the logs for Microsoft Support.
If error 0x800f0985 is still there
If even the repair reinstall did not clear the code, the next step depends on who manages the PC. A home PC can use Reset this PC with Keep my files. A server or a managed PC needs the logs.
| Situation | What to do |
|---|---|
| Home PC, the repair reinstall failed or was missing | Reset this PC with Keep my files: Reinstall Windows without losing files. Your files stay, installed apps are removed. |
| Work or school PC that gets updates from WSUS, Configuration Manager or Intune | Send the administrator the code, the KB number and a copy of CBS.log. |
| Windows Server 2019 and the in-place upgrade failed | Collect CBS.log, the CbsPersist_*.cab files and C:\Windows\Logs\DISM\dism.log, and open a case with Microsoft Support. |
| The PC froze or lost power during an update before the error began | Check the drive for errors first: Check a disk for errors (chkdsk) |
Nothing in Microsoft's description of this code points to memory, the drive or the processor. The exception is a drive that reports errors in chkdsk: a failing drive damages the component store again after every repair.
- What to send to support: the exact code, the KB number, the OS build from winver, the time of the last failed attempt and the logs above.
- The line from CBS.log that names the component and the file.
- Which fixes you already ran, and the last line DISM printed.
How to keep error 0x800f0985 from coming back
- Restart when Windows Update asks, so that no install stays pending.
- Install each month's update in its month, so the PC never jumps over several updates at once.
- On servers, take a snapshot before patching, so a bad update can be rolled back in minutes.
- After an update that installed, check Update history for the next month's result before you assume the PC is healthy.
- Do not turn off or unplug the PC while an update is being installed.
- Do not delete files from the WinSxS folder by hand. Use Disk Cleanup or DISM for that.
- Do not use the
/Sourceoption with media of another Windows version or build family.
Frequently asked questions
What does error 0x800f0985 mean?
It means the Windows servicing stack failed to apply a reverse delta while installing an update. Microsoft gives the code the name PSFX_E_APPLY_REVERSE_DELTA_FAILED. It describes it as possibly related to missing manifests or payloads. In plain words, Windows tried to take a system file back to its base version before building the new one, and the file on the PC was missing or was not the version it expected. The download and your internet connection are fine. The fault is in the component store on the PC.
What is 0x800f0985(-2146498171)?
It is the same error written twice. 0x800f0985 is the hexadecimal form, and -2146498171 is the same 32-bit value read as a signed decimal number. Configuration Manager, WSUS reports and some scripts show both together, and CBS.log writes the decimal one in lines such as "NTSTATUS -2146498171". So when you search a log, search for both forms. The fixes on this page apply whichever form you see.
How do I fix 0x800f0985 on Windows Server 2019?
Start with Fix 2. On Server 2019 the reports on Microsoft Q&A describe the same pattern: the previous cumulative update installed with damage, and every later one fails with 0x800f0985. Uninstalling that previous update, restarting and installing the new one worked for two administrators. If not, install the latest servicing stack update and repair the store with DISM using a Server 2019 ISO as the source. When that also fails, Microsoft's answer for this code is an in-place upgrade with the same Server 2019 media, which keeps roles, apps and data.
Which updates fail with error 0x800f0985?
Any cumulative update can, because the cause is the state of the PC, not one update. Reports on Microsoft Q&A name KB5066586, KB5068791 and KB5075904 on Windows Server 2019, and older threads name Windows 10 updates from 2020. Readers also search for KB5120238 with this code; we could not confirm that update's details or a known issue for it. The next month's update usually fails the same way until the damage is repaired, which is why Fix 2 and Fix 3 matter more than the KB number.
Is 0x800f0985 a known issue that Microsoft will fix?
No. We found no release health entry or update page that lists 0x800f0985 as a known issue of a specific update. Microsoft treats the code as damage in the servicing stack of one PC. In its article on errors that need an in-place upgrade, updated in July 2026, Microsoft writes that for these codes the only reliable resolution is an in-place upgrade. That article is written for Azure virtual machines, but the servicing stack is the same on other PCs.
Will removing the last update make my PC less safe?
For a short time, yes. Cumulative updates contain the fixes of the months before them, so while the previous update is removed, its security fixes are missing. As soon as the new cumulative update installs, the PC has all of them again, plus the new ones. Do it in one sitting: remove, restart, install the new update. On a server, choose a maintenance window and take a snapshot before you start.
Do I need to reinstall Windows to fix 0x800f0985?
Not always. Many readers get past it with a restart, the newest update or by removing the previous update. If those fail, the repair reinstall is the next step, and it is not a clean install: Fix problems using Windows Update on Windows 11, or Upgrade this PC now with installation media, keeps your apps, files and settings. Back up the files you cannot lose first anyway. A full reset that removes apps is only for when the repair reinstall itself fails.
Does the Windows Update troubleshooter fix 0x800f0985?
Rarely. The troubleshooter checks the update services and clears stuck downloads. 0x800f0985 happens after the download, while Windows builds files in the component store, and the troubleshooter does not repair that store. The administrator on Microsoft Q&A who tried SFC, DISM and a reset of Windows Update without success shows how deep the fault sits. Run the troubleshooter only if you want to rule out the simple cases: Run the Windows Update troubleshooter.
What is the difference between 0x800f0985 and 0x800f0987?
Both are servicing stack errors from the same family. Microsoft names 0x800F0985 PSFX_E_APPLY_REVERSE_DELTA_FAILED and 0x800F0987 PSFX_E_NULL_DELTA_HYDRATION_FAILED, which it ties to package corruption or an integration failure. Both mean Windows could not rebuild a file from the delta in the update, and both are on Microsoft's list of codes for which an in-place upgrade is the reliable answer. The fixes on this page are the right order for both.
Sources
- Microsoft Learn: Troubleshoot Windows Update errors that require in-place upgrades (0x800F0985 PSFX_E_APPLY_REVERSE_DELTA_FAILED) (learn.microsoft.com)
- Microsoft Learn: Common Windows Update errors (how to read CBS.log, DISM RestoreHealth and SFC) (learn.microsoft.com)
- Microsoft Q&A: Windows Server 2019, error 0x800f0985 (learn.microsoft.com)
Did this fix work?
One click, no account. It tells the next reader which guides are worth their time.
Questions and experiences: fix Windows Update error 0x800f0985 in Windows
Still broken, or found a fix we did not cover? Ask here: members and our editors answer. Reading is open; writing needs a free account.
…