
How to fix AppX Deployment Service (AppXSVC) and wsappx high CPU usage?

Prefer to fix it yourself? The manual steps follow.
- 9methods
- 5 minutes to check, 15 to 30 minutes for most fixes
- Intermediate
Applies to The AppX Deployment Service (AppXSVC) and the wsappx process on Windows 11 and Windows 10
9 methods in this guide
Hello. I recently updated my Windows 10 with the latest updates and noticed that it is working kind of slow. When I opened the Task Manager, I noticed that the process wsappx is taking nearly 90% of my CPU usage! When I clicked on it, it showed the AppX Deployment Service (AppXSVC) service and WSAPPX. What is it, and can I shut it down? If not, how can I fix AppX Deployment Service (AppXSVC) high CPU usage? Any help would be appreciated.
AppX Deployment Service (AppXSVC) is the Windows service that installs, updates and removes Microsoft Store apps, and it runs inside the wsappx process in Task Manager. High CPU for a few minutes while apps update is normal. When it never calms down, let the Store finish its updates first, then restore the service's old Manual start if a December 2025 update made it Automatic.
wsappx is safe and part of Windows: its AppX Deployment Service installs and updates Store apps. Do not disable it. First check in Task Manager and the Store whether apps are updating and let them finish (Fix 1 and Fix 2). If the service has run at every start since the December 2025 update KB5072033, set it back to Manual (Fix 3).
| Error | No error message. Task Manager shows Service Host: wsappx or AppX Deployment Service (AppXSVC) high in the CPU, Disk or Memory column. |
|---|---|
| Where it appears | Task Manager on Windows 11 and Windows 10, most often after start-up, after a Windows update or while Microsoft Store updates apps. Event Viewer logs it starting and stopping. |
| Main cause | Microsoft Store installing or updating apps in the background. Less often a Store app update that fails and retries, or the service starting at every boot since KB5072033. |
| Fastest fix | Let the Store finish its updates, then pause automatic app updates (Fix 2). On Windows 11 after December 2025, set AppXSVC back to Manual (Fix 3). |
| Also written as | wsappx, AppXSVC, appxsvc, AppX Deployment Service, appxdeployment service, svchost.exe wsappx, WSService (Windows 8), ClipSVC (Client License Service). |
| Microsoft's status | KB5072033 (9 December 2025): "The AppX Deployment Service (Appxsvc) has moved to Automatic startup type to improve reliability in some isolated scenarios." Before that the default was Manual. |
| Safe to disable? | Not on a normal PC. Microsoft says that if it is disabled, Store applications cannot be deployed and do not function properly. Many built-in Windows 11 apps update through the Store. |
| Real file | C:\Windows\System32\svchost.exe, started with -k wsappx -p. A svchost.exe in any other folder is not Windows. |
| Time to fix | 5 minutes to check, 10 to 30 minutes to let updates finish or change the startup type. |
Facts checked on 15 October 2026. Steps written for Windows 11 (24H2, 25H2 and 26H2) and Windows 10 22H2, with the startup change read from Microsoft's KB5072033 release notes (OS Builds 26200.7462 and 26100.7462).
What wsappx and the AppX Deployment Service (AppXSVC) are
wsappx is not a program of its own. It is the name of a group of Windows services that run inside one Service Host (svchost.exe) process. The busy one is almost always AppX Deployment Service, service name AppXSVC. Microsoft describes it as the service that "provides infrastructure support for deploying Store applications": it installs, updates and removes the apps you get from Microsoft Store, and the built-in apps that come as Store packages.
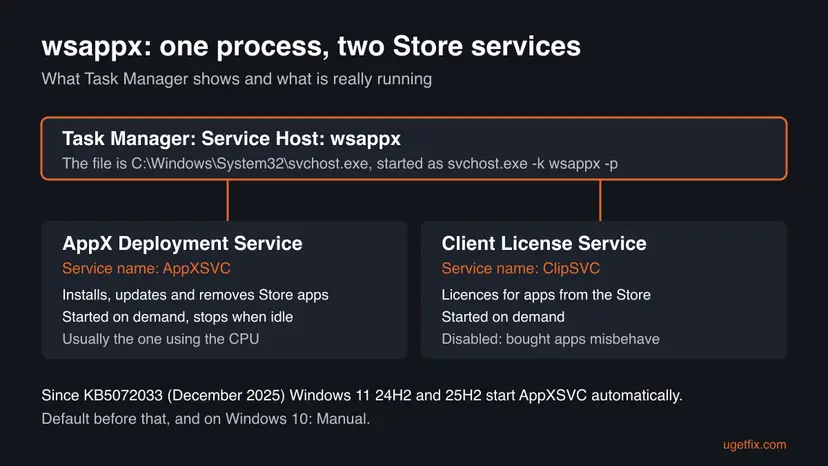
| What you see | Where | What it is |
|---|---|---|
| Service Host: wsappx or wsappx | Task Manager, Processes tab | The svchost.exe process that hosts the Store services. |
| AppX Deployment Service (AppXSVC) | Task Manager Services tab, services.msc | Installs, updates and removes Store apps. Started on demand. |
| Client License Service (ClipSVC) | Same places | Handles the licences of Store apps. Disabled, apps bought in the Store misbehave. |
| Windows Store Service (WSService) | Windows 8 and 8.1 only | The older name of the Store service in that group. |
| "The AppX Deployment Service (AppXSVC) service entered the stopped state." | Event Viewer, Windows Logs > System, Service Control Manager | An information entry, not an error. The service started for a job and stopped when it was done. |
AppXSVC starts when a Store app needs installing or updating and stops when the job is done. A spike of a few minutes after start-up or after a Windows update is the service doing its job. Constant load for an hour with no updates in the Store is not.
Why AppX Deployment Service uses high CPU, from most to least common
Most often Microsoft Store is simply updating apps in the background: many at once after a Windows feature update or after the PC was off for weeks. Less often one app update fails and the service retries it again and again. Since December 2025 there is a third cause on Windows 11: the service now starts at every boot. Microsoft publishes no statistics, so this order comes from its notes and the reports we read.
| Cause | How often | How to tell | Fix |
|---|---|---|---|
| Store apps installing or updating in the background | Most often | The Store's Downloads page shows apps updating. The load ends when the list is empty. | Fix 1, Fix 2 |
| AppXSVC set to Automatic by KB5072033 on Windows 11 24H2 or 25H2 | Often since December 2025 | The service runs right after every start, even with no updates waiting. Monitoring tools report it stopping and starting. | Fix 3 |
| A Store app update stuck in a download or install loop | Sometimes | The same app stays in Downloads with an error or keeps restarting. | Fix 4, Fix 5 |
| Many built-in apps you never use, all kept up to date | Sometimes | Long update lists of apps you never open. | Fix 6 |
| Missing Windows updates or damaged system files | Less often | Other Windows parts fail too, Store errors with codes. | Fix 7, Fix 8 |
| Malware using the svchost.exe name | Rarely | The file is not in C:\Windows\System32. | Fix 9 |
Microsoft does not say which "isolated scenarios" made it switch AppXSVC to Automatic, or whether Windows sets it back after a later update. The old version of this page linked the load to Superfetch and Windows Search; we found no source for that and left those fixes out.
How to fix AppX Deployment Service (AppXSVC) high CPU usage
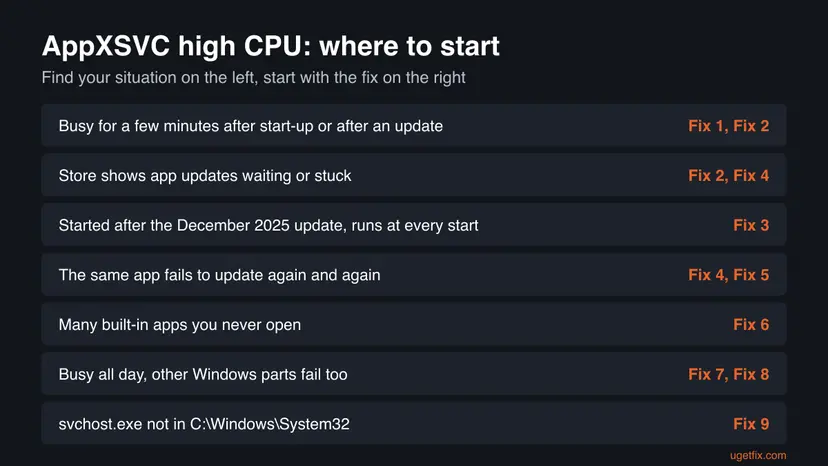
Fix 1 takes two minutes and tells you whether the Store is busy. Fix 2 and Fix 3 solve most cases. Fix 4 and Fix 5 deal with a Store update that keeps failing. Fix 6 cuts the number of apps to update. Fix 7 to Fix 9 are the general repairs.
| What you see or have | Start with |
|---|---|
| Busy for a few minutes after start-up or after a Windows update. | Fix 1, then Fix 2 |
| The Store shows apps updating or waiting. | Fix 2 |
| Windows 11, the load began after the December 2025 update, the service runs at every start. | Fix 3 |
| The same app fails to update again and again. | Fix 4, then Fix 5 |
| Long update lists of built-in apps you never open. | Fix 6 |
| Busy all day and other Windows parts fail too. | Fix 7, then Fix 8 |
The svchost.exe behind wsappx is not in C:\Windows\System32. | Fix 9 |
Fix 1. Check that it is AppXSVC and what the Store is doing
3 minutesNo riskEveryone, before changing anything. It tells you whether the load is normal work or a problem.
wsappx holds more than one service, and AppXSVC only works when there is something to install or update. If the Store shows a running update list, the load is expected and ends on its own.
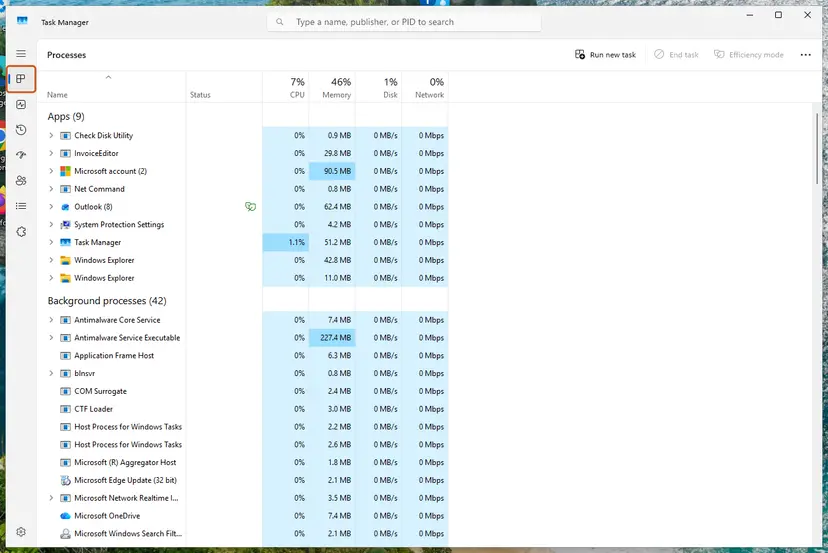
- Press Ctrl + Shift + Esc to open Task Manager. On Windows 10, select More details if you see a short list.
- On the Processes tab, select the CPU column header so the busiest process is on top. Do the same with Disk.
- Expand Service Host: wsappx and note which service is inside: AppX Deployment Service (AppXSVC) or Client License Service (ClipSVC).
- Open Microsoft Store and select Library (Windows 10: Downloads and updates). Look for apps that are downloading or waiting.
- Watch Task Manager for five minutes while the list changes.
| What you see | Go to |
|---|---|
| Apps updating in the Store, load falls as the list shrinks | Fix 2 |
| Nothing to update, AppXSVC still busy for minutes after every start | Fix 3 |
| One app stuck in the list or failing with an error | Fix 4 |
svchost.exe opens from a folder other than C:\Windows\System32 | Fix 9 |
It worked if: You know whether wsappx is busy because the Store is updating apps or on its own with nothing to do.
If not: If no Service Host: wsappx line is busy, the load comes from another process. Note its name and search for that one.
Fix 2. Let Microsoft Store finish its updates, then pause automatic app updates
10 to 30 minutesNo riskThe Store shows apps updating, or the load comes after a Windows update or after the PC was off for a long time.
Each Store app update is unpacked and registered by AppXSVC, which costs CPU and disk. Letting the queue finish ends the work, and pausing automatic updates stops the service from starting a new queue while you work.
- Open Microsoft Store and select Library in the lower left corner.
- Select Get updates and leave the PC on until every app shows as updated.
- Restart the PC and check Task Manager again: wsappx should drop to near 0% within a few minutes.
- If the load comes back every time you work, select your profile picture in the Store and open Settings.
- Turn off App updates. Depending on your Store version, this switch may only pause updates for a few weeks.
With automatic updates paused, open Library > Get updates once a week at a time that suits you. Store apps such as Notepad, Photos and Calculator still need their security fixes.
It worked if: The update list is empty, AppXSVC stops on its own and wsappx no longer shows in the busy part of Task Manager.
If not: If the Store has nothing to update and the service still runs after every start on Windows 11, go to Fix 3. If one app never finishes, go to Fix 4.
Fix 3. Set AppXSVC back to Manual start after the December 2025 update
5 minutesRead the warningWindows 11 24H2 or 25H2 with KB5072033 or a later update, where AppXSVC now runs at every start.
Microsoft's KB5072033 notes say AppXSVC "has moved to Automatic startup type". Before, it was Manual and started only when a Store app needed it. Setting the registry value back to 3 restores that on-demand start without disabling the service.
A wrong value under Services can stop a service from starting. Export the key before you change it (Back up the registry before editing it). Use 3 (Manual), never 4 (Disabled). Microsoft moved the service to Automatic for reliability, so if Store installs start failing, put the value back to 2.
- Press Win + R, type
regeditand press Enter. Select Yes in User Account Control. - Go to
HKEY_LOCAL_MACHINE\SYSTEM\CurrentControlSet\Services\AppXSVC. - Right-click AppXSVC and select Export to save a backup of the key.
- Double-click Start on the right. A value of 2 means Automatic.
- Change Value data to 3 (Manual) and select OK.
- Restart the PC and check Task Manager for a few minutes.
| Start value | Startup type | Use |
|---|---|---|
| 2 | Automatic | What KB5072033 sets on Windows 11 24H2 and 25H2 |
| 3 | Manual | The old default: started only when a Store app needs it |
| 4 | Disabled | Do not use: Store apps cannot install or update |
It worked if: After the restart AppXSVC is not running until the Store installs or updates an app, and wsappx stays quiet at start-up.
If not: If a later Windows update puts the value back to 2, repeat this fix after the update. If Store apps stop installing, set the value back to 2 and use Fix 2 instead.
Fix 4. Clear the Microsoft Store cache and reset the Store app
5 minutesLow riskOne app keeps downloading or failing in the Store, or the Store shows errors while wsappx is busy.
A damaged Store cache can make the same download start again and again, and AppXSVC works on every attempt. Clearing the cache with wsreset, and then repairing or resetting the Store, ends that loop.
- Clear the Store cache. Press Windows + R, type wsreset.exe and select OK. A blank Command Prompt window opens; after a short while it closes and Microsoft Store opens by itself.
- Open System components. If the problem stays, select Start > Settings > System > System components. Next to Microsoft Store, select the three dots and Advanced options. If Microsoft Store is not listed there, look for it in Settings > Apps > Installed apps.
- Repair first. Scroll to Reset and select Repair. Repair keeps the app's data. Open the Store and check whether it works.
- Reset if Repair did not help. Select Reset and confirm. This deletes the Store app's data on this PC; your purchases stay in your Microsoft account. Open the Store and sign in again.
These steps were written for Windows 11 26H2 (build 26300). The full page with the other versions and what each result means: Reset the Microsoft Store
It worked if: The Store opens empty for a moment, then the stuck app installs or the error is gone, and wsappx calms down.
If not: If the same app still fails, re-register the Store apps in Fix 5 or uninstall that one app and install it again from the Store.
Fix 5. Re-register Microsoft Store apps with PowerShell
10 minutesLow riskSeveral Store apps fail to open or update, and the Store reset in Fix 4 did not help.
Re-registering reads each app's manifest again and repairs a damaged registration. A broken registration is a common reason for an update that AppXSVC tries and fails to apply again and again.
Expect wsappx to be very busy while the command runs: that is AppXSVC doing the work. Red lines for apps that are in use are normal. Step by step: How to re-register Microsoft Store apps with PowerShell.
- Open PowerShell. Select Start, type PowerShell and select Windows PowerShell. Open it the normal way, not as administrator: in an administrator window the app is registered to the administrator account instead of yours.
- Find the app's package. Type the command below with a part of the app's name between the asterisks and press Enter. If the app is installed, PowerShell prints its details, including Name and InstallLocation. If nothing is printed, the app is not installed for your account: see the section below.
Get-AppxPackage -Name '*WindowsCalculator*' - Re-register the app. Paste the three commands below, with the same name between the asterisks, and press Enter. They read the folder the app is installed in and register its manifest again. If no red text appears, it worked.
$InstallLocation = Get-AppxPackage -Name '*WindowsCalculator*' | Select-Object -ExpandProperty InstallLocation $ManifestPath = $InstallLocation + '\Appxmanifest.xml' Add-AppxPackage -Path $ManifestPath -Register -DisableDevelopmentMode - Open the app. Close PowerShell and start the app from Start. If it still fails, restart the PC and try once more.
These steps were written for Windows 11 25H2 and 26H2, Windows 10 22H2. The full page with the other versions and what each result means: How to re-register Microsoft Store apps with PowerShell
It worked if: The apps open again, the Store can update them, and after a restart wsappx is quiet.
If not: If the same apps still fail, go to Fix 7 and Fix 8. If one app is the problem, uninstall it in Fix 6.
Fix 6. Remove built-in Store apps you never use
10 minutesLow riskThe Store keeps updating many built-in apps you never open, such as games, news or trial apps.
Every installed Store app is one more package that AppXSVC has to update. Removing the ones you do not use makes each update round shorter, so the service runs less often and for less time.
- Open PowerShell as administrator. Right-click Start and select Terminal (Admin). Select Yes when Windows asks for permission.
- Find the package name. List the installed apps with the command below. To narrow the list, put part of the name between asterisks, for example Get-AppxPackage *Weather* | Select-Object Name, PackageFullName.
Get-AppxPackage | Select-Object Name, PackageFullName - Remove the app. Run the command below with the name you found. It removes the app for your account.
Get-AppxPackage *Microsoft.BingWeather* | Remove-AppxPackage - Check that it is gone. Run the search again. If it prints nothing, the app is removed.
Get-AppxPackage *Microsoft.BingWeather* - Remove it for all users (optional). To remove the app from every account on the PC, run:
Get-AppxPackage -AllUsers *Microsoft.BingWeather* | Remove-AppxPackage -AllUsers - Stop it coming back for new users (optional). Windows installs provisioned apps for every new account. This removes the app from that list:
Get-AppxProvisionedPackage -Online | Where-Object DisplayName -like "*BingWeather*" | Remove-AppxProvisionedPackage -Online
These steps were written for Windows 11 and Windows 10 (the commands are the same). The full page with the other versions and what each result means: Remove built-in Windows apps with PowerShell
It worked if: Fewer apps appear in the Store update list and wsappx finishes each round faster.
If not: If the load stays the same, the cause is not the number of apps. Go to Fix 7.
Fix 7. Install pending Windows updates and restart
20 to 40 minutesLow riskWindows shows updates waiting, a restart is pending, or the Store reports errors with codes.
A half-installed Windows update can leave app packages waiting for the next restart, and AppXSVC keeps working on them. Finishing the update and restarting lets Windows complete those jobs.
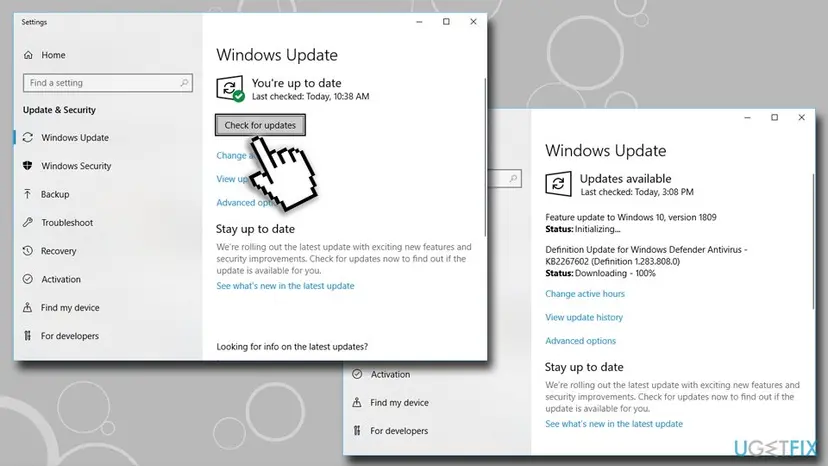
- Press Win + I and select Windows Update (Windows 10: Update & Security > Windows Update).
- Select Check for updates and install everything offered.
- Restart the PC when Windows asks, even if it says the restart can wait.
- Open Task Manager after the restart and give wsappx ten minutes to finish.
Windows 10 left support on 14 October 2025. KB5072033 is a Windows 11 update, so the Automatic start in Fix 3 does not apply to Windows 10.
It worked if: Windows Update shows that you are up to date and wsappx settles after the first few minutes.
If not: If updates fail to install, see Reset Windows Update components. If the load stays, go to Fix 8.
Fix 8. Repair Windows system files with SFC and DISM
20 minutesNo riskWindows is up to date, the Store is empty, and AppXSVC or other services still misbehave.
AppXSVC is part of Windows. If its files or the component store are damaged, deployments can fail and repeat, which shows up as steady CPU use. SFC and DISM replace damaged system files with good copies.
- Open an elevated command window. Right-click Start and select Terminal (Admin), or type cmd in the search box, right-click Command Prompt and select Run as administrator. Select Yes when Windows asks for permission.
- Run DISM first. Type the command below and press Enter. DISM downloads clean copies of damaged components from Windows Update, so it can take several minutes. Wait until it says The operation completed successfully.
DISM.exe /Online /Cleanup-Image /RestoreHealth - Run System File Checker. In the same window, type the command below and press Enter. Do not close the window until the verification reaches 100%.
sfc /scannow - Read the result and restart. Compare the last message with the table below this guide, then restart the PC so that repaired files are loaded.
These steps were written for Windows 11 24H2 and 25H2. The full page with the other versions and what each result means: Run DISM and SFC to repair Windows system files
It worked if: SFC reports that it repaired corrupt files or found no integrity violations, and wsappx settles after a restart.
If not: If SFC cannot repair some files even after DISM, rule out malware in Fix 9, then read the section on what to do when nothing helped.
Fix 9. Check the svchost.exe file and scan for malware
15 minutesNo riskThe svchost.exe behind wsappx is outside C:\Windows\System32, or the CPU stays high with nothing updating.
Malware likes the svchost.exe name because many copies of it run on every PC, and miners hide behind busy system names. The real one is always in C:\Windows\System32. A Microsoft Defender scan rules out anything using that name.
- In Task Manager, open the Services tab, right-click AppXSvc and select Go to details.
- Right-click the highlighted svchost.exe and select Open file location.
- Check that File Explorer opens
C:\Windows\System32. - Run a full scan with Microsoft Defender as in How to scan for malware with Microsoft Defender.
It worked if: The file is in System32 and Defender finds no threats, so the load is not malware.
If not: If the file is somewhere else or Defender finds a threat, remove it and run an offline scan before any other fix.
AppX Deployment Service still uses high CPU: what to check next
If the Store has nothing to update, the service starts on demand and the scan is clean, look at what AppXSVC is working on. Windows keeps a separate log of every app deployment, and it names the package that fails.
- AppX deployment log: press Win + R, type
eventvwr.msc, open Applications and Services Logs > Microsoft > Windows > AppXDeploymentServer > Microsoft-Windows-AppXDeploymentServer/Operational. Errors that name the same package again and again show the app to remove or reinstall. - Service starts and stops: in Windows Logs > System, filter for Service Control Manager. Lines such as "The AppX Deployment Service (AppXSVC) service entered the running state." are normal; dozens per hour are not.
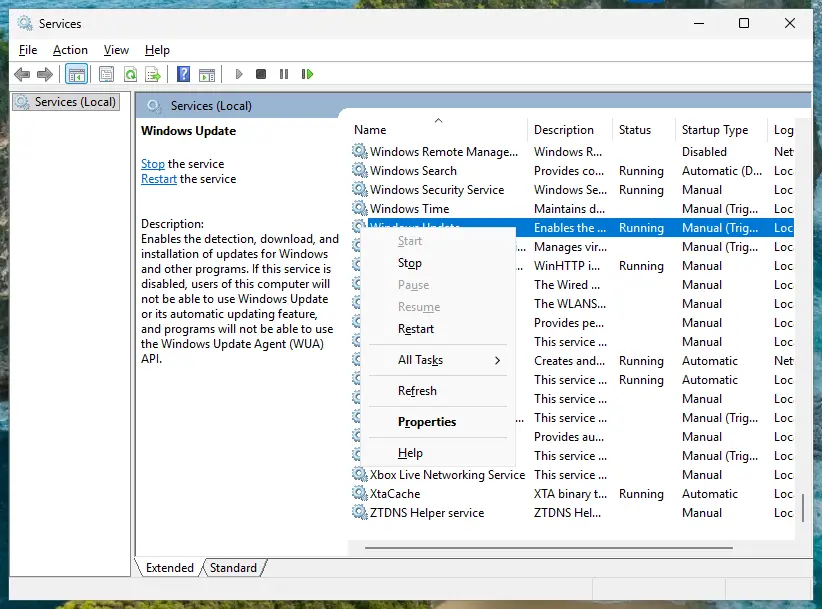
- Restart the service: in
services.msc, right-click AppX Deployment Service (AppXSVC) and select Restart. Step by step: Check and restart Windows services. - Repair install: as a last step, reinstall Windows over itself and keep your files and apps: Reinstall Windows without losing files.
AppXSVC is software only. High CPU from wsappx does not mean a failing processor. On an old hard disk, however, app updates take much longer, so the disk column stays high for longer.
How to keep wsappx from slowing your PC down again
- Let the Store finish its updates once, right after a Windows update, instead of shutting the PC down in the middle.
- If updates in the background bother you, pause them in the Store and update by hand once a week (Fix 2).
- Remove Store apps you never use, so each update round is shorter (Fix 6).
- After big Windows 11 updates, check the Start value of AppXSVC if the load comes back at every start (Fix 3).
- Do not disable AppXSVC or ClipSVC, and do not block the Store with registry tricks. Store apps then stop installing and updating, including their security fixes.
Frequently asked questions
What is wsappx in Task Manager?
wsappx is a group of Windows services that runs inside one Service Host process, the real file being C:\Windows\System32\svchost.exe. On Windows 11 and Windows 10 it holds AppX Deployment Service (AppXSVC), which installs, updates and removes Microsoft Store apps, and Client License Service (ClipSVC), which handles their licences. On Windows 8 it also held Windows Store Service (WSService). It is part of Windows, not a virus, as long as the file is in System32. It shows up whenever the Store installs or updates an app, including the built-in apps.
What is the AppX Deployment Service (AppXSVC)?
AppXSVC is the Windows service that Microsoft describes as providing infrastructure support for deploying Store applications. In plain words, it unpacks, installs, updates and removes apps from Microsoft Store and the built-in apps delivered as Store packages. It used to start only when needed, with startup type Manual. Since KB5072033 in December 2025, Windows 11 24H2 and 25H2 start it automatically. Some people search for it as appxdeployment service or app deployment service; they mean the same thing.
Why does wsappx use so much CPU?
Because unpacking and registering app packages is heavy work for the processor and the disk. The load is highest after a Windows feature update, when many built-in apps update at once, or after the PC was off for weeks. A Store app that fails to update and retries in a loop keeps it busy too. On Windows 11 since December 2025, the service also starts at every boot. Fix 1 shows which of these is yours in two minutes.
Is it safe to disable the AppX Deployment Service?
Not on a normal PC. Microsoft's own guidance says that if AppXSVC is disabled, Store applications cannot be deployed to the system and do not function properly. Microsoft rates it as acceptable to disable only on locked-down Windows IoT Enterprise devices that do not use Store apps. On Windows 11, apps such as Notepad, Photos and Calculator get their updates through the Store. Setting it back to Manual in Fix 3 removes the start-up load without that cost.
How do I disable wsappx or AppXSVC anyway?
You can set the Start value under HKEY_LOCAL_MACHINE\SYSTEM\CurrentControlSet\Services\AppXSVC to 4, which means Disabled. We do not recommend it: Store apps then stop installing and updating, and apps bought in the Store may misbehave if ClipSVC is disabled too. The old version of this page suggested blocking the whole Store through Group Policy or the registry; we no longer recommend that. Value 3 (Manual) in Fix 3 gives the same quiet start-up while keeping the Store working.
Why does AppXSVC run at startup now?
Microsoft changed it. The release notes of KB5072033, the 9 December 2025 update for Windows 11 24H2 and 25H2, say the AppX Deployment Service has moved to Automatic startup type to improve reliability in some isolated scenarios. Every later monthly update carries that change. Administrators of Windows Server 2025 reported the same switch, with monitoring tools flagging the service as it starts and stops. If the start-up load bothers you, Fix 3 sets it back to Manual.
What does "The AppX Deployment Service (AppXSVC) service entered the stopped state" mean?
It is an information entry from Service Control Manager in the System log of Event Viewer, not an error. It means the service finished its job and stopped, which is how a Manual or on-demand service is meant to work. You see the matching line when it starts: "The AppX Deployment Service (AppXSVC) service entered the running state." A few such pairs a day are normal. Dozens per hour point to an app update that fails and retries: see Fix 4.
Why does my monitoring tool say AppXSVC is not running with startup type automatic?
After KB5072033 the service is set to Automatic, yet it still stops when it has no work, so tools that check whether every Automatic service is running report it. Administrators on Microsoft Q&A describe constant stop and start alerts on Windows Server 2025 after that update. Either exclude AppXSVC from the check, or set its Start value back to 3 (Manual) as in Fix 3, which several administrators did. Microsoft has not said this is a bug.
Why does AppX Deployment Service cause high disk or memory usage?
Installing an app means reading its package, writing its files and registering it, so the disk works as hard as the processor. On a PC with an old hard disk the disk column can sit at 100% for a long time, and memory use grows while large app packages are processed. The cause and the fixes are the same as for high CPU: let the Store finish (Fix 2), restore Manual start (Fix 3) and remove apps you do not use (Fix 6).
What are wsapps and "serviço de implantação AppX"?
wsapps and wwsappx are typing mistakes for wsappx, the Task Manager name covered on this page. "Serviço de implantação AppX" is the Portuguese name and "service de déploiement AppX" the French name of the same AppX Deployment Service. The service name AppXSVC is the same in every language, so the commands, registry path and fixes on this page work on a Windows PC set to any language.
Sources
- Microsoft Support: December 9, 2025, KB5072033 (OS Builds 26200.7462 and 26100.7462) (support.microsoft.com)
- Microsoft Learn: Guidance on configuring system services, Windows IoT Enterprise (learn.microsoft.com)
- Microsoft Q&A: AppXSVC forced to Automatic on Server 2025 (administrator reports) (learn.microsoft.com)
Did this fix work?
One click, no account. It tells the next reader which guides are worth their time.
Questions and experiences: fix AppX Deployment Service (AppXSVC) and wsappx high CPU usage
Still broken, or found a fix we did not cover? Ask here: members and our editors answer. Reading is open; writing needs a free account.
…