
How to fix BlueStacks not installing in Windows?

Prefer to fix it yourself? The manual steps follow.
- 8methods
- 10 minutes to 1 hour
- Intermediate
Applies to BlueStacks 5 for Windows 11 and Windows 10, with a note for Windows 7
8 methods in this guide
Hello. I tried to install BlueStacks but it is not working. What could the problem be?
The BlueStacks installer fails for a short list of reasons: a damaged download, missing permissions, an old graphics driver, missing Windows updates or security software in the way. This guide starts with the quickest checks and ends with the riskier ones. Every fix says what you should see when it worked.
Delete the old setup file and download a new installer from the official BlueStacks site, then run it again (Fix 1). If it still fails, run it as administrator and try the BlueStacks offline installer (Fix 3), which BlueStacks provides for downloads that go wrong. Update the graphics driver and Windows after that.
| Error | BlueStacks does not install, the installer does not open, or it closes with a message. Users report There was an error while trying to download BlueStacks and Error code: 1. |
|---|---|
| Where it appears | In the BlueStacks installer window, or as a Windows dialog saying BlueStacks Installer has stopped working. On Windows 7 it can be a pop-up about Service Pack 1. |
| Main cause | A damaged or incomplete download, missing permissions, an outdated graphics driver, missing Windows updates or security software that blocks the setup. |
| Fastest fix | Delete the installer, download a new one from the official BlueStacks site and run it again (Fix 1). |
| Also written as | BlueStacks installer not opening, BlueStacks installer not working, BlueStacks cannot be installed on this computer. |
| Affects | BlueStacks 5 on Windows 11 and Windows 10. Windows 7 and 8 can only use BlueStacks 5.21.300 and below, according to BlueStacks. |
| Official status | BlueStacks documents the offline installer, the graphics driver check and the Windows 7 Service Pack 1 error. It does not document Error code: 1 in the pages we read. |
| Time to fix | 5 minutes for Fix 1, up to an hour for the full list. |
Facts checked on 16 October 2026. Steps written for Windows 11 (25H2 and 26H2) and Windows 10 22H2.
What the BlueStacks install errors mean and what they do not
People describe a failed BlueStacks install in several ways. Some see a message in the installer window, some see a Windows dialog, and some see nothing at all because the setup file never opens. The table lists what readers report and what each sign points to.
| What you see | Where | What it tells you |
|---|---|---|
| There was an error while trying to download BlueStacks | The installer window, reported by users | The download step failed. Start with Fix 1 and Fix 3. BlueStacks does not explain this text in the pages we read. |
| Error code: 1 | The installer window, reported by users | No official meaning found. Treat it as a general install failure and work through the fixes in order. |
| BlueStacks Installer has stopped working | A Windows dialog | The installer process crashed. Fix 2, Fix 4 and Fix 5 are the likely ones. |
| Double-clicking the installer does nothing | Nothing appears | The file is damaged or something blocks it. Fix 1, then Fix 8. |
| A pop-up about Windows Service Pack 1 | Windows 7 only | Windows 7 needs Service Pack 1 before BlueStacks 5 installs. See Fix 5. |
If the message mentions BlueStacks Air, you are looking at the Mac version, which BlueStacks builds for Apple silicon Macs. This guide covers the BlueStacks App Player for Windows. The section If BlueStacks still will not install and the FAQ explain what to do with an Air message on a Windows PC.
Why BlueStacks does not install on a Windows PC
BlueStacks names three causes on its support pages: network trouble while downloading, outdated graphics drivers and a missing Service Pack 1 on Windows 7. Users add security software, a missing certificate and the Windows hypervisor. The table matches each cause to a sign and a fix.
| Cause | How to tell | Fix |
|---|---|---|
| A damaged or incomplete installer download | The installer does not open, closes at once or stops partway | Fix 1 |
| Missing permissions, or a program the installer treats as too old | The installer closes without a message | Fix 2 |
| Network trouble while downloading | The text about an error while downloading BlueStacks | Fix 3 |
| An outdated graphics driver | BlueStacks says this can block installing or launching | Fix 4 |
| Missing Windows updates or damaged system files | Crashes during setup, or the Service Pack 1 pop-up on Windows 7 | Fix 5 |
| A missing certificate for the installer signature | Users report it. The installer has a Digital Signatures tab | Fix 6 |
| The Windows hypervisor | Users report it, mostly when BlueStacks fails after setup | Fix 7 |
| Security software that blocks the setup | The installer vanishes or is quarantined after you start it | Fix 8 |
BlueStacks lists at least 4 GB of RAM as the minimum for BlueStacks 5 and recommends Windows 10 or above with 8 GB or more. Windows 10 22H2 is out of support since 14 October 2025, but BlueStacks still lists Windows 10 as a recommended system. If your PC has less than 4 GB of RAM, no fix in this guide can make the installer work.
How to fix BlueStacks not installing on Windows
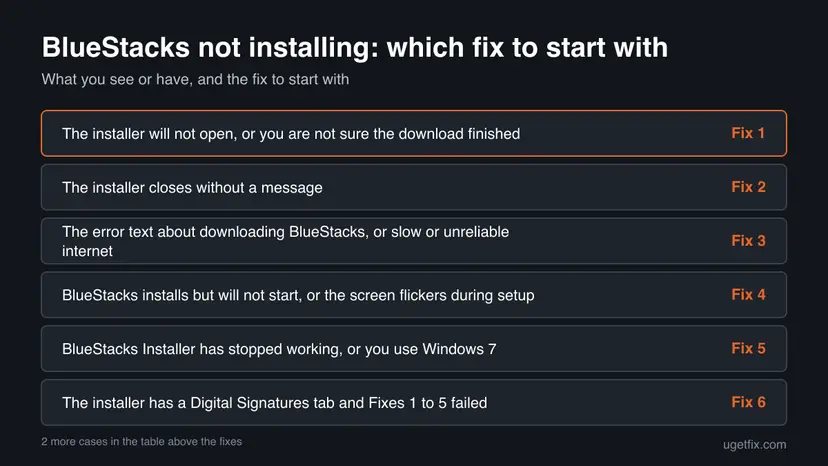
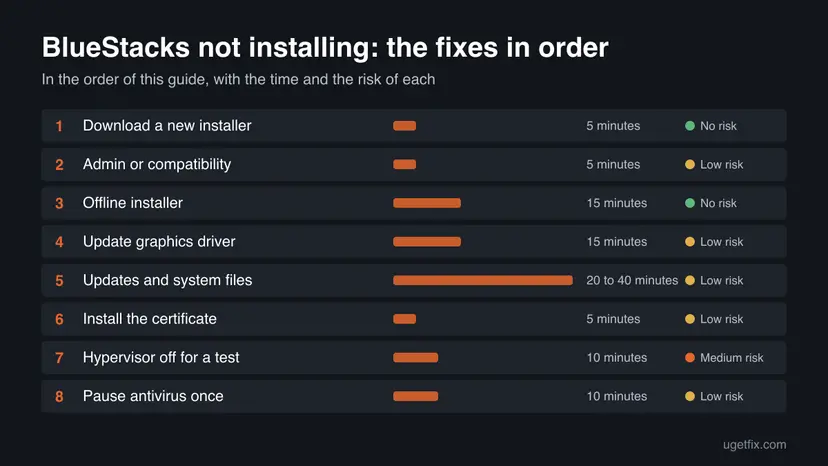
Work through the fixes in order, because the first two are quick and risk nothing. Restart the PC and run the installer after each one, and stop as soon as BlueStacks installs. Fix 7 and Fix 8 change protection on your PC, so they come last.
| What you see or have | Start with |
|---|---|
| The installer will not open, or you are not sure the download finished | Fix 1 |
| The installer closes without a message | Fix 2 |
| The error text about downloading BlueStacks, or slow or unreliable internet | Fix 3 |
| BlueStacks installs but will not start, or the screen flickers during setup | Fix 4 |
| BlueStacks Installer has stopped working, or you use Windows 7 | Fix 5 |
| The installer has a Digital Signatures tab and Fixes 1 to 5 failed | Fix 6 |
| BlueStacks installs but fails at launch on a PC with Hyper-V or WSL 2 | Fix 7 |
| The installer disappears or your security software reports it | Fix 8 |
Fix 1. Download a new installer from the official site
5 minutesNo riskEveryone, first. Above all when the installer will not open, or stops partway through.
An installer that was cut off or damaged during the download is the simplest reason for a setup that will not start, and a new copy costs nothing.
- Close BlueStacks if it is open, then open the folder that holds the old installer, usually Downloads, and delete the file.
- Open your browser and type the official BlueStacks address,
bluestacks.com, yourself. Do not use an advert or a link from an unknown site. - Download the installer again and wait until the browser shows the download as finished.
- Double-click the new installer and follow the prompts.
If downloads keep failing or stall, test the connection first with How to check your internet connection in Windows before you try again.
It worked if: The installer window opens and shows the setup progress without an error message.
If not: Go to Fix 2 if the window closes by itself, or to Fix 3 if the download keeps failing.
Fix 2. Run the installer as administrator or in compatibility mode
5 minutesLow riskThe installer closes without a message, or Windows says BlueStacks Installer has stopped working.
The installer writes files and services to protected places, so it can fail without administrator rights. Compatibility mode makes Windows treat the setup like it is running on an earlier version.
Do step 1 of the procedure first and test the installer. Only change the compatibility setting if running as administrator did not help.
- Run the program as administrator once. Right-click the program in the Start search results, or right-click its shortcut, and select Run as administrator. Select Yes when Windows asks for permission. If the program now works, it only needed administrator rights.
- Open the program's properties. If the program still fails, right-click its shortcut or its .exe file and select Properties.
- Open the Compatibility tab. Select the Compatibility tab. Every setting on this tab applies to this one program only.
- Turn on compatibility mode. Select the Run this program in compatibility mode for check box. In the list below it, select the version of Windows the program was made for.
- Make it always run as administrator. Only if step 1 helped: select the Run this program as an administrator check box. Windows will then ask for permission every time the program starts.
- Save and test. Select OK and start the program again. If it does not help, come back to this tab and try another version of Windows in the list.
These steps were written for Windows 11 25H2 and 26H2. The full page with the other versions and what each result means: How to run a program as administrator or in compatibility mode
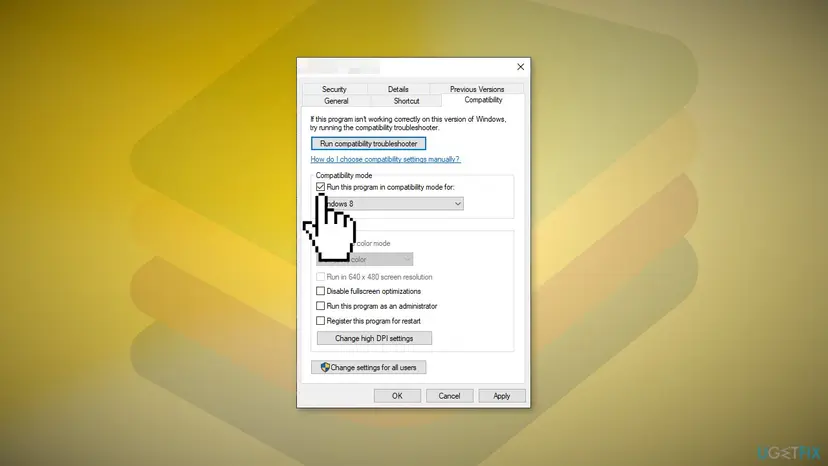
Right-click the BlueStacks installer, not a shortcut, when you open its properties. Users report that choosing an earlier version of Windows from the list helps when the setup crashes. BlueStacks does not publish a compatibility setting of its own.
It worked if: The installer starts and moves past the point where it closed before.
If not: Reset the compatibility box to its default, then go to Fix 3.
Fix 3. Install BlueStacks with the offline installer
15 minutesNo riskThe installer shows an error while downloading BlueStacks, or the online setup fails on a slow or unstable connection.
BlueStacks publishes an offline installer for people who have trouble downloading BlueStacks 5 because of network problems, and you start it from Command Prompt with a command for the Android version you want.
- Download the BlueStacks 5 offline installer for your Windows version from the BlueStacks support article called BlueStacks 5 offline installer. It has one file for 64-bit Windows and one for 32-bit Windows.
- Open the folder that holds the file and note its exact name. The version number inside the name changes with each release. On 2026-10-16 the 64-bit file was
BlueStacksFullInstaller_5.22.166.1003_amd64_native.exe. - Click the address bar of the folder, replace the address with
cmdand press Enter. A Command Prompt window opens in that folder. - Paste one of the commands below. The file name in the command must be the same as your downloaded file, so change the version number if yours differs.
- Press Enter and wait for the installation to finish.
Nougat 64-bit
BlueStacksFullInstaller_5.22.166.1003_amd64_native.exe --defaultImageName Nougat64 --imageToLaunch Nougat64Pie 64-bit
BlueStacksFullInstaller_5.22.166.1003_amd64_native.exe --defaultImageName Pie64 --imageToLaunch Pie64Android 11
BlueStacksFullInstaller_5.22.166.1003_amd64_native.exe --defaultImageName Rvc64 --imageToLaunch Rvc64Android 13
BlueStacksFullInstaller_5.22.166.1003_amd64_native.exe --defaultImageName Tiramisu64 --imageToLaunch Tiramisu64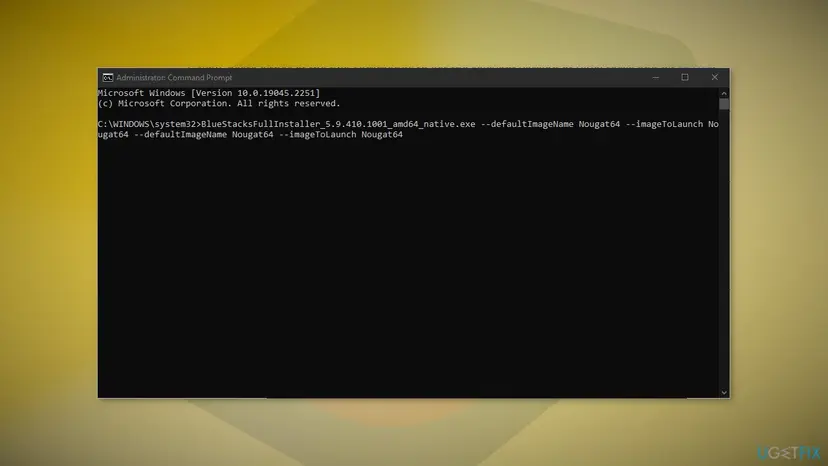
If BlueStacks is not downloading at all, or the download stops again and again, this is the fix BlueStacks offers. The offline installer sets up BlueStacks 5 Nougat 32-bit by default when you simply double-click it. 32-bit Windows only supports Nougat 32-bit. When setup is done, BlueStacks says BlueStacks X opens, and you start BlueStacks 5 from its App Player icon.
It worked if: Setup runs to the end and BlueStacks X opens, with the App Player icon ready to start BlueStacks 5.
If not: Check that the file name in the command matches your file letter for letter, then go to Fix 4.
Fix 4. Update the graphics driver
15 minutesLow riskThe installer starts but crashes, the screen flickers during setup, or BlueStacks installs and then fails to start.
BlueStacks says that outdated graphics card drivers can make the installation or the first launch fail, so the driver is the first hardware item it asks you to update.
- Open Device Manager. Right-click Start and select Device Manager.
- Open the device's Driver tab. Expand the category (for example Display adapters), right-click the device, select Properties and open the Driver tab. Driver Date and Driver Version show what is installed now.
- Update the driver. Select Update Driver and let Windows search automatically. To use a driver you downloaded from the device maker, select Browse my computer for drivers instead and point to the unpacked folder.
These steps were written for Windows 11 24H2 and later. The full page with the other versions and what each result means: Update, roll back or reinstall a driver
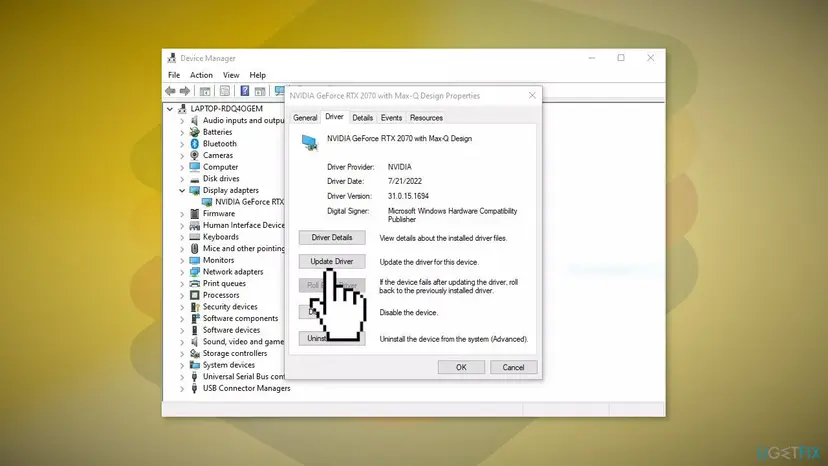
Windows may report that the best driver is already installed. BlueStacks then points you to the graphics maker for the newest driver: Intel, AMD or NVIDIA. If you find no update there, it suggests the support page of your PC maker. Restart the PC after the update and run the installer again.
It worked if: The driver version in Device Manager is newer than before, and the installer finishes without crashing.
If not: Go to Fix 5 to install Windows updates and repair system files.
Fix 5. Install Windows updates and repair system files
20 to 40 minutesLow riskBlueStacks Installer has stopped working, or the PC has not had updates in a long time. Also for Windows 7.
BlueStacks asks for the latest Windows updates and a scan for corrupt files in the same article as the driver check, because missing updates or damaged system files can stop the setup.
- Open Settings > Windows Update, select Check for updates and install everything it offers.
- Restart the PC when Windows asks.
- Open an elevated command window. Right-click Start and select Terminal (Admin), or type cmd in the search box, right-click Command Prompt and select Run as administrator. Select Yes when Windows asks for permission.
- Run DISM first. Type the command below and press Enter. DISM downloads clean copies of damaged components from Windows Update, so it can take several minutes. Wait until it says The operation completed successfully.
DISM.exe /Online /Cleanup-Image /RestoreHealth - Run System File Checker. In the same window, type the command below and press Enter. Do not close the window until the verification reaches 100%.
sfc /scannow - Read the result and restart. Compare the last message with the table below this guide, then restart the PC so that repaired files are loaded.
These steps were written for Windows 11 24H2 and 25H2. The full page with the other versions and what each result means: Run DISM and SFC to repair Windows system files
The BlueStacks article only names sfc /scannow. The procedure above runs DISM first, which gives System File Checker clean files to work with.
BlueStacks says Windows 7 must have Service Pack 1 before you install or update BlueStacks 5, and shows a pop-up if it is missing. Search the Microsoft Update Catalog for KB976932, choose your Windows version in the Title column, download and install it, then restart. Windows 7 and 8 can only use BlueStacks 5.21.300 and below, and the latest version needs Windows 10 or above.
It worked if: Windows Update reports that your device is up to date and the scan finishes with no integrity violations, or with repaired files.
If not: Go to Fix 6 if the installer has a Digital Signatures tab, or to Fix 7.
Fix 6. Install the installer's certificate
5 minutesLow riskThe installer has a Digital Signatures tab and Fixes 1 to 5 did not help.
Windows checks the digital signature of a setup file, and users report that installing the signer's certificate lets the check pass. BlueStacks does not describe this step in the pages we read.
- Right-click the BlueStacks installer and select Properties.
- Open the Digital Signatures tab, select the signature in the list and select Details.
- Select View Certificate, then Install Certificate.
- Choose Current User and select Next.
- Choose Automatically select the certificate store based on the type of certificate and select Next.
- Select Finish, wait for the message that the import was successful and run the installer again.
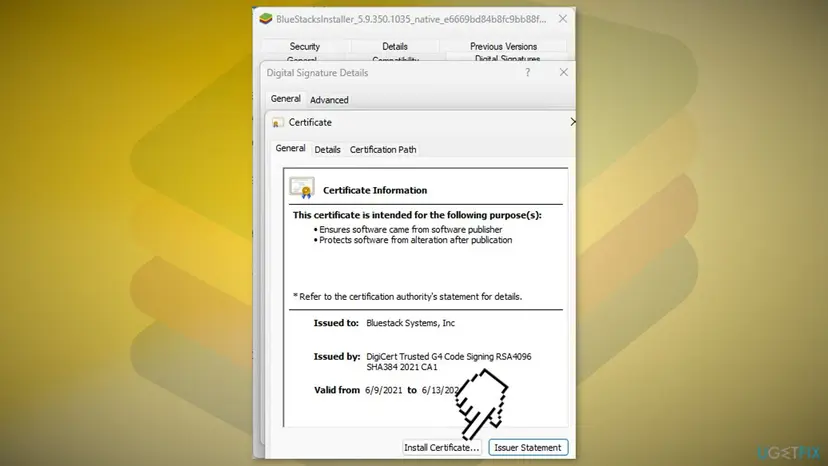
Do this only for a file you downloaded from the official BlueStacks site. If the installer has no Digital Signatures tab, the file is unsigned or changed, so delete it and repeat Fix 1.
It worked if: Windows shows that the import was successful and the installer starts normally.
If not: Go to Fix 7 if BlueStacks installs but fails to start, otherwise to Fix 8.
Fix 7. Switch off the Windows hypervisor for one install
10 minutesRead the warningFixes 1 to 6 failed, or BlueStacks installs and then fails to start on a PC that uses Hyper-V, WSL 2 or Windows Sandbox.
Users report that the Windows hypervisor can clash with BlueStacks, and BlueStacks has a separate article for BlueStacks 5 failing to launch with Hyper-V enabled. Setting the hypervisor launch type to off removes the clash until you set it back.
With the hypervisor off, Hyper-V virtual machines, WSL 2, Windows Sandbox and other features that depend on it stop working until you turn it back on. Do this only to test, and undo it afterwards.
- Type cmd in the Start search box, right-click Command Prompt and select Run as administrator.
- Type the command below and press Enter.
- Restart the PC, then run the BlueStacks installer.
- When you are done, run
bcdedit /set hypervisorlaunchtype autoin the same way and restart again to undo the change.
Command
bcdedit /set hypervisorlaunchtype off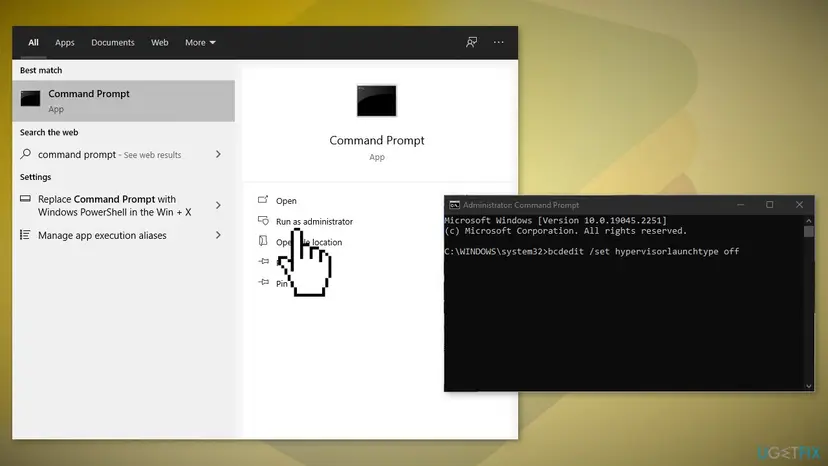
It worked if: After the restart the installer completes, and BlueStacks starts.
If not: Set the launch type back to auto as described, restart and go to Fix 8.
Fix 8. Pause security software for one installer test
10 minutesLow riskThe installer vanishes after you start it, your security program reports it, or everything above failed.
Security software sometimes blocks a legitimate setup by mistake, and a single test with real-time protection paused shows whether it is the cause. Users report the same on older versions such as BlueStacks 4.
Use this only for an installer you downloaded from the official BlueStacks site, and only for one attempt. With Windows Security, the procedure below covers it.
- Open Windows Security. Select Start, type Windows Security and open the app.
- Open the protection settings. Select Virus & threat protection, then under Virus & threat protection settings select Manage settings.
- Switch off Real-time protection. Set Real-time protection to Off and select Yes when Windows asks for permission.
- Do the task right away. Run the install or repair your guide describes now. Real-time protection turns back on by itself after a short while.
- Turn it back on. When the task is done, set Real-time protection back to On instead of waiting.
These steps were written for Windows 11 and Windows 10 (the steps are the same). The full page with the other versions and what each result means: Turn off Microsoft Defender protection for a moment
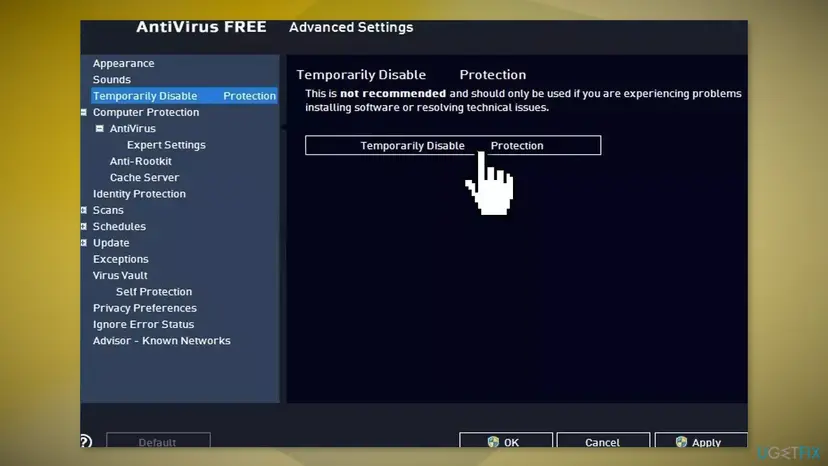
A third-party antivirus has its own pause option, often in the tray icon menu. Pause it for the shortest time offered, run the installer and switch protection back on straight away. If your antivirus quarantined the file, restore it or download a new copy.
It worked if: The installer runs while protection is paused and BlueStacks installs.
If not: Switch protection back on, then read the next section.
If BlueStacks still will not install
When all eight fixes fail, the cause is usually something particular to this PC. The table lists the situations we can answer and what to do about each.
| Situation | What to do |
|---|---|
| An older BlueStacks install is still on the PC | Remove it completely first with How to uninstall BlueStacks completely from Windows 11 and 10, then run a new installer. |
| The PC has less than 4 GB of RAM | BlueStacks lists 4 GB as the minimum. Close other programs or install more RAM before you try again. |
| The installer works but BlueStacks does not open or shows -1101, -2001 or -2004 | That is a launch problem. BlueStacks has a separate article for BlueStacks 5 not opening and lists virtualization, system requirements, CPU and RAM settings, graphics drivers and antivirus as the usual causes. |
| A message mentions BlueStacks Air | Air is the Mac version. On a Windows PC, download the BlueStacks App Player for Windows instead. |
If none of this applies, BlueStacks asks you to send a problem report with your log files through its support site. Describe what you did, which Windows version you use and which fixes you tried.
How to keep BlueStacks installs working
- Download BlueStacks only from the official site, and wait until the download is complete before you start it.
- Keep Windows and the graphics driver up to date.
- Keep the offline installer file so you can reinstall without a download.
- Uninstall an old BlueStacks completely before you install a new version.
- Do not run an installer from a link in an advert or a forum post.
- Do not leave real-time protection paused after a test.
- Do not leave the hypervisor switched off once the install is done.
- Do not install a certificate for a file you cannot trace to the official site.
A fresh Windows update and a current graphics driver prevent most install problems in the BlueStacks documentation. After BlueStacks installs, use Windows Update every month and recheck the driver when you replace the graphics card or run a feature update.
Frequently asked questions
Why is BlueStacks not installing on my PC?
The usual reasons are a damaged or incomplete installer, missing administrator rights, network trouble during the download, an outdated graphics driver, missing Windows updates, or security software that blocks the setup. BlueStacks names network trouble, graphics drivers and a missing Service Pack 1 on Windows 7 on its support pages. Start with Fix 1, a new download from the official site, and work down the list. Each fix takes a few minutes, and the first two risk nothing.
What does Error code: 1 mean in the BlueStacks installer?
BlueStacks does not document Error code: 1 in the support pages we read, so we cannot give an official meaning. Users report it together with the text There was an error while trying to download BlueStacks, which points to the download step. Treat it as a general install failure. Download a new installer (Fix 1) and try the offline installer (Fix 3), which BlueStacks provides for people who have trouble downloading BlueStacks 5.
Why does the BlueStacks installer not open?
A damaged download, missing permissions or security software are the most likely reasons. Delete the file and download a new one from the official site, then right-click it and select Run as administrator. If nothing appears at all, your security program may have quarantined the setup file. Check its quarantine list before you try Fix 8, and restore the file only if it came from the official BlueStacks site.
What can I do when BlueStacks Installer has stopped working?
This dialog comes from Windows, not from BlueStacks, and means the installer process crashed. Run the installer as administrator, try compatibility mode, then update the graphics driver and install Windows updates (Fixes 2, 4 and 5). On Windows 7 the cause can be a missing Service Pack 1, which BlueStacks fixes with Microsoft update KB976932. Windows 7 and 8 can only use BlueStacks 5.21.300 and below.
Does BlueStacks install on Windows 11?
Yes. BlueStacks lists Windows 10 and above as the recommended operating system for BlueStacks 5, with at least 4 GB of RAM and 8 GB or more recommended. If it does not install on Windows 11, the same fixes apply: a new installer, run as administrator, a current graphics driver and Windows updates. Windows 11 needs no special step that Windows 10 does not.
What does BlueStacks Air cannot be installed on this computer mean?
BlueStacks Air is the BlueStacks program for Macs with Apple silicon. If a message about Air appears, you opened the Mac installer or followed a Mac link. On a Windows PC you need the BlueStacks App Player for Windows, which this guide covers. BlueStacks also publishes a page with the system specifications for installing BlueStacks Air on a Mac.
Can antivirus software stop BlueStacks from installing?
Yes. Security software can block a legitimate setup by mistake, and users report this with BlueStacks 4 as well as newer versions. Pause real-time protection for one attempt only, with a file from the official site, and switch it on again as soon as the test is over. Pausing protection is the last fix in this guide because it leaves the PC exposed while it is off.
What is the difference between the offline installer and the normal installer?
BlueStacks offers the offline installer for people who have trouble downloading BlueStacks 5 because of network problems. Double-clicking it installs BlueStacks 5 Nougat 32-bit by default, and BlueStacks X opens when setup ends. On 64-bit Windows you can install Nougat 64-bit, Pie 64-bit, Android 11 or Android 13 by running the file from Command Prompt with the matching command, as shown in Fix 3.
Do I need to switch off Hyper-V to install BlueStacks?
Not normally. We found no BlueStacks page that says Hyper-V blocks the installer. Users report that switching the hypervisor off helped them, and BlueStacks has a separate article for BlueStacks 5 failing to launch when Hyper-V is enabled. Try Fixes 1 to 6 first. If you use Fix 7, set the launch type back to auto when you finish, or Hyper-V, WSL 2 and Windows Sandbox stay disabled.
Sources
- BlueStacks Support: BlueStacks 5 offline installer (support.bluestacks.com)
- BlueStacks Support: Solution for BlueStacks failing to boot or install due to outdated GPU drivers (support.bluestacks.com)
- BlueStacks Support: Solution for error while installing or updating BlueStacks on Windows 7 (support.bluestacks.com)
Did this fix work?
One click, no account. It tells the next reader which guides are worth their time.
Questions and experiences: fix BlueStacks not installing in Windows
Still broken, or found a fix we did not cover? Ask here: members and our editors answer. Reading is open; writing needs a free account.
…