
How to fix Windows update error 0x800f0905?

Prefer to fix it yourself? The manual steps follow.
- 9methods
- 5 minutes to 2 hours
- Intermediate
Applies to Windows 11 24H2, 25H2 and 26H2 and Windows 10 22H2 monthly cumulative updates, for example KB5074109 (OS builds 26100.7623 and 26200.7623); Windows Server in rare cases
9 methods in this guide
- What the error means
- Why it appears
- Where the cause is written
- The fixes
- 1. Restart, then update
- 2. Remove with DISM
- 3. System Restore
- 4. Manual install
- 5. Repair system files
- 6. Update troubleshooter
- 7. Reset update components
- 8. Repair reinstall
- 9. In-place upgrade
- If it is still there
- Keep it from coming back
- FAQ
Hello, my PC has been trying to update itself every day, and it keeps failing with error 0x800f0905. It has been happening for several weeks now, and I always get the same result. The computer takes a lot of resources for this process, so I can't continue with my tasks as normal. Please help.
Error 0x800f0905 is a servicing error: Windows could not change its own update packages. It shows up in two ways, as an install error next to a new update and as a failed uninstall of an update, as with KB5074109 in January 2026. Restart and check for updates first, then follow the fixes for your case.
Restart the PC and select Check for updates again: a newer cumulative update often installs where the old one failed, and it also replaces a bad update you could not remove (Fix 1). If an update will not uninstall, remove it with DISM /Online /Remove-Package (Fix 2). If an update will not install, install it by hand (Fix 4). When nothing works, Fix problems using Windows Update reinstalls Windows and keeps your files (Fix 8).
| Error | Install error - 0x800f0905 next to an update, or Uninstall failed with 0x800f0905 when you remove one. Microsoft's servicing name for the code is CBS_E_NO_ACTIVE_EDITION. |
|---|---|
| Where it appears | Settings > Windows Update and Update history, the Uninstall updates list, and the command line when wusa /uninstall or DISM fails. |
| Main cause | Component-Based Servicing, the part of Windows that adds and removes update packages, cannot finish the change. With an uninstall, the update is usually a combined package that Windows cannot take apart with the normal tools. |
| Fastest fix | Restart and install the newest update (Fix 1). For a stuck uninstall: DISM /Online /Remove-Package (Fix 2). |
| Also written as | 0x800F0905, 800f0905, error 0x800f0905, install error - 0x800f0905, uninstall failed 0x800f0905, (0x800f0905), errore 0x800f0905, erro 0x800f0905. |
| Affects | Windows 11 24H2 and 25H2 above all, Windows 10 22H2 and Windows Server. In January 2026 many users could not uninstall KB5074109 because of it. |
| Microsoft's status | No published known issue for the code. Microsoft Learn lists 0x800F0905 among servicing errors where an in-place upgrade is the reliable repair. Microsoft's update pages say wusa /uninstall does not work on combined packages. |
| Where the cause is written | C:\Windows\Logs\CBS\CBS.log and the archived CbsPersist_*.cab files in the same folder. Search for 0x800f0905. |
| Time to fix | 5 minutes for Fix 1, 10 to 20 minutes for Fix 2 and Fix 3, one to two hours for a repair reinstall. |
Facts checked on 15 October 2026. Steps written for Windows 11 (24H2, 25H2 and 26H2) and Windows 10 22H2.
What Windows update error 0x800f0905 means
0x800f0905 comes from Component-Based Servicing (CBS), the Windows service that installs and removes system packages such as monthly updates. It is not a download error. The update files are on the PC, and Windows stopped while it was adding them or taking them out.
Microsoft Learn gives the code the name CBS_E_NO_ACTIVE_EDITION and lists it among errors where "the only reliable resolution is an in-place upgrade". Microsoft does not describe the name for home users. Read literally, servicing could not find the Windows edition package it expected to change, which points to a damaged or inconsistent package store rather than to the update itself.
| What you see | Where | What it tells you |
|---|---|---|
| Install error - 0x800f0905 | Settings > Windows Update, next to the update, with Retry | The update downloaded and could not be installed. |
| There were some problems installing updates, but we'll try again later. If you keep seeing this and want to search the web or contact support for information, this may help: (0x800f0905) | Settings > Update & Security > Windows Update on Windows 10 | The same install failure in the older Windows 10 wording. |
| Uninstall failed with 0x800f0905 | Settings > Windows Update > Update history > Uninstall updates | Windows could not remove an installed update. |
| Installer encountered an error: 0x800f0905 | The Windows Update Standalone Installer, after wusa /uninstall or a double-clicked .msu file | The same servicing failure, reported by the installer instead of Settings. |
| 0x800F0905 in CBS.log | C:\Windows\Logs\CBS | The time and the package that failed. Support will ask for this log. |
Microsoft's list with this code was written for Windows Server on Azure virtual machines. The servicing stack is the same in Windows 11 and Windows 10, so the meaning and the repair hold, but the Azure tools on that page do not apply to a home PC.
Why error 0x800f0905 appears
The causes are ordered from the most likely to the least likely. The first question is whether you were installing or removing an update, because the fixes are different.
| Cause | How often | How to tell | Fix |
|---|---|---|---|
| You tried to remove a monthly update that came as a combined servicing stack and cumulative update package. | Most often in 2026 | The error says Uninstall failed, or wusa /uninstall fails. | Fix 1, Fix 2, Fix 3 |
| A bad monthly update that Microsoft has since replaced with a fixed one. | Often | News sites report problems with the same KB, and a newer update is offered. | Fix 1 |
| A damaged download or a stuck attempt in the update cache. | Sometimes | The install fails again at the same point on every retry. | Fix 4, Fix 6, Fix 7 |
A damaged component store, the folder C:\Windows\WinSxS that every update builds on. | Sometimes | DISM reports that the store is repairable, or the error comes back every month. | Fix 5, Fix 8 |
| Damage that no repair command reaches. | Rarely | Every fix above ended with 0x800f0905 again. | Fix 8, Fix 9 |
Microsoft's update pages say it plainly: running wusa.exe with the /uninstall switch on the combined package "will not work because the combined package contains the SSU", and you cannot remove the servicing stack update once it is installed. The cumulative part can still be removed with DISM /Remove-Package, which is Fix 2.
The January 2026 wave is the best known case. KB5074109, the Windows 11 security update of 13 January 2026 (OS builds 26100.7623 and 26200.7623), caused app freezes with files on OneDrive and Dropbox. Windows Central reported on 23 January 2026 that some users could not uninstall it because of 0x800f0905. Users on forums report the same with other monthly updates.
Where CBS.log is and what to look for
You do not need the log for the first fixes. Read it when they did not help, or before you ask for help, because it names the package that failed.
- Press Win + R, type
%systemroot%\Logs\CBSand press Enter. - Copy
CBS.logto the Desktop and open the copy in Notepad, so the original stays untouched. - Press Ctrl + F and search for
0x800f0905. Note the time of the last hit. - Look a few lines above that hit for the package name, which usually contains the KB number or the build number.
- If the failure is older, open the
CbsPersist_*.cabfiles in the same folder. A.cabfile opens like a folder in File Explorer.
- A package name with the KB you tried to remove: go to Fix 2.
- The words
ERROR_SXS_COMPONENT_STORE_CORRUPTormark store corrupt: go to Fix 5, then Fix 8. - No clear line at all: go through the fixes in order.
How to fix Windows update error 0x800f0905
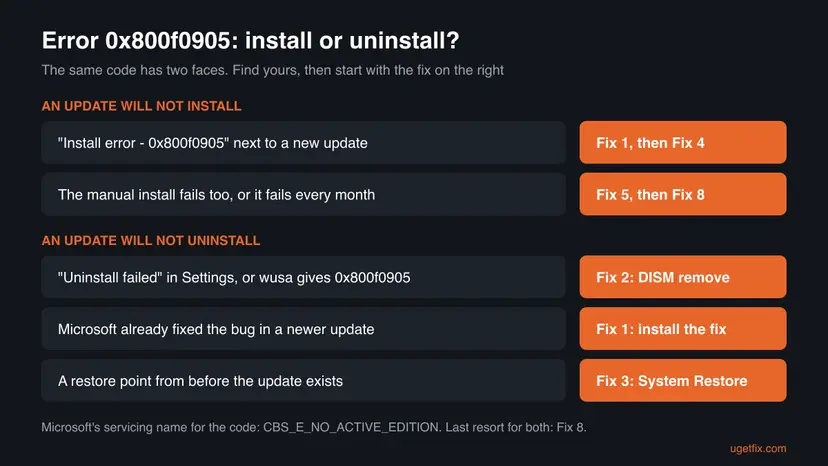
Fix 1 helps in both cases. Fix 2 and Fix 3 are for an update that will not uninstall, Fix 4 for one that will not install. Fix 5 to Fix 7 are the general repairs, each short with the full procedure linked. Fix 8 and Fix 9 reinstall Windows over itself and keep your apps and files, which Microsoft names as the reliable repair for this code.
| What you see or have | Start with |
|---|---|
| The error appeared with this month's update and the PC has not restarted for days. | Fix 1 |
| You want to remove a bad update and Uninstall failed shows 0x800f0905. | Fix 1, then Fix 2 |
| You want to remove an update and have a restore point from before it. | Fix 3 |
| The same update fails to install every day. | Fix 4 |
| The manual install also fails, or DISM reports damage. | Fix 5, then Fix 8 |
| You do not want to type commands. | Fix 6, then Fix 8 |
| A work or school PC that gets updates from the organization. | Ask the administrator, with CBS.log |
Fix 1. Restart the PC and install the newest update
5 to 20 minutesNo riskAlways first, in both cases. Above all when the problem came with this month's update.
A restart finishes servicing work that waits on files in use. Cumulative updates also replace each other: Microsoft's KB5078127 of 24 January 2026 includes everything in KB5074109 and fixes its OneDrive and Dropbox problem, so installing the newer update ends the reason to remove the old one.
- Save your work and select Start > Power > Restart. Use Restart, not Shut down.
- Open Settings > Windows Update. If updates are paused, select Resume updates.
- Select Check for updates and install everything that is offered, including optional fixes for a known problem.
- If an update shows Install error - 0x800f0905, select Retry next to it once.
- Restart again when asked, then open Settings > Windows Update > Update history and check that the newest update is listed as installed.
Note the KB number of the update that failed in Update history now. Fix 2 and Fix 4 need it, and so does support.
It worked if: The newest update installs, the PC restarts, and Update history shows it as successfully installed. The problem the old update caused is gone.
If not: If you still need to remove an update, go to Fix 2. If an update still will not install, go to Fix 4.
Fix 2. Remove the stuck update with DISM instead of Settings or wusa
10 to 20 minutesRead the warningUninstall failed with 0x800f0905 in Settings, or wusa /uninstall fails with the same code.
Monthly updates now come as one package with the servicing stack update inside. Microsoft says wusa /uninstall does not work on such a package and that the cumulative part is removed with DISM /Remove-Package and the package name.
Removing a cumulative update also removes its security fixes until a newer update is installed. Create a restore point first (Undo recent changes with System Restore, tab Create a restore point) and back up the files you cannot lose: Back up your files (Windows Backup, File History, Time Machine)
- Right-click Start and select Terminal (Admin). Select Yes when Windows asks for permission.
- List the installed packages as a table:
DISM /Online /Get-Packages /Format:Table - Find the line whose name starts with
Package_for_RollupFixand contains the build number of the update, for example26100.7623for KB5074109. Copy the whole name. - Remove that package. Paste your own package name after the colon:
DISM /Online /Remove-Package /PackageName:<package name> - Wait until DISM says The operation completed successfully. and restart the PC when it asks.
- Open Settings > Windows Update and pause updates, so the same update does not come back at once.
If Windows no longer starts, the recovery screen has its own option: Troubleshoot > Advanced options > Uninstall Updates > Uninstall latest quality update. Step by step: How to uninstall a Windows update
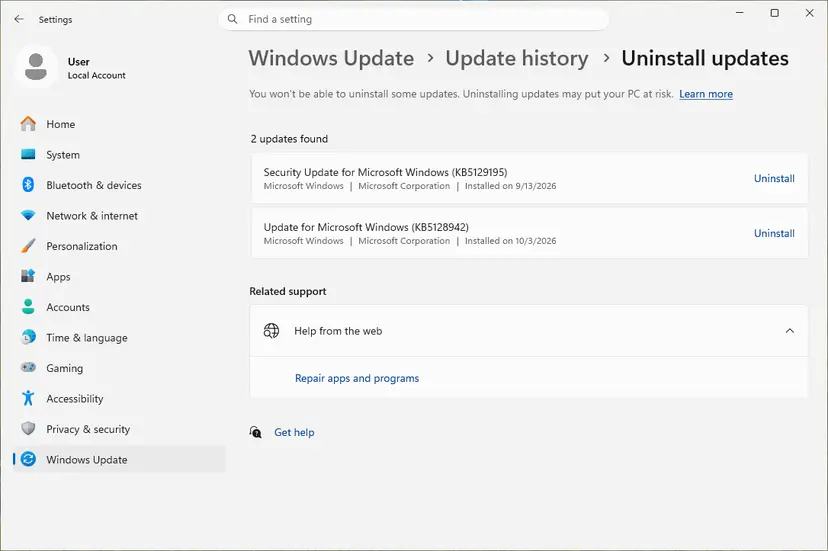
It worked if: DISM reports The operation completed successfully., and after the restart Update history no longer lists the update as installed. winver shows the earlier build number.
If not: If DISM also stops with 0x800f0905, roll the system back with System Restore in Fix 3.
Fix 3. Undo the update with System Restore
15 to 30 minutesLow riskYou want the update gone and a restore point from before it exists. Windows creates one before most updates when System Protection is on.
System Restore puts system files, drivers and the registry back to an earlier state without going through the update's own removal, so the servicing step that fails with 0x800f0905 is not used. Windows Central named it as one of the two ways around the failed KB5074109 rollback.
- Open System Restore. Press Windows+R, type the command below and press Enter. You can also open Control Panel > Recovery > Open System Restore. If a first page opens, select Next.
rstrui.exe - Choose a restore point. Select a restore point from a time before the problem started. The Description often names the event, such as a driver or app install. If the one you need is missing, select Show more restore points (shown only when there are more).
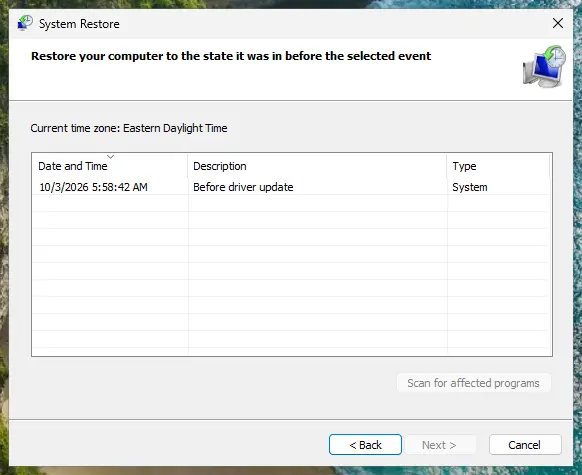
Pick a restore point from before the problem started. Screenshot: Windows 11 26H2. - See what will change. Select Scan for affected programs. The upper list shows programs and drivers that will be removed; the lower list shows those that might come back and may need to be reinstalled. Select Close.
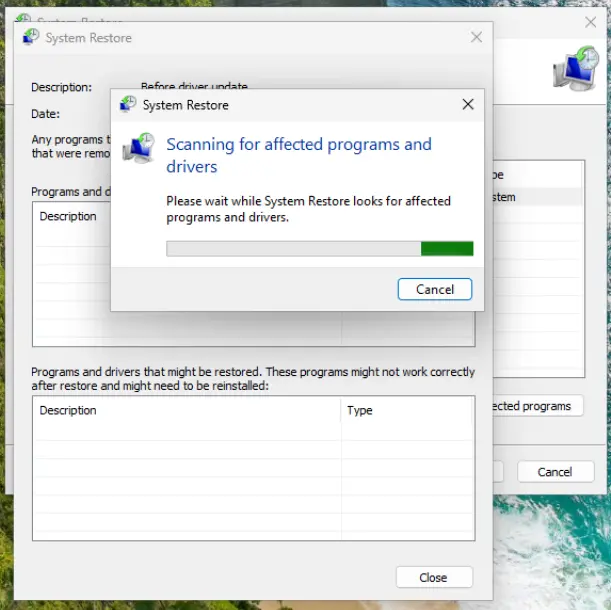
The scan lists programs and drivers the restore removes or brings back. Screenshot: Windows 11 26H2. - Start the restore. Select Next, check the summary and select Finish. Windows restarts and applies the restore point. Do not turn the PC off.
- Check the result. After sign-in Windows reports whether the restore succeeded. Check whether the problem is gone.
These steps were written for Windows 11 and Windows 10 (the steps are the same). The full page with the other versions and what each result means: Undo recent changes with System Restore
Your personal files are not touched, but apps and drivers installed after the restore point are removed. Scan for affected programs shows which ones before you start.
It worked if: Windows restarts, reports that System Restore completed successfully, and winver shows the build from before the update.
If not: No restore point, or the restore failed: use the repair reinstall in Fix 8, which users report also left the bad update behind.
Fix 4. Install the failing update by hand from the Microsoft Update Catalog
20 to 40 minutesLow riskOne update shows Install error - 0x800f0905 on every retry.
The catalog gives the full package instead of the small pieces Windows Update sends, so a damaged or missing piece in the update cache is not used again. It also shows whether the fault is the download or the PC: if the full package fails too, the PC needs Fix 5 or Fix 8.
- Check your Windows version. Press Windows key + R, type winver and press Enter. Note the version (for example 25H2) and the OS build.
- Find the KB number. Open Settings > Windows Update. A failed or pending update is listed with its KB number; earlier ones are under Update history.
- Check the processor type. Open Settings > System > About and look at System type: an x64-based PC needs the x64 file, an ARM-based PC (for example Snapdragon) needs the arm64 file.
- Search the catalog. Open the Microsoft Update Catalog at catalog.update.microsoft.com in your browser, type the KB number (for example KB5124010) in the search box and press Enter.
- Pick the right row. Find the row whose title names your Windows version and your processor type (x64-based or arm64-based) and select Download on that row.
- Download every file listed. A window lists one or more .msu links. Download all of them into one empty folder, for example C:\packages. On Windows 11 24H2 and later the list can include earlier checkpoint updates that the new one needs.
- Install a single file. If there is only one file, double-click it and confirm the installation in the Windows Update Standalone Installer.
- Install several files with DISM. If there are several files, open an elevated Terminal or Command Prompt and run DISM with the newest file. DISM finds the other files in the same folder and installs them in the right order.
DISM /Online /Add-Package /PackagePath:C:\packages\<newest-file>.msu - Restart. Restart the PC when the installation finishes, then run winver again: the OS build should have changed.
These steps were written for Windows 11 24H2 and later; Windows 10 22H2. The full page with the other versions and what each result means: Install an update from the Microsoft Update Catalog
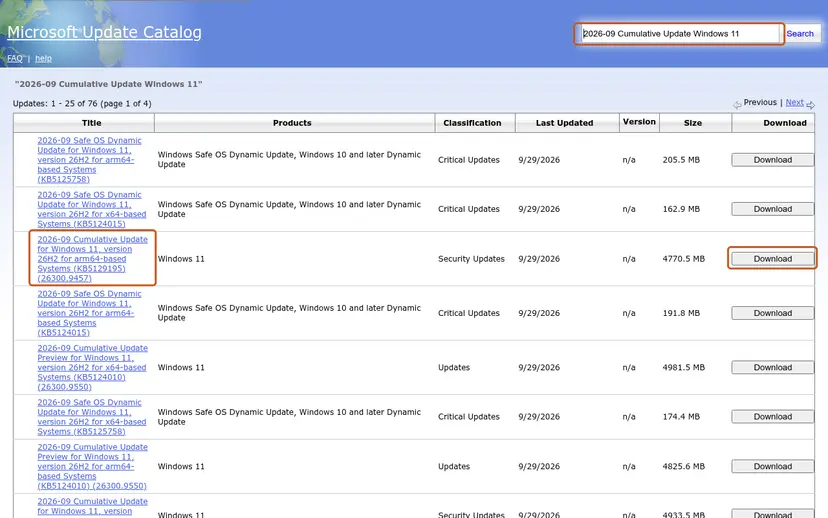
On Windows 11 24H2 and 25H2 the catalog can list an earlier checkpoint update next to the one you want. Our guide to install error 0x800f0991 shows how to install both with one DISM command.
It worked if: The installer or DISM reports that the update was installed, and after the restart winver shows the new build number.
If not: If the manual install also ends with 0x800f0905, repair the component store in Fix 5.
Fix 5. Repair the component store with DISM and SFC
15 to 40 minutesNo riskThe manual install failed, DISM in Fix 2 failed, or the error comes back every month.
Servicing reads and writes the component store in C:\Windows\WinSxS for every install and every removal. DISM with RestoreHealth replaces damaged components with clean copies, and SFC then repairs the system files built from them.
- Open an elevated command window. Right-click Start and select Terminal (Admin), or type cmd in the search box, right-click Command Prompt and select Run as administrator. Select Yes when Windows asks for permission.
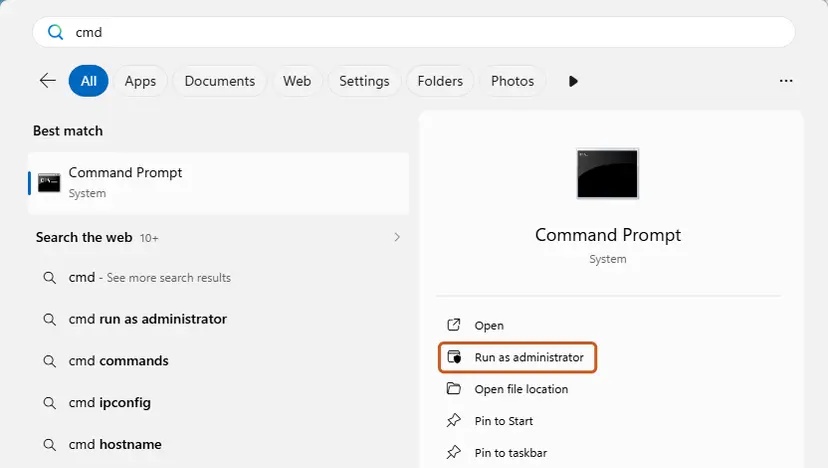
Search for cmd and choose Run as administrator. Screenshot: Windows 11 26H2. - Run DISM first. Type the command below and press Enter. DISM downloads clean copies of damaged components from Windows Update, so it can take several minutes. Wait until it says The operation completed successfully.
DISM.exe /Online /Cleanup-Image /RestoreHealth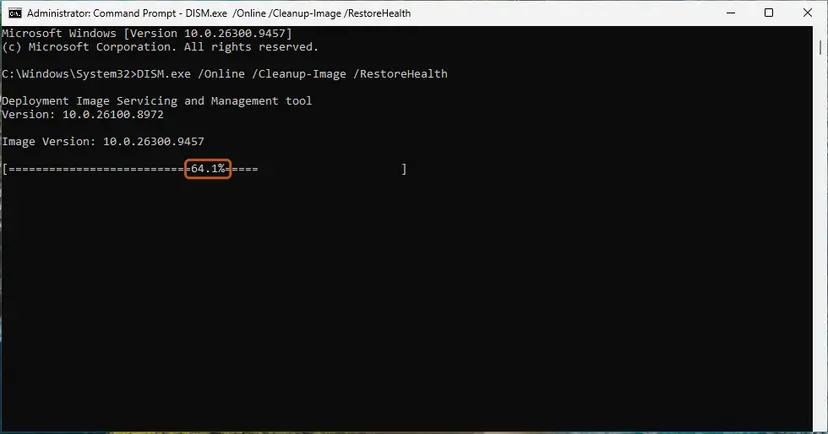
DISM /RestoreHealth running. Screenshot: Windows 11 26H2. - Run System File Checker. In the same window, type the command below and press Enter. Do not close the window until the verification reaches 100%.
sfc /scannow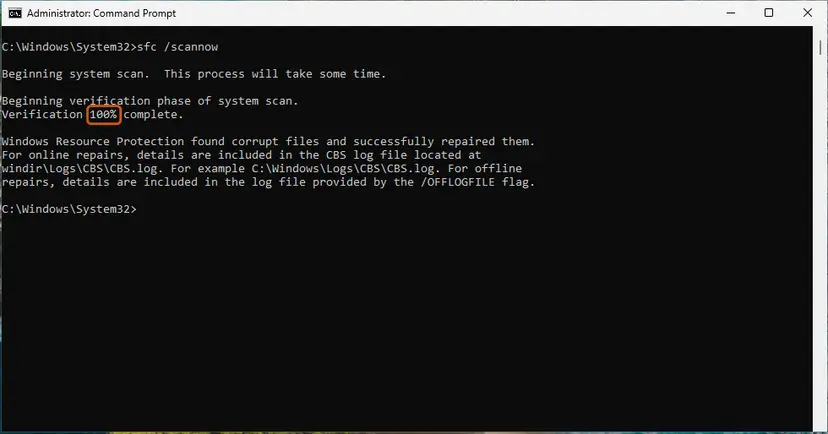
sfc /scannow at 100%. Screenshot: Windows 11 26H2. - Read the result and restart. Compare the last message with the table below this guide, then restart the PC so that repaired files are loaded.
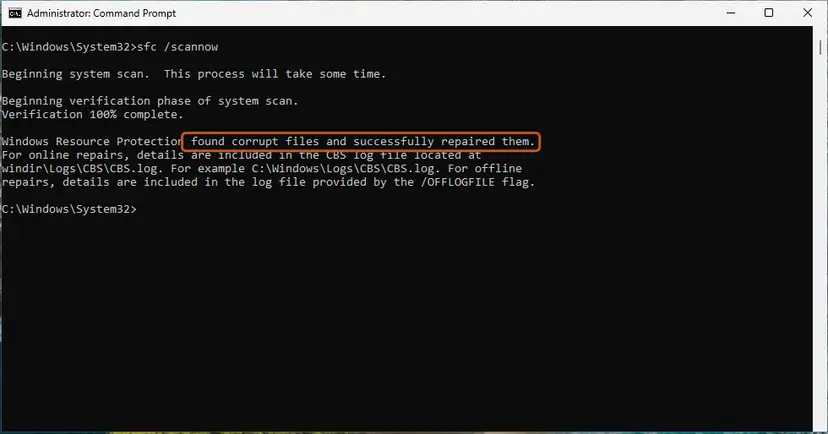
The result line tells you what SFC did. Screenshot: Windows 11 26H2.
These steps were written for Windows 11 24H2 and 25H2. The full page with the other versions and what each result means: Run DISM and SFC to repair Windows system files
A clean result does not rule this error out. Users who could not remove KB5074109 report that both tools found no errors. If both are clean, go to Fix 8.
It worked if: DISM ends with The operation completed successfully., SFC reports that it repaired files or found no violations, and the update installs or uninstalls after a restart.
If not: Run the troubleshooter in Fix 6.
Fix 6. Run the Windows Update troubleshooter
5 minutesNo riskYou do not want to type commands, or the fixes above changed nothing.
The troubleshooter checks the update services and clears a stuck attempt. It does not repair the component store, but it is free of risk and rules out the simple cases before a reinstall.
- Open Troubleshoot settings. Select Start > Settings > System > Troubleshoot.
- Open the list of troubleshooters. Select Other troubleshooters.
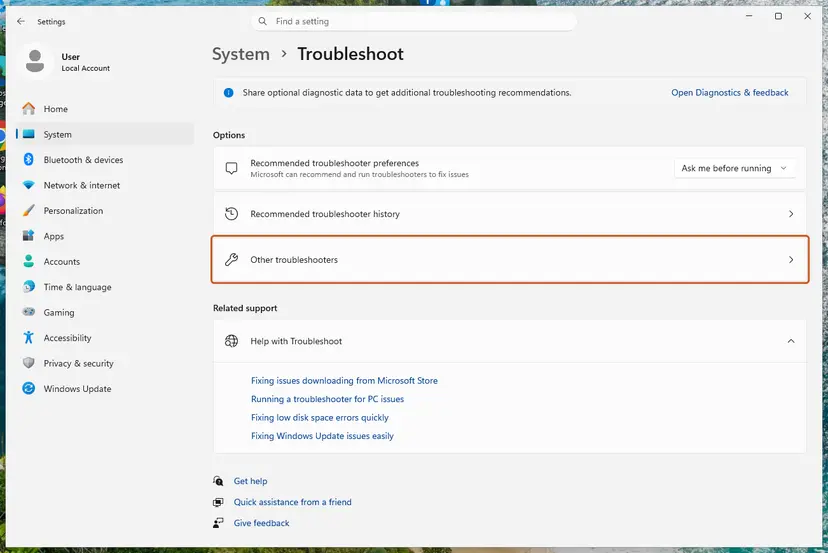
Settings, System, Troubleshoot: select Other troubleshooters. Screenshot: Windows 11 26H2. - Run the Windows Update troubleshooter. Under Most frequent, select Run next to Windows Update. The Get Help app opens and starts the checks.
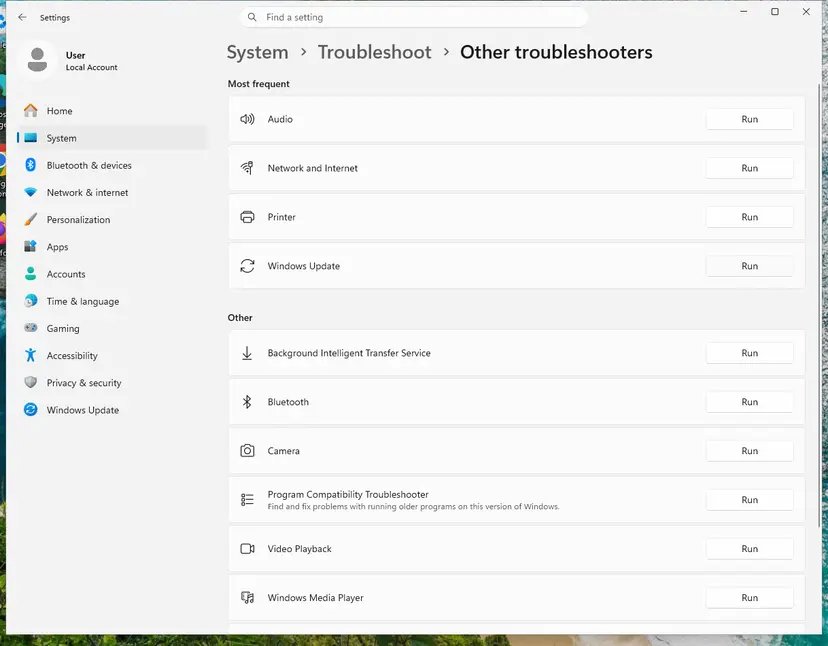
Windows Update is in the Most frequent group; select Run on its row. Screenshot: Windows 11 26H2. - Read the result. Wait until Get Help finishes. If it found and fixed a problem, it says so and asks whether this solved the problem. Answer the question so it can offer the next step.
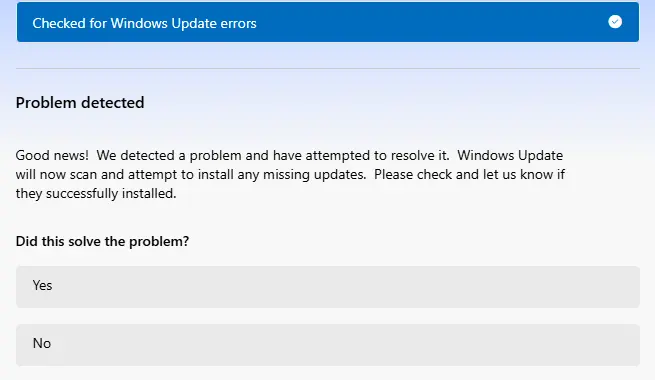
Get Help reports what it found and asks if the problem is solved. Screenshot: Windows 11 26H2. - Restart the PC. Restart when the troubleshooter finishes, even if it does not ask you to.
- Check for updates again. Select Start > Settings > Windows Update > Check for updates, and install the updates it finds.
These steps were written for Windows 11 (screenshots: 26H2). The full page with the other versions and what each result means: Run the Windows Update troubleshooter
It worked if: Get Help reports that it found and fixed a problem, and the update installs on the next check.
If not: Reset the update cache in Fix 7.
Fix 7. Reset the Windows Update components and the update cache
10 minutesLow riskAn update fails to install at once, at the same point every time.
A damaged download in the SoftwareDistribution folder is used again at every retry. Stopping the update services, among them BITS and Windows Update, and renaming the cache folders makes Windows download the update again. It does not help an update that will not uninstall.
- Open Command Prompt as administrator. Type cmd in the search box, right-click Command Prompt and select Run as administrator. Select Yes when Windows asks for permission.
- Stop the update services. Type the commands below and press Enter after each one. If Windows says that other services depend on Cryptographic Services, it stops them too. A message that a service is not started is fine.
net stop wuauserv net stop bits net stop cryptsvc - Delete the download queue files. This clears the list of downloads that the Background Intelligent Transfer Service keeps. If Windows says it cannot find the files, continue.
del "%ALLUSERSPROFILE%\Application Data\Microsoft\Network\Downloader\qmgr*.dat" - Rename the update cache folders. Renaming keeps a copy in case you need it; Windows creates new, empty folders when the services start again. If you get Access is denied, a service is still running: repeat the previous step.
ren %systemroot%\SoftwareDistribution SoftwareDistribution.old ren %systemroot%\System32\catroot2 catroot2.old - Start the services again. Type the commands below and press Enter after each one. The requested service has already been started is fine: Windows started it on its own.
net start cryptsvc net start bits net start wuauserv - Restart and check for updates. Restart the PC. Then select Start > Settings > Windows Update > Check for updates. The first check can take longer than usual because everything is downloaded again.
These steps were written for Windows 11 and Windows 10 (the steps are the same). The full page with the other versions and what each result means: Reset Windows Update components
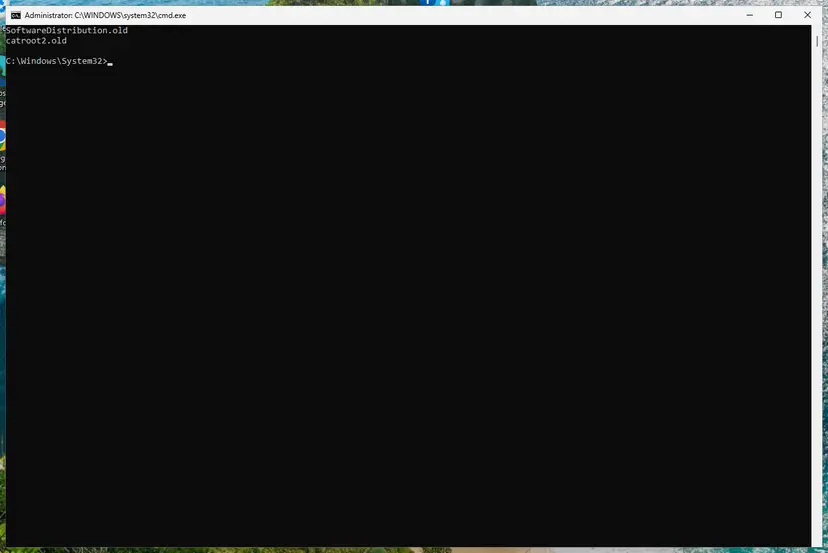
It worked if: Windows Update downloads the update again from zero and installs it.
If not: The fault is inside Windows itself. Use the repair reinstall in Fix 8.
Fix 8. Reinstall Windows over itself with Fix problems using Windows Update
1 to 2 hoursLow riskNothing above worked, in either case.
The reinstall puts a clean copy of your current Windows in place, with a healthy package store. Microsoft Learn calls an in-place reinstall the only reliable resolution when 0x800F0905 is in the CBS log. Users who could not remove KB5074109 report that the update was gone afterwards.
Back up the files you cannot lose before any repair of Windows, even one that keeps them: Back up your files (Windows Backup, File History, Time Machine)
- Open Recovery in Settings. Open Settings > System > Recovery. Next to Fix problems using Windows Update, select Reinstall now. This keeps your apps, files and settings.
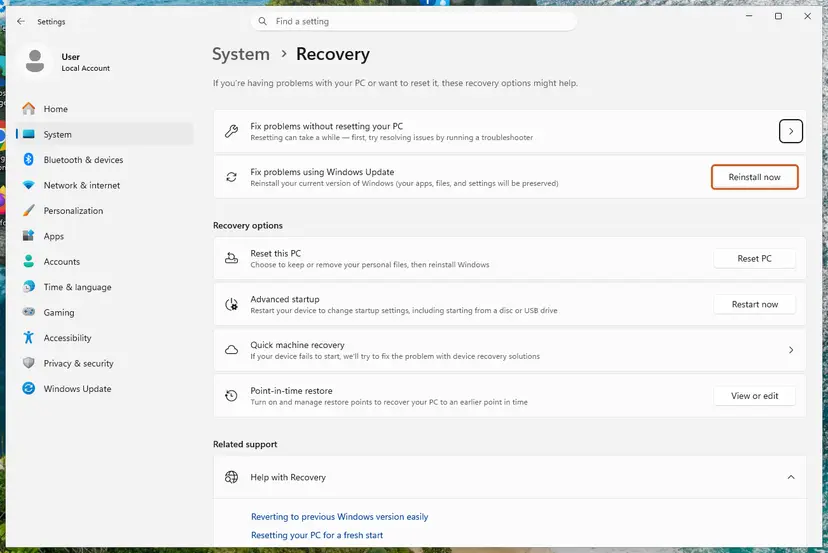
Fix problems using Windows Update reinstalls the current version and keeps apps, files and settings. Screenshot: Windows 11 26H2. - Start the reinstall. Choose whether the PC may restart on its own 15 minutes after the installation, then select OK.
- Wait and restart. Windows Update downloads and installs a repair copy of your current Windows version. Keep the PC plugged in and online, and restart it when asked.
These steps were written for Windows 11 22H2 and later. The full page with the other versions and what each result means: Reinstall Windows without losing files
- Keep the PC plugged in and online for the whole reinstall.
- The option is in Settings > System > Recovery as Fix problems using Windows Update with a Reinstall now button. It can be missing on a PC managed by work or school.
- Older restore points can be gone afterwards, so use Fix 3 first if you need one.
It worked if: The PC restarts into the same desktop with your apps and files, and Windows Update installs the next update without the error.
If not: If the option is missing or the reinstall fails, run Windows setup yourself in Fix 9.
Fix 9. Run an in-place upgrade with Windows setup and keep your files
1 to 2 hoursLow riskFix 8 is missing or failed, on Windows 11 or Windows 10.
Setup replaces every system component and keeps your data, apps and settings. It is the in-place upgrade Microsoft names for this code, done with the normal setup window instead of the server command.
- Back up the files you cannot lose, as in Fix 8.
- Open Microsoft's Windows 11 download page and download the Installation Assistant, or the ISO under Download Windows 11 Disk Image (ISO). On Windows 10 that cannot move to Windows 11, use the Windows 10 download page.
- With the ISO: double-click it to open it as a drive and run
setup.exe. With the Installation Assistant: run it and follow it. - When setup asks what to keep, select Keep personal files and apps.
- Leave the PC on and online until it restarts into Windows.
- Open Settings > Windows Update and select Check for updates.
Microsoft Learn describes the same repair for servers as setup.exe /auto upgrade /dynamicupdate disable. On a home PC the normal setup window does the same job.
It worked if: Windows starts with your apps and files, winver shows the new build, and the next update installs.
If not: Read "If the error is still there" below.
If error 0x800f0905 is still there
When the in-place upgrade did not help or could not start, the next step depends on who manages the PC and what CBS.log says.
| Situation | What to do |
|---|---|
| Work or school PC with updates from WSUS, Configuration Manager or Intune | Send the administrator the code, the KB number and a copy of the whole C:\Windows\Logs\CBS folder. |
| Setup itself fails | Free space on drive C: and try again: Free up disk space and delete temporary files. Then use Reset this PC with Keep my files: your apps are removed, your files stay. |
| The PC lost power or froze during an update before the error began | Check the drive for errors before you reinstall: Check a disk for errors (chkdsk) |
| You want an expert to read the log | Post the zipped CBS folder on Microsoft Q&A or in a Windows Update forum, with the KB number and the build from winver. |
- What to send to support: the exact code, whether it was an install or an uninstall, the KB number, the build from winver and CBS.log.
- Which fixes you already ran, and the last line DISM printed.
- This is not a hardware fault in itself. The exception is a drive that reports errors in chkdsk: a failing drive damages the store again after every repair.
How to keep error 0x800f0905 from coming back
- Restart when Windows Update asks for it, so pending servicing work is finished before the next update.
- Keep System Protection on for drive C:, so a restore point exists before each update.
- When an update causes trouble, check for a newer fixed update before you try to remove it.
- Keep free space on drive C: before the monthly update. Cumulative updates for Windows 11 are several gigabytes.
- Do not delete files in
C:\Windows\WinSxSby hand to save space. Updates build on that folder. - Do not run cleanup scripts that remove packages from the component store.
- Do not switch the PC off while it shows that updates are being installed or removed.
- Do not pause updates for months to avoid the error. The security fixes are in the failed update.
Windows 10 left support on 14 October 2025. A Windows 10 PC that stops installing updates is better moved to Windows 11 with the in-place upgrade in Fix 9, if its hardware allows it.
Frequently asked questions
What does error 0x800f0905 mean?
It means Windows could not add or remove an update package. The code comes from Component-Based Servicing, and Microsoft Learn gives it the name CBS_E_NO_ACTIVE_EDITION. Microsoft lists it among the servicing errors where an in-place upgrade is the reliable repair. It is not a network error: the files are on the PC. You see it as Install error - 0x800f0905 next to a new update, or as a failed uninstall of an installed update.
Why can't I uninstall KB5074109 with error 0x800f0905?
KB5074109 is the Windows 11 security update of 13 January 2026, OS builds 26100.7623 and 26200.7623. It came as a combined package with the servicing stack update, and Microsoft says wusa /uninstall does not work on such a package. Windows Central reported the failed rollback on 23 January 2026. You do not need to remove it any more: KB5078127 of 24 January 2026 includes it and fixes its OneDrive and Dropbox problem. Install that with Fix 1.
How do I uninstall an update when Settings says Uninstall failed 0x800f0905?
Use DISM instead of Settings. Open Terminal as administrator, run DISM /Online /Get-Packages /Format:Table, find the Package_for_RollupFix line with the build number of the update and remove it with DISM /Online /Remove-Package /PackageName: followed by that name. Microsoft documents this as the way to remove the cumulative part of a combined package. Fix 2 has every step. If DISM fails too, use System Restore in Fix 3.
Does error 0x800f0905 appear on Windows 11?
Yes, most reports in 2025 and 2026 are from Windows 11 24H2 and 25H2, and the KB5074109 uninstall problem was a Windows 11 problem. The menus on this page are the Windows 11 ones: Settings, Windows Update, Update history. The fixes are the same on Windows 11 and Windows 10, with the Windows 10 path given where it differs. On Windows 11, Fix problems using Windows Update is under Settings > System > Recovery.
I get 0x800f0905 on Windows 10. Are the fixes the same?
Yes. Windows 10 uses the same servicing stack, and its message is longer: There were some problems installing updates, but we'll try again later, with (0x800f0905) at the end. Fix 1, Fix 4, Fix 5 and Fix 7 work the same way. Windows 10 left support on 14 October 2025, so a Windows 10 PC that stops updating is a good moment to move to Windows 11 with Fix 9, if the hardware allows it.
What does Installer encountered an error: 0x800f0905 mean?
It is the same servicing error shown by the Windows Update Standalone Installer, the window that opens when you run an .msu file or use wusa from the command line. During an uninstall it usually means the update is a combined package that wusa cannot remove: use DISM in Fix 2. During an install it means the package could not be added: repair the component store in Fix 5, then use the repair reinstall in Fix 8.
Is 0x800f0905 a known issue that Microsoft will fix?
Not as a published known issue for the code. Microsoft fixes the bugs of a bad update in the next one, as KB5078127 did for KB5074109, but the error code itself means the servicing step failed on your PC. Microsoft Learn lists 0x800F0905 among errors where an in-place upgrade is the reliable resolution. So the repair is on the PC: Fix 2 or Fix 3 for an uninstall, Fix 4, Fix 5 or a reinstall that keeps your files for an install.
Do I lose my files with Fix problems using Windows Update?
No. It reinstalls the current version of Windows and keeps your apps, files and settings. This is different from Reset this PC, which removes your apps even when you keep your files. Still, back up the files you cannot lose first, keep a laptop on its charger and plan for one to two hours. Users report that older restore points can be gone afterwards, so if you want to use System Restore, do that first.
Why does Windows Update use so many resources while it keeps failing?
Because it downloads and tries to install the same update again on every attempt. The download and the servicing work use the disk and the processor for a long time, then fail and start over the next day. Fixing the error ends the loop. While you work through the fixes, you can pause updates for a week in Settings > Windows Update. Do not leave them paused for months, because the failed update carries the security fixes.
Is this page the answer for errore 0x800f0905, erro 0x800f0905 and other languages?
Yes. The code is the same in every language of Windows: only the words in front of it are translated, such as errore, erro or erreur. The fixes on this page are the same. The menu names in the steps are the English ones. In another display language, follow the position of the items: Settings, then Windows Update, then Update history. The DISM commands are typed the same way on every PC.
Sources
- Microsoft Learn: Troubleshoot Windows Update errors that require in-place upgrades (0x800F0905 = CBS_E_NO_ACTIVE_EDITION, CBS log locations) (learn.microsoft.com)
- Microsoft Support: January 24, 2026, KB5078127 (OS Builds 26200.7628 and 26100.7628) Out-of-band (includes KB5074109, how to remove the LCU with DISM) (support.microsoft.com)
- Windows Central: Windows 11 won't even let some users uninstall KB5074109, error 0x800f0905 is blocking the rollback (23 January 2026) (windowscentral.com)
Did this fix work?
One click, no account. It tells the next reader which guides are worth their time.
Questions and experiences: fix Windows update error 0x800f0905
Still broken, or found a fix we did not cover? Ask here: members and our editors answer. Reading is open; writing needs a free account.
…