
How to fix Windows update error 0xc1900131?

Prefer to fix it yourself? The manual steps follow.
- 7methods
- 15 minutes to 2 hours
- Intermediate
Applies to Windows 11 (23H2, 24H2, 25H2, 26H2) and Windows 10 22H2, feature updates through Windows Update, the Installation Assistant or an ISO
7 methods in this guide
Hello, I have been having some issues with installing Windows version 23H2. The update downloads fine, but then the installation fails with error code 0xc1900131.
Error 0xc1900131 stops a Windows version upgrade, such as 23H2, 24H2 or 25H2, after the download. Microsoft lists it as MOSETUP_E_INSTALL_HASH_MISMATCH: "The install cannot continue because the instance hash does not match." Remove the files left by the earlier attempt first, so Setup starts again from a clean copy.
0xc1900131 means Windows Setup checked the upgrade it had prepared and found that it does not match what it expected, so it stopped before changing anything. Restart the PC, then delete the temporary Windows installation files with Disk Cleanup (Fix 1) and reset the Windows Update cache (Fix 2). If the error comes back, install the new version from a freshly downloaded ISO or the Installation Assistant (Fix 3).
| Error | 0xc1900131, Microsoft's name MOSETUP_E_INSTALL_HASH_MISMATCH, description "The install cannot continue because the instance hash does not match." |
|---|---|
| Where it appears | In Settings > Windows Update next to a feature update, as Install error - 0xc1900131, in Update history, or in a Windows Setup window that ends the upgrade. |
| Main cause | The upgrade that Setup prepared on the PC, or the image it runs from, does not match. Leftovers of an earlier attempt or a damaged download are the usual reasons. |
| Fastest fix | Restart, delete the temporary Windows installation files (Fix 1), then reset the Windows Update cache (Fix 2). |
| Also written as | 0xC1900131, 0XC1900131, 0x1900131 (the leading c dropped), error 0xc1900131, install error - 0xc1900131. |
| Affects | Version upgrades of Windows 11 and Windows 10. Windows 10 left support on 14 October 2025, and 22H2 is its last version. |
| Microsoft's status | A documented Windows Setup error code, not a known bug of one release. Microsoft gives one line for it and does not explain the instance hash further. |
| Where the cause is written | setupact.log and setuperr.log in C:\$WINDOWS.~BT\Sources\Panther. |
| Time to fix | 15 minutes for Fix 1 and Fix 2, plus the new download and install, which can take an hour or more. |
Facts checked on 15 October 2026. Steps written for Windows 11 25H2 and 26H2 feature updates, Windows 10 22H2.
What error 0xc1900131 means
Microsoft's table of modern setup error codes gives 0xc1900131 a single line: MOSETUP_E_INSTALL_HASH_MISMATCH, "The install cannot continue because the instance hash does not match." A hash is a short fingerprint of data. Setup compares the fingerprint of the install it is about to finish with the one it recorded, and they differ.
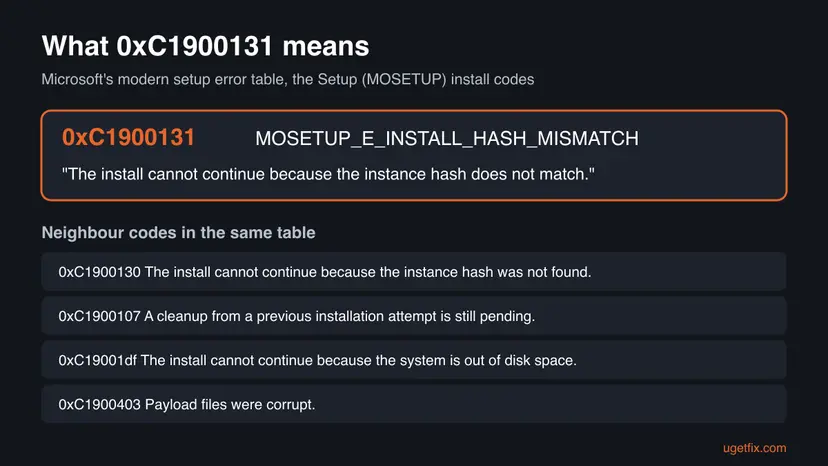
| Code | What Microsoft's table says | What it tells you |
|---|---|---|
| 0xC1900131 | MOSETUP_E_INSTALL_HASH_MISMATCH, "The install cannot continue because the instance hash does not match." | The prepared upgrade does not match. Start again from clean files. |
| 0xC1900130 | MOSETUP_E_INSTALL_HASH_MISSING, "The install cannot continue because the instance hash was not found." | The fingerprint is missing. The same fixes apply. |
| 0xC1900107 | MOSETUP_E_CLEANUP_PENDING, "A cleanup operation from a previous installation attempt is still pending. A system reboot is required." | An earlier attempt is not cleaned up yet. Restart first. |
| 0xC19001df | MOSETUP_E_DISK_FULL, "The install cannot continue because the system is out of disk space." | Too little space. Free up drive C. |
Microsoft does not say what exactly the "instance" is, and we could not confirm it. In practice the code shows up after the download, when Setup is ready to install. That is why the reader above saw the update download fine and then fail.
0xc1900131 stops Setup before it installs the new version. Windows stays on the version you have, and your files, apps and settings are not changed.
Why the upgrade fails with 0xc1900131
The code says that two copies of the same thing differ. So the causes are the ones that leave Setup with a mixed or damaged set of files. Each cause points to a fix.
| Cause | How often | How to tell | Fix |
|---|---|---|---|
| Files from an earlier, failed upgrade attempt are still on drive C. | Most often | The same version failed before, or the upgrade was cancelled or the PC was turned off during it. | Fix 1 |
| The download in the Windows Update cache is damaged or incomplete. | Often | The update shows Install error - 0xc1900131 in Settings and fails the same way after a retry. | Fix 2 |
| The ISO or Installation Assistant download is damaged. | Sometimes | You ran Setup from an ISO, a USB stick or the Installation Assistant. | Fix 3 |
| Drive C ran out of space while Setup prepared the upgrade. | Sometimes | Less than 20 GB free on drive C. | Fix 4 |
| Windows Update itself or the system files are damaged. | Rarely | Other updates fail too, or SFC finds errors. | Fix 5, Fix 6, Fix 7 |
On Microsoft Q&A, a volunteer answering a failed 24H2 upgrade described 0xC1900131 as a corrupted image and advised deleting the ISO and downloading a fresh copy. That is a forum report, not Microsoft's documentation, but it matches the fixes below.
Where the setup logs show what failed
You do not need the logs for Fix 1 to Fix 3. Read them first if you want to know which file did not match, or if you plan to contact support, because Fix 1 deletes them.
| Log | Where | What to look for |
|---|---|---|
| Update history | Settings > Windows Update > Update history | The name of the feature update that failed, such as version 25H2, and the date. |
| Setup log | C:\$WINDOWS.~BT\Sources\Panther\setupact.log | Lines with 0xC1900131 or HASH, and the lines just above them. |
| Setup error log | C:\$WINDOWS.~BT\Sources\Panther\setuperr.log | The first error in the file. Later errors often follow from it. |
The $WINDOWS.~BT folder is hidden. Paste the path into the address bar of File Explorer to open it, and copy the Panther folder to your desktop before you run Fix 1.
How to fix Windows update error 0xc1900131
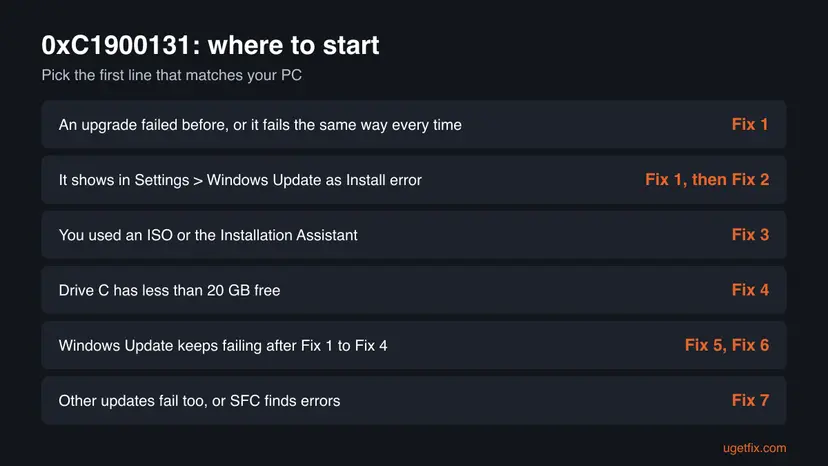
Fix 1 and Fix 2 remove what Setup compares and solve the error for most readers. Fix 3 installs the new version from a fresh download. Fix 4 makes room. Fix 5 to Fix 7 repair Windows Update and Windows itself and come last.
| What you see or have | Start with |
|---|---|
| An upgrade to this version failed before, or it fails the same way every time. | Fix 1 |
| Settings > Windows Update shows Install error - 0xc1900131. | Fix 1, then Fix 2 |
| You ran Setup from an ISO, a USB stick or the Installation Assistant. | Fix 3 |
| Drive C has less than 20 GB free. | Fix 4 |
| Windows Update keeps failing after Fix 1 to Fix 4. | Fix 5, then Fix 6 |
| Other updates fail too, or SFC finds errors. | Fix 7 |
Fix 1. Restart and delete the files of the earlier upgrade attempt
10 to 15 minutesLow riskEveryone, and first of all readers whose upgrade failed or was cancelled before.
Setup keeps a prepared upgrade in hidden folders on drive C. If those files come from an earlier attempt, they can differ from what the new attempt recorded, which is exactly the mismatch the code names. A restart finishes any pending cleanup, and Disk Cleanup removes the rest so Setup builds a new set.
- Copy
C:\$WINDOWS.~BT\Sources\Pantherto your desktop if you want to keep the setup logs. - Select Start > Power > Restart. Use Restart, not Shut down, so a pending cleanup can finish.
- Type
Disk Cleanupin the search box and open it. Choose drive C: and select OK. - Select Clean up system files, choose drive C: again and select OK.
- Tick Temporary Windows installation files, Windows upgrade log files and Windows Update Cleanup if they are in the list.
- Select OK, then Delete Files, and wait until Disk Cleanup closes.
- Restart the PC once more and open Settings > Windows Update. Select Check for updates.
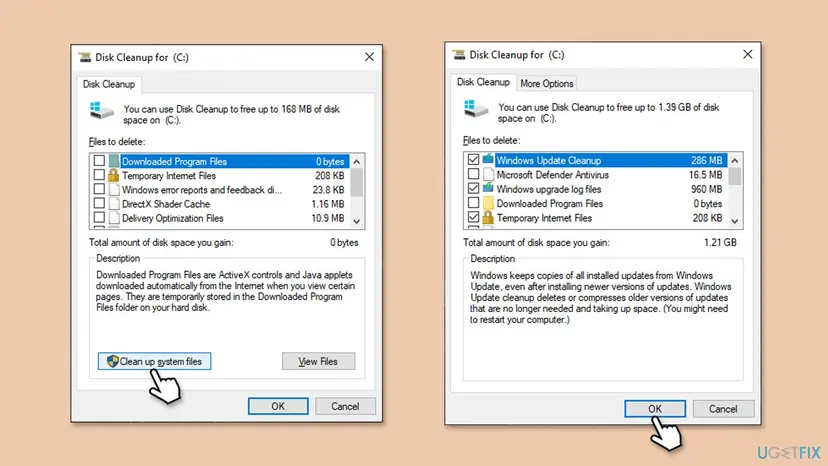
Some items, such as Temporary Windows installation files, appear only when there are leftovers. If none of them is listed, the PC has no old upgrade files and you can go on to Fix 2.
It worked if: The feature update downloads again or shows as ready, then installs and asks for a restart without the error.
If not: If Settings shows Install error - 0xc1900131 again, reset the Windows Update cache with Fix 2.
Fix 2. Reset the Windows Update cache so the upgrade downloads again
10 minutes, plus the new downloadLow riskThe upgrade comes through Settings > Windows Update and Fix 1 did not help.
Windows Update keeps what it downloaded in C:\Windows\SoftwareDistribution and the signatures in catroot2. If that download is damaged, Setup builds a mismatched install from it on every retry. Renaming both folders forces a clean, complete download.
- Open Command Prompt as administrator. Type cmd in the search box, right-click Command Prompt and select Run as administrator. Select Yes when Windows asks for permission.
- Stop the update services. Type the commands below and press Enter after each one. If Windows says that other services depend on Cryptographic Services, it stops them too. A message that a service is not started is fine.
net stop wuauserv
net stop bits
net stop cryptsvc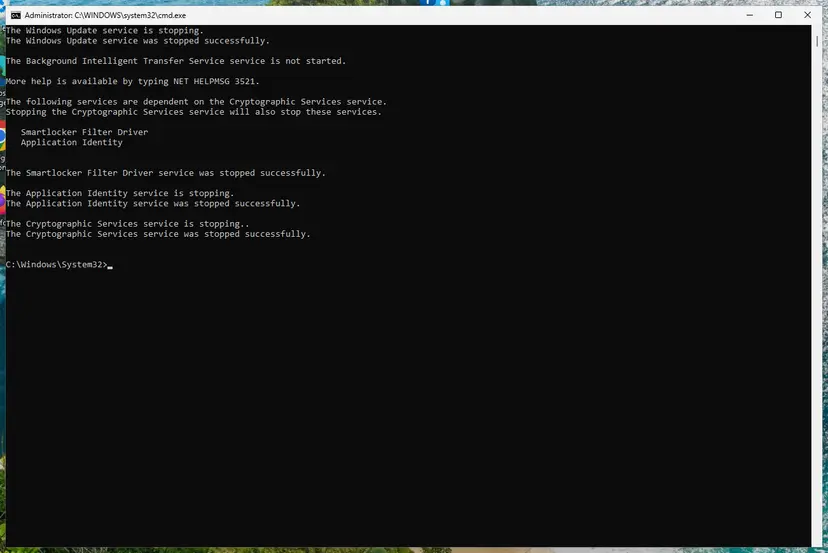
The update services are stopped. Screenshot: Windows 11 26H2. - Delete the download queue files. This clears the list of downloads that the Background Intelligent Transfer Service keeps. If Windows says it cannot find the files, continue.
del "%ALLUSERSPROFILE%\Application Data\Microsoft\Network\Downloader\qmgr*.dat" - Rename the update cache folders. Renaming keeps a copy in case you need it; Windows creates new, empty folders when the services start again. If you get Access is denied, a service is still running: repeat the previous step.
ren %systemroot%\SoftwareDistribution SoftwareDistribution.old
ren %systemroot%\System32\catroot2 catroot2.old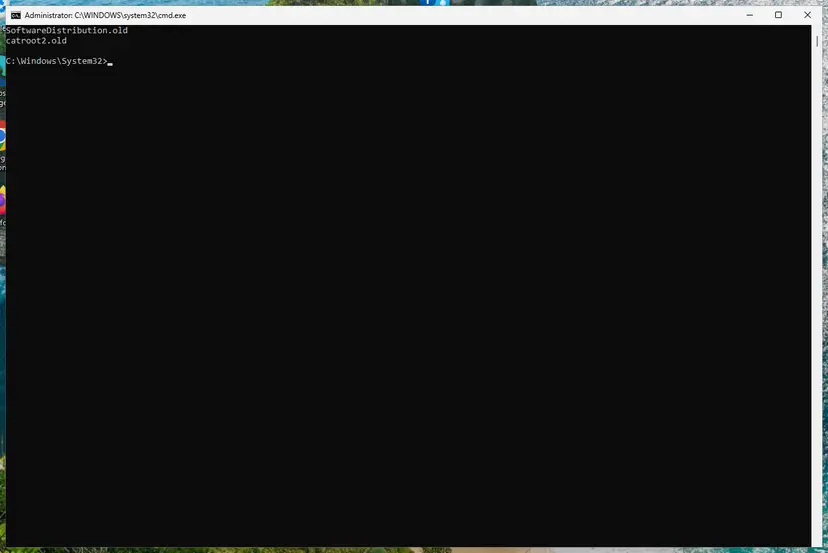
Both folders now end in .old. Screenshot: Windows 11 26H2. - Start the services again. Type the commands below and press Enter after each one. The requested service has already been started is fine: Windows started it on its own.
net start cryptsvc
net start bits
net start wuauserv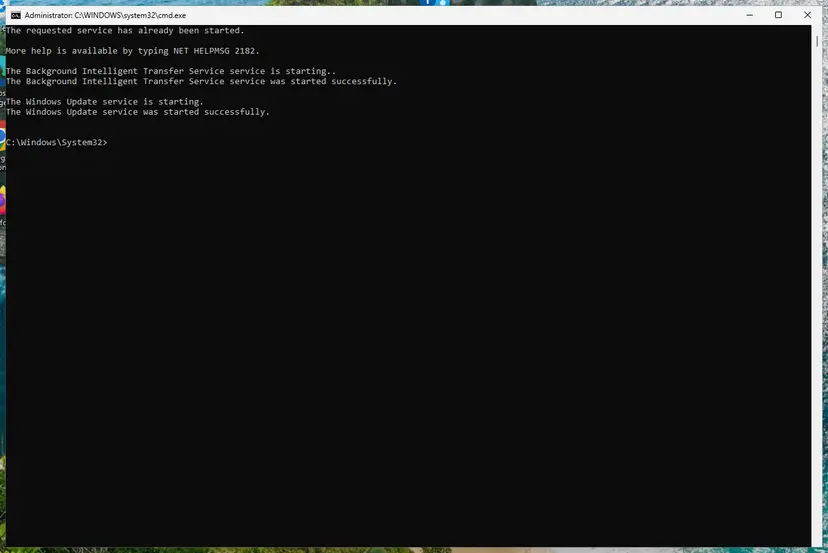
BITS and Windows Update are running again. Screenshot: Windows 11 26H2. - Restart and check for updates. Restart the PC. Then select Start > Settings > Windows Update > Check for updates. The first check can take longer than usual because everything is downloaded again.
These steps were written for Windows 11 and Windows 10 (the steps are the same). The full page with the other versions and what each result means: Reset Windows Update components
- Restart the PC after the services are started again.
- Open Settings > Windows Update and select Check for updates. The feature update downloads again from zero.
- Keep the PC plugged in, awake and online until it asks for a restart.
Update history can look empty after the reset, because its list lived in the renamed folder. Delete SoftwareDistribution.old and catroot2.old once the upgrade has worked.
It worked if: The update shows a new download percentage, then installs without the error.
If not: If the same code appears after the new download, install the new version outside Windows Update with Fix 3.
Fix 3. Install the new version from a fresh ISO or the Installation Assistant
1 to 2 hoursLow riskYou ran Setup from an ISO, a USB stick or the Installation Assistant, or Fix 1 and Fix 2 did not help.
A damaged or older copy of the setup files gives Setup an image that does not match. A new download straight from Microsoft brings a complete set of files, and Setup records a new instance from it.
- Back up your important files first: Back up your files (Windows Backup, File History, Time Machine).
- Delete the old ISO file and any old Windows11InstallationAssistant file from your Downloads folder.
- Open Microsoft's Download Windows 11 page in a browser.
- Under Windows 11 Installation Assistant, select Download Now and run the new file. Or download the Windows 11 Disk Image (ISO) again.
- For the ISO, right-click the new file, select Mount, and double-click
setup.exeon the new drive. - Choose to keep personal files and apps, and let Setup run with the PC plugged in.
- After the last restart, open Settings > Windows Update and install the remaining updates.
Windows 10 22H2 is the last version of Windows 10, so there is no newer Windows 10 feature update. If your PC meets the requirements, the Installation Assistant upgrades it to Windows 11 and keeps your files and apps. Windows 10 stopped getting free security fixes on 14 October 2025.
It worked if: Setup finishes, Windows starts on the new version, and Settings > System > About shows it.
If not: If Setup stops with 0xc1900131 again, check free space with Fix 4 and read setuperr.log as described above.
Fix 4. Free up at least 20 GB on drive C
15 to 30 minutesLow riskDrive C has less than 20 GB free, or Setup has failed with space errors before.
Microsoft asks for at least 20 GB free to upgrade 64-bit Windows and 16 GB for 32-bit. When the drive fills up while Setup prepares the install, it can be left with an incomplete set of files that no longer matches.
- Open File Explorer > This PC and check the free space on drive C.
- Empty the Recycle Bin and move large videos or old downloads to another drive.
- Uninstall apps you no longer use in Settings > Apps > Installed apps.
- If the PC has a small drive, connect a USB drive. Setup can use it during the upgrade.
- Run Fix 1 again, then check for updates.
With Storage Sense and screenshots: Free up disk space and delete temporary files
It worked if: Drive C shows 20 GB or more free, and the upgrade installs.
If not: If space is not the problem, run the troubleshooter in Fix 5.
Fix 5. Run the Windows Update troubleshooter
5 minutesNo riskThe upgrade comes through Windows Update and Fix 1 to Fix 4 did not help.
It checks the Windows Update services and their settings, which a cache reset does not. It cannot repair the setup image itself, so it comes after the specific fixes.
- Open Troubleshoot settings. Select Start > Settings > System > Troubleshoot.
- Open the list of troubleshooters. Select Other troubleshooters.
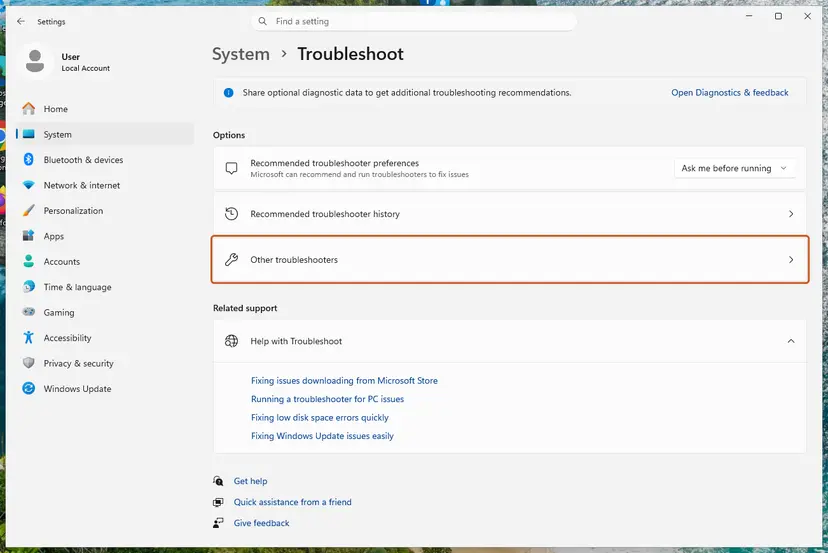
Settings, System, Troubleshoot: select Other troubleshooters. Screenshot: Windows 11 26H2. - Run the Windows Update troubleshooter. Under Most frequent, select Run next to Windows Update. The Get Help app opens and starts the checks.
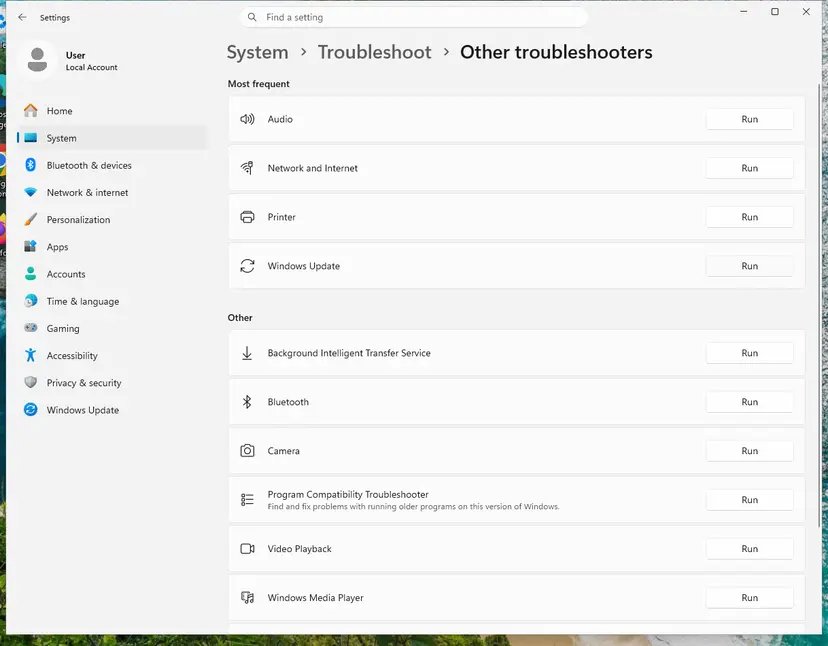
Windows Update is in the Most frequent group; select Run on its row. Screenshot: Windows 11 26H2. - Read the result. Wait until Get Help finishes. If it found and fixed a problem, it says so and asks whether this solved the problem. Answer the question so it can offer the next step.
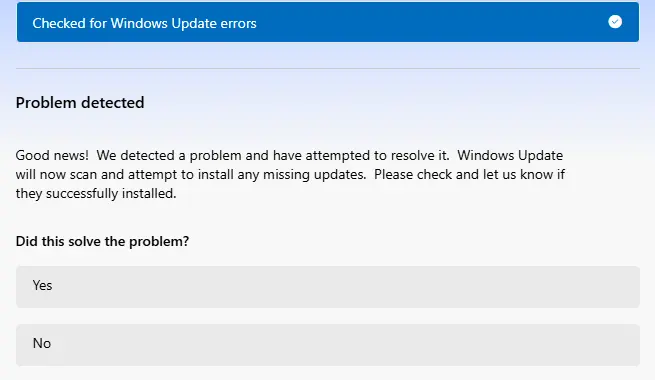
Get Help reports what it found and asks if the problem is solved. Screenshot: Windows 11 26H2. - Restart the PC. Restart when the troubleshooter finishes, even if it does not ask you to.
- Check for updates again. Select Start > Settings > Windows Update > Check for updates, and install the updates it finds.
These steps were written for Windows 11 (screenshots: 26H2). The full page with the other versions and what each result means: Run the Windows Update troubleshooter
On Windows 11 the troubleshooter opens in the Get Help app. On Windows 10 22H2 it is under Settings > Update & Security > Troubleshoot > Additional troubleshooters.
It worked if: The troubleshooter lists what it repaired, and the next check for updates installs the upgrade.
If not: On Windows 11, try Fix 6. On Windows 10, go to Fix 7.
Fix 6. Reinstall the current Windows 11 version with Fix problems using Windows Update
1 hour or moreLow riskWindows 11, and the error stays after Fix 1 to Fix 5.
This recovery option downloads a fresh copy of the version you have now and reinstalls it, keeping apps, files and settings. A clean base often lets the next feature update install.
- Open Settings > System > Recovery.
- Next to Fix problems using Windows Update, select Reinstall now.
- Choose whether the PC may restart on its own, then select OK.
- Keep the PC plugged in and online until it restarts and finishes.
- Open Settings > Windows Update and check for updates again.
More options, including Reset this PC: Reinstall Windows without losing files
It worked if: Windows restarts on the same version, and the next check for updates installs the new version.
If not: If this option fails too, repair the system files with Fix 7.
Fix 7. Repair Windows system files with DISM and SFC
20 to 40 minutesLow riskOther updates fail too, or every fix above failed.
DISM repairs the component store that updates install into, and SFC then repairs protected system files from it. Damaged system files can make Setup fail its checks again and again.
- Open an elevated command window. Right-click Start and select Terminal (Admin), or type cmd in the search box, right-click Command Prompt and select Run as administrator. Select Yes when Windows asks for permission.
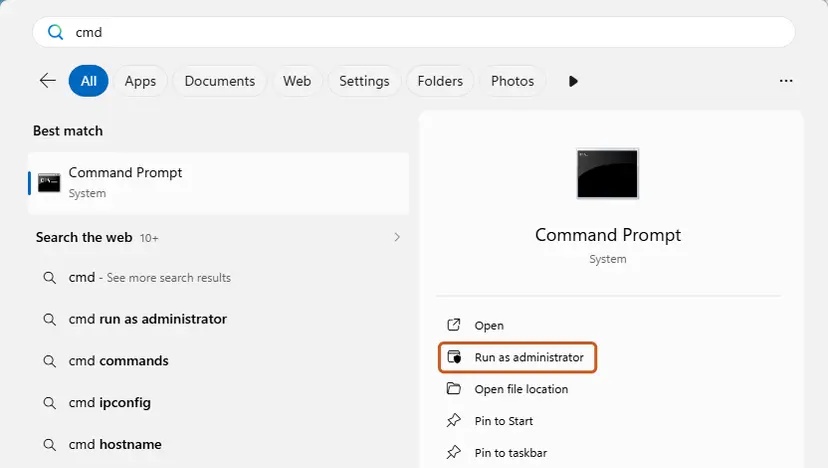
Search for cmd and choose Run as administrator. Screenshot: Windows 11 26H2. - Run DISM first. Type the command below and press Enter. DISM downloads clean copies of damaged components from Windows Update, so it can take several minutes. Wait until it says The operation completed successfully.
DISM.exe /Online /Cleanup-Image /RestoreHealth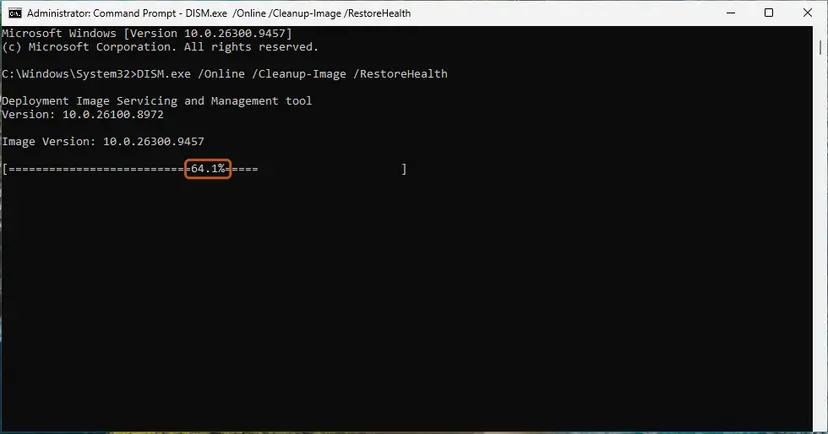
DISM /RestoreHealth running. Screenshot: Windows 11 26H2. - Run System File Checker. In the same window, type the command below and press Enter. Do not close the window until the verification reaches 100%.
sfc /scannow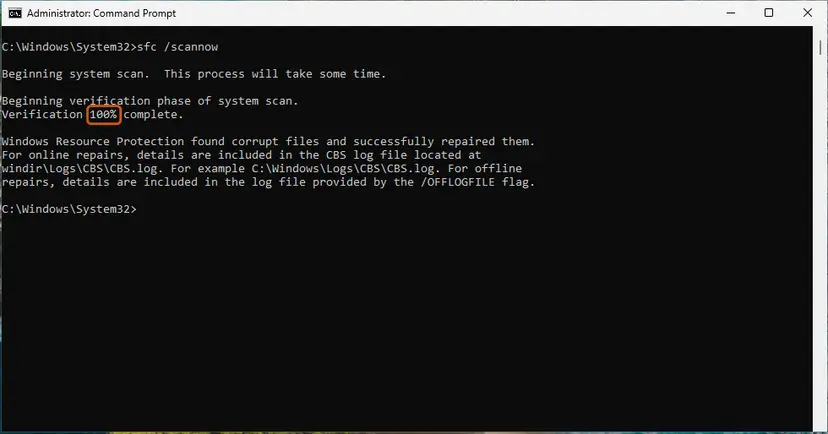
sfc /scannow at 100%. Screenshot: Windows 11 26H2. - Read the result and restart. Compare the last message with the table below this guide, then restart the PC so that repaired files are loaded.
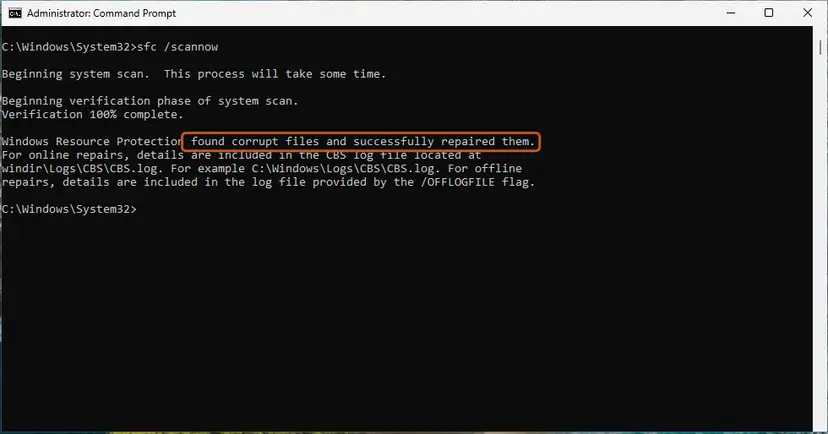
The result line tells you what SFC did. Screenshot: Windows 11 26H2.
These steps were written for Windows 11 24H2 and 25H2. The full page with the other versions and what each result means: Run DISM and SFC to repair Windows system files
It worked if: DISM reports that the restore operation completed, and SFC reports no integrity violations or that it repaired them.
If not: Run Fix 1 and Fix 3 again after the repair, then read the section below.
If error 0xc1900131 is still there
When the error comes back after clean files, a fresh ISO and a system repair, the setup logs decide the next step. Collect them right after the failure, before the next try overwrites them.
| What you find | What to do |
|---|---|
| The fresh ISO also fails with 0xc1900131 | Download the ISO on another PC or network and try again. A security device or proxy can damage large downloads. |
| The error appears only on a work or school PC | Ask the IT department. Upgrades may come from their own server, and the image there may be the one that does not match. |
setuperr.log names a driver or an app | Uninstall that app or update the driver: Update, roll back or reinstall a driver, then run Fix 1 and try again. |
| chkdsk or SFC reports errors again and again | Back up your files and check the drive: Check a disk for errors (chkdsk). A failing drive damages files as they are written. |
Files that keep turning out damaged on one PC can point to a failing drive or memory. Other signs are files that will not open, crashes outside Setup and disk errors. Run a memory test with How to test your RAM with Windows Memory Diagnostic before the next upgrade attempt.
- What to send to support: the code 0xc1900131, the version you tried to install, and your current version from Settings > System > About.
- Attach
setupact.logandsetuperr.logfromC:\$WINDOWS.~BT\Sources\Panther. - Say which fixes you already tried and whether you used Windows Update, the Installation Assistant or an ISO.
How to keep 0xc1900131 from coming back
- Keep 20 GB or more free on drive C before a feature update.
- Leave the PC plugged in and awake until the upgrade has finished.
- Restart after a failed upgrade before you try again.
- Download ISO files and the Installation Assistant only from Microsoft, and download them again for each new version.
- Do not turn the PC off or cancel Setup in the middle of an upgrade.
- Do not run Setup from an old ISO kept from an earlier attempt.
- Do not delete files in
C:\$WINDOWS.~BTby hand while Setup is running. - Do not stay on Windows 10: it no longer gets free security fixes.
Frequently asked questions
What does error 0xc1900131 mean?
It means Windows Setup stopped an upgrade because the prepared install does not match what it recorded. Microsoft's setup error table names it MOSETUP_E_INSTALL_HASH_MISMATCH: "The install cannot continue because the instance hash does not match." Microsoft does not explain the instance hash further. In practice, leftovers of an earlier attempt or a damaged download are behind it. Your files are not changed. Start with Fix 1.
What does Install error - 0xc1900131 in Windows Update mean?
It is the same error, shown in Settings > Windows Update next to the feature update. "Install error" tells you the download finished and the failure came when Windows tried to install it. Pressing Retry usually reuses the same prepared files, so the code comes back. Restart, delete the temporary Windows installation files with Disk Cleanup (Fix 1), reset the update cache (Fix 2), then check for updates again.
Is 0x1900131 the same error?
Yes. 0x1900131 is 0xc1900131 with the letter c dropped, usually a typing slip. Windows always shows the full code, 0xc1900131 or 0xC1900131, and the case of the letters does not matter. Every fix on this page applies. If you see a different code, such as 0xc1900101 or 0xc1900130, look it up by its exact digits, because each code in this group has its own meaning.
What is the difference between 0xc1900131 and 0xc1900130?
Both come from the same part of Windows Setup. 0xc1900130, MOSETUP_E_INSTALL_HASH_MISSING, says the instance hash was not found. 0xc1900131 says it was found but does not match. Either way Setup cannot confirm that the prepared install is the one it expects. The fixes are the same: remove the old upgrade files, download again and, if needed, install from a fresh ISO.
Does 0xc1900131 mean my PC cannot run Windows 11?
No. Compatibility problems have their own codes in Microsoft's table, such as 0xC1900200, "The system does not pass the minimum requirements to install the update." 0xc1900131 is about the install files, not the hardware. If Windows Update offered you the version, it considers the PC eligible. Clean up and download again. If the error keeps returning on one PC, check the drive and memory as described above.
Will deleting the temporary Windows installation files remove my files?
No. Temporary Windows installation files, Windows upgrade log files and Windows Update Cleanup hold only setup and update data. Your documents, photos, apps and settings are not in them. The one thing you lose is the setup logs, so copy the Panther folder first if you want them. Windows creates new setup files when the upgrade starts again.
Should I scan for malware because of 0xc1900131?
It is not a typical sign of malware, and no source we read ties this code to an infection. A mismatch after an interrupted or damaged download is far more likely. A full scan with Microsoft Defender does no harm if the PC also shows other strange behaviour: How to scan for malware with Microsoft Defender. Otherwise start with the fixes on this page.
Can I just keep pressing Retry until it works?
It rarely helps. Each retry starts from the files Setup already prepared, and those are the ones that do not match. One restart is worth it, because it lets Windows finish a pending cleanup from the earlier attempt. After that, remove the old files with Fix 1 and reset the cache with Fix 2. If the error stays, a fresh ISO in Fix 3 avoids the stored files completely.
I have done everything and it still does not work. What now?
This also answers the Spanish search "ya he hecho todo y no funciona". Copy setupact.log and setuperr.log from C:\$WINDOWS.~BT\Sources\Panther, then download the ISO again on another network and run Setup from it. If it still fails, read the first error in setuperr.log, check the drive with chkdsk and test the memory. Send the logs to Microsoft support or your IT department.
This page came up for a search about something else. Is it the right one?
This page is only about Windows Setup error 0xc1900131. It is not about duplicate image finders or other tools, so if you searched for one of those, this guide will not help with it. If you typed a short question such as "how to fix this problem" and see 0xc1900131 on your screen, the short answer at the top and Fix 1 are where to start.
Sources
- Microsoft Learn: Windows 10 upgrade resolution procedures (modern setup error codes, 0XC1900131 MOSETUP_E_INSTALL_HASH_MISMATCH and its neighbours) (learn.microsoft.com)
- Microsoft Support: Troubleshoot problems updating Windows (free space needed for an upgrade) (support.microsoft.com)
- Microsoft Q&A: Windows Upgrade Fails (0x8007001F - 0x3000D), a volunteer's answer on 0XC1900131 and the setup log paths (learn.microsoft.com)
Did this fix work?
One click, no account. It tells the next reader which guides are worth their time.
Questions and experiences: fix Windows update error 0xc1900131
Still broken, or found a fix we did not cover? Ask here: members and our editors answer. Reading is open; writing needs a free account.
…