
How to fix Microsoft GameInput is crashing the PC?

Prefer to fix it yourself? The manual steps follow.
- 9methods
- 10 to 60 minutes
- Intermediate
Applies to Windows 11 and Windows 10 22H2 gaming PCs with the Xbox app, Gaming Services or any game that installs the GameInput redistributable
9 methods in this guide
Hello, I have recently noticed that my PC started crashing with random reboots or even BSODs. It can happen at random times, especially if I'm gaming. So I started to look into it via the Event Viewer and found out that "Microsoft GameInput" (with the message "Windows Installer reconfigured the product. Product Name: Microsoft GameInput") is causing these issues. Any advice on how to deal with this? Thanks in advance.
Microsoft GameInput is a small input component that games install, and the Event Viewer line about it is usually only a note that Windows Installer touched it. The crash itself comes from something else. Read the stop code first (Fix 1), then repair Gaming Services (Fix 2).
The Event Viewer line "Windows Installer reconfigured the product" for Microsoft GameInput reports a finished configuration, not a failure, so it is rarely the crash itself. Find the real stop code in Reliability Monitor (Fix 1). Then run the Gaming Services Repair Tool in the Xbox app (Fix 2), update Windows and the graphics driver (Fix 3) and reinstall GameInput (Fix 5).
| Error | Random reboots or blue screens on a gaming PC, with Microsoft GameInput named in Event Viewer or Reliability Monitor. |
|---|---|
| Where it appears | Event Viewer > Windows Logs > Application, as a Windows Installer note with Product Name: Microsoft GameInput. Sometimes a "Please wait while Windows configures Microsoft GameInput" box when a game starts. |
| Main cause | Not proven to be GameInput. The log line is a reconfiguration note; the crash is more often a driver, Gaming Services, memory or a game problem. |
| Fastest fix | Read the stop code in Reliability Monitor (Fix 1), then Xbox app > profile picture > Support > Gaming Services Repair Tool (Fix 2). |
| Also written as | Microsoft Game Input, GameInput Redist, GameInputRedist.msi, "successful application reconfiguration" for Microsoft GameInput. |
| Affects | Windows 11 and Windows 10. Microsoft says GameInput supports Windows 10 19H1 (May 2019) and later. |
| Vendor status | Microsoft documents GameInput for game developers only. We found no Microsoft page that lists crashes or a fix for the Event Viewer entry (checked 16 October 2026). |
| Time to fix | 10 minutes for Fixes 1 to 3, up to an hour with a game reinstall or a memory test. |
Facts checked on 16 October 2026. Steps written for Windows 11 (25H2 and 26H2) and Windows 10 22H2.
What the Microsoft GameInput message in Event Viewer means
GameInput is Microsoft's input API for keyboards, mice, gamepads and other controllers. Microsoft says it replaces the older XInput, DirectInput and Raw Input styles in one interface, and that modern Windows supports it out of the box. Games that use it ship the GameInput redistributable, a file named GameInputRedist.msi, in their own installer.
When that package is installed, updated or repaired, Windows Installer writes an Information entry to the Application log. This is the text users copy into Google:
Event Viewer > Windows Logs > Application
Windows Installer reconfigured the product.
Product Name: Microsoft GameInput.
Product Version: 3.5.270.0.
Product Language: 1033.
Manufacturer: Microsoft Corporation.
Reconfiguration success or error status: 0.- What it says
- Windows Installer finished reconfiguring the package. The line ends with a status, and 0 is the Windows Installer value for success.
- Product Version
- The installed GameInput build. Reports show 10.1.22621.1011, 3.3.221.0 and 3.5.270.0, and the number rises with each update.
- Product Language: 1033
- English (United States). It is not an error code.
- Manufacturer
- Microsoft Corporation. A genuine entry names Microsoft here.
The line appears because GameInput was configured shortly before the crash, for example when a game launched and the package repaired itself. Users who removed GameInput report that the crashes continued, which fits a cause somewhere else. Treat the entry as a hint about timing and read the real stop code first.
The "Please wait while Windows configures Microsoft GameInput" box is the standard Windows Installer progress window. It shows when a package is being repaired or configured, and users report seeing it each time a game starts. A box that returns at every launch means the repair does not stick, which Fix 2 and Fix 5 address.
Why a PC crashes with Microsoft GameInput in the log: the causes, ranked
Microsoft publishes no crash statistics for GameInput. The order below is our reading of user reports and of how GameInput gets onto a PC, so treat it as a guide to what to try first, not as measured data.
| Cause | How often | How to tell | Fix |
|---|---|---|---|
| A graphics, chipset or controller driver or Windows build with a gaming bug. | Often | The stop code names a driver file, or updates and optional drivers are waiting. | Fix 1, then Fix 3 |
| Gaming Services is damaged or half updated, so GameInput keeps being reconfigured. | Often when the entry repeats | The configuring box shows at every game start, or the Xbox app opens with missing content. | Fix 2, then Fix 4 |
| The GameInput package or the game install is damaged. | Sometimes | Only one game crashes, or the entry shows right before that game starts. | Fix 5 |
| Damaged Windows system files. | Sometimes | Other Windows features misbehave, or the crash has no pattern. | Fix 6 |
| Failing memory, an overheating part or a weak power supply. | Less often, but common with random reboots | Crashes also happen outside games, with different stop codes each time. | Fix 7 |
| A damaged Windows installation. | Rarely | Nothing above helps and the problem began after an upgrade. | Fix 8 or Fix 9 |
How to fix Microsoft GameInput crashes on Windows 11 and Windows 10
Fix 1 shows what really crashed the PC and decides which of the others matter. Fixes 2 to 5 repair the parts GameInput depends on and take about 30 minutes in all. Fixes 6 and 7 test Windows and the hardware. Fixes 8 and 9 are last resorts.
| What you see or have | Start with |
|---|---|
| Random reboots or blue screens and you do not yet know the stop code. | Fix 1 |
| The Xbox app opens with missing content, or the configuring box shows at every game start. | Fix 2, then Fix 4 |
| The stop code names a driver such as a graphics or network driver file. | Fix 3 |
| Only one game crashes and the GameInput entry shows just before it starts. | Fix 5 |
| The PC also crashes in a browser, Teams or on the desktop with different codes. | Fix 6, then Fix 7 |
| Nothing helped and you have backed up your files. | Fix 8 or Fix 9 |
Fix 1. Find the real crash cause in Reliability Monitor and Event Viewer
5 minutesLow riskAlways first. It tells you whether GameInput matters at all.
The GameInput line says Windows Installer finished a configuration. The line that names the crash is a different entry, and the stop code in it points to the right fix.
- Press Win, type
reliability historyand open View reliability history. - Find the red X at the time of the last crash and select that day.
- In the list below, open Technical details for the entry marked Windows was not properly shut down or Hardware error.
- Write down the Bug Check name or the stop code, and any
.sysfile it names. - Open Event Viewer (
eventvwr.msc) and go to Windows Logs > System. Look for Kernel-Power (Event 41) and BugCheck entries at the same time.
| What you find | What it points to | Go to |
|---|---|---|
A .sys file of your graphics card, network or audio device. | That device driver. | Fix 3 |
| Names such as MEMORY_MANAGEMENT or a different code every time. | Memory or hardware. | Fix 7 |
| Only Kernel-Power 41 with Bug Check 0 and no blue screen. | Power loss, overheating or a hard reset. | Fix 7 |
| A game or Xbox process that closes, with no reboot. | Game or Gaming Services. | Fix 2, Fix 5 |
It worked if: You have a stop code or a file name and know which fix to start with.
If not: If Reliability Monitor shows no blue screens and no reboots, only closed apps, go to Fix 2.
Fix 2. Run the Gaming Services Repair Tool from the Xbox app
5 to 10 minutesLow riskThe Xbox app opens with missing content, the configuring box shows at every game start, or you play Xbox app and Game Pass games.
Xbox Support offers this tool for problems installing or updating Gaming Services and for an Xbox app that launches with missing content. Users link both to the GameInput entry, so it is the cheapest repair that targets the right component.
- Open the Xbox app and select your profile picture at the top.
- Select Support.
- Select Gaming Services Repair Tool, then Start Troubleshooting.
- Let it finish and follow what it reports. It may reinstall Gaming Services by itself.
- Restart the PC and play the game that crashed.
Xbox Support says that on Windows 22H2 or older you may need to be signed in as the local administrator to run it, and that the answer is to update Windows (Fix 3). A downloadable version of the tool also exists on the same Xbox Support page.
It worked if: The tool reports that Gaming Services is repaired, and the configuring box no longer shows at game start.
If not: If the crashes or the box return, go to Fix 4.
Fix 3. Install Windows updates and the optional driver updates
15 to 30 minutesLow riskThe stop code names a driver, or Windows has updates waiting.
A driver or Windows bug that only shows while gaming is the most common reason for random reboots. Updating also replaces the inbox GameInput parts that ship with Windows.
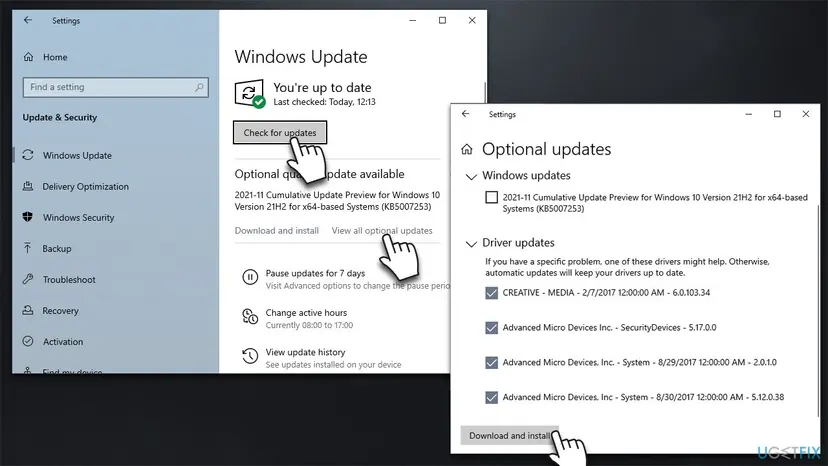
- Open Settings > Windows Update and select Check for updates. Install everything and restart.
- Select Advanced options > Optional updates (on Windows 10, View optional updates).
- Open Driver updates, tick the graphics and chipset drivers and select Download & install.
- Restart the PC and test the game.
For one driver that the stop code named, update or roll it back by hand.
- Open Device Manager. Right-click Start and select Device Manager.
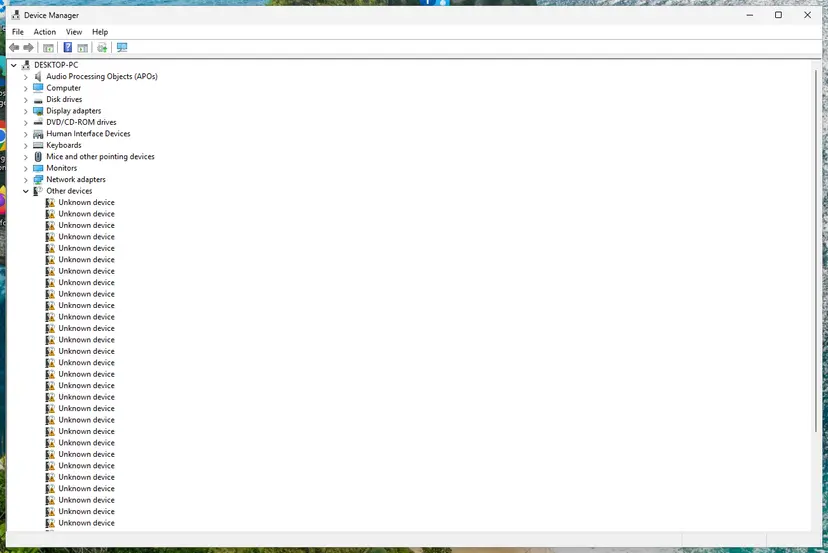
Device Manager lists devices by category; a yellow warning sign marks a device with a problem. Screenshot: Windows 11 26H2. - Open the device's Driver tab. Expand the category (for example Display adapters), right-click the device, select Properties and open the Driver tab. Driver Date and Driver Version show what is installed now.
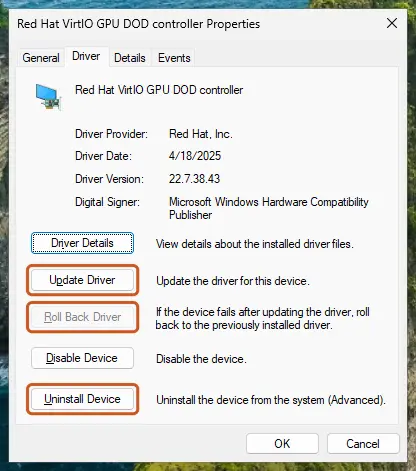
The Driver tab holds all three actions: update, roll back, uninstall. Screenshot: Windows 11 26H2. - Update the driver. Select Update Driver and let Windows search automatically. To use a driver you downloaded from the device maker, select Browse my computer for drivers instead and point to the unpacked folder.
- Or roll back the driver. If the problem started after a driver update, select Roll Back Driver, choose a reason and select Yes. The button is greyed out when Windows has no earlier driver to return to.
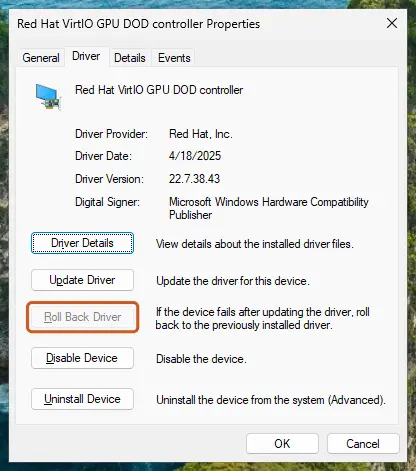
Roll Back Driver is greyed out here because there is no earlier driver. Screenshot: Windows 11 26H2. - Or reinstall the driver. Select Uninstall Device. Tick Attempt to remove the driver for this device only if you want Windows to delete the driver package too, then select Uninstall.
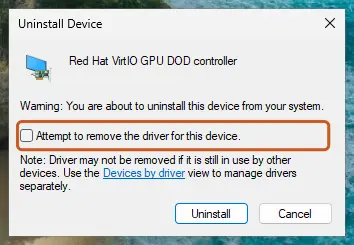
Tick the checkbox only to delete the driver package as well. Screenshot: Windows 11 26H2. - Restart. Restart the PC. Windows detects the device again and installs a driver for it.
- Check optional driver updates. Open Settings > Windows Update > Advanced options > Optional updates. If driver updates are listed, tick the ones you need and select Download & install.
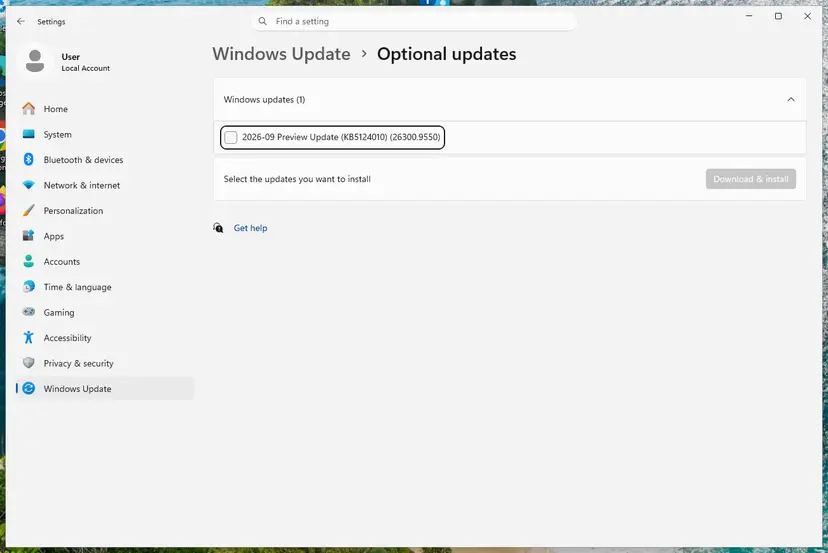
Optional updates on our test PC; driver updates appear here when Windows Update has any for your hardware. Screenshot: Windows 11 26H2.
These steps were written for Windows 11 24H2 and later. The full page with the other versions and what each result means: Update, roll back or reinstall a driver
It worked if: Windows Update shows that you are up to date and the game runs without a reboot.
If not: If the update fails or loops, run Run the Windows Update troubleshooter. If the stop code is unchanged, go to Fix 4.
Fix 4. Remove Gaming Services with PowerShell and install it again
10 minutesLow riskThe repair tool did not help, or the Xbox app and Store cannot update Gaming Services.
Many users link the GameInput entry to Gaming Services updates, and a half-updated package keeps being reconfigured. A fresh copy from Microsoft Store replaces it. Your installed games stay.
- Close the Xbox app and Microsoft Store.
- Right-click Start and select Terminal (Admin). On Windows 10 select Windows PowerShell (Admin). Select Yes.
- Paste the first command and press Enter. It removes Gaming Services for all users.
- Paste the second command and press Enter. Microsoft Store opens on the Gaming Services page.
- Select Get or Install and wait for it to finish.
- Restart the PC, open the Xbox app once and start your game.
Terminal (Admin): remove Gaming Services
Get-AppxPackage -AllUsers Microsoft.GamingServices | Remove-AppxPackage -AllUsersTerminal (Admin): open Gaming Services in Microsoft Store
start ms-windows-store://pdp/?productid=9MWPM2CQNLHN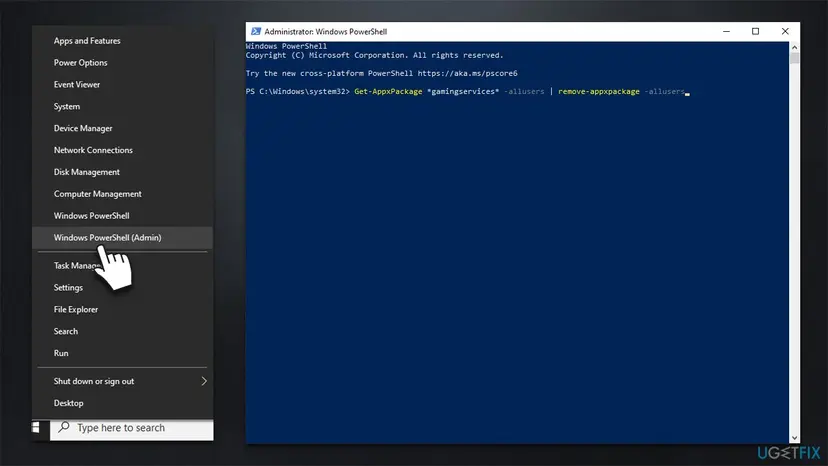
It worked if: Gaming Services shows as installed in Microsoft Store and the Xbox app opens without missing content.
If not: If the Store will not install it, reset Microsoft Store with Reset the Microsoft Store. Otherwise go to Fix 5.
Fix 5. Uninstall Microsoft GameInput and let the game install it again
10 to 20 minutesLow riskOnly one game crashes, or the GameInput entry and the configuring box appear right before it starts.
Microsoft says PC games must include the GameInput redistributable in their installers, so a repair of the game puts a good copy back. The redistributable also refuses to install an older version over a newer one, so reinstalling cannot downgrade you.
- Close the game and its launcher.
- Open Settings > Apps > Installed apps. On Windows 10 open Apps & features.
- Find Microsoft GameInput, select the three dots (Windows 10: select the entry) and choose Uninstall.
- Restart the PC.
- Verify or repair the game files in its launcher, using How to verify game files in Steam, Epic Games, Xbox app, EA app, Battle.net and GOG Galaxy. The game installer then adds GameInput back.
Microsoft lists a Windows Package Manager command for installing the same redistributable on a development PC. Run winget install Microsoft.GameInput in an elevated terminal. We found it documented for developers only, so use it as an option, not as the first choice.
If you see no Microsoft GameInput entry in Installed apps, it is already part of Windows on your PC and there is nothing to remove. Skip to the next fix.
It worked if: The game starts without the configuring box and the crash does not return in a long session.
If not: If it still crashes, go to Fix 6.
Fix 6. Repair Windows system files with SFC and DISM
15 to 30 minutesLow riskThe crashes have no pattern, or other Windows features misbehave.
Corrupted system files can cause crashes and give GameInput a broken base to run on. These scans find and replace them from the Windows component store.
- Open an elevated command window. Right-click Start and select Terminal (Admin), or type cmd in the search box, right-click Command Prompt and select Run as administrator. Select Yes when Windows asks for permission.
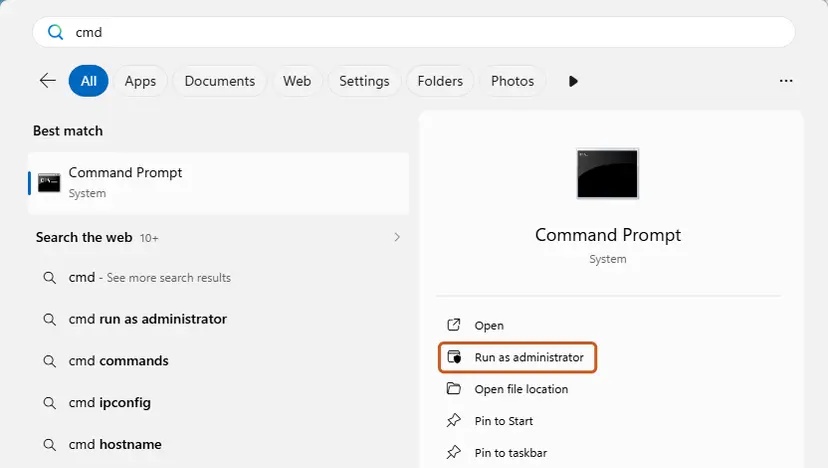
Search for cmd and choose Run as administrator. Screenshot: Windows 11 26H2. - Run DISM first. Type the command below and press Enter. DISM downloads clean copies of damaged components from Windows Update, so it can take several minutes. Wait until it says The operation completed successfully.
DISM.exe /Online /Cleanup-Image /RestoreHealth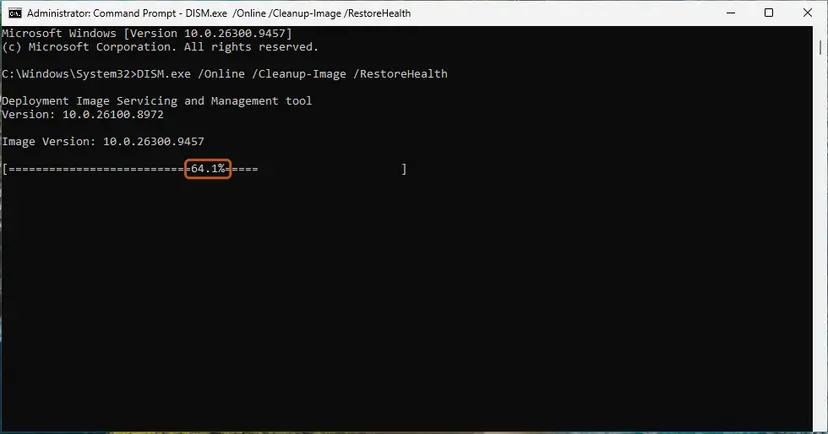
DISM /RestoreHealth running. Screenshot: Windows 11 26H2. - Run System File Checker. In the same window, type the command below and press Enter. Do not close the window until the verification reaches 100%.
sfc /scannow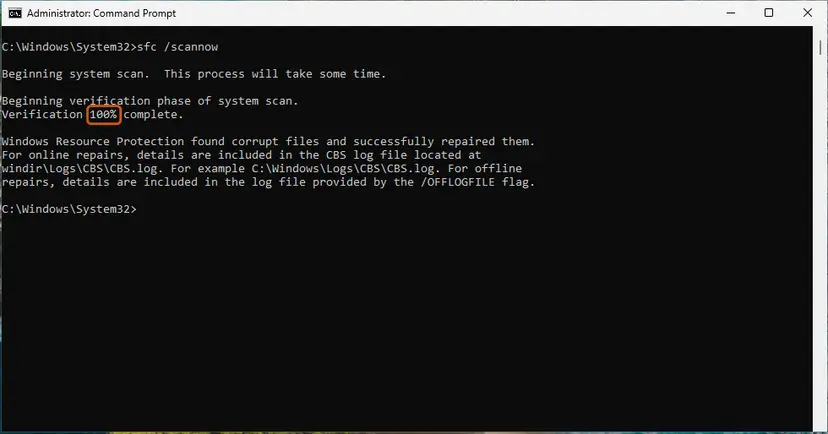
sfc /scannow at 100%. Screenshot: Windows 11 26H2. - Read the result and restart. Compare the last message with the table below this guide, then restart the PC so that repaired files are loaded.
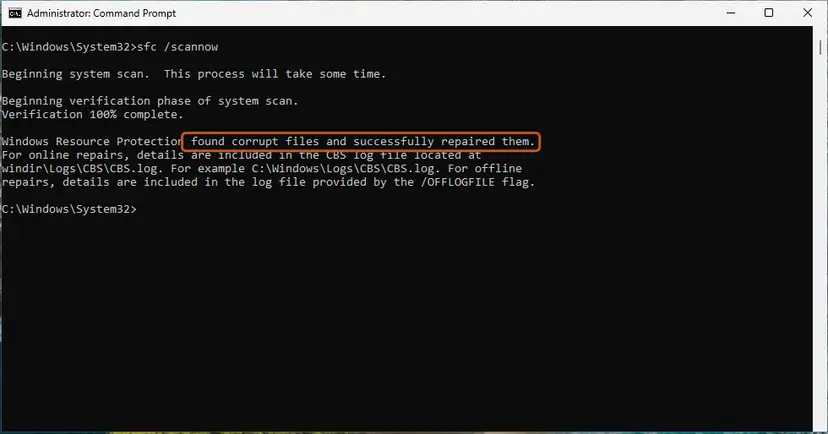
The result line tells you what SFC did. Screenshot: Windows 11 26H2.
These steps were written for Windows 11 24H2 and 25H2. The full page with the other versions and what each result means: Run DISM and SFC to repair Windows system files
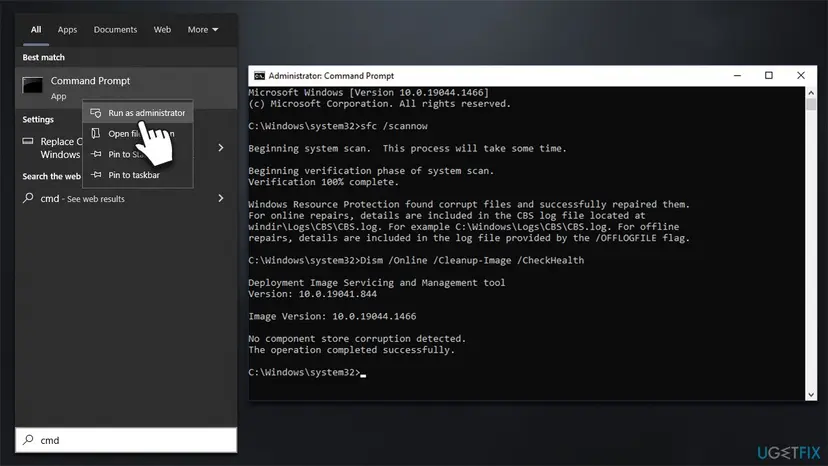
It worked if: SFC says it found no integrity violations, or that it repaired what it found.
If not: If DISM cannot repair the image, go to Fix 7 and keep Fix 9 in mind.
Fix 7. Test the memory and the system drive
30 to 60 minutesLow riskThe crashes also happen outside games, with different stop codes, or the PC restarts without a blue screen.
Random reboots and changing stop codes point to hardware as often as to software. Faulty memory is the classic cause, and Windows has a built-in test.
- Open Windows Memory Diagnostic. Press Windows + R, type mdsched.exe and select OK. You can also search for Windows Memory Diagnostic and open it from the results.
- Choose when to test. Select Restart now and check for problems (recommended) to test right away. Select Check for problems the next time I start my computer if you want to finish your work first: the test then runs at the next start.
- Let the test run. The PC restarts into a blue screen that shows the progress of the test. You do not have to do anything. When the test ends, the PC restarts by itself and Windows loads.
- Look for the notification. Sign in. After a short while Windows shows a notification with the result, also when no errors were found. If you missed it, read the result in Event Viewer.
- Open the System log. Press Windows + R, type eventvwr and select OK. In Event Viewer, expand Windows Logs and select System.
- Find the result. Right-click System and select Find. Type MemoryDiagnostics-Results and press Enter. Select the event that is found: its text says whether the test detected errors.
These steps were written for Windows 11 25H2 and 26H2, Windows 10 22H2. The full page with the other versions and what each result means: How to test your RAM with Windows Memory Diagnostic
- Open Command Prompt as administrator. Type cmd in the search box on the taskbar, right-click Command Prompt and select Run as administrator. Select Yes when Windows asks for permission.
- Scan the drive without changing anything. Type the command below and press Enter. Replace C: with another drive letter to check that drive. This scan only reports; it does not fix anything.
chkdsk C: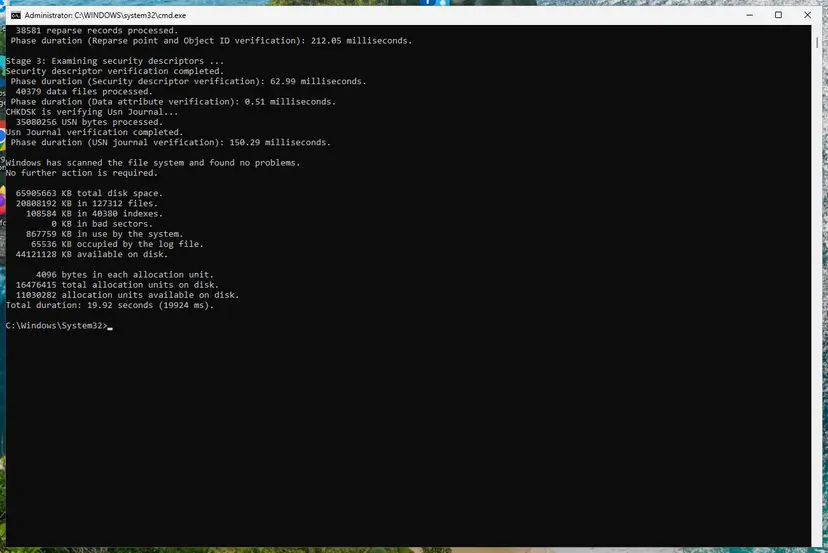
A clean result: no problems found and 0 KB in bad sectors. Screenshot: Windows 11 26H2. - If errors were found, run the repair. Run chkdsk with /f to fix file system errors. On the Windows drive (C:) chkdsk cannot lock the drive while Windows is running, so it offers to check it at the next restart.
chkdsk C: /f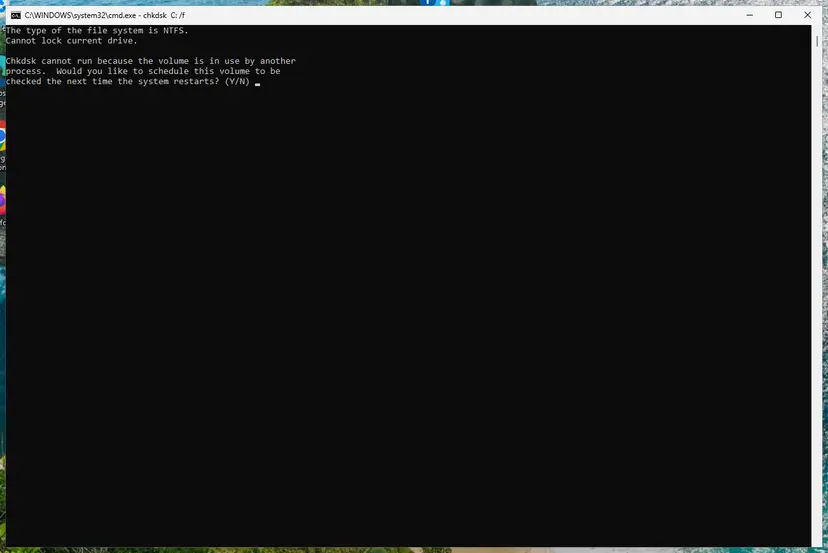
On the system drive chkdsk /f asks to run at the next restart. Screenshot: Windows 11 26H2. - Schedule the check and restart. Type Y and press Enter, then restart the PC. chkdsk runs before Windows starts. Do not turn the PC off while it runs.
- Read the result after the restart. The report of a check made at startup is not shown on the desktop. Open PowerShell and run the command below to see it, or open Event Viewer (eventvwr.msc) > Windows Logs > Application and filter by the sources Chkdsk and Wininit.
Get-WinEvent -FilterHashtable @{LogName='Application'} | Where-Object { $_.ProviderName -match 'wininit' } | Select-Object -First 1 | Format-List TimeCreated, Message
These steps were written for Windows 11 and Windows 10 (the steps are the same). The full page with the other versions and what each result means: Check a disk for errors (chkdsk)
Also check the temperatures of the graphics card and processor while gaming, and make sure the power supply is rated for your graphics card. We could not find a Microsoft figure for this, so use the card maker's recommendation.
It worked if: The memory test and chkdsk report no problems, or they name a fault you can act on.
If not: If memory errors appear, replace the memory module. If the tests are clean, go to Fix 8.
Fix 8. Rename the Gaming Services folders in WindowsApps
15 minutesRead the warningFixes 2 to 5 did not stop the crashes and the Gaming Services folders are involved.
Some users report that renaming the Microsoft.GamingServices folders in WindowsApps stopped the crashes. Microsoft does not document this, so use it only after the fixes above.
Taking ownership of WindowsApps changes who controls the folder where all Store apps live. Before you start, write down the owner shown in Advanced Security Settings. Create a restore point or back up your files first. Skip this fix if you are unsure.
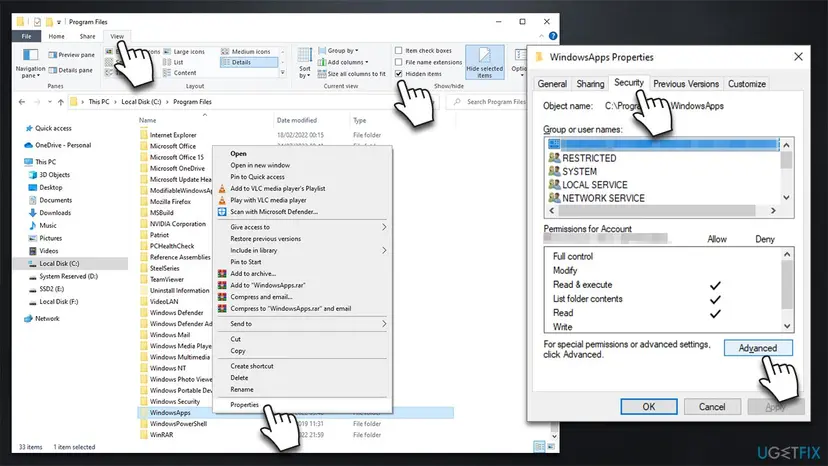
- Open File Explorer (Win + E), select View > Show > Hidden items (Windows 10: the View tab and the Hidden items box).
- Go to
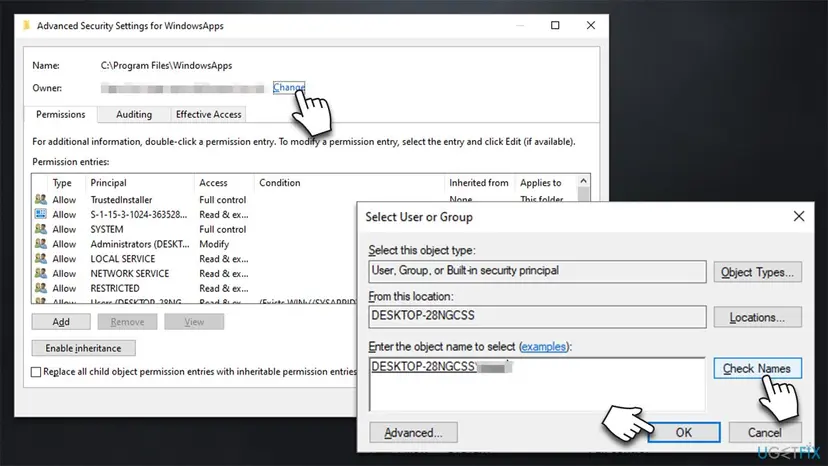
C:\Program Files\WindowsApps. If access is denied, right-click WindowsApps and select Properties. - Open the Security tab and select Advanced, then select Change next to Owner.
- Type your user name, select Check Names, then OK.
- Tick Replace owner on subcontainers and objects, select Apply and OK.
- Find every folder named
Microsoft.GamingServices.followed by a version and_x64__. Rename each one by adding a word at the end. - Restart the PC and test the game.
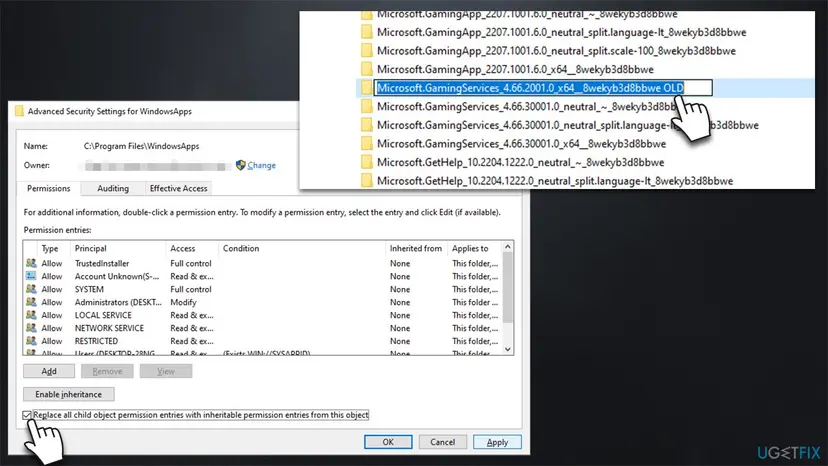
Users note that Windows restores the original folder names after an update, so the change lasts only until then.
It worked if: The game runs without crashes until the next Windows or Gaming Services update.
If not: If the crashes remain, go to Fix 9.
Fix 9. Reset Windows and keep your files
1 to 2 hoursRead the warningEverything above failed, the stop codes keep changing and the hardware tests were clean.
A reset reinstalls Windows and every Windows component, including the parts GameInput uses. It removes the damage that SFC and DISM cannot repair.
A reset can keep personal files, but it removes installed apps and games and resets settings. Back up your files and note the games you want to reinstall first. Disconnect optional devices such as printers and external drives.
- Open Recovery in Settings. Open Settings > System > Recovery. Next to Fix problems using Windows Update, select Reinstall now. This keeps your apps, files and settings.
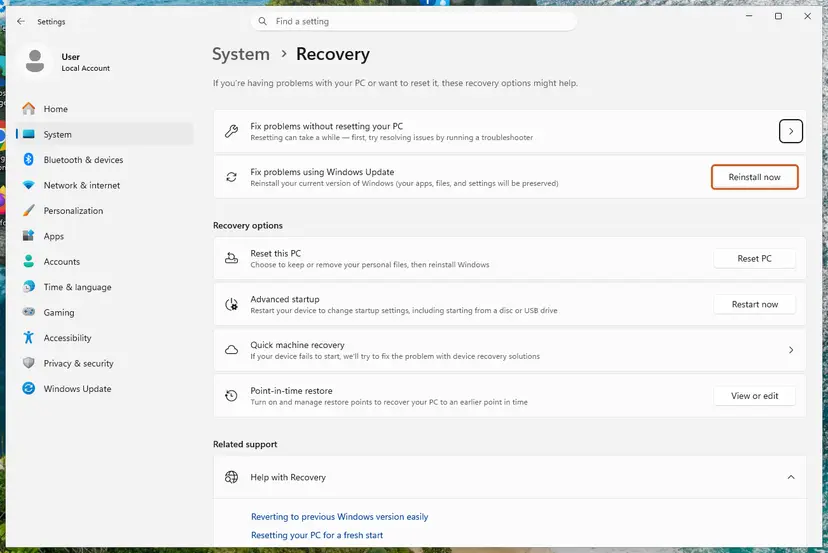
Fix problems using Windows Update reinstalls the current version and keeps apps, files and settings. Screenshot: Windows 11 26H2. - Start the reinstall. Choose whether the PC may restart on its own 15 minutes after the installation, then select OK.
- Wait and restart. Windows Update downloads and installs a repair copy of your current Windows version. Keep the PC plugged in and online, and restart it when asked.
- If that did not help: Reset PC. Back in Settings > System > Recovery, next to Reset this PC, select Reset PC. This keeps your personal files but removes installed apps and settings.
- Choose Keep my files. Select Keep my files. Do not select Remove everything.
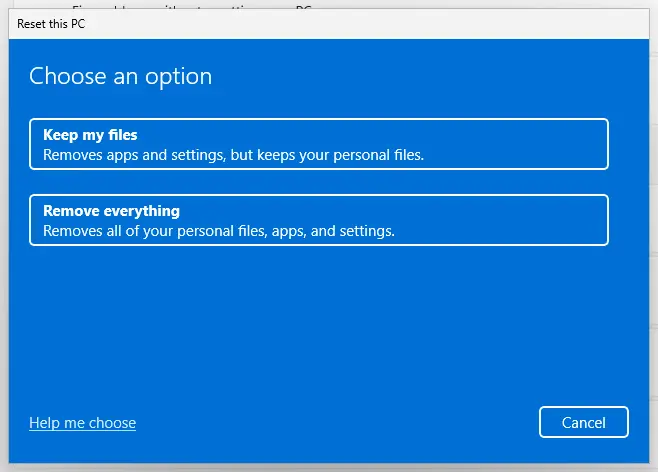
Keep my files removes apps and settings but keeps personal files. Screenshot: Windows 11 26H2. - Choose where Windows comes from. Select Cloud download to download a fresh copy of Windows, or Local reinstall to use the files already on the PC (faster, but may not include the latest updates).
- Reset. Review the summary and select Reset. The PC restarts several times.
These steps were written for Windows 11 22H2 and later. The full page with the other versions and what each result means: Reinstall Windows without losing files
It worked if: Windows starts fresh. Install the graphics driver and the games one at a time and play between each to see what brings the crashes back.
If not: If crashes return on a clean Windows, the cause is hardware. Use the list in the next section.
If the PC still crashes after these fixes
If the crashes continue, collect the evidence before you contact anyone. The blue screen leaves a record, and it is far more useful to support than the GameInput line.
- Note the stop code and the
.sysfile name from Reliability Monitor (Fix 1). - Check whether a dump file exists in
C:\Windows\Minidump. If it does, keep a copy. - Open Settings > System > About and note the Windows version and build.
- Note the crash time, the game and whether the GPU was under load.
- What to send to support: the stop code, the file name, your Windows build, the GameInput version from the Event Viewer line, and the fixes you tried.
- When it is hardware: the stop code changes at every crash, the PC restarts with no blue screen, the memory test reports errors or temperatures are high.
- When it is the game: only one title crashes and a clean Windows with that title still crashes. Report it to the game's publisher.
How to keep GameInput crashes from coming back
- Keep Windows, the Xbox app and Gaming Services updated through Windows Update and Microsoft Store > Library.
- Update the graphics driver from the card maker, and do not mix driver tools.
- Do not remove Gaming Services or GameInput with tuning or debloat tools.
- Do not let the PC sleep or shut down while a game is installing or updating.
- Check temperatures if you overclock, and return to default settings when testing a crash.
Windows 10 left support on 14 October 2025. The Xbox app and GameInput still run on Windows 10 22H2, but a PC that gets no security updates falls behind what new drivers and games expect.
Frequently asked questions
Is Microsoft GameInput crashing my PC?
Probably not by itself. The Event Viewer entry says Windows Installer reconfigured the product and ends with a status of 0, which means success. It shows that GameInput was configured shortly before the crash, not that it caused it. Users who removed GameInput report that the crashes continued. Read the stop code in Reliability Monitor (Fix 1). A graphics or chipset driver, Gaming Services, memory or heat is a more likely cause. Fix 2 and Fix 5 repair GameInput's side anyway.
What does "Windows Installer reconfigured the product. Product Name: Microsoft GameInput" mean?
It means Windows Installer finished configuring the Microsoft GameInput package. The message lists the product version, language 1033 (English, United States), the manufacturer Microsoft Corporation, and a status. A status of 0 is the Windows Installer value for success. The entry appears when a game or Gaming Services installs, updates or repairs GameInput. It is an Information entry, not an error. The version in it changes with each GameInput update, for example 3.3.221.0 or 3.5.270.0.
What is Microsoft GameInput and is it a virus?
Microsoft GameInput is a genuine Microsoft input API, not a virus. Microsoft describes it as one interface for keyboards, mice, gamepads and other controllers, supported on Windows 10 19H1 (May 2019) and later. Games ship it as GameInputRedist.msi in their installers. A real entry lists Microsoft Corporation as the manufacturer. If you doubt a file, scan it with How to scan for malware with Microsoft Defender, or open Installed apps and check that the publisher is Microsoft.
Why does Windows say "Please wait while Windows configures Microsoft GameInput"?
It is the Windows Installer progress box, and it shows while the GameInput package is configured or repaired. Users report seeing it each time a game starts and say GameInput keeps reinstalling itself. That means the repair does not stick. Run the Gaming Services Repair Tool (Fix 2), reinstall Gaming Services (Fix 4) and reinstall GameInput through a game file check (Fix 5). Let the box finish the first time and do not close it.
What is GameInput in Task Manager, and what is the GameInput Redist service?
We could not confirm either name in the Microsoft pages we read. Microsoft documents GameInput as an API and the GameInputRedist.msi installer, and does not describe a service or a Task Manager process by name. An entry with GameInput in its name most likely belongs to that runtime. To check, right-click it in Task Manager, choose Open file location and look at the file's Properties > Details for Microsoft Corporation as the publisher.
Should I uninstall Microsoft GameInput?
You can, but it is not a fix on its own. Users report that removing it did not stop the crashes. A game that needs GameInput installs it again when you verify or repair the game, and the redistributable will not install an older version over a newer one. Uninstall it only as part of Fix 5, then repair the game. If Installed apps shows no Microsoft GameInput entry, it is built into your Windows and needs no action.
Does this affect Windows 10 as well as Windows 11?
Yes. Microsoft says GameInput supports Windows 10 version 19H1 (May 2019) and later, so both systems can show the entry. The fixes here are written for Windows 11 and Windows 10 22H2, with the menu differences noted. Windows 10 left support on 14 October 2025, so it gets no new security fixes, and Fix 3 matters more there. Move to Windows 11 if your PC meets the requirements.
Is it safe to rename the Gaming Services folders in WindowsApps?
It is possible but not risk-free, which is why it is Fix 8, near the end. Microsoft does not document this step. It needs you to take ownership of WindowsApps, which changes permissions on the folder that holds your Store apps. Note the original owner first and back up your files. Users report that Windows restores the folder names after an update, so it is a temporary workaround.
Do I need to reinstall Windows because of GameInput?
Almost never. The GameInput entry does not show that Windows is damaged. Work through Fixes 1 to 7 first, because the real cause is usually a driver, Gaming Services or hardware. A reset (Fix 9) is the last step when the stop codes keep changing and the memory and drive tests are clean. Back up your files first. Even then, if crashes return on a clean install, replace the hardware you suspect.
Sources
- Microsoft Learn: GameInput introduction (Microsoft Game Development Kit) (learn.microsoft.com)
- Microsoft Learn: GameInput for PC and console with NuGet (learn.microsoft.com)
- Xbox Support: Gaming Services Repair Tool for PC (support.xbox.com)
Did this fix work?
One click, no account. It tells the next reader which guides are worth their time.
Questions and experiences: fix Microsoft GameInput is crashing the PC
Still broken, or found a fix we did not cover? Ask here: members and our editors answer. Reading is open; writing needs a free account.
…