
How to fix error 0x80240004 in Microsoft Store and Windows Update

Prefer to fix it yourself? The manual steps follow.
- 8methods
- 5 to 90 minutes
- Easy
Applies to Microsoft Store downloads and app updates, Settings > Windows Update
8 methods in this guide
I keep getting errors when I try to download any app from the Microsoft Store. This is becoming a real issue, because updates for the installed apps are not working either. The error code I always get is 0x80240004.
Error 0x80240004 comes from the Windows Update client, which Microsoft lists as WU_E_NOT_INITIALIZED: an object the client needs could not be initialized. Microsoft Store shows it when no app will download or update, and Windows Update shows it after an update fails. Reset the update components first, then clear and repair the Store.
0x80240004 means the Windows Update client, which Microsoft Store also uses for downloads, could not start one of its own parts. Most often its cache or services are in a bad state. Reset the Windows Update components first (Fix 1), restart and try again. If only the Store still fails, clear its cache and repair it (Fix 2). Your apps and files stay.
| Error | 0x80240004, Microsoft's name WU_E_NOT_INITIALIZED: "The object couldn't be initialized." |
|---|---|
| Where it appears | In Microsoft Store as Try that again with "The error code is 0x80240004, in case you need it.", and in Settings > Windows Update after an update fails. |
| Main cause | The update client cannot start a part it needs, most often because its cache in C:\Windows\SoftwareDistribution and catroot2 or one of its services is in a bad state. |
| Fastest fix | Reset the Windows Update components (Fix 1), then clear and repair Microsoft Store (Fix 2). |
| Also written as | 80240004, (0x80240004), error 0x80240004, download error - 0x80240004, 0x80240004 (-2145124348). The negative number is the same code as a signed decimal. |
| Affects | Windows 11 and Windows 10. Users have reported it since Windows 8, so it is not tied to one Windows version. |
| Microsoft's status | Listed in the Windows Update error code list. No known bug or patch tied to this code. |
| Close relatives | 0x80240003 (WU_E_UNKNOWN_ID), 0x80240005 (WU_E_RANGEOVERLAP), 0x80240008 (WU_E_ITEMNOTFOUND). |
| Time to fix | 5 to 15 minutes for Fix 1 and Fix 2. Up to 90 minutes for a repair install. |
Facts checked on 15 October 2026. Steps written for Windows 11 (25H2 and 26H2) and Windows 10 22H2.
What error 0x80240004 means
Microsoft's Windows Update error code list gives 0x80240004 the name WU_E_NOT_INITIALIZED and the description: "The object couldn't be initialized." The update client is built from several parts: services, a small database of updates and a download cache. When one of them cannot be started or loaded, the client stops before it downloads anything and returns this code.
So if you asked "đây là lỗi gì" (what error is this) or just "explique": it is a start-up failure inside Windows Update, not a broken app and not a hardware fault. Microsoft Store shows it too, because the Store hands its downloads to the same update client.
| What you see | Where | What it tells you |
|---|---|---|
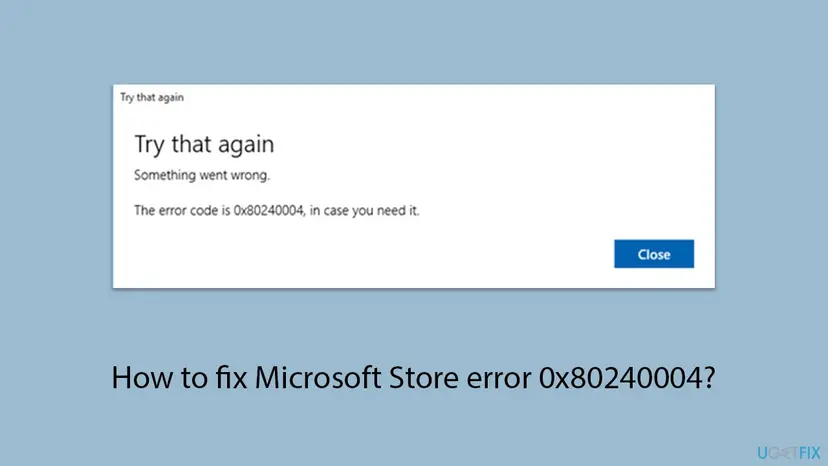
| Try that again. Something went wrong. The error code is 0x80240004, in case you need it. | Microsoft Store, when you select Get, Install or Update | A Store download went through the update client and failed there. Fix 1, then Fix 2. |
| There were some problems installing updates, but we'll try again later. (0x80240004) | Settings > Windows Update | The update client could not start a part it needs while it installed. Fix 1, then Fix 4 and Fix 5. |
| Download error - 0x80240004 | Settings > Windows Update, next to one update | The same failure at the download stage. Fix 1, then Fix 5. |
| 0x80240004 (-2145124348) | Event Viewer, logs and scripts | The same code, with its signed decimal value added. |
The 0x8024 part of the code marks the Windows Update client. That is why the first fix on this page resets Windows Update, even when you only saw the error in Microsoft Store.
Why the update client cannot start: the reason for this error
Microsoft gives the meaning of the code but no list of causes. The causes below follow from that meaning and from the answers given on Microsoft Q&A to readers with this error, ranked by how often they explain what readers see.
| Cause | How often | How to tell | Fix |
|---|---|---|---|
Damaged files in the update cache folders SoftwareDistribution and catroot2. | Most often | Every Store download and update fails, often after an interrupted update. | Fix 1 |
| A damaged Microsoft Store cache or Store app. | Often | Only Store downloads fail. Windows Update works. | Fix 2 |
| A Windows Update, BITS or Cryptographic service that is stopped or disabled. | Sometimes | Downloads never start, and the error comes back at once. | Fix 3, Fix 4 |
| One update or a version upgrade that the client cannot start. | Sometimes | Settings shows the error next to one update, the Store is fine. | Fix 5 |
| A damaged Store app registration. | Rarely | The Store does not open, or closes at once. | Fix 6 |
| Damaged system files or component store. | Rarely | Several updates fail, also with other codes, and other apps misbehave. | Fix 7, Fix 8 |
If you asked "kenapa bisa seperti itu" (why does this happen): most often an update was cut off by a restart or a power loss, and the cache it left behind cannot be loaded the next time.
How to fix error 0x80240004
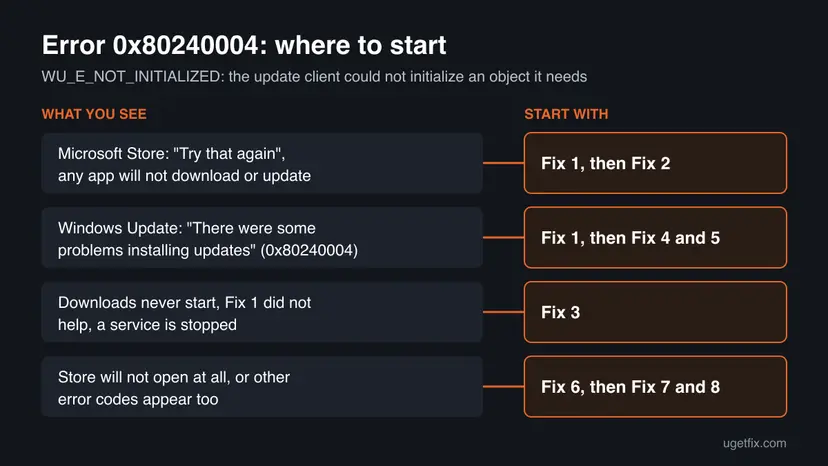
Fix 1 works for both Microsoft Store and Windows Update and is the one to try first. Fix 2 is for the Store only. Fixes 3 to 5 are for update services and Windows Update. Fixes 6 to 8 repair the Store app and Windows itself.
| What you see or have | Start with |
|---|---|
| No Microsoft Store app will download or update, as in the question above. | Fix 1, then Fix 2 |
| Settings > Windows Update says There were some problems installing updates with (0x80240004). | Fix 1, then Fix 4 and Fix 5 |
| Fix 1 did not help and downloads never start. | Fix 3 |
| Microsoft Store does not open at all. | Fix 6 |
| Store and Windows Update both fail, also with other codes. | Fix 7, then Fix 8 |
Fix 1. Reset the Windows Update components and cache
15 minutesLow riskEveryone with 0x80240004, in Microsoft Store or in Settings > Windows Update.
The update client loads its records and downloads from C:\Windows\SoftwareDistribution and its signature data from C:\Windows\System32\catroot2. When files there are damaged, the client cannot initialize and returns 0x80240004. Stopping the services and renaming both folders makes Windows build fresh ones on the next start.
- Open Command Prompt as administrator. Type cmd in the search box, right-click Command Prompt and select Run as administrator. Select Yes when Windows asks for permission.
- Stop the update services. Type the commands below and press Enter after each one. If Windows says that other services depend on Cryptographic Services, it stops them too. A message that a service is not started is fine.
net stop wuauserv net stop bits net stop cryptsvc - Delete the download queue files. This clears the list of downloads that the Background Intelligent Transfer Service keeps. If Windows says it cannot find the files, continue.
del "%ALLUSERSPROFILE%\Application Data\Microsoft\Network\Downloader\qmgr*.dat" - Rename the update cache folders. Renaming keeps a copy in case you need it; Windows creates new, empty folders when the services start again. If you get Access is denied, a service is still running: repeat the previous step.
ren %systemroot%\SoftwareDistribution SoftwareDistribution.old ren %systemroot%\System32\catroot2 catroot2.old - Start the services again. Type the commands below and press Enter after each one. The requested service has already been started is fine: Windows started it on its own.
net start cryptsvc net start bits net start wuauserv - Restart and check for updates. Restart the PC. Then select Start > Settings > Windows Update > Check for updates. The first check can take longer than usual because everything is downloaded again.
These steps were written for Windows 11 and Windows 10 (the steps are the same). The full page with the other versions and what each result means: Reset Windows Update components

Restart the PC, open Settings > Windows Update and select Check for updates. Then open Microsoft Store and try the download again.
It worked if: Check for updates finishes without an error, and the Store app that failed now downloads.
If not: If only Microsoft Store still fails, go to Fix 2. If Windows Update still fails, go to Fix 3.
Fix 2. Clear the Store cache, then repair or reset Microsoft Store
5 minutesLow riskMicrosoft Store still shows Try that again with 0x80240004 after Fix 1, and Windows Update works.
The Store keeps its own cache and settings on top of the update client. If they still point at the state from before Fix 1, the Store repeats the failed start. The wsreset command clears that cache. Repair fixes the Store app and keeps its data, and Reset deletes the Store's data on this PC while your apps and purchases stay.

- Clear the Store cache. Press Windows + R, type wsreset.exe and select OK. A blank Command Prompt window opens; after a short while it closes and Microsoft Store opens by itself.
- Open System components. If the problem stays, select Start > Settings > System > System components. Next to Microsoft Store, select the three dots and Advanced options. If Microsoft Store is not listed there, look for it in Settings > Apps > Installed apps.
- Repair first. Scroll to Reset and select Repair. Repair keeps the app's data. Open the Store and check whether it works.
- Reset if Repair did not help. Select Reset and confirm. This deletes the Store app's data on this PC; your purchases stay in your Microsoft account. Open the Store and sign in again.
These steps were written for Windows 11 26H2 (build 26300). The full page with the other versions and what each result means: Reset the Microsoft Store
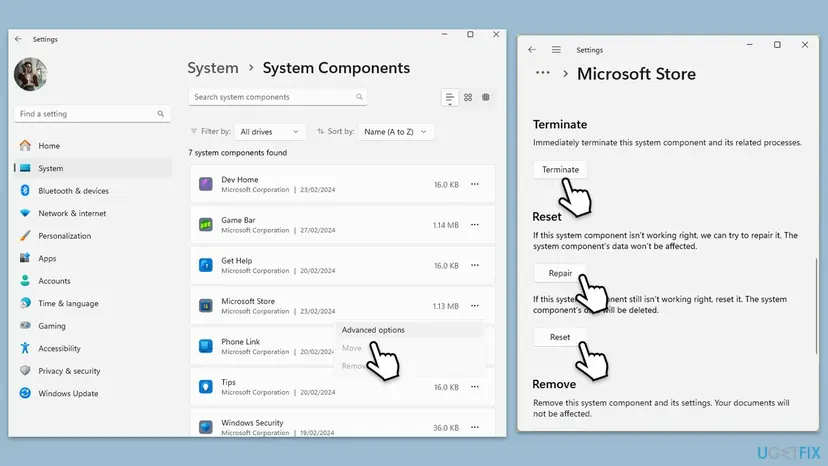
On Windows 10 the same buttons are under Settings > Apps > Apps & features > Microsoft Store > Advanced options. Then open Library in the Store and select Get updates, so the Store updates itself first.
It worked if: The Store opens, and the app downloads or updates without the Try that again dialog.
If not: Sign out of the Store and in again, then try once more. If the error stays, check the services with Fix 3.
Fix 3. Check that the update and Store services can start
5 minutesLow riskDownloads never start, or the error comes back right after Fix 1.
Not initialized often means a service the client needs could not start. A service set to Disabled by a tweaking tool or an old setting stays off after every restart, so the reset in Fix 1 cannot help on its own.
- Press Win + R, type
services.mscand press Enter. - Find Windows Update, Background Intelligent Transfer Service and Cryptographic Services.
- Double-click each one. If Startup type is Disabled, set it to Manual or Automatic, select Apply and then Start.
- Check Storage Service the same way: it manages storage settings, and the old version of this guide named it for Store downloads.
- Restart the PC and try the download again.
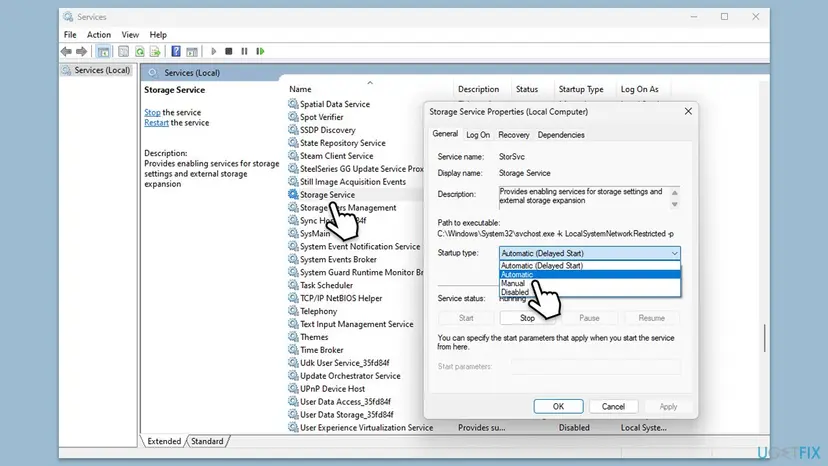
More detail on starting and restarting services: Check and restart Windows services
It worked if: All four services show Running or start when needed, and the download no longer fails at once.
If not: If a service will not start and shows its own error, note it and run the troubleshooter in Fix 4.
Fix 4. Run the Windows Update troubleshooter
5 minutesNo riskSettings > Windows Update still fails after Fixes 1 and 3, or you prefer an automatic check.
It checks the update services, their settings and their permissions in one pass, which can catch a problem the manual steps above do not touch.
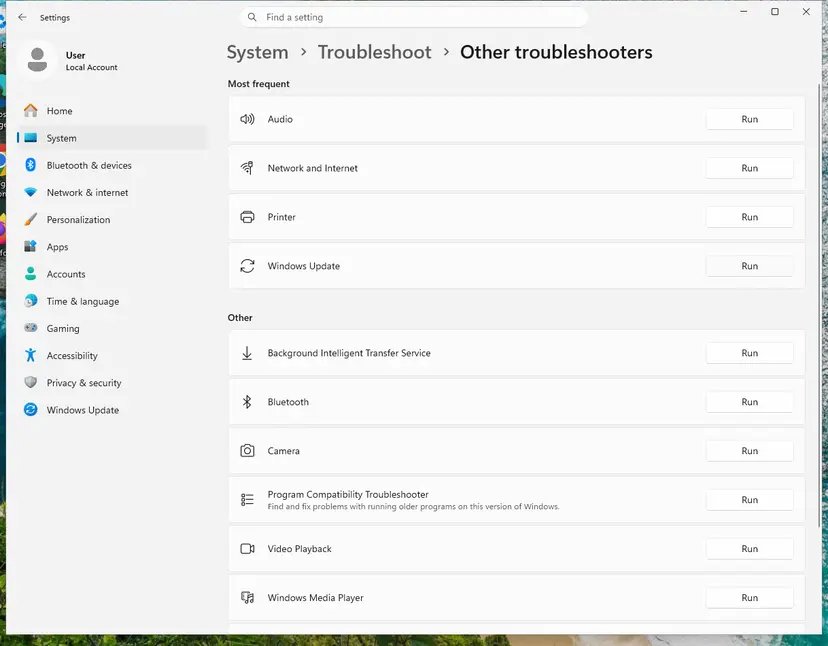
- Open Troubleshoot settings. Select Start > Settings > System > Troubleshoot.
- Open the list of troubleshooters. Select Other troubleshooters.
- Run the Windows Update troubleshooter. Under Most frequent, select Run next to Windows Update. The Get Help app opens and starts the checks.
- Read the result. Wait until Get Help finishes. If it found and fixed a problem, it says so and asks whether this solved the problem. Answer the question so it can offer the next step.
- Restart the PC. Restart when the troubleshooter finishes, even if it does not ask you to.
- Check for updates again. Select Start > Settings > Windows Update > Check for updates, and install the updates it finds.
These steps were written for Windows 11 (screenshots: 26H2). The full page with the other versions and what each result means: Run the Windows Update troubleshooter
It worked if: The troubleshooter reports that it fixed a problem, and the next update check runs without the error.
If not: If it finds nothing and one update keeps failing, install it by hand with Fix 5.
Fix 5. Install the failing update by hand
10 to 60 minutesLow riskWindows Update error 0x80240004 shows next to one update with a KB number, or a version upgrade will not install.
A manual install does not start the update client's download at all. The Windows Update Standalone Installer takes the package straight from the file, so the part that cannot be initialized is skipped.
- In Settings > Windows Update, write down the KB number of the update that fails.
- Press Win + R, type
winverand press Enter. Note the version and OS build. - Download the file for that KB, your version and your processor from the Microsoft Update Catalog, and run it.
- Check your Windows version. Press Windows key + R, type winver and press Enter. Note the version (for example 25H2) and the OS build.
- Find the KB number. Open Settings > Windows Update. A failed or pending update is listed with its KB number; earlier ones are under Update history.
- Check the processor type. Open Settings > System > About and look at System type: an x64-based PC needs the x64 file, an ARM-based PC (for example Snapdragon) needs the arm64 file.
- Search the catalog. Open the Microsoft Update Catalog at catalog.update.microsoft.com in your browser, type the KB number (for example KB5124010) in the search box and press Enter.
- Pick the right row. Find the row whose title names your Windows version and your processor type (x64-based or arm64-based) and select Download on that row.
- Download every file listed. A window lists one or more .msu links. Download all of them into one empty folder, for example C:\packages. On Windows 11 24H2 and later the list can include earlier checkpoint updates that the new one needs.
- Install a single file. If there is only one file, double-click it and confirm the installation in the Windows Update Standalone Installer.
- Install several files with DISM. If there are several files, open an elevated Terminal or Command Prompt and run DISM with the newest file. DISM finds the other files in the same folder and installs them in the right order.
DISM /Online /Add-Package /PackagePath:C:\packages\<newest-file>.msu - Restart. Restart the PC when the installation finishes, then run winver again: the OS build should have changed.
These steps were written for Windows 11 24H2 and later; Windows 10 22H2. The full page with the other versions and what each result means: Install an update from the Microsoft Update Catalog
If the error came while moving to a new Windows version, the answer on Microsoft Q&A for this code suggests updating from Microsoft's software download page instead. On Windows 11 that is the Installation Assistant there.
It worked if: The installer finishes, the PC restarts, and the update shows as installed in Update history.
If not: If the installer fails too, repair the system files with Fix 7.
Fix 6. Re-register the Microsoft Store app
5 minutesLow riskMicrosoft Store does not open, closes at once, or still fails after Fix 2.
The Store app is registered to your user account. If that registration is damaged, the Store may not start its side of the download at all. Re-registering reads the Store's manifest again without downloading anything.
Use the procedure below with *WindowsStore* between the asterisks, so only the Store package is registered again, not every app on the PC.
- Open PowerShell. Select Start, type PowerShell and select Windows PowerShell. Open it the normal way, not as administrator: in an administrator window the app is registered to the administrator account instead of yours.
- Find the app's package. Type the command below with a part of the app's name between the asterisks and press Enter. If the app is installed, PowerShell prints its details, including Name and InstallLocation. If nothing is printed, the app is not installed for your account: see the section below.
Get-AppxPackage -Name '*WindowsCalculator*'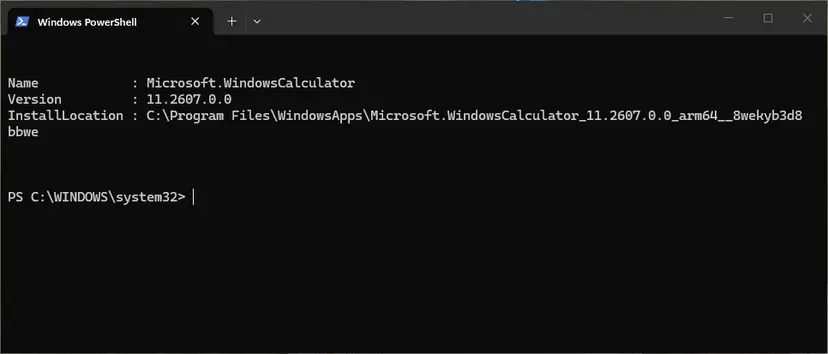
Get-AppxPackage shows the package name and where it is installed. Screenshot: Windows 11 26H2. - Re-register the app. Paste the three commands below, with the same name between the asterisks, and press Enter. They read the folder the app is installed in and register its manifest again. If no red text appears, it worked.
$InstallLocation = Get-AppxPackage -Name '*WindowsCalculator*' | Select-Object -ExpandProperty InstallLocation $ManifestPath = $InstallLocation + '\Appxmanifest.xml' Add-AppxPackage -Path $ManifestPath -Register -DisableDevelopmentMode - Open the app. Close PowerShell and start the app from Start. If it still fails, restart the PC and try once more.
These steps were written for Windows 11 25H2 and 26H2, Windows 10 22H2. The full page with the other versions and what each result means: How to re-register Microsoft Store apps with PowerShell
It worked if: Microsoft Store opens and downloads apps again.
If not: If PowerShell shows red text or the Store still fails, repair Windows with Fix 7.
Fix 7. Repair system files with SFC and DISM
20 to 30 minutesLow riskSeveral updates or apps fail, also with other codes, or Fixes 1 to 6 did not help.
DISM repairs the component store that updates install into, and SFC repairs protected system files. If a file the update client loads is damaged, the client cannot initialize no matter how often its cache is reset.
- Open an elevated command window. Right-click Start and select Terminal (Admin), or type cmd in the search box, right-click Command Prompt and select Run as administrator. Select Yes when Windows asks for permission.
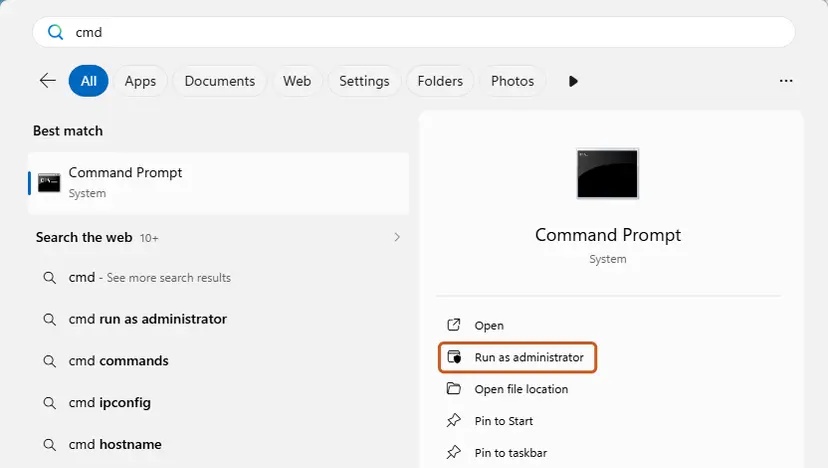
Search for cmd and choose Run as administrator. Screenshot: Windows 11 26H2. - Run DISM first. Type the command below and press Enter. DISM downloads clean copies of damaged components from Windows Update, so it can take several minutes. Wait until it says The operation completed successfully.
DISM.exe /Online /Cleanup-Image /RestoreHealth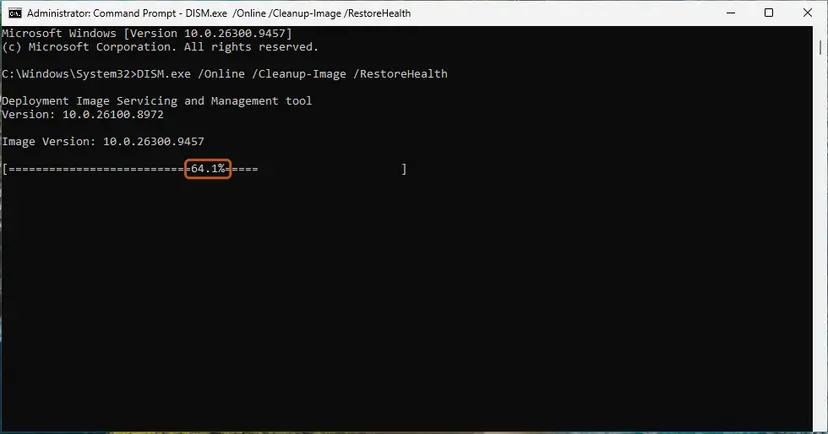
DISM /RestoreHealth running. Screenshot: Windows 11 26H2. - Run System File Checker. In the same window, type the command below and press Enter. Do not close the window until the verification reaches 100%.
sfc /scannow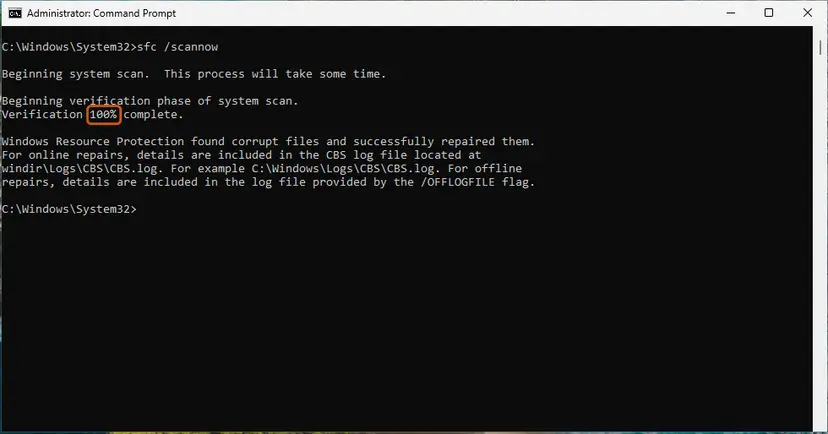
sfc /scannow at 100%. Screenshot: Windows 11 26H2. - Read the result and restart. Compare the last message with the table below this guide, then restart the PC so that repaired files are loaded.
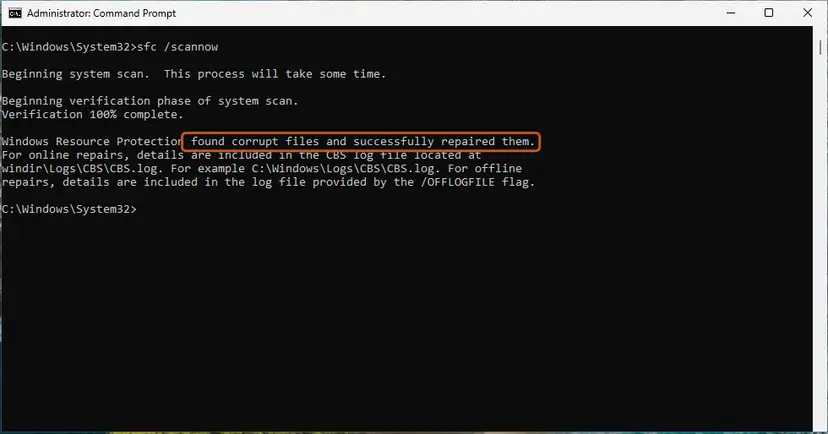
The result line tells you what SFC did. Screenshot: Windows 11 26H2.
These steps were written for Windows 11 24H2 and 25H2. The full page with the other versions and what each result means: Run DISM and SFC to repair Windows system files
It worked if: SFC reports that it found no problems or repaired them, and the next update or Store download works.
If not: Do a repair install with Fix 8.
Fix 8. Repair-install Windows and keep your files and apps
45 to 90 minutesRead the warningNothing above worked, and the Store or Windows Update keeps failing with 0x80240004.
A repair install puts a fresh copy of every update and Store component in place at once, while it keeps your files, apps and most settings.
A repair install keeps files and apps, but a power cut or a failed install can leave Windows unable to start. Copy your important files to a USB drive or cloud storage first: Back up your files (Windows Backup, File History, Time Machine)
- Open Recovery in Settings. Open Settings > System > Recovery. Next to Fix problems using Windows Update, select Reinstall now. This keeps your apps, files and settings.
- Start the reinstall. Choose whether the PC may restart on its own 15 minutes after the installation, then select OK.
- Wait and restart. Windows Update downloads and installs a repair copy of your current Windows version. Keep the PC plugged in and online, and restart it when asked.
- If that did not help: Reset PC. Back in Settings > System > Recovery, next to Reset this PC, select Reset PC. This keeps your personal files but removes installed apps and settings.
- Choose Keep my files. Select Keep my files. Do not select Remove everything.
- Choose where Windows comes from. Select Cloud download to download a fresh copy of Windows, or Local reinstall to use the files already on the PC (faster, but may not include the latest updates).
- Reset. Review the summary and select Reset. The PC restarts several times.
These steps were written for Windows 11 22H2 and later. The full page with the other versions and what each result means: Reinstall Windows without losing files
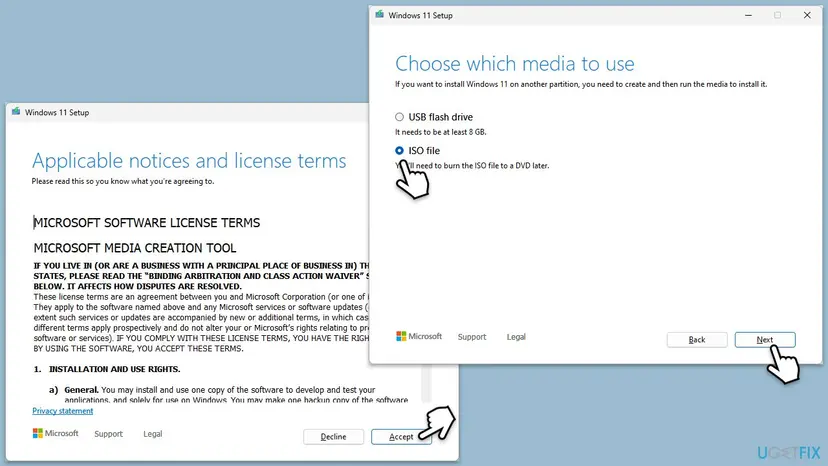
In Setup, choose Keep personal files and apps on the Choose what to keep screen. If Setup asks for a product key, the ISO does not match your installed edition: download the right one.
It worked if: Windows starts on the repaired build, and Microsoft Store and Windows Update work without 0x80240004.
If not: Windows 10 left support on 14 October 2025. If you are still on Windows 10 without Extended Security Updates, plan the move to Windows 11.
If error 0x80240004 is still there
The Windows Update log shows which part could not start. Open PowerShell and run the command below. It builds a readable WindowsUpdate.log on your desktop from the trace files.
Get-WindowsUpdateLog| Where to look | What it means |
|---|---|
0x80240004 in WindowsUpdate.log | The lines just above it name the component or update that could not be initialized. |
| Event Viewer > Windows Logs > System, source Service Control Manager | A Windows Update, BITS or Cryptographic Services entry that failed to start. Go back to Fix 3. |
Errors in C:\Windows\Logs\CBS\CBS.log | The component store reports damage. Run Fix 7 or Fix 8. |
| The error stops in Safe Mode with Networking | Another program is in the way. Find it with a clean boot: How to perform a clean boot in Windows |
Third-party security software can block the update services. Pause your antivirus for one download, then turn it back on at once: Turn off Microsoft Defender protection for a moment. If that was it, add an exception or ask its maker for an update. Never leave protection off.
If you ask Microsoft Support or your administrator for help, send your Windows version and build from winver, the app name or KB number, and the log lines around the code. This is not a hardware fault: the code is about the update client failing to start one of its parts.
How to keep error 0x80240004 from coming back
- Restart the PC when Windows Update asks you to. A pending restart leaves the update cache half written.
- Let Microsoft Store update itself from Library > Get updates.
- Keep enough free space on drive C for updates to download.
- Run a supported Windows: Windows 11, or Windows 10 only with Extended Security Updates.
- Do not turn off the PC while an update downloads or installs.
- Do not delete files in
C:\Windows\SoftwareDistributionby hand while updates run. Use Fix 1. - Do not use tools that disable Windows Update services for good.
If the Store shows 0x80240008 instead, the client started but could not find an item. That one has its own guide: error 0x80240008.
Frequently asked questions
What does error 0x80240004 mean?
It means the Windows Update client could not initialize one of its own parts. Microsoft's Windows Update error code list names it WU_E_NOT_INITIALIZED, with the description "The object couldn't be initialized." The part is usually a service or the update cache, which Microsoft Store uses too. That is why the same code shows in the Store and in Windows Update. Resetting the update components with Fix 1 is the first step in both places.
What does this message mean (q significa este mensaje)?
The Store message "Try that again. Something went wrong. The error code is 0x80240004, in case you need it." means the download could not start, because the Windows Update client behind the Store failed to start a part it needs. The app itself is not broken and your account is fine. Reset the update components (Fix 1), restart, and select Get or Update again. If only the Store keeps failing, clear its cache and repair it with Fix 2.
What should I do in this situation (что делать в такой ситуации)?
Start with the reset of the Windows Update components in Fix 1. It stops the update services, renames the two cache folders and starts the services again, so Windows builds a fresh cache. It fixes both Microsoft Store and Windows Update downloads. Restart, then try again. If only the Store still fails, use Fix 2. If downloads never start, check the services with Fix 3. Your files and apps stay safe during all three.
What does Download error - 0x80240004 in Windows Update mean?
It means Windows Update could not start one of its parts while it downloaded one update. The word Download only tells you at which stage it failed. Reset the update components (Fix 1), restart and select Check for updates again. If the same update fails, run the troubleshooter (Fix 4), then download that KB from the Microsoft Update Catalog and install it by hand (Fix 5). The manual install does not need the update client's download.
Why does Microsoft Store show a Windows Update error code?
Because the Store hands its downloads to the Windows Update client. The 0x8024 part of the code marks that client, and Microsoft lists all 0x8024 codes in its Windows Update error code list. So when the client cannot start, the Store can only show its general Try that again dialog with the client's code in it. That is why Fix 1 resets Windows Update even if you only saw the error in the Store.
What is 0x80240004 (-2145124348)?
It is the same error printed with its signed decimal value. Windows error codes are 32-bit numbers, and Event Viewer, some logs and scripts show them as negative decimals: 0x80240004 is -2145124348. The meaning does not change. It is WU_E_NOT_INITIALIZED, a part of the update client that could not start. Use the same fixes, starting with Fix 1. In WindowsUpdate.log, the lines above the code usually name the part that failed.
Will resetting Microsoft Store or the update cache delete my apps?
No. Clearing the Store cache with wsreset and repairing the Store keep everything. Reset deletes only the Store app's own data on this PC, so you may need to sign in again. Installed apps stay, and purchases stay in your Microsoft account. Resetting the Windows Update cache renames two folders. Installed updates stay on the PC, but Update history may look empty afterwards, because only the list was cleared.
Is the 0x80240004 error the same on Windows 10 and Windows 11?
Yes. The code and its meaning are the same, and so are the fixes. Only some menu paths differ: on Windows 11 Microsoft Store sits under Settings > System > System Components, on Windows 10 under Settings > Apps > Apps & features. Windows 10 left support on 14 October 2025, so a Windows 10 PC without Extended Security Updates gets fewer fixes from Microsoft. Users also reported this code on Windows 8, which is no longer supported.
Is error 0x80240004 a hardware fault?
No. The code is about a part of the update client that could not start, not about a part of the PC. The same PC downloads normally once the cache and services are repaired. If the PC also freezes, restarts by itself or shows disk errors, check the drive with Check a disk for errors (chkdsk), because that is a separate problem. If several updates fail with different codes, repair Windows with Fix 7 and Fix 8.
Sources
- Microsoft Learn: Windows Update error code list by component (learn.microsoft.com)
- Microsoft Q&A: Error code (0x80240004) after trying update to the newest Windows version (learn.microsoft.com)
Did this fix work?
One click, no account. It tells the next reader which guides are worth their time.
Questions and experiences: fix error 0x80240004 in Microsoft Store and Windows Update
Still broken, or found a fix we did not cover? Ask here: members and our editors answer. Reading is open; writing needs a free account.
…