Question
Issue: [Fix] Most recent File Explorer window keeps popping up in the foreground in Windows
Recently, I've noticed some strange behavior from File Explorer: whenever I am doing anything on Windows (e.g., watching a video, working on an Excel sheet, or playing games), the most recent Explorer window moves itself into the foreground, disrupting everything I'm doing. The only way I can stop this is by closing all File Explorer tabs, which is not always optimal for me.
Solved Answer
File Explorer, an integral application of the Windows operating system, serves as a file management system that allows users to access, manage, and organize files and directories on their computers. Providing a visual interface, it ensures smooth interaction with system files and directories, thus significantly enhancing productivity.
However, an issue has been recently observed in Windows 11 where the opened Explorer window routinely pops up in the foreground, disrupting other active applications. This issue primarily occurs when a user is engaged in another application or watching a video. The latest opened File Explorer window forces itself to the foreground, interrupting the current task. To temporarily circumvent this problem, users need to close all active Explorer windows, which, needless to say, is a significant inconvenience.
Multiple causes might be contributing to this unexpected behavior. In some cases, users reported that an intermittently disconnecting and reconnecting external hard drive triggered the issue. The system, detecting the reconnection as a new event, might push the Explorer window to the forefront.
Additionally, it could be a mere bug within the system – inherent flaws or programming errors that cause the software to behave erratically. Other reasons could include incompatible software running in the background, system configuration issues, or even potential malware attacks.
To resolve this persistent issue, several potential solutions exist. One is performing a System File Checker (SFC) and Deployment Image Servicing and Management (DISM) scan. These are inbuilt Windows tools that can detect and repair corrupt or missing system files.
![[Fix] Most recent File Explorer window keeps popping up in the foreground in Windows [Fix] Most recent File Explorer window keeps popping up in the foreground in Windows](https://ugetfix.com/wp-content/uploads/articles/askit/fix-most-recent-file-explorer-window-keeps-popping-up-in-the-foreground-in-windows_en-768x432.jpg)
Alternatively, keeping Windows updated with the latest patches can also help, as these often include fixes for known bugs. Initiating a Clean Boot to start Windows with a minimal set of drivers and startup programs could help identify if background applications are causing the issue. Finally, a complete repair or reinstallation of Windows could be a last resort if other solutions fail.
In case these manual methods seem daunting, consider using FortectMac Washing Machine X9 PC repair software. This automated tool offers a comprehensive solution to a broad range of Windows issues.
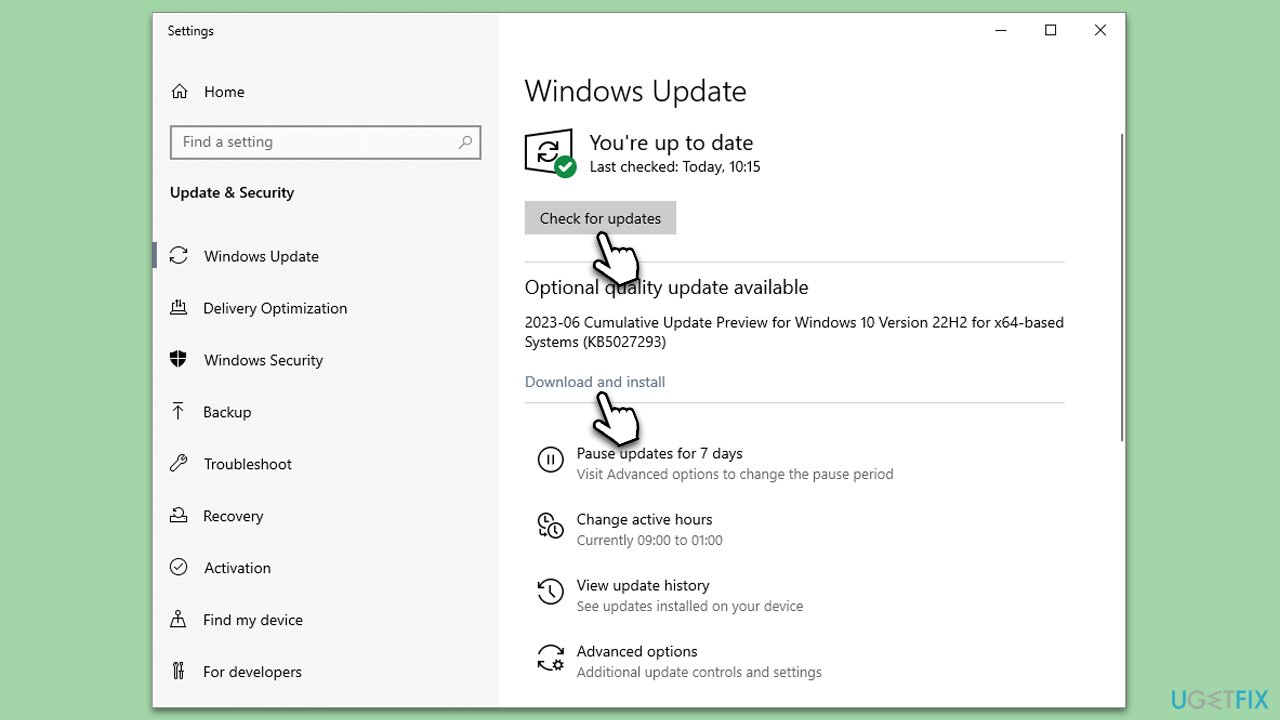
1. Install all Windows updates
Windows updates often include patches that fix known bugs and improve system stability. Ensuring your system is up-to-date can eliminate the problem if it's due to a known issue that Microsoft has addressed.
- Type Updates in Windows search and hit Enter.
- Here, click Check for updates and wait till all the files are downloaded and installed.
- If optional updates are available, install them too.
- When all is done, reboot your system to apply all updates.
2. Disable media Autoplay in Control Panel
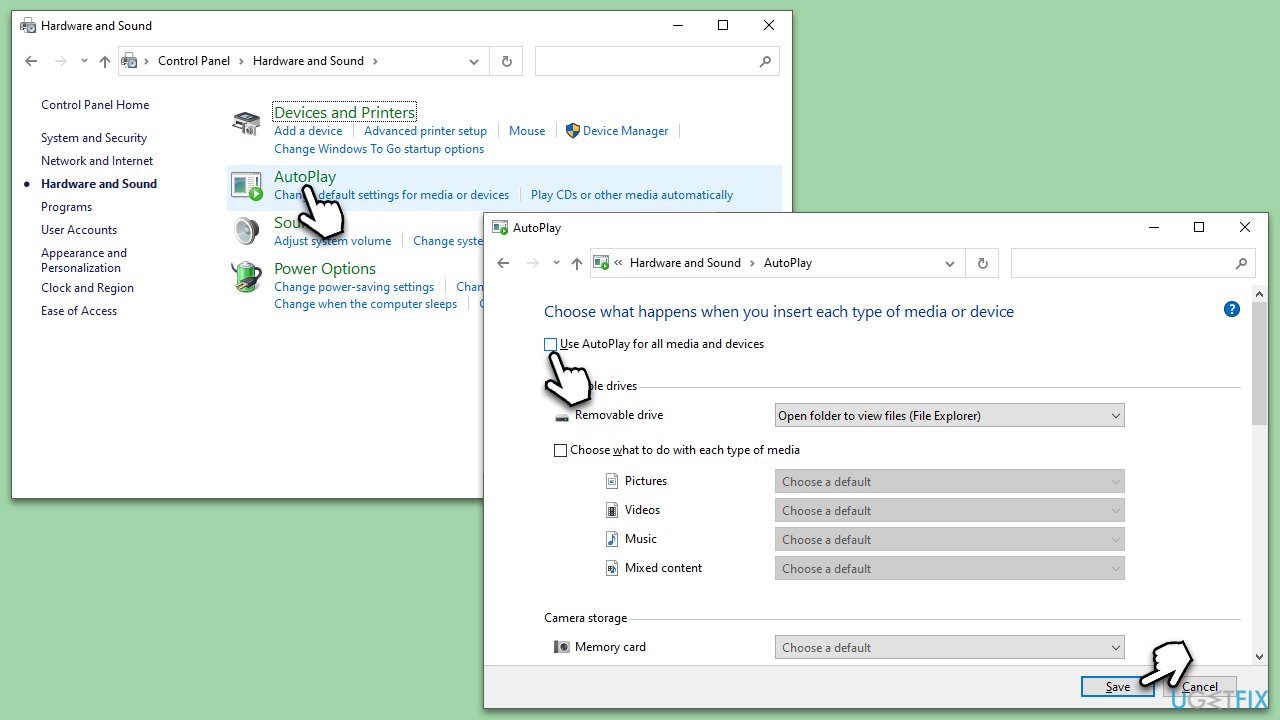
Autoplay might be causing the File Explorer window to pop up when it detects new media. Disabling it might help prevent this behavior.
- Type Control Panel in Windows search and hit Enter.
- Click on Hardware and Sound.
- Click on AutoPlay.
- Uncheck the box next to Use AutoPlay for all media and devices.
- Click on Save.
3. Disconnect unused peripherals
Sometimes, intermittently connecting and disconnecting peripherals can trigger File Explorer to come into focus. Disconnecting unused peripherals could potentially fix this issue.
- Identify any peripherals that you are not actively using.
- Disconnect these peripherals from your computer.
4. Perform SFC and DISM scans
These scans help identify and repair corrupted or missing system files that might be causing the Explorer window to pop up in the foreground.
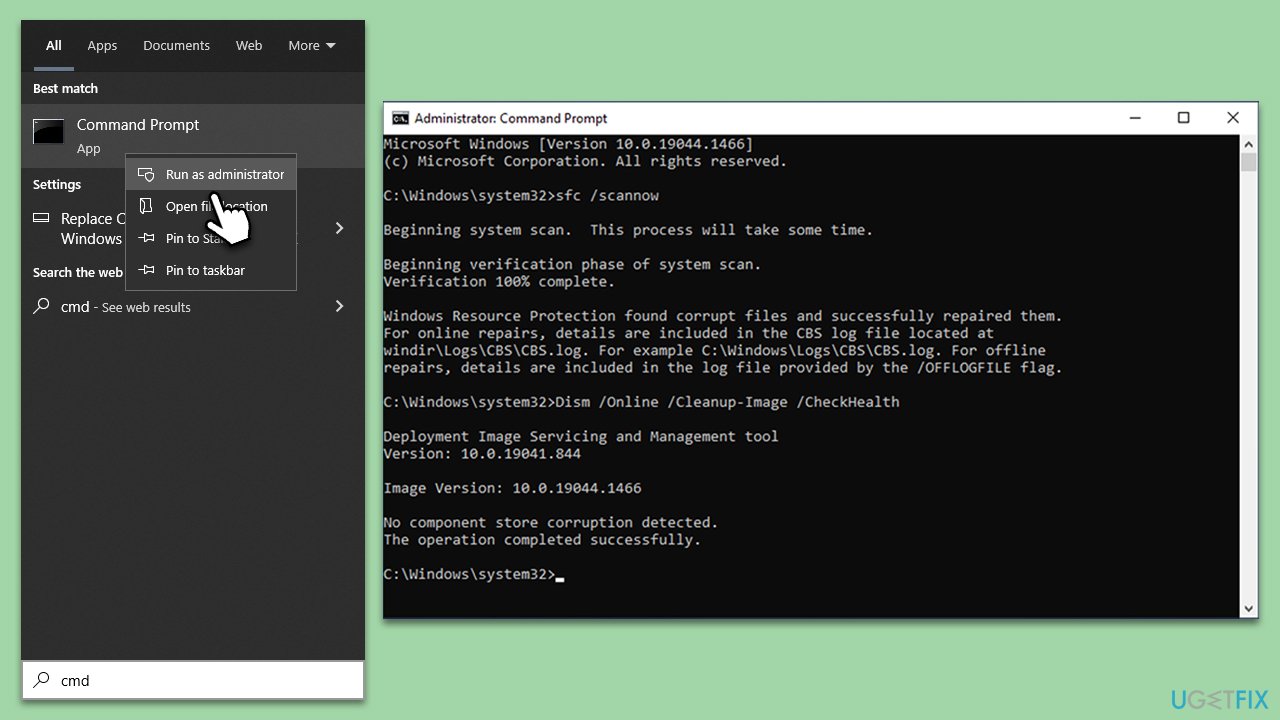
- Type cmd in Windows search.
- Right-click on Command Prompt and select Run as administrator.
- When the User Account Control window pops up, click Yes.
- Use the following command and press Enter:
sfc /scannow - After the SFC scan is complete, use the following commands, pressing Enter after each:
- Dism /Online /Cleanup-Image /CheckHealth
Dism /Online /Cleanup-Image /ScanHealth
Dism /Online /Cleanup-Image /RestoreHealth
(Note: if you get an error executing this last command, add /Source:C:\RepairSource\Windows /LimitAccess to it and try again). - Reboot your device.
5. Use Clean Boot
A Clean Boot starts Windows with a minimal set of drivers and startup programs, eliminating software conflicts that occur when you install a program or an update or when you run a program in Windows. It helps diagnose if the issue is caused by a third-party application or service.
- Press the Win + R to open the Run dialog.
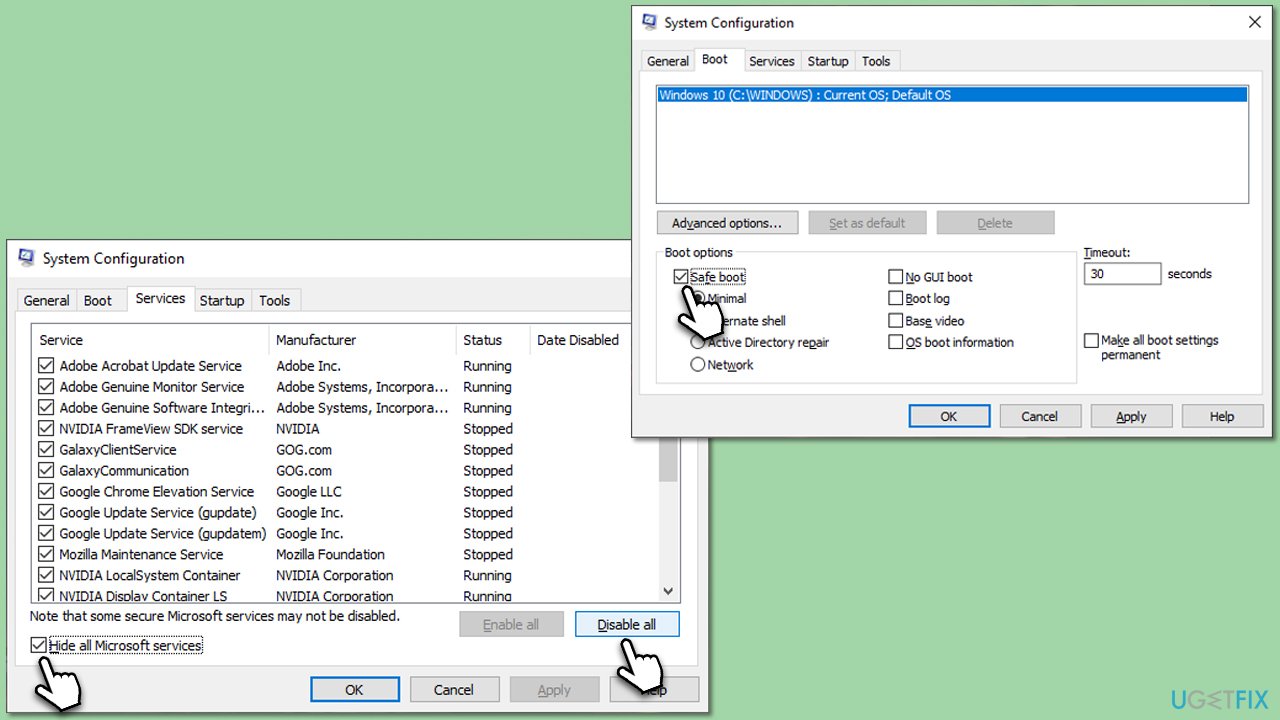
- Type msconfig and press Enter.
- In the System Configuration window, select Selective Startup, and uncheck Load startup items.
- Go to the Services tab and check the box Hide all Microsoft services, then click Disable all.
- Click on the Startup tab and open Task Manager.
- Disable all the startup items in the Task Manager.
- Click OK, and restart the computer.
Once your computer restarts in a Clean Boot state, you should observe if the issue still persists.
- If the issue is resolved, then it means one of the background programs was causing the problem. In this case, you would enable each service one by one (and restart each time) to identify the specific service causing the problem.
- If the issue still persists in the Clean Boot state, it likely means that the problem is not related to third-party services and applications, and you may need to explore other solutions.
6. Repair-install Windows
If all else fails, a repair installation can reset Windows' state without deleting your personal files and apps, potentially resolving the issue.
- Download Windows 11 Installation Media from the official website.
- Launch mediacreationtool.exe by double-clicking it.
- If User Account Control shows up, click Yes.
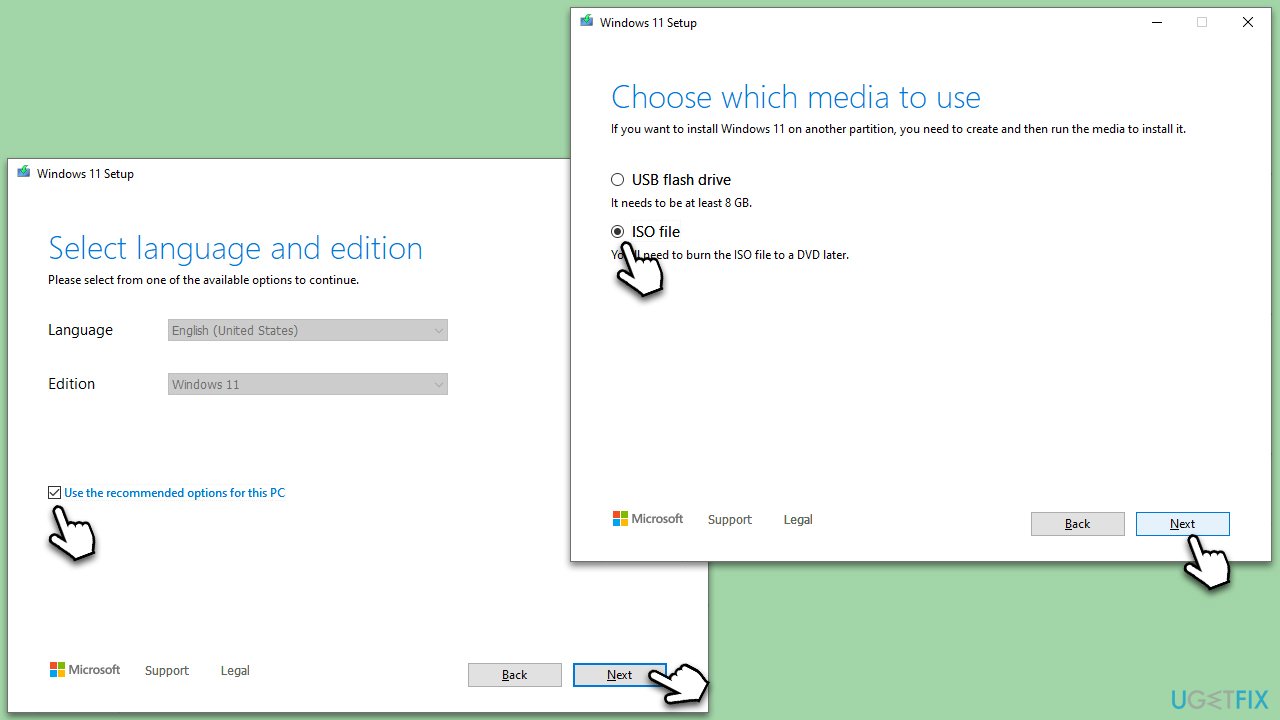
- Select Create installation media (USB flash drive, DVD or ISO file) for another PC, and then pick Use the recommended options for this PC, and click Next.
- Select the ISO file and click Next.
- Pick the location for your ISO file and wait till all the needed files are downloaded, then click Finish.
Next, follow these steps to repair-install Windows:
- Go to the location of your ISO file, right-click, and select Mount.
- Run the setup.exe file.
- You will be asked whether you want to update Windows to the latest version – pick Not right now and click Next.
- Accept Terms and Windows will make several checks to ensure everything is fine.
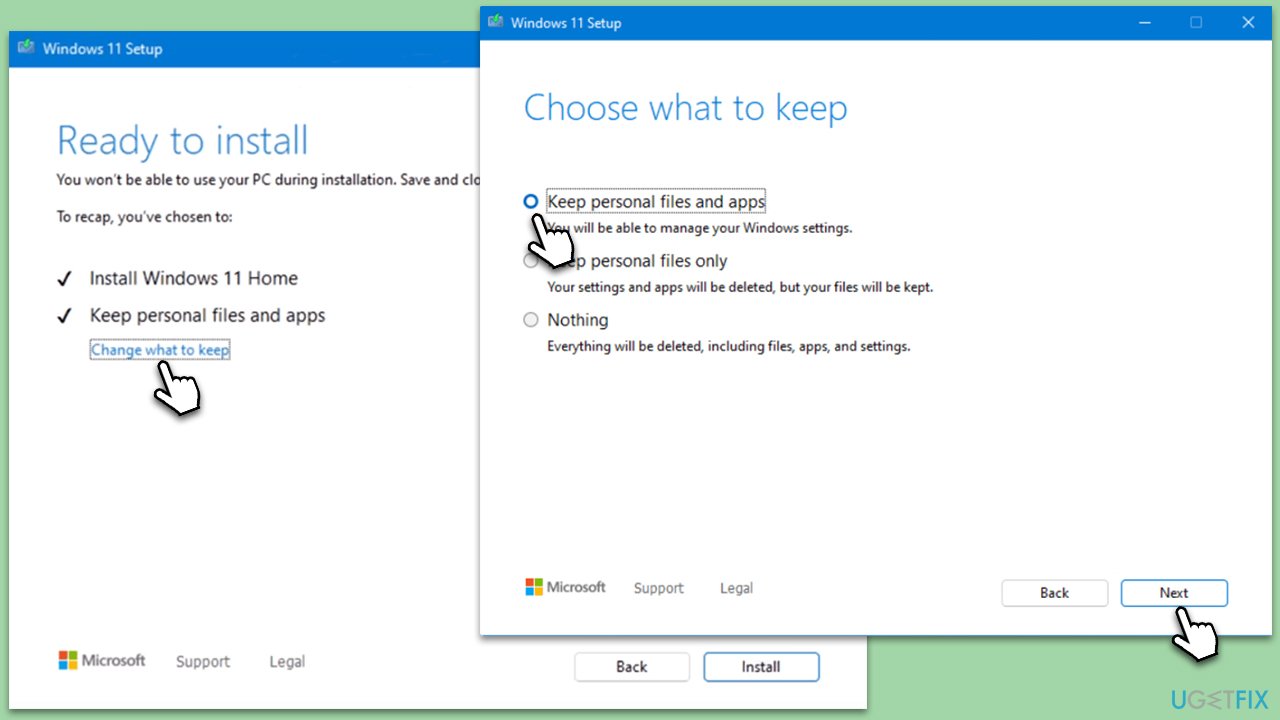
- Click Change what to keep.
- Here, you have several options: Keep your files and apps, Keep files only, or Keep nothing – choose what suits you the best. Click Next.
- Finally, click Install to begin the installation process.
Repair your Errors automatically
ugetfix.com team is trying to do its best to help users find the best solutions for eliminating their errors. If you don't want to struggle with manual repair techniques, please use the automatic software. All recommended products have been tested and approved by our professionals. Tools that you can use to fix your error are listed bellow:
Access geo-restricted video content with a VPN
Private Internet Access is a VPN that can prevent your Internet Service Provider, the government, and third-parties from tracking your online and allow you to stay completely anonymous. The software provides dedicated servers for torrenting and streaming, ensuring optimal performance and not slowing you down. You can also bypass geo-restrictions and view such services as Netflix, BBC, Disney+, and other popular streaming services without limitations, regardless of where you are.
Don’t pay ransomware authors – use alternative data recovery options
Malware attacks, particularly ransomware, are by far the biggest danger to your pictures, videos, work, or school files. Since cybercriminals use a robust encryption algorithm to lock data, it can no longer be used until a ransom in bitcoin is paid. Instead of paying hackers, you should first try to use alternative recovery methods that could help you to retrieve at least some portion of the lost data. Otherwise, you could also lose your money, along with the files. One of the best tools that could restore at least some of the encrypted files – Data Recovery Pro.


