Question
Issue: [Fix] Windows activation fails after hardware change
Recently, I installed a new motherboard on my computer but have been unable to activate Windows ever since. When running through troubleshooting steps, it displays the previous edition of Windows that I had before – both are labeled as 10 Pro – however, an alert claims that these do not match. I can't recall the original key, so I am at a loss for what to do next.
Solved Answer
Windows licensing refers to the legal agreement between Microsoft and the user of the Windows operating system. The license dictates how the software can be used and distributed and typically comes in the form of a product key or digital license. Users typically acquire it along with a purchased laptop or a desktop computer, which is the most convenient option.
However, there are several types of Windows licenses available, including:
- OEM (Original Equipment Manufacturer) licenses, which are typically bundled with new computers and can only be used on that specific computer.
- Retail licenses can be purchased separately and can be transferred to a different computer.
- Volume licensing is intended for businesses and organizations that need to license multiple copies of Windows.
- Subscription-based licensing, such as Windows as a Service, allows users to pay for Windows monthly or annually and receive updates and support during that time.
It is important to note that using a Windows license without proper authorization, such as using a cracked or pirated key, is illegal and can lead to software malfunctions and security vulnerabilities.
Hardware change is a common practice among desktop users – it gets outdated, and new, better specifications become available. Unfortunately, these changes can sometimes influence the Windows license, and many users said their operating systems suddenly stopped being genuine after, which can be extremely frustrating
![[Fix] Windows activation fails after hardware change [Fix] Windows activation fails after hardware change](https://ugetfix.com/wp-content/uploads/articles/askit/fix-windows-activation-fails-after-hardware-change_en.jpg)
In most cases, Windows activation fails after hardware change because most regular users utilize an OEM license, which becomes unavailable, mainly because it is permanently tied to the motherboard. In case of other hardware changes, issues with license activation lie elsewhere.
Below we provide several steps that should help you aid after Windows activation fails after a hardware change. Before moving on to manual steps, we recommend checking the system with FortectMac Washing Machine X9 PC repair tool, which can check whether these issues are not related to corrupted system components or similar issues.
1. Check if you have OEM or FPP license
As mentioned, if you have an OEM license, it is tied to the motherboard. In case you changed the motherboard, and you were using OEM, you would have to purchase a new Windows license. Here's how to check:
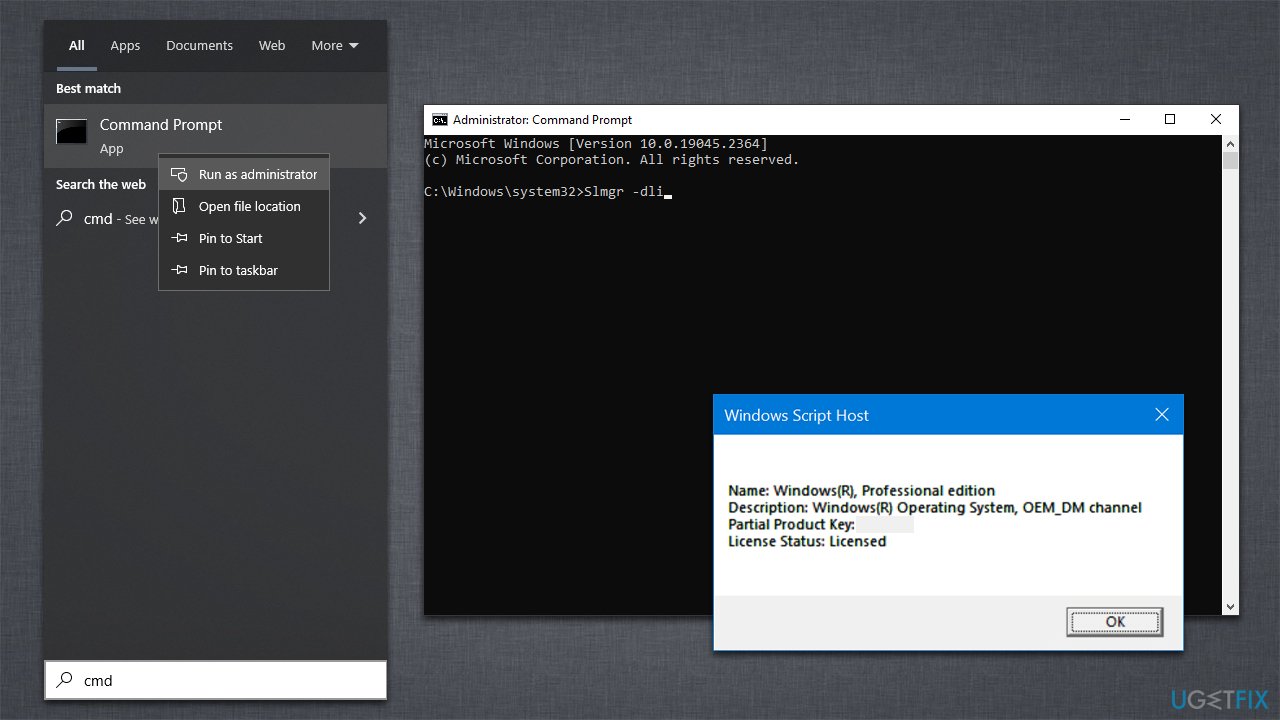
- Type cmd in Windows search.
- Right-click on Command Prompt and pick Run as administrator.
- When User Account Control shows up, click Yes.
- Copy and paste the following command, pressing Enter after:
Slmgr –dli - This should bring up a pop-up window with all the necessary licensing information.
- Check the Description section.

2. Use the license key
When a Windows key is available to you, you should proceed with the following steps to activate it:
- Open Command Prompt as administrator as explained above.
- In the Command Prompt window, copy and paste the following command and press Enter:
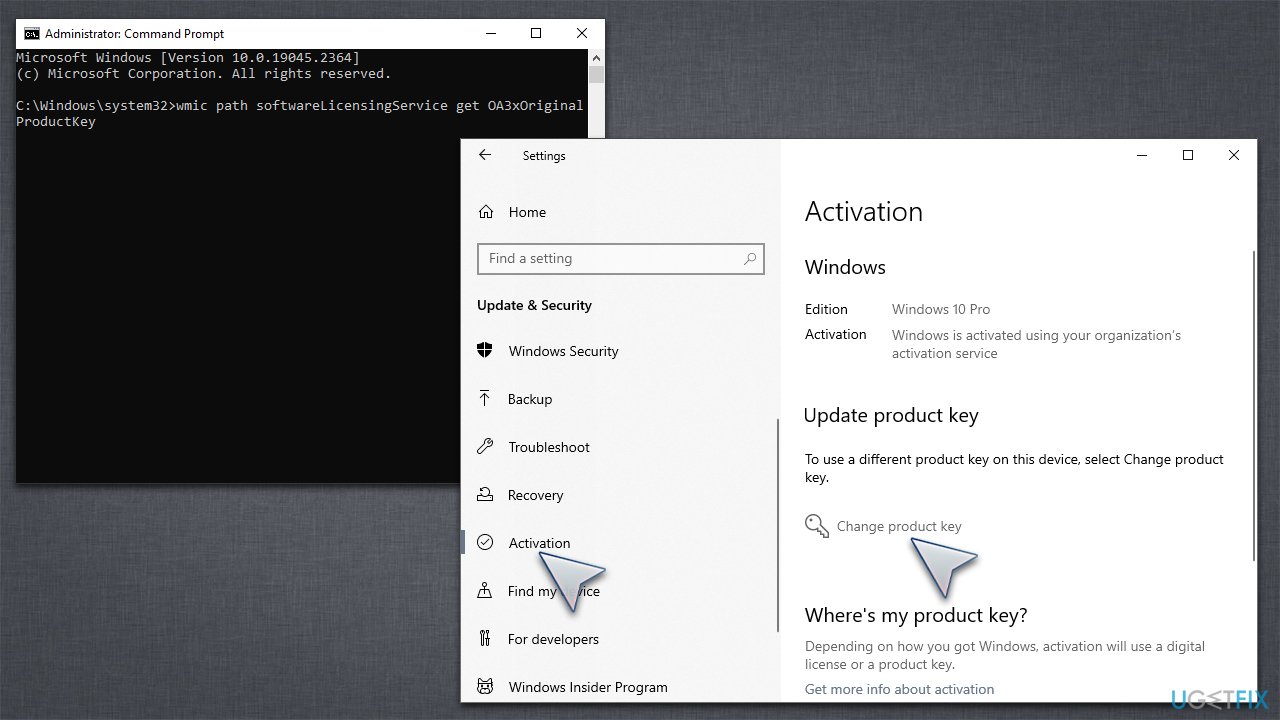
wmic path softwareLicensingService get OA3xOriginalProductKey - This should show you the product key, so copy it, then close down Command Prompt.
- Next, right-click on Start and pick Settings.
- Go to Update & Security > Activation.
- Under Update product key, select Change product key.
- Enter the product key and click Next.

3. Try activating via Command Prompt
While the solution described before should be sufficient to activate Windows, it does not work for everyone. In such a case, try activating via Command Prompt:
- Open Command Prompt as administrator.
- In the new window, copy and paste the following, replacing “License key” with your personal key:
slmgr /ipk License Key
slmgr /ato - Press Enter.
- Restart your PC.
If you are using a digital license but aren't sure what it is, proceed with the following commands in Command Prompt instead:
- slmgr /xpr
- Press Enter.
4. Run the troubleshooter
- Right-click on Start and select Settings.
- Go to Update & Security section.
- On the left side of the window, pick Activation.
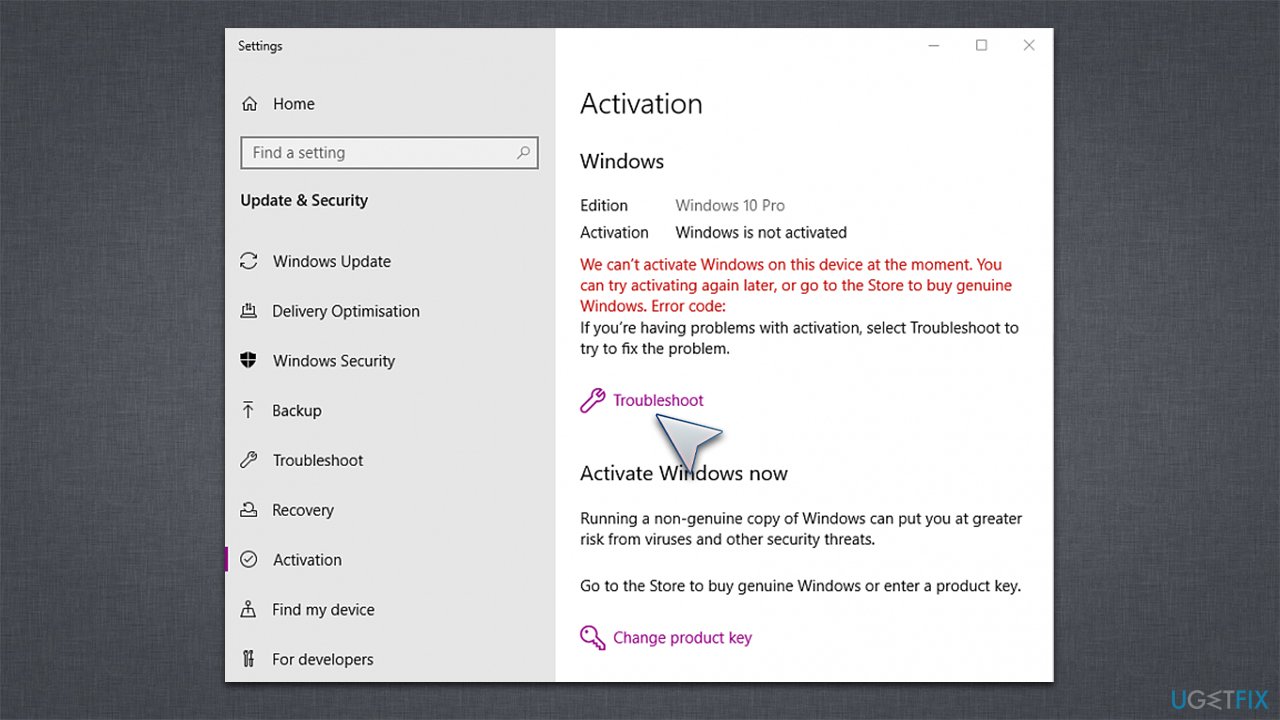
- On the right side, you should see the error message, and below it – Troubleshoot.
- Select Troubleshoot, then select I changed hardware on this device recently, and click Next.
- Enter your Microsoft Account details.
- From all the devices your account is linked to, select the computer you are using, mark the This is the device I’m using right now option, and click Activate.

Repair your Errors automatically
ugetfix.com team is trying to do its best to help users find the best solutions for eliminating their errors. If you don't want to struggle with manual repair techniques, please use the automatic software. All recommended products have been tested and approved by our professionals. Tools that you can use to fix your error are listed bellow:
Prevent websites, ISP, and other parties from tracking you
To stay completely anonymous and prevent the ISP and the government from spying on you, you should employ Private Internet Access VPN. It will allow you to connect to the internet while being completely anonymous by encrypting all information, prevent trackers, ads, as well as malicious content. Most importantly, you will stop the illegal surveillance activities that NSA and other governmental institutions are performing behind your back.
Recover your lost files quickly
Unforeseen circumstances can happen at any time while using the computer: it can turn off due to a power cut, a Blue Screen of Death (BSoD) can occur, or random Windows updates can the machine when you went away for a few minutes. As a result, your schoolwork, important documents, and other data might be lost. To recover lost files, you can use Data Recovery Pro – it searches through copies of files that are still available on your hard drive and retrieves them quickly.


