Question
Issue: How to fix auto muting microphone on Windows 10?
My internal microphone automatically sets itself to mute. After that, I open Properties and click unmute, but after a few seconds, it sets itself to 0 and gets muted again. I really don’t know what to do. Could you please help?
Solved Answer
Many people encounter a problem related to the auto muting microphone (both internal and external). Although this issue prevails on Windows 10 OS, the microphone may start malfunctioning on the older Microsoft products[1] as well. Typically the microphone works fine for a long time, but the starts randomly muting it and going to zero levels.
According to Microsoft experts, this might happen due to improper sound settings or outdated device drivers.[2] Nevertheless, the version of malware/virus infection should not be rejected as well. Therefore, if you cannot have a proper Skype conversation or record something due to continuously auto muting microphone, try the methods that we have listed below.
How to fix auto muting microphone on Windows 10?
Usually, an internal or external microphone sets itself to mute automatically due to the incorrect sound settings. Even if you haven’t modified those settings, they might have been changed automatically after the installation of some updates or malware infection. 
Therefore, the first thing you should try is a thorough system scan with a professional anti-malware / fixer. We would recommend using FortectMac Washing Machine X9. This tool will also ensure that all Windows Registry files are correct. Besides, it will fix damaged/corrupted system files. If the scan did not help to stop the microphone from muting, here’s what you should try:
Method 1. Update device drivers
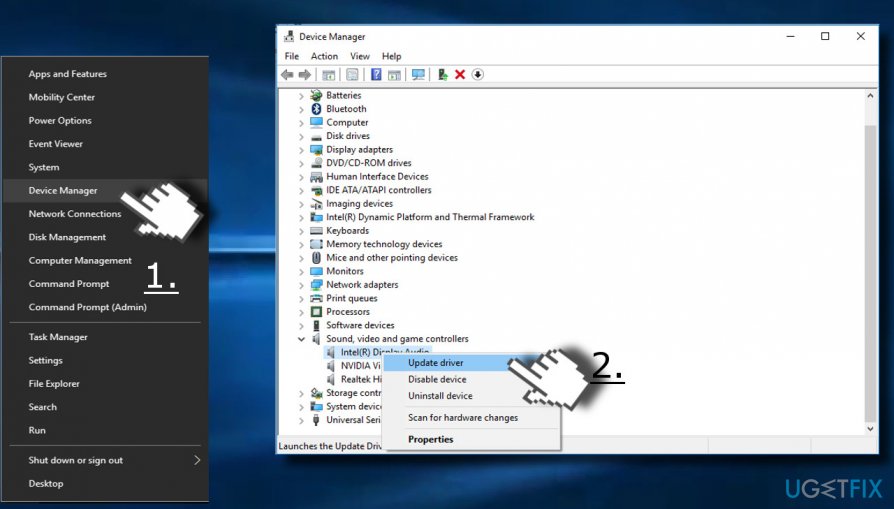
- Right-click on Windows key and select Device Manager.
- Expand Sound, video, and game controllers and update all device drivers from that list.
- For this purpose, right-click on driver and click Update Drivers.
- Finally, reboot your PC.
- In case you prefer an auto driver update method, a handy tool could be DriverFix

Method 2. Modify microphone’s settings
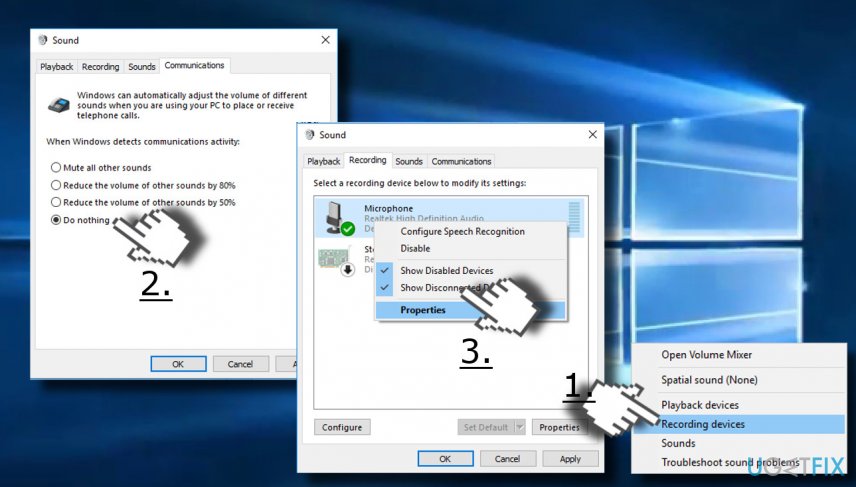
- Right-click on the speaker icon placed next to the taskbar (near date/time).
- Select Recording Devices.
- When the Sound control window opens, select the Communications tab.
- When the question When Windows detects communication activity emerges, select Do nothing.
- Then click Apply. After that, check your microphone if it stopped muting itself. If the problem did not stop, please do the following:
- Open the Recording tab on the Sounds window again.
- Right-click on the microphone and select Properties.

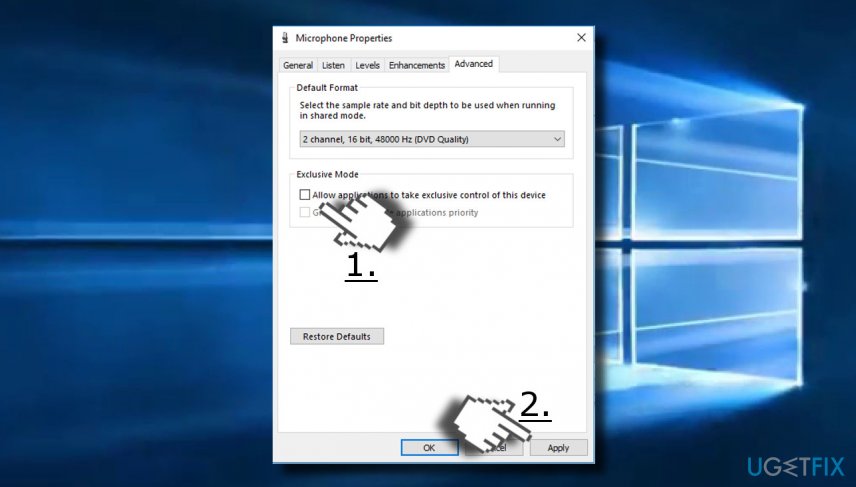
- Click the Advanced tab on the new window.
- Uncheck the Allow applications to take exclusive control of this device option.
- Click Apply to save the changes.

Method 3. Change the format of the Microphone
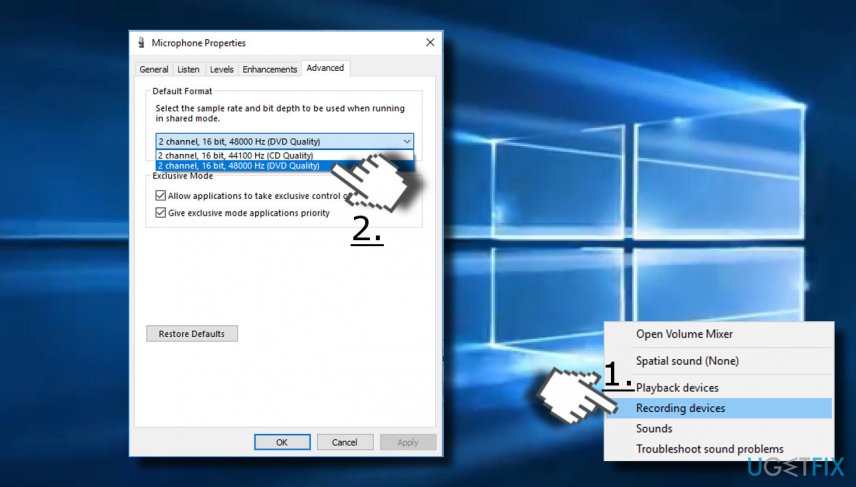
- Right-click on the speaker icon placed next to the taskbar (near date/time).
- Select Recording Devices and double-click on the microphone that you are currently using.
- Open the Advanced tab and select any of the 16-bit options on the list.

If none of the previous methods did help, you should try to fix auto muting microphone by disabling your anti-virus. Many people have reported that they were using Norton anti-virus. If you are using it as well (or any other third-party antivirus), try to disable it temporarily and check if the issue persists.
Finally, the microphone error may be fostered by svchost.exe file.[3] To check that, open Task Manager and check how much CPU this process is consuming. If it sucks up more than 30%, there is a high probability that this process is the culprit. Here you may find a helpful article for removing the corrupted svchost.exe file.
Repair your Errors automatically
ugetfix.com team is trying to do its best to help users find the best solutions for eliminating their errors. If you don't want to struggle with manual repair techniques, please use the automatic software. All recommended products have been tested and approved by our professionals. Tools that you can use to fix your error are listed bellow:
Access geo-restricted video content with a VPN
Private Internet Access is a VPN that can prevent your Internet Service Provider, the government, and third-parties from tracking your online and allow you to stay completely anonymous. The software provides dedicated servers for torrenting and streaming, ensuring optimal performance and not slowing you down. You can also bypass geo-restrictions and view such services as Netflix, BBC, Disney+, and other popular streaming services without limitations, regardless of where you are.
Don’t pay ransomware authors – use alternative data recovery options
Malware attacks, particularly ransomware, are by far the biggest danger to your pictures, videos, work, or school files. Since cybercriminals use a robust encryption algorithm to lock data, it can no longer be used until a ransom in bitcoin is paid. Instead of paying hackers, you should first try to use alternative recovery methods that could help you to retrieve at least some portion of the lost data. Otherwise, you could also lose your money, along with the files. One of the best tools that could restore at least some of the encrypted files – Data Recovery Pro.
- ^ Matt Elliot. Why you need to upgrade from this older version of Windows 10. CNET. The latest consumer technology breakthroughs, the latest tech news.
- ^ Lowell Heddings. When Do You Need to Update Your Drivers?. How-To Geek. Online tech magazine.
- ^ Jake Doevan. What is svchost.exe? Should I remove it?. 2SPYWARE. The highest-quality information about malware and general security.
