Question
Issue: How to fix headset mic picking up PC audio in Windows?
Hello. For some reason, my microphone is picking up all of the audio from my Windows PC. I have no idea how to fix this issue. Any tips would be appreciated.
Solved Answer
A headset mic picking up PC audio in Windows is a common issue that many users may experience while using their computers. This problem occurs when the microphone is configured to record audio input from the computer's speakers or any other audio source that is playing on the PC.
This can happen if the microphone's audio source is set to “Stereo Mix” or “What You Hear” in the recording settings. This option allows users to record audio from the computer's output, but it can also cause the microphone to pick up unwanted audio from the computer. This can result in audio feedback, echoing, or distortion, which can be extremely annoying for users, particularly if they are using their headsets for professional or gaming purposes.
This issue can have a significant impact because it can degrade the quality of audio recordings, phone calls, or video conferences. It can also cause interruptions and distractions while online gaming or streaming, resulting in a poor user experience. Furthermore, if the microphone is used in a professional setting, such as when recording music or podcasts, the recording quality can suffer significantly.
Depending on the specific cause of the problem, there are several possible solutions. These solutions may entail modifying the recording settings in Windows or utilizing third-party software to manage audio input and output. Adjusting the microphone volume, disabling the “Stereo Mix” or “What You Hear” audio source, updating the audio drivers,[1] or using noise-canceling software are some possible solutions.
In this guide, you will find 6 steps that should help you fix headset mic picking up PC audio in Windows. You can also use a system repair tool like FortectMac Washing Machine X9 that can fix most system errors, BSODs,[2] corrupted files, and registry[3] issues. Otherwise, follow the step-by-step instructions below.
Method 1. Run the Speech Troubleshooter
- Press the Windows key + X on your keyboard.
- From the pop-up menu, select Settings.
- In the Settings menu, click on Update and Security.
- In the Update and Security menu, select Troubleshoot.
- Scroll down and click on Additional troubleshooters.
- Look for Speech and click on it.
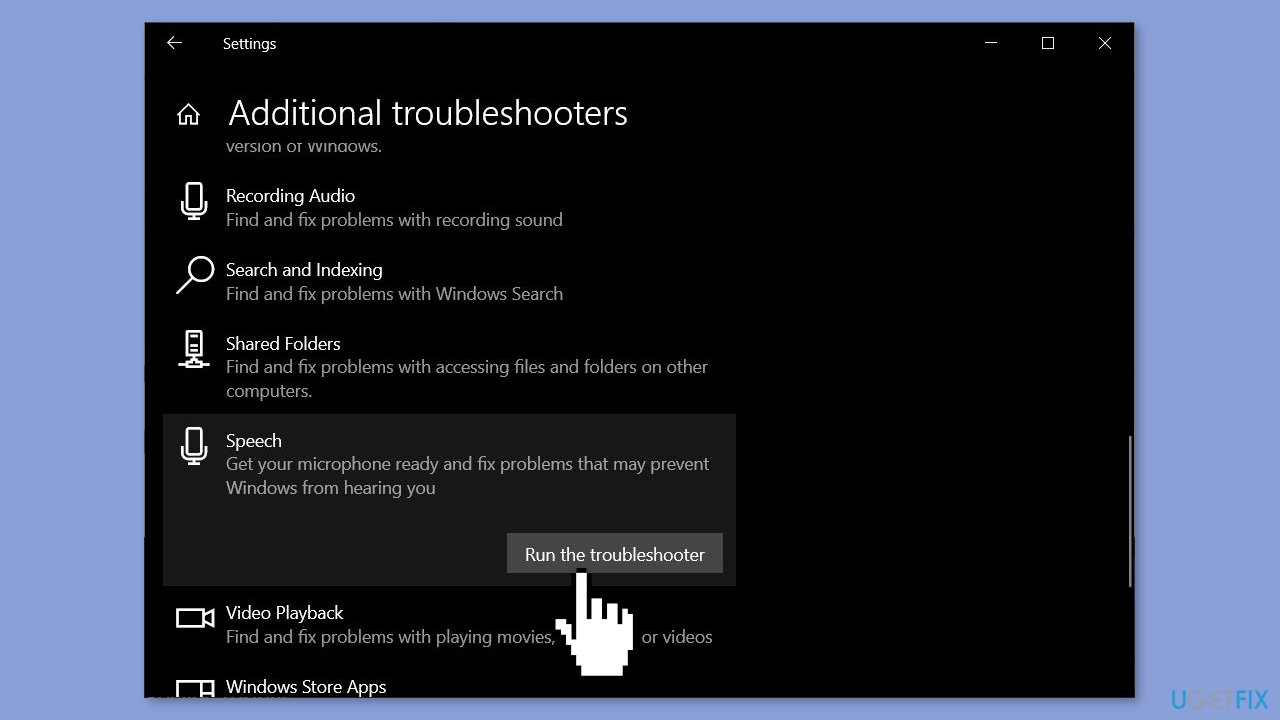
- Click on Run the troubleshooter to start the troubleshooter for speech.
- Follow the prompts to complete the troubleshooter and fix any issues found.
Method 2. Rollback Audio Drivers
- Press the Windows key + X on your keyboard.
- From the pop-up menu, select Device Manager.
- In the Device Manager window, expand the Sound, video and game controllers category.
- Look for the audio driver that you want to update and right-click on it.
- Select Update driver from the context menu.
- In the Update Drivers window, select Browse my computer for driver software.
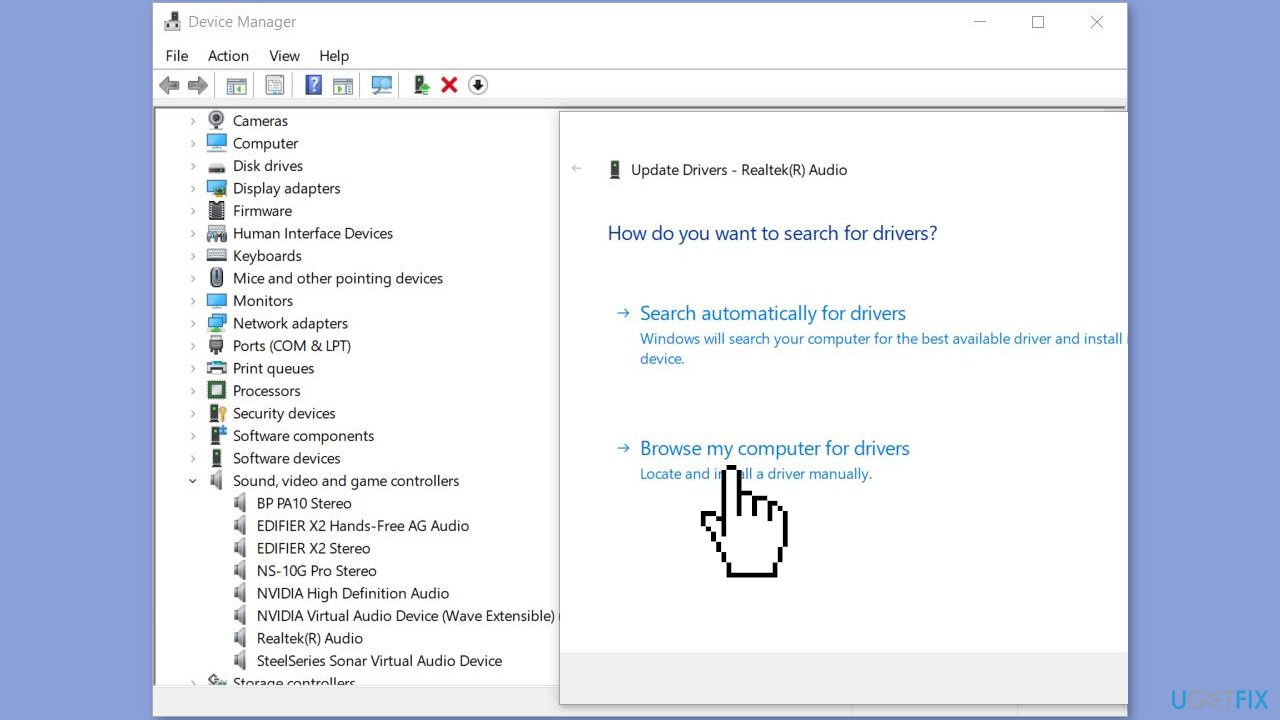
- Select Let me pick from a list of available drivers on my computer.
- Choose an old driver from the list and click Next.
- Follow the on-screen prompts to complete the driver installation process.
Method 3. Check Sound Settings
- Go to Control Panel.
- In Control Panel, select Large icons from the View by drop-down menu.
- Select Sound.
- Select the Recording tab.
- Right-click on the microphone and select Enable if it is disabled.
- Right-click on the microphone again and select Set as Default Device.
- Right-click on the microphone and select Properties.
- In the microphone properties window, click on the Levels tab.
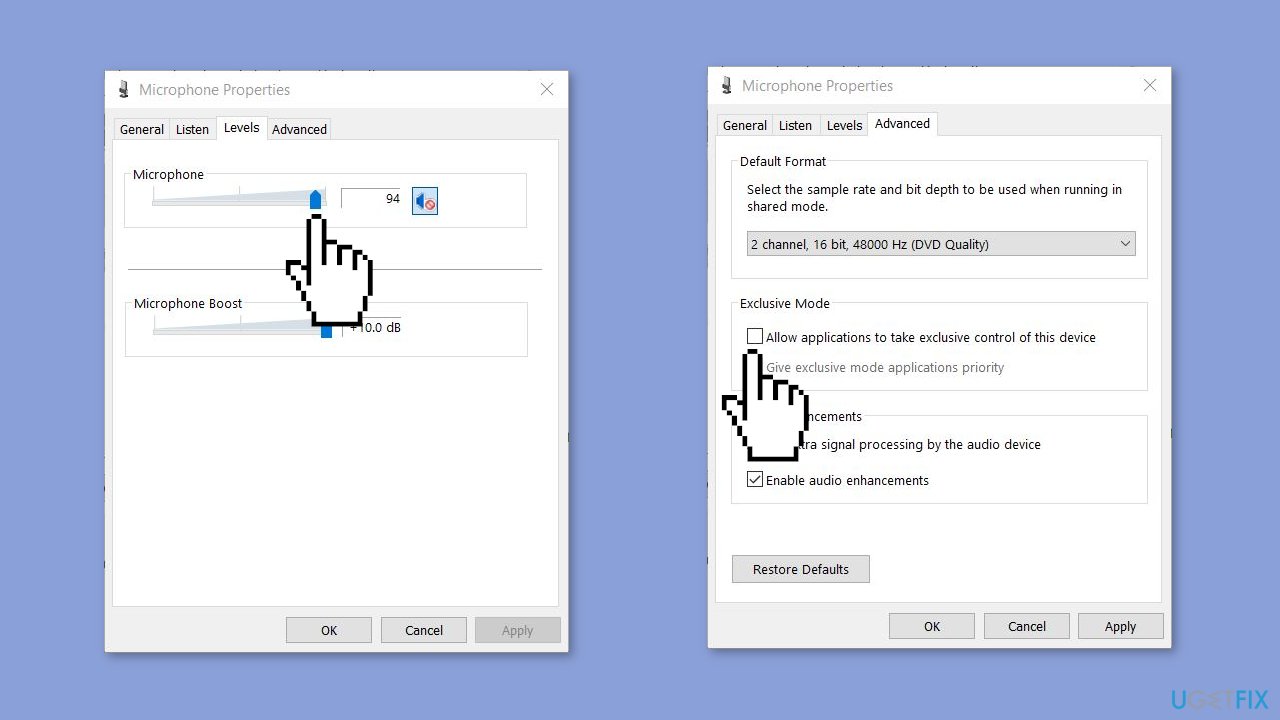
- Drag the volume slider towards the largest value to increase the microphone volume.
- Click OK to save the changes.
- Click on the Advanced tab.
- Uncheck the box next to Allow applications to take exclusive control of this device.
- Click OK to save the changes.
- Restart your computer and check if the microphone is working properly.
Method 4. Disable Stereo Mix
- Type Sound in the Windows search box and open Sound Settings.
- Under Related Settings on the right side of the screen, click on Sound Control Panel.
- In the Sound Control Panel window that pops up, select the Recording tab from the top menu bar.
- Check that the only enabled device is the microphone you're using. Right-click on any other device names, including Stereo Mix, and choose Disable.
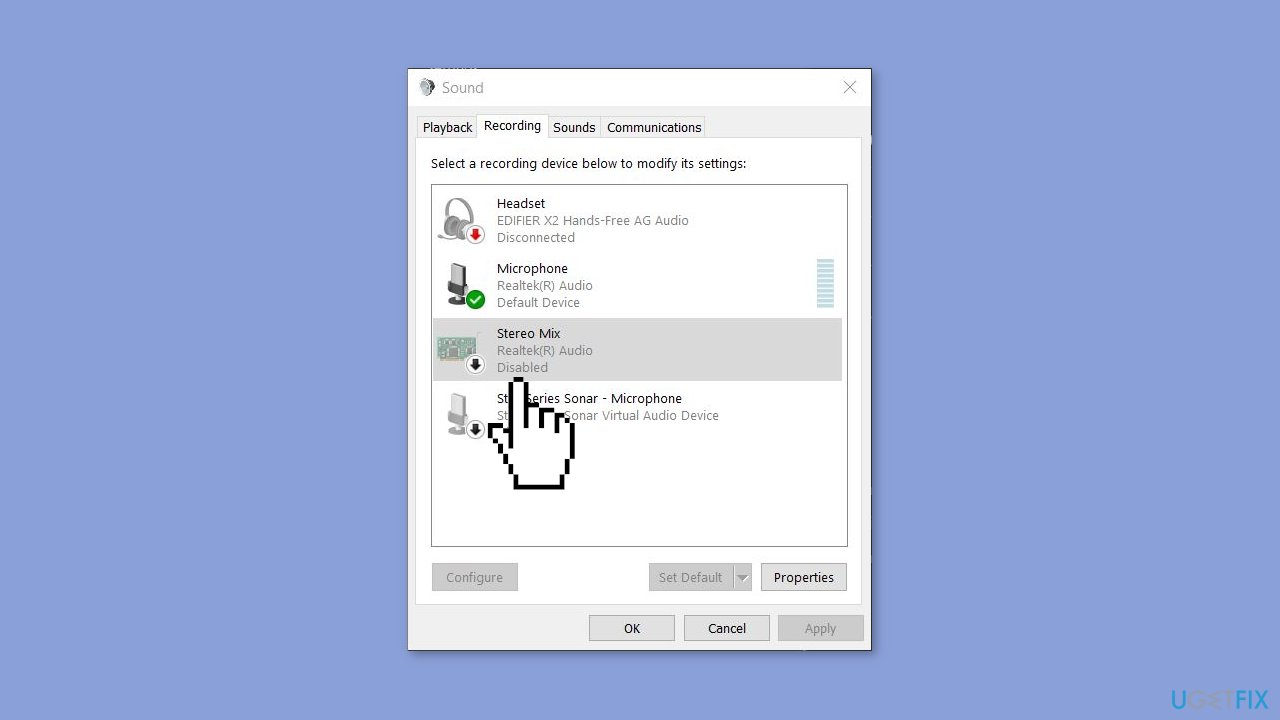
- Right-click in the blank space below the list and check the box next to Show Disconnected Devices. Do the same for them.
- If the microphone you're using isn't the Default Device with a green checkmark next to it, select it and click on the Properties button.
- Under Device usage, choose the Use this device (enable) option.
- Click Apply, and then OK to save the changes.
Method 5. Disable the Listen to this device Feature
- Locate the Sound icon on the right side of the taskbar, right-click on it, and select Sounds.
- Choose the Recording tab from the top menu bar and right-click on your primary microphone that is the default device.
- Select Properties and pick the Listen tab from the top menu bar.
- Ensure that the box next to Listen to this device is unchecked.
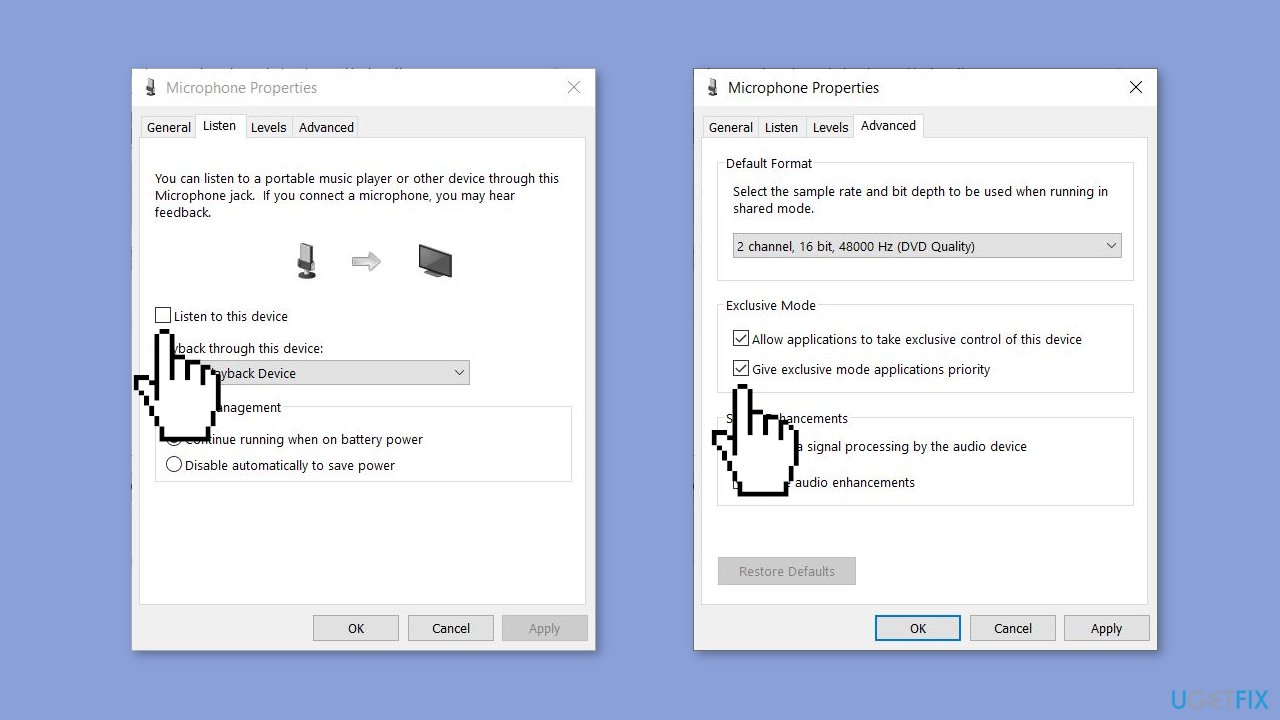
- Under Playback through this device, select the Default Playback device option.
- Head to the Advanced menu.
- Make sure you check both options under Exclusive Mode.
- Click Apply and then OK to save the changes.
Method 6. Check the Hardware
Aside from being a software issue, the problem of a headset mic picking up PC audio in Windows could also be hardware-related. This could indicate a problem with the headset itself, such as a loose connection or a damaged wire. If none of the previous software-related solutions have worked, it's worth inspecting the headset's physical condition.
Users should ensure that the headset's cables are securely plugged into the computer's audio jacks and that the device is properly connected to the headset. They should also check to see if the microphone picks up any sound when the headset is disconnected from the PC, as this could indicate a hardware issue with the microphone itself.
If the problem persists after checking the headset's hardware, the headset may need to be replaced or repaired professionally.
Repair your Errors automatically
ugetfix.com team is trying to do its best to help users find the best solutions for eliminating their errors. If you don't want to struggle with manual repair techniques, please use the automatic software. All recommended products have been tested and approved by our professionals. Tools that you can use to fix your error are listed bellow:
Access geo-restricted video content with a VPN
Private Internet Access is a VPN that can prevent your Internet Service Provider, the government, and third-parties from tracking your online and allow you to stay completely anonymous. The software provides dedicated servers for torrenting and streaming, ensuring optimal performance and not slowing you down. You can also bypass geo-restrictions and view such services as Netflix, BBC, Disney+, and other popular streaming services without limitations, regardless of where you are.
Don’t pay ransomware authors – use alternative data recovery options
Malware attacks, particularly ransomware, are by far the biggest danger to your pictures, videos, work, or school files. Since cybercriminals use a robust encryption algorithm to lock data, it can no longer be used until a ransom in bitcoin is paid. Instead of paying hackers, you should first try to use alternative recovery methods that could help you to retrieve at least some portion of the lost data. Otherwise, you could also lose your money, along with the files. One of the best tools that could restore at least some of the encrypted files – Data Recovery Pro.
- ^ Device driver. Wikipedia, the free encyclopedia.
- ^ Chris Hoffman. Everything You Need To Know About the Blue Screen of Death. Howtogeek. Tech Insight Magazine.
- ^ Tim Fisher. What Is the Windows Registry?. Lifewire. Software and Apps.


