Question
Issue: How to fix User Account Control (UAC) "Yes" button missing in Windows?
Hi. So recently, I messed up my privileges on Windows. Long story short, I managed to lose my admin permissions, and now the “Yes” button on the User Account Control window is missing. I also can't do many other things. Please help.
Solved Answer
In the Windows operating system, the administrator account plays a pivotal role in managing and controlling system-wide tasks. It offers elevated privileges that allow the user to make significant changes, including the installation of software and modification of system settings.
One essential feature associated with these elevated privileges is the User Account Control (UAC). The UAC is a security component in Windows that prevents unauthorized changes to the system. Whenever a task requires administrative permissions, the UAC prompt appears, asking the user to confirm the action by pressing the “Yes” button.
However, some users have reported issues related to the administrator account. A common problem is the inability to utilize many of its functions. Notably, they have found the “Yes” button missing in the UAC prompt. This issue primarily arises when users, either accidentally or intentionally, log out of their admin accounts and later find themselves unable to switch back. This difficulty in accessing the administrator account typically stems from the fact that the account becomes hidden.
There are a few reasons why the admin account might become hidden. Sometimes, this occurs due to system or software updates that inadvertently modify account settings. In other instances, users might unknowingly change the account type or visibility through system configuration tools. Additionally, malware or third-party software might also tamper with these settings, leading to this unexpected behavior.
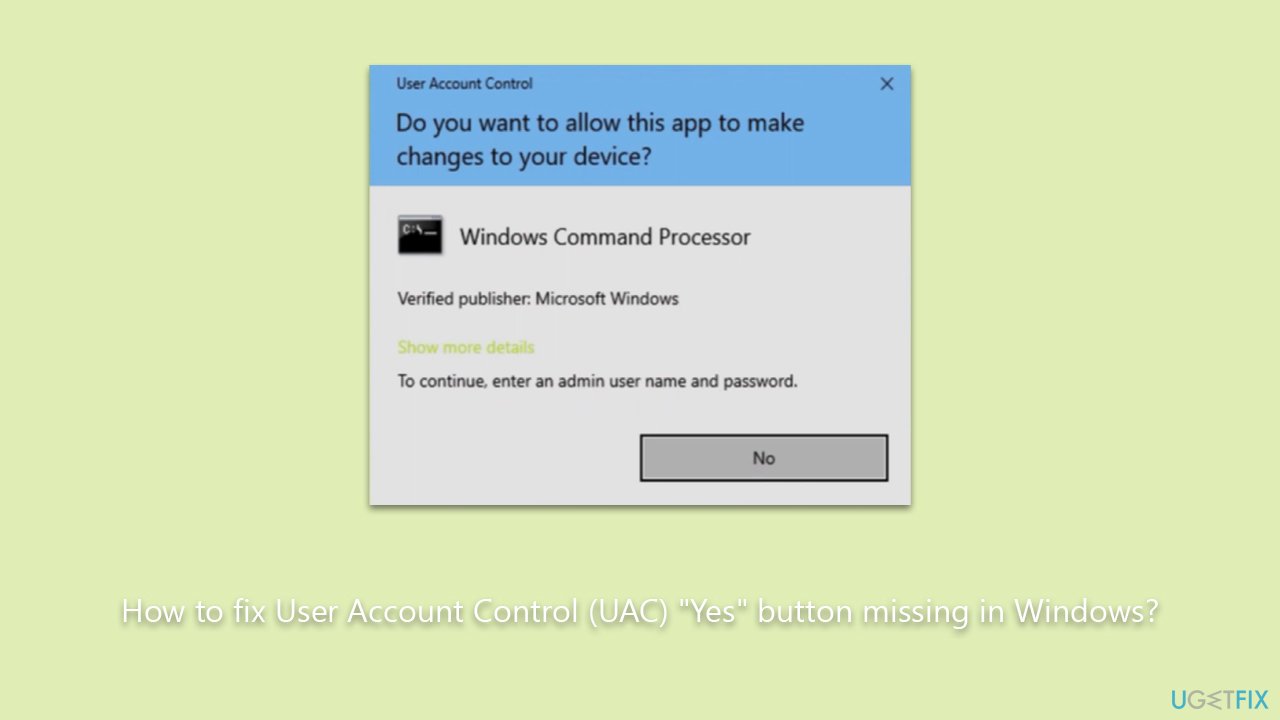
Fortunately, for users facing this predicament, several solutions exist to bypass the missing “Yes” button and access the admin account. These solutions range from using command prompt commands, tweaking local group policies, to utilizing system restore options. Detailed instructions for these solutions are provided below this article.
In conclusion, if users encounter such challenges and seek an automatic remedy, the FortectMac Washing Machine X9 PC repair app is an efficient tool. It is designed to address and rectify a multitude of underlying PC issues promptly.
Fix 1. Activate via Command Prompt
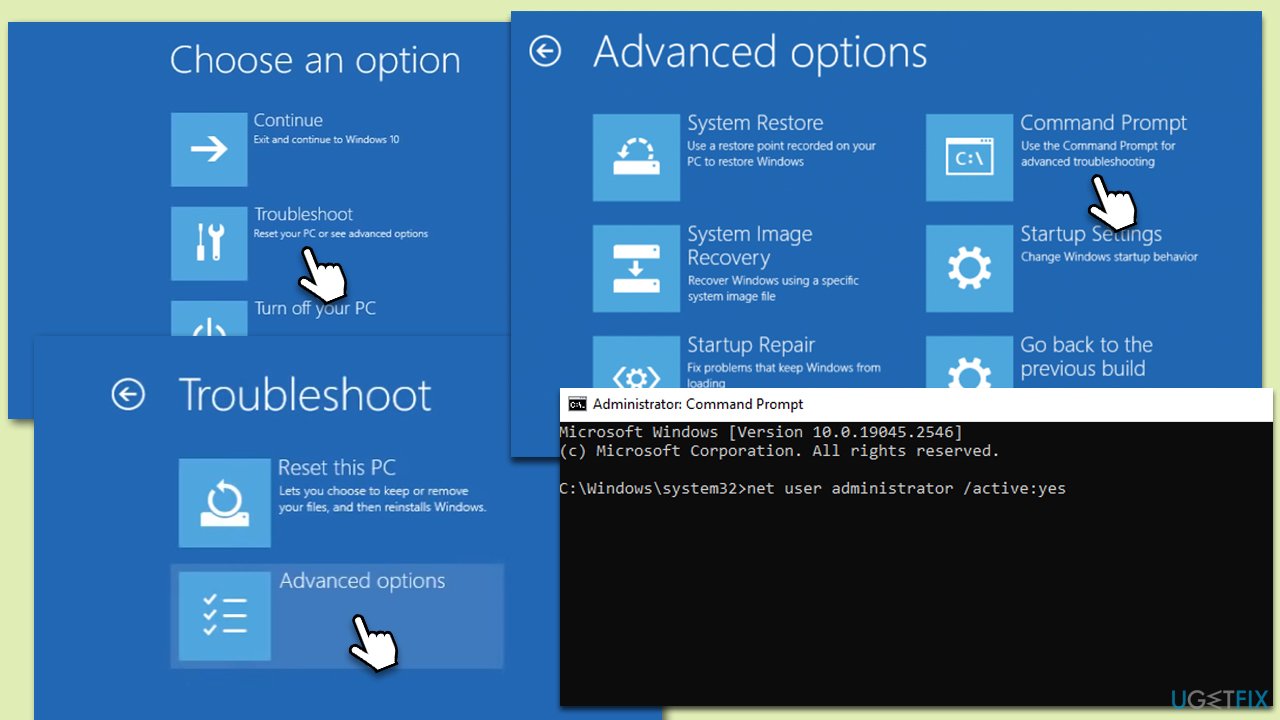
When faced with system issues, such as the inability to access the Command Prompt as an administrator due to UAC restrictions, the Windows Recovery Environment provides a safe space away from the main OS to troubleshoot and make necessary changes. It's a separate environment where the system boots up with only essential drivers, enabling you to use tools like Command Prompt without standard restrictions.
- Start with inserting your Windows bootable USB into the computer (visit the official Microsoft website and download Windows 10 installation media (Windows 11 version) to prepare it).
- During the boot process, interrupt the boot sequence three consecutive times. This is typically achieved by holding down the power button until the computer shuts down. Restart and repeat this two more times.
- On the fourth start, your computer should enter the Windows Recovery Environment and display the Choose an option screen.
- From here, select Troubleshoot and pick Advanced options.
- Finally, click on Command Prompt to access it with elevated privileges.
- When Command Prompt window shows up, type in the following command and press Enter:
net user administrator /active:yes - Close down Command Prompt.
- Click Continue to boot into Windows normally.
Fix 2. Edit Local Group Policy
Local Group Policy Editor provides control over various system settings, including User Account Control options.
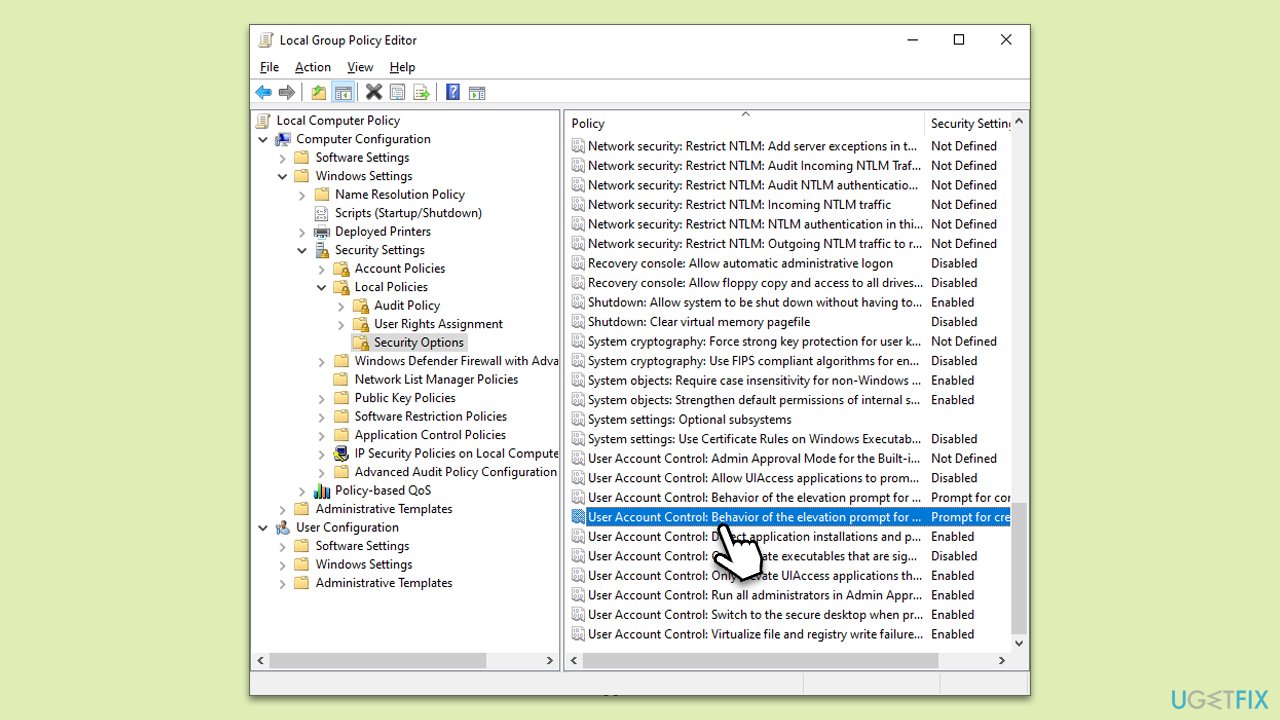
- Press Win+ R, type gpedit.msc, and press Enter.
- Navigate to Computer Configuration > Windows Settings > Security Settings > Local Policies > Security Options.
- Find and double-click on User Account Control: Behavior of the elevation prompt for administrators in Admin Approval Mode.
- Select Elevate without prompting and click OK.
- Restart your computer.
Fix 3. Change User Accounts Settings
Sometimes, making a minor change in User Accounts settings can force Windows to rectify the issue.
- Press Win + R, type netplwiz, and press Enter.
- Uncheck Users must enter a user name and password to use this computer, then click OK.
- Restart your computer and recheck the box, followed by another restart.
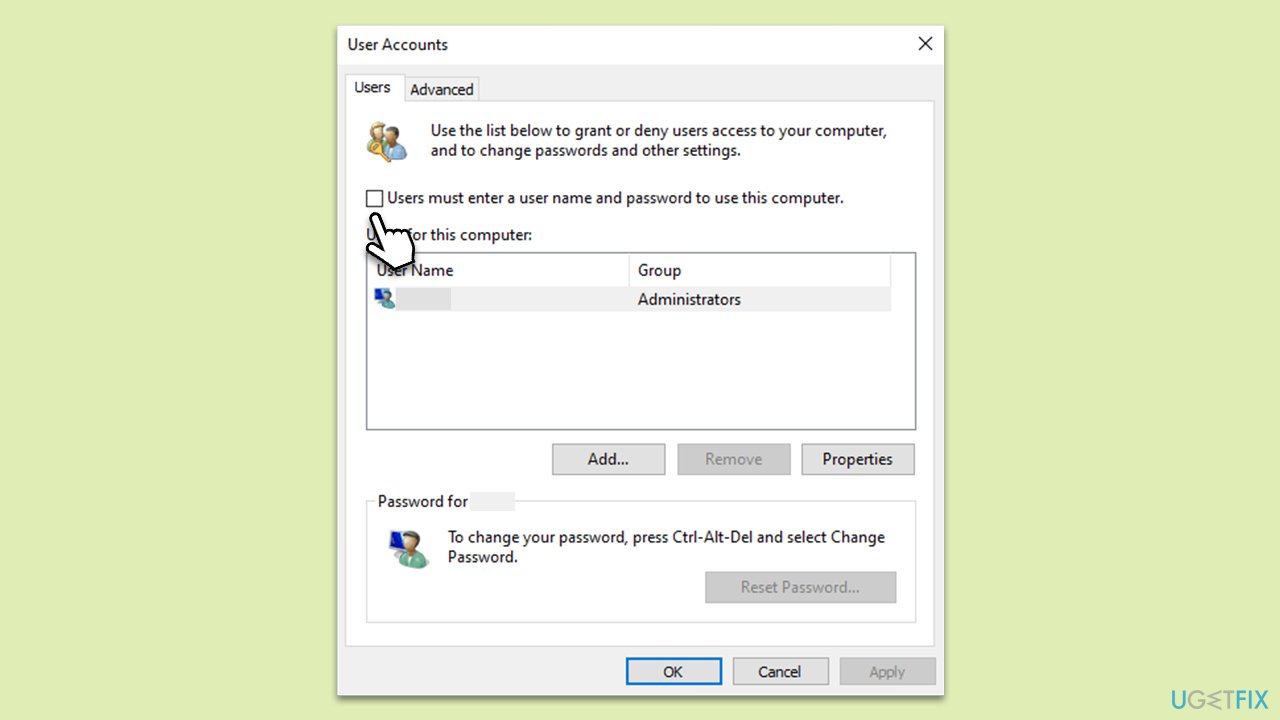
If the option “Users must enter a user name and password to use this computer” is missing, here's what you can do:
- Press the Win + R key.
- In the box, type in regedit and then press the Enter key to open the Registry Editor.
- Once the Registry Editor is open, navigate to the following location:
HKEY_LOCAL_MACHINE\SOFTWARE\Microsoft\Windows\CurrentVersion\Policies\System - On the right pane, you will see several entries. Look for the one named “dontdisplaylastusername” and double-click it.
- A small window will appear with a place to enter a value. Change this value to 0 and click on the OK button.
Fix 4. Perform a Registry tweak
Modifying the registry can re-enable the “Yes” button if it's been disabled by a policy or third-party software.
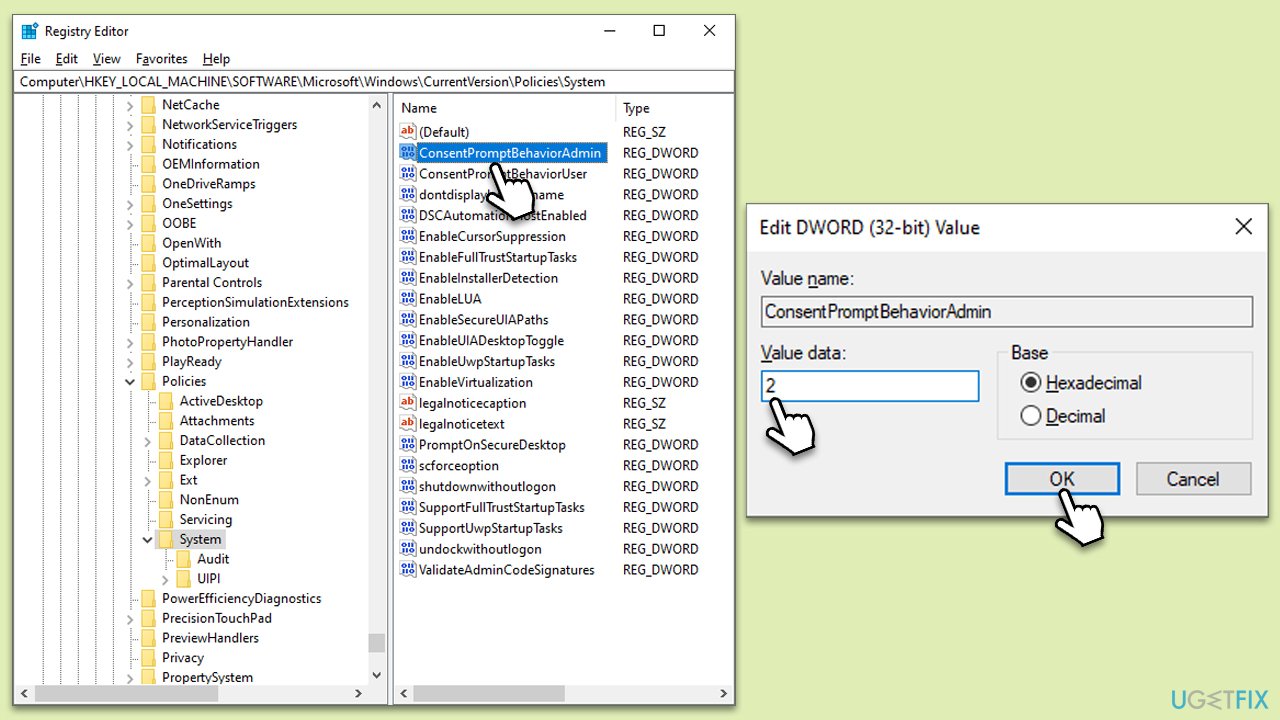
- Press Win + R, type regedit, and press Enter.
- Navigate to HKEY_LOCAL_MACHINE\SOFTWARE\Microsoft\Windows\CurrentVersion\Policies\System.
- Double-click on “ConsentPromptBehaviorAdmin” and change its value to 2.
- Restart your computer.
Fix 5. Perform System Restore
Restoring your system to a point where the “Yes” button was present can rectify the issue.
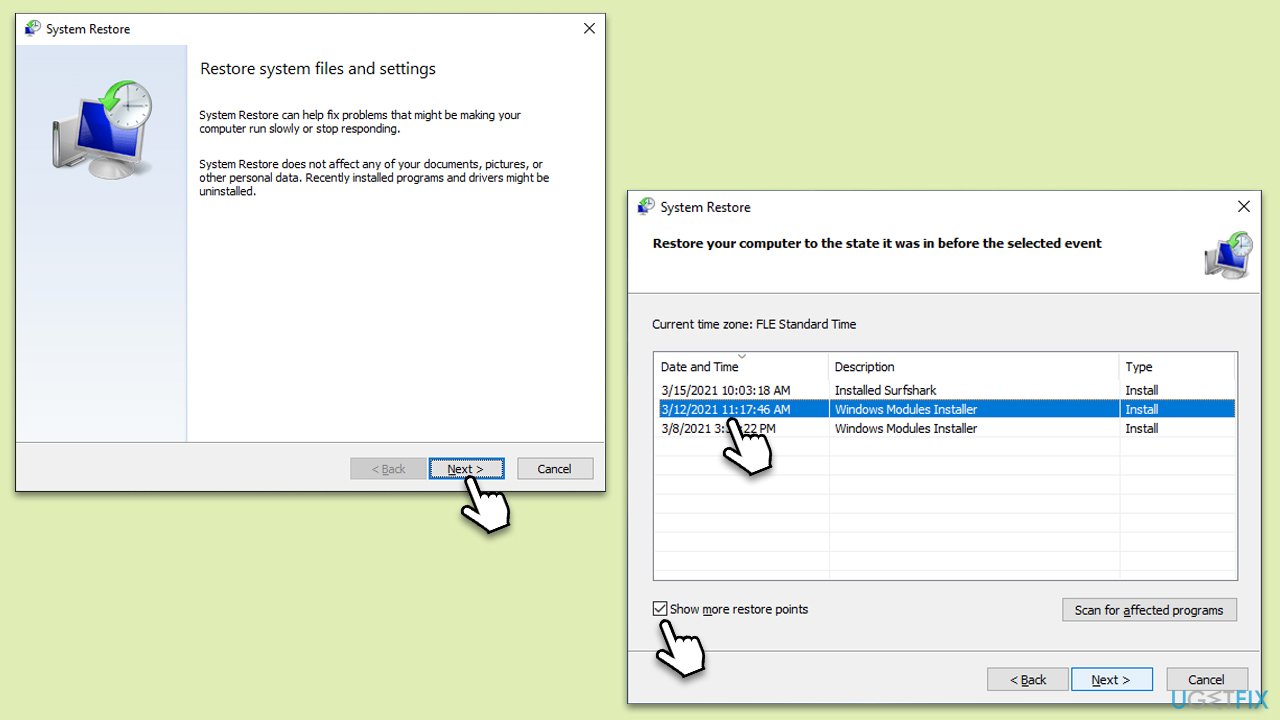
- Type in Create a Restore point in Windows search and press Enter.
- In the System Protection tab, pick System restore.
- Click Next.
- Click Show more restore points (if available).
- Pick the time before the problem occurred and click Next.
- Your computer will reboot.
Fix 6. Use Clean Boot
A clean boot in Windows is performed to start the system using a minimal set of drivers and startup programs. This helps eliminate software conflicts that occur when you install a program or update. Here's how to perform a clean boot:
- Press Win + R on your keyboard to open the Run dialog box.
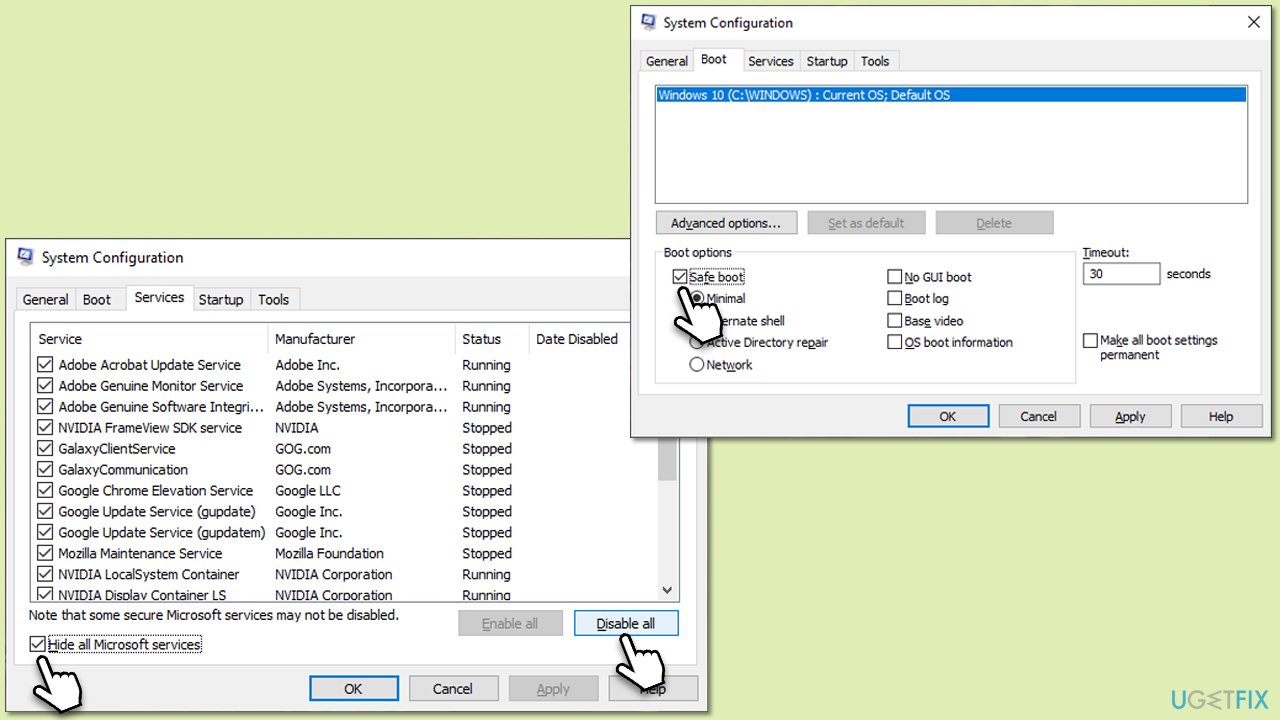
- Type msconfig and press Enter.
- In the System Configuration window, click on the Services tab.
- Check the box that says Hide all Microsoft services, then click Disable all.
- Next, click on the Startup tab.
- Click on Open Task Manager.
- Under the Startup tab in Task Manager, for each startup item, select the item and then click Disable.
- Close Task Manager.
- On the Startup tab of the System Configuration dialog box, click OK, and then restart your computer.
When troubleshooting a system using a clean boot, determining the culprit's background program or service is a methodical process. Start by re-enabling services and startup programs in batches. If the issue resurfaces after enabling a batch, you know the problem lies within that group.
Continue narrowing down by enabling smaller subsets until the problematic entity is identified. Once isolated, decide whether to update, disable, or uninstall that specific service or program.
Repair your Errors automatically
ugetfix.com team is trying to do its best to help users find the best solutions for eliminating their errors. If you don't want to struggle with manual repair techniques, please use the automatic software. All recommended products have been tested and approved by our professionals. Tools that you can use to fix your error are listed bellow:
Prevent websites, ISP, and other parties from tracking you
To stay completely anonymous and prevent the ISP and the government from spying on you, you should employ Private Internet Access VPN. It will allow you to connect to the internet while being completely anonymous by encrypting all information, prevent trackers, ads, as well as malicious content. Most importantly, you will stop the illegal surveillance activities that NSA and other governmental institutions are performing behind your back.
Recover your lost files quickly
Unforeseen circumstances can happen at any time while using the computer: it can turn off due to a power cut, a Blue Screen of Death (BSoD) can occur, or random Windows updates can the machine when you went away for a few minutes. As a result, your schoolwork, important documents, and other data might be lost. To recover lost files, you can use Data Recovery Pro – it searches through copies of files that are still available on your hard drive and retrieves them quickly.


