Question
Issue: How to fix 0xC1900101 – 0x20017 error on Windows 10 upgrade installation?
When I try to install Windows 10 to my Windows 8.1 laptop, I’m not allowed to do so due to the 0xC1900101 – 0x20017 error. It shows each time in a blue screen environment and says “We couldn’t install Windows 10. We’ve set your PC back to the way it was right before you started installing Windows 10.” At the end of this screen, the error code is given and no further explanations of what should I do or what is the core of this problem. Could you please help me?
Solved Answer
Windows Error Code 0xC1900101 – 0x20017 can show up when trying to upgrade to Windows 10 from an older version or when trying to apply a new build version via Windows updates. The message shows up when the installation completely fails, and the user is left without any proper explanation, in most cases.[1] In some cases, users can see the following explanation along the error code:
The installation failed in the SAFE_OS phase with an error during BOOT operation
0xC1900101 – 0x20017 is also called Windows 10 installation error and is similar to 0xc1900101-0x30018. These two error codes may show up interchangeably, so it’s assumed that the reason for them is the same. In most cases, 0xC1900101 – 0x20017 BSOD fails the entire installation process and rolls back to the previous operating system version or previous Windows build.
The vast majority of people who have encountered it was trying to install the Windows 10 Anniversary Update.[2] The most irritating thing is that the update reaches 99% but then freezes and throws a 0xC1900101 – 0x20017 error. Nevertheless, according to the Windows experts who have been investigating this issue in great detail, this problem appears on freshly installed Windows OS as well.
The message itself is not very informative. It simply declares that the installation process could not be executed and that it has “failed in the SAFE_OS phase” Unexperienced users probably do not understand a word in this message and have no idea what fixes should be performed to work around it. This is why we have a few solutions for you below.

How to fix 0xC1900101 – 0x20017 Windows 10 error
Luckily, we can calm you down. Windows installation error 0xC1900101 – 0x20017 is not that serious as it may occur at first. This is not a malware[3] issue or a crucial problem. The majority of people who have encountered it managed to fix it manually without any difficulties.
While its causes are not precisely clear, its emergence means that due to some system failure, Windows cannot access required information related to system files, registries, or similar. Therefore, before you start the installation or upgrade, run a scan with FortectMac Washing Machine X9 in order to fix issues persisting in the current Windows version; if that did not help, try one of the following fixes.
Ensure you have enough disk space
In some cases, users get seemingly scary errors due to simple reasons. Since the 0xC1900101 – 0x20017 error occurs during the update or upgrade of Windows, it could be caused un insufficient disk space. Thus, you should check how much space your disk holds.
- For Windows 32-bit version, you will need at least 20 GB of free space.
- For Windows 64-bit version, you will need at least 32 GB of free space.
- Windows update size varies, although it is typically much less that the sizes above.
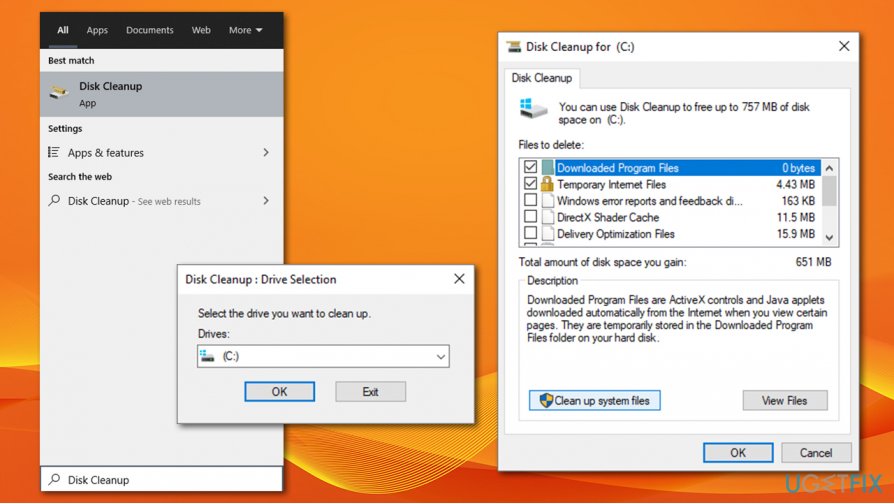
If you have too little space, you should perform Disk Cleanup and/or delete unnecessary files:
- Type Disk Cleanup in Windows search and press Enter.
- Select the drive you are using to install Windows/updates (C: by default).
- Select appropriate fields and press Clean up system files.

Temporarily Uninstall all third-party antivirus, firewall or drive encryption software
If you have third-party software that might interfere with file import installed, uninstall it and see of that helps you (you can reinstall software later):
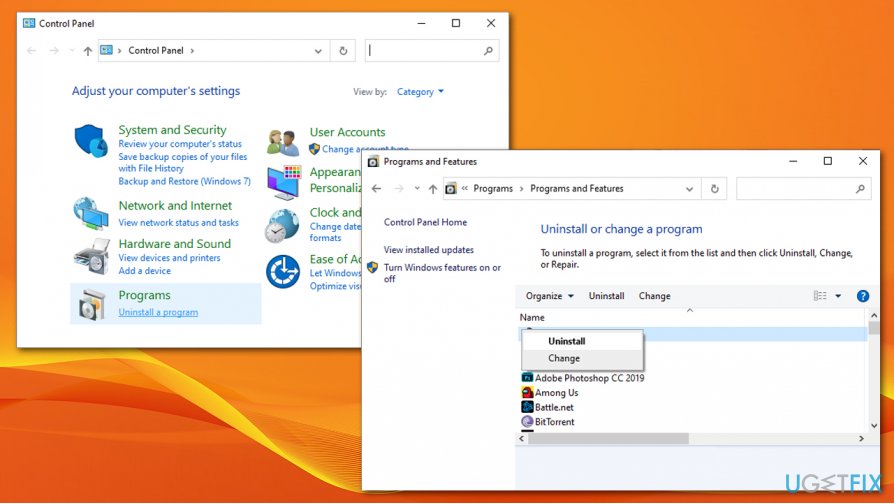
- Type in Control Panel in Windows search and then press Enter.
- Go to Program > Uninstall a program.
- Locate an antivirus, firewall, or other software.
- Right-click and select Uninstall.

- Follow on-screen instructions to finalize.
- Reboot and try to upgrade/update Windows once again.
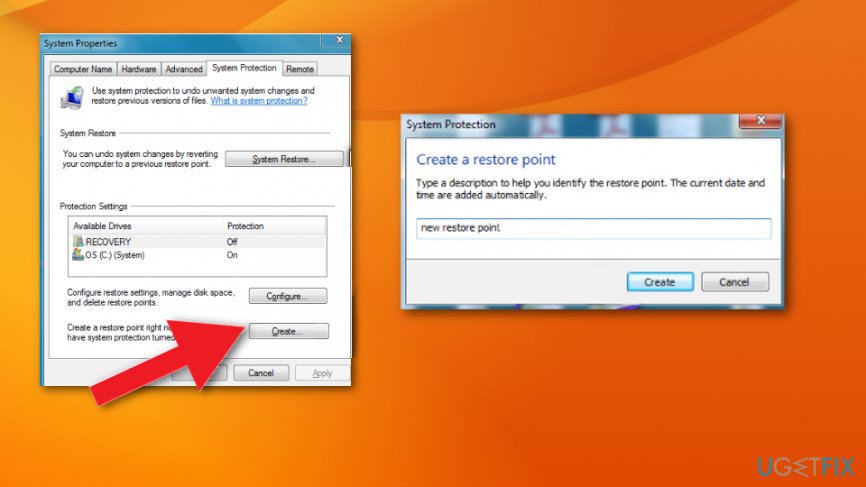
Create a Windows restore point
- Hold Windows key and R together on the keyboard.
- Then type the following in the dialog box:
SystemPropertiesProtection.exe - Then click Create and specify the name of the restore point.
- Click OK and confirm the creation.

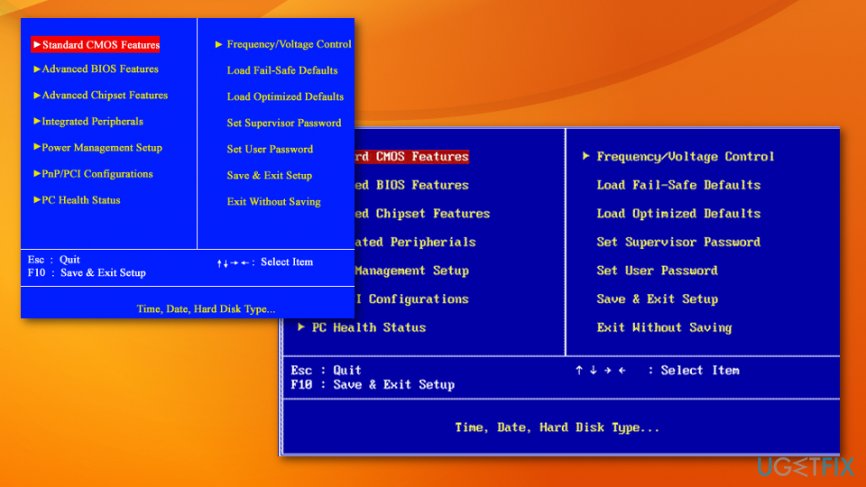
Disable wireless from BIOS
- Restart the computer.
- During the boot press F2 and Del constantly to enter the BIOS.

- Go to the Advanced tab once that is done.
- Navigate to Wireless option and press Enter to open it.
- Once two Internal Bluetooth and Internal WLAN options appear, disable both.
- Press Esc and go back to the main screen to save changes.
Update or Reinstall drivers
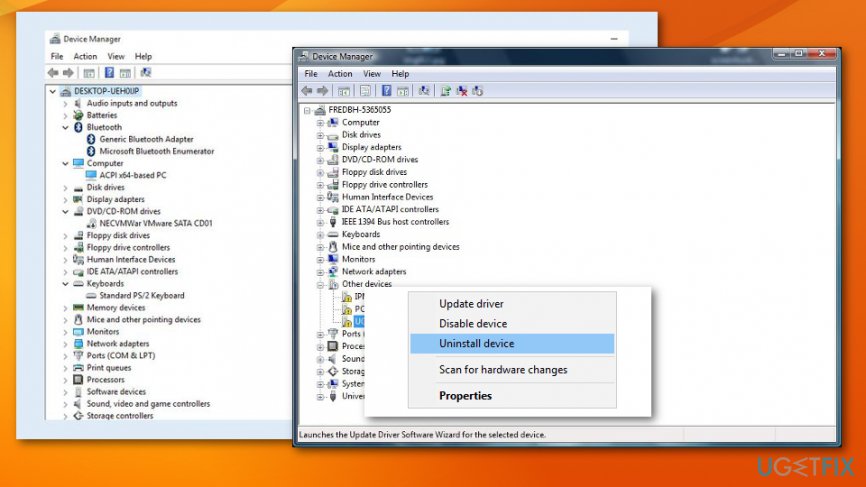
- Press Win key and type Device Manager.
- Click on the search results and look for the malfunctioning drivers. They should be labeled with a yellow exclamation mark, so go through the list of devices on the left pane and check each of them.
- If any driver/device is running improperly, right-click on it and select Properties.
- After that, select Drivers and click on Update Drivers option.
- Finally, reboot the system.
Uninstall Broadcom Bluetooth and Wireless drivers
If you are running Windows 7 or 8.1 OS, the culprit may be Broadcom Bluetooth and Wireless drivers, so to fix 0xC1900101 – 0x20017 error you should try uninstalling them both. For that, perform these steps:
- Go to Start and type Device Manager in the search box.

- Click on the search results and find Bluetooth driver.
- Right-click on it and select Uninstall.
- After that, find a Wireless Network driver, right-click on it, and select Uninstall.
- Finally, reboot the system and try to install the update.
Reset Windows Update components
- Click Win key + X and select Command Prompt (Admin).
- Disable BITS, Cryptographic, MSI Installer, and the Windows Update Services. In order to do so, type the following commands in the Command Prompt and hit Enter after each of them: net stop wuauserv, net stop cryptSvc, net stop bits and net stop msiserver.
- After that, type these commands to rename SoftwareDistribution and Catroot2 folders. Don’t forget to type Enter after each of them: ren C:\\Windows\\SoftwareDistribution SoftwareDistribution.old and ren C:\\Windows\\System32\\catroot2 Catroot2.old
- Once done, enable BITS, Cryptographic, MSI Installer, and the Windows Update Services. This can be done by typing the following commands followed by Enter: net start wuauserv, net start cryptSvc, net start bits, and net start msiserver.
- Finally, close Command Prompt window and reboot your PC.
Use Media Creation Tool
- Download Windows 10 installation media from the official Microsoft website.
- Double-click the installer to launch it.
- Agree to Terms and select Next.
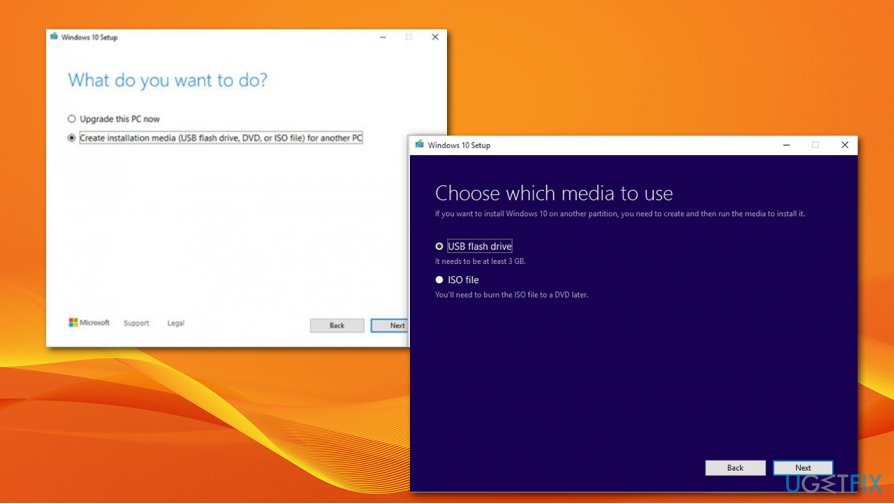
- Select Create installation media (USB flash drive, DVD or ISO file) for another PC and click Next.
- Pick USB flash drive (make sure you have USB connected to your PC).
- Now follow on-screen instructions, and once the option to pick partition style shows up, select UEFI.
- Proceed with on-screen instructions to finalize the process.
- Once done, double-click the Ready to install option.

- Select Keep personal files.
- Wait till the installation is finished.
Repair your Errors automatically
ugetfix.com team is trying to do its best to help users find the best solutions for eliminating their errors. If you don't want to struggle with manual repair techniques, please use the automatic software. All recommended products have been tested and approved by our professionals. Tools that you can use to fix your error are listed bellow:
Access geo-restricted video content with a VPN
Private Internet Access is a VPN that can prevent your Internet Service Provider, the government, and third-parties from tracking your online and allow you to stay completely anonymous. The software provides dedicated servers for torrenting and streaming, ensuring optimal performance and not slowing you down. You can also bypass geo-restrictions and view such services as Netflix, BBC, Disney+, and other popular streaming services without limitations, regardless of where you are.
Don’t pay ransomware authors – use alternative data recovery options
Malware attacks, particularly ransomware, are by far the biggest danger to your pictures, videos, work, or school files. Since cybercriminals use a robust encryption algorithm to lock data, it can no longer be used until a ransom in bitcoin is paid. Instead of paying hackers, you should first try to use alternative recovery methods that could help you to retrieve at least some portion of the lost data. Otherwise, you could also lose your money, along with the files. One of the best tools that could restore at least some of the encrypted files – Data Recovery Pro.
- ^ Windows 10 Installation Error - 0xC1900101 - 0x20017. Answers. Microsoft community forum.
- ^ Mauro Huculak. Windows 10 Anniversary Update common problems and how to fix them. Windowscentral. News, reviews and help.
- ^ Malware. Techtarget. Search security.
