Question
Issue: How to fix Windows update high CPU usage?
Hello. I noticed that my Windows PC was getting slow and found that the Windows Update process is using high amounts of CPU for no reason. Is there a way to fix this?
Solved Answer
Users may find it difficult when Windows Update results in high CPU consumption because it could hinder system speed, make programs lag, and worsen overall performance. This issue frequently results from incomplete or stalled updates that start a cycle of installation attempts and use more resources. Windows Update is essential for preserving the security and stability of the system, but its unexpected consequences can cause serious annoyance.
Windows Update might use a lot of CPU resources for a variety of reasons. Too many background programs that are actively running is one common offender. Along with the update process, these programs compete for system resources, slowing down the system as a whole. Additionally, a lack of RAM makes matters worse because the update process competes with other applications for memory, which hurts speed.
High CPU consumption might also be the result of corrupted Windows update processes. The system may continually try to process incomplete or flawed update files, using up extra CPU cycles in the process. Virus infections can also influence the update process, making it run endlessly and consume system resources.
In this guide, you will find 5 steps that should help you fix Windows update high CPU. You can also run a maintenance tool like FortectMac Washing Machine X9 that can fix most system errors, BSODs,[1] corrupted files, and registry[2] issues. Otherwise, follow the step-by-step instructions below.
Solution 1. Restart the Windows Update Service
- Open the Windows search box.
- Type Services in the search box.
- From the search results, click on Services to open the corresponding application.
- Scroll down within the Services window to locate Windows Update.
- Right-click on Windows Update.
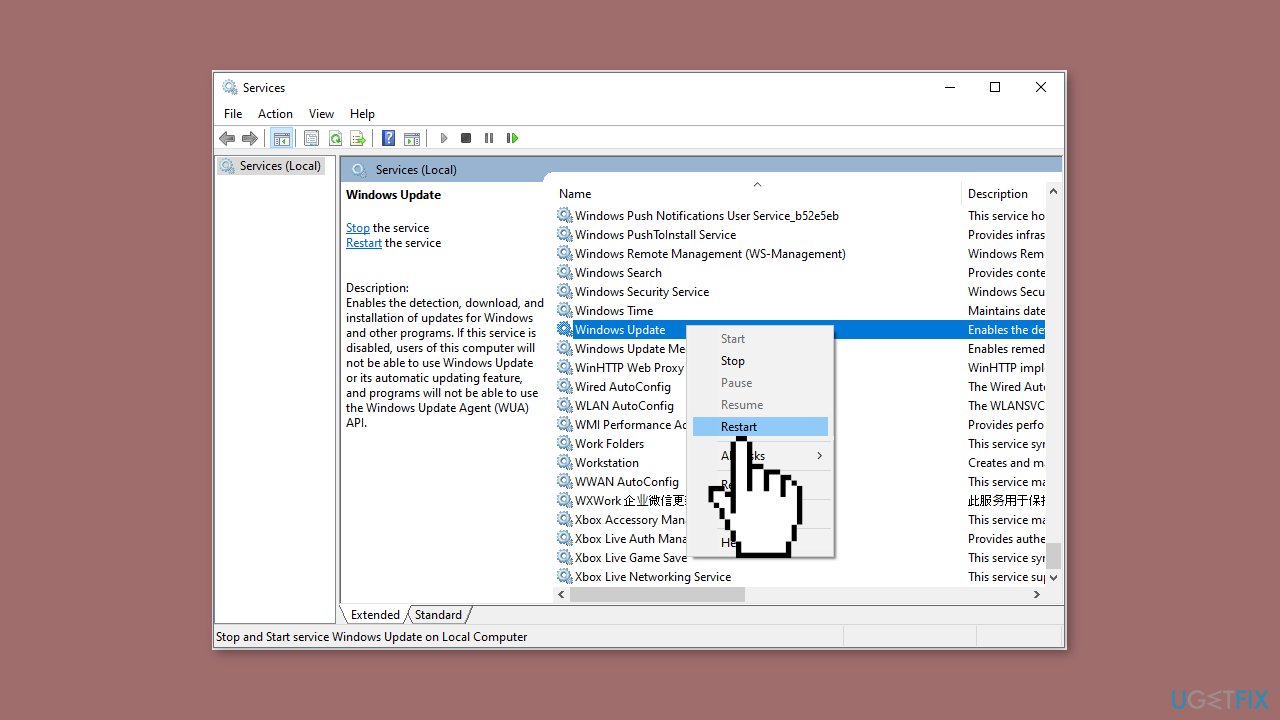
- Choose Restart from the context menu that appears.
- Repeat the process for two more services:
- Locate Background Intelligent Transfer Service in the list.
- Right-click on it.
- Select Restart from the context menu.
- Similarly, locate Cryptographic Services.
- Right-click on it.
- Choose Restart from the context menu.
Solution 2. Disable Startup Programs
- Right-click on the Windows logo button.
- From the context menu, select Task Manager.
- Click on the Startup tab.
- Locate the target program from the list.
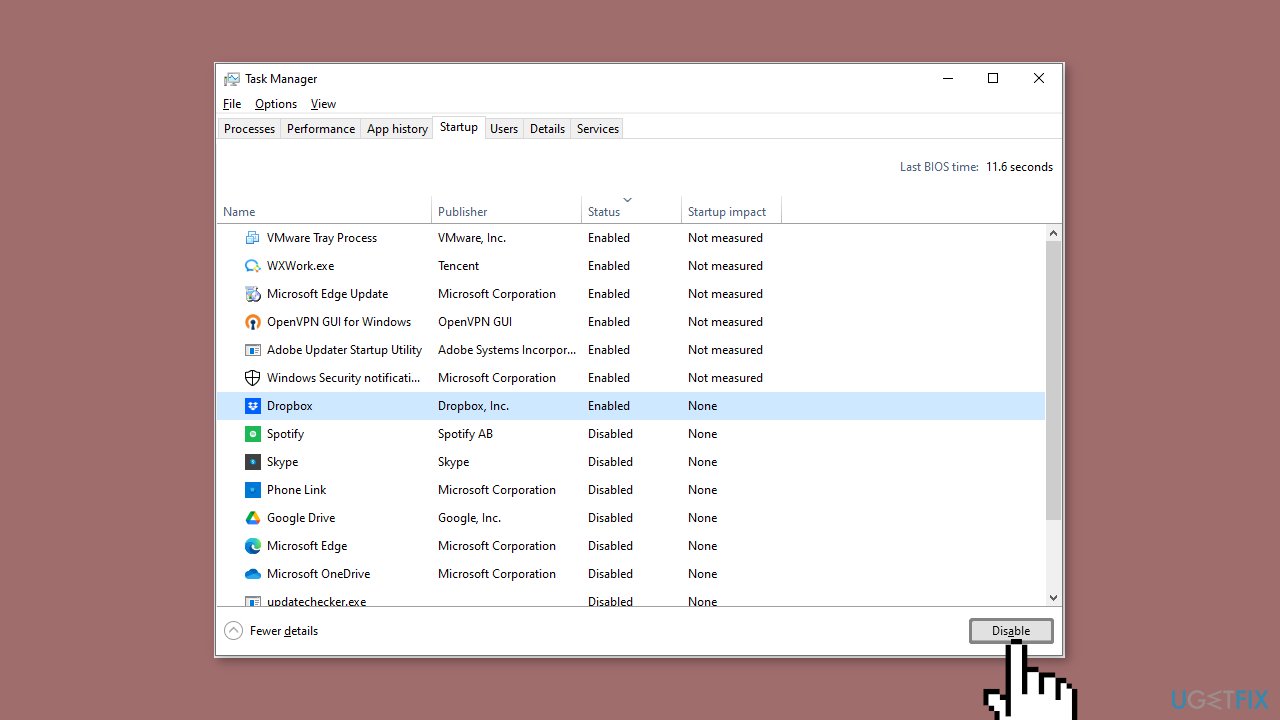
- Select the target program by clicking on it once.
- With the program selected, locate and click the Disable button.
- If you want to disable more programs:
- Repeat the process for each unnecessary program you want to disable.
- Keep in mind that the disabled startup programs will not automatically launch the next time you boot your Windows system.
Solution 3. Run the Windows Update Troubleshooter
- Press the Windows key + I to open Windows Settings.
- Within the Windows Settings, navigate to the System tab.
- Scroll down the options in the System tab and locate Troubleshoot; click on it.
- Inside the Troubleshoot screen, find and select the Other troubleshooters option.
- A list of various troubleshooters will be displayed.

- Look for the Windows Update troubleshooter in the list.
- Click on the Run button associated with the Windows Update troubleshooter.
- Allow the troubleshooter to complete its process.
- Once the troubleshooter finishes, check your computer to determine if the issue has been resolved.
Solution 4. Change Windows Update Settings
- Press the Windows key + I to open Windows Settings.
- Click on Update & Security.
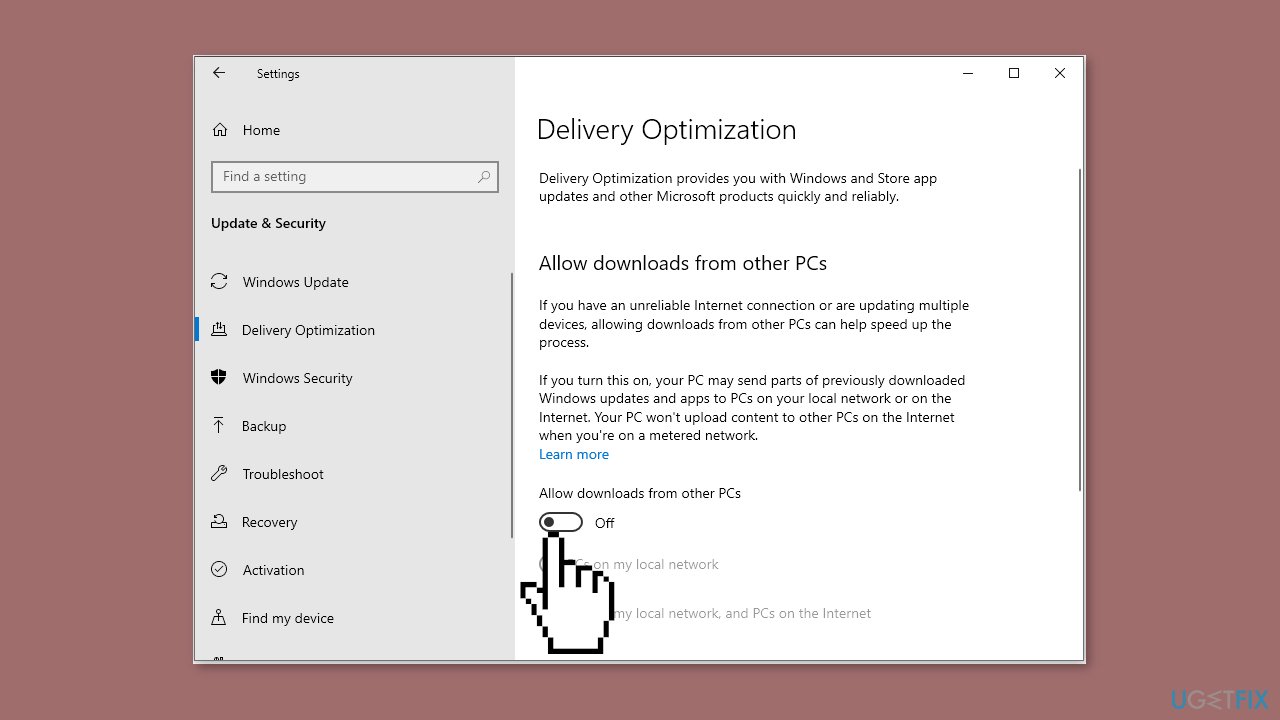
- Navigate to the Delivery Optimization section.
- Ensure that the Allow downloads from other PCs option is switched off.
Solution 5. Scan for Malware
It is possible that a malware infection may be the cause of Windows update high CPU usage. It is important to run a comprehensive security scan to rule out this possibility and ensure that the computer is not infected. This can help to prevent further issues with the Windows operating system and ensure that it is functioning properly.
If you have access to a security scanner, or if your organization pays for one, you can use it to scan your entire system to check for a virus infection. Otherwise, you can use Windows Defender to scan your system:
- Click on the Windows Start menu or press the Windows key on your keyboard.
- Type Microsoft Defender in the search bar and click on Microsoft Defender Antivirus to open the application.
- Click on the Virus & threat protection option in the left-hand menu.
- Click on the Quick scan or Full scan option, depending on your preference.

- If you choose Quick scan, Microsoft Defender Antivirus will scan the most vulnerable and commonly infected areas of your computer.
- If you choose Full scan, Microsoft Defender Antivirus will scan your entire computer, including all files, folders, and programs.
- Click on the Scan now button to start the selected scan type and wait for the scan to complete.
- The time it takes will depend on the size of your hard drive and the number of files being scanned.
- Once the scan is complete, you will be informed of any detected threats, and you can choose to quarantine or remove them.
- If no threats are found, Microsoft Defender Antivirus will inform you that your device is secure.
Repair your Errors automatically
ugetfix.com team is trying to do its best to help users find the best solutions for eliminating their errors. If you don't want to struggle with manual repair techniques, please use the automatic software. All recommended products have been tested and approved by our professionals. Tools that you can use to fix your error are listed bellow:
Prevent websites, ISP, and other parties from tracking you
To stay completely anonymous and prevent the ISP and the government from spying on you, you should employ Private Internet Access VPN. It will allow you to connect to the internet while being completely anonymous by encrypting all information, prevent trackers, ads, as well as malicious content. Most importantly, you will stop the illegal surveillance activities that NSA and other governmental institutions are performing behind your back.
Recover your lost files quickly
Unforeseen circumstances can happen at any time while using the computer: it can turn off due to a power cut, a Blue Screen of Death (BSoD) can occur, or random Windows updates can the machine when you went away for a few minutes. As a result, your schoolwork, important documents, and other data might be lost. To recover lost files, you can use Data Recovery Pro – it searches through copies of files that are still available on your hard drive and retrieves them quickly.
- ^ Chris Hoffman. Everything You Need To Know About the Blue Screen of Death. Howtogeek. Technology Magazine.
- ^ Windows Registry. Wikipedia, the free encyclopedia.


