Question
Issue: How to disable Error Reporting in Windows?
Hello. How do I disable the Error Reporting feature in Windows?
Solved Answer
Windows Error Reporting is a feature that was introduced in Windows XP to help users troubleshoot crash dumps and send crash reports to Microsoft for further analysis. It can be helpful in finding solutions to system problems and releasing patches to fix them. However, there may be scenarios where users may want to disable Windows Error Reporting.
One reason to disable the feature is if you use a spare system that is not connected to the internet, or if it has an outdated OS version that is no longer supported by Microsoft. Some users may also find the tool annoying if it frequently pops up. Before deciding to disable Windows Error Reporting, it is important to consider the potential consequences. If Microsoft does not receive crash reports, it will not be aware of problems with the OS and will not release patches to fix them.
Additionally, solution information will not be available in the Security and Maintenance section of the Control Panel. There are several ways to disable Windows Error Reporting. These include using the Services Panel, the Group Policy Editor (available on Windows Professional, Ultimate, and Enterprise editions), and the Registry Editor.

Older Windows OS versions, such as Windows 7, also have their own method using the Action Center in the Control Panel. It is important to carefully follow the steps and create a backup of the registry before attempting any changes. If you experience any system problems, you can use a maintenance tool like FortectMac Washing Machine X9 that can fix most system errors, BSODs,[1] corrupted files, registry[2] issues, or clear cookies and cache[3] automatically.
To disable Windows Error Reporting:
Method 1. Using the Services Panel
- Press the Windows key + R to open the Run command box
- Type services.msc and press Enter to open the Services panel
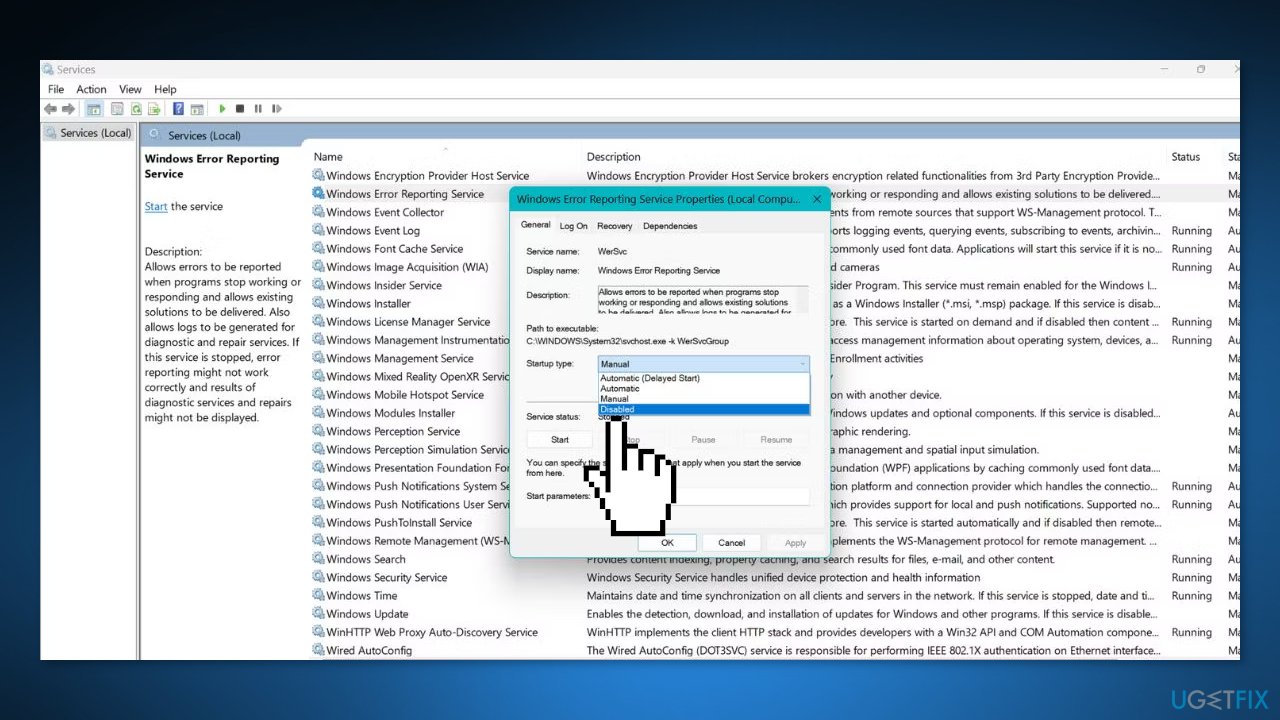
- Scroll down and locate the Windows Error Reporting Service
- Double-click to open the Properties window

- Change the Startup type to Disabled and click Apply
- Click OK and exit the Services panel
- Restart your system
Method 2. Using the Group Policy Editor
The Group Policy Editor is another tool that can be used to disable the Windows Error Reporting feature. It is a powerful Windows administration tool that allows users to modify various aspects of the operating system. However, this tool is only available to users of Windows Professional, Ultimate, and Enterprise editions.
- Press the Windows key + R to open the Run command box
- Input gpedit.msc and press Enter to open the Group Policy Editor
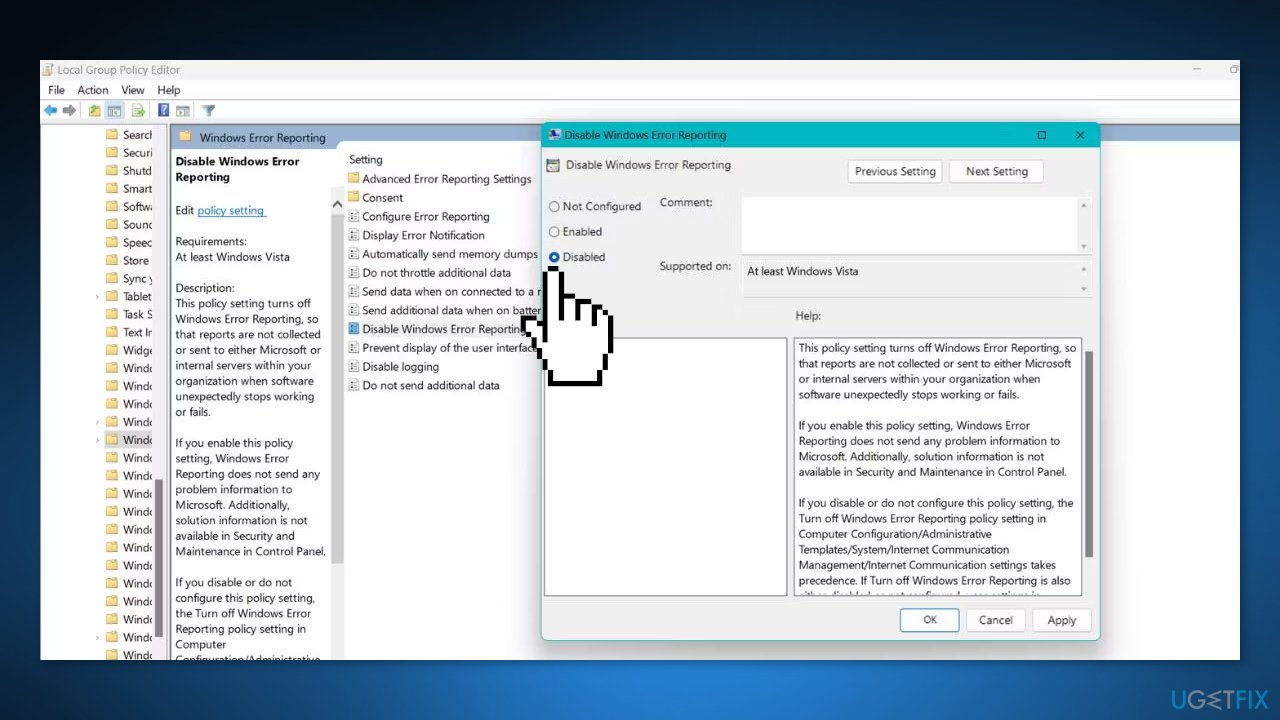
- Navigate to Computer Configuration > Administrative Templates > Windows Components > Windows Error Reporting

- Double-click on Disable Windows Error Reporting and select the Disabled radio button
- Click Apply and then click OK
- Exit the Group Policy Editor and restart your system
Method 3. Using the Registry Editor
Windows Home users can try modifying the registry. However, it is important to note that incorrect registry modifications can disrupt the normal functioning of the system. Therefore, it is recommended to create and export a backup of the registry before attempting any changes. This way, you can revert to the old registry settings if something goes wrong. For more information, check How to back up and restore the Windows registry?
- Press the Windows key + R to open the Run box
- Type regedit and press Enter
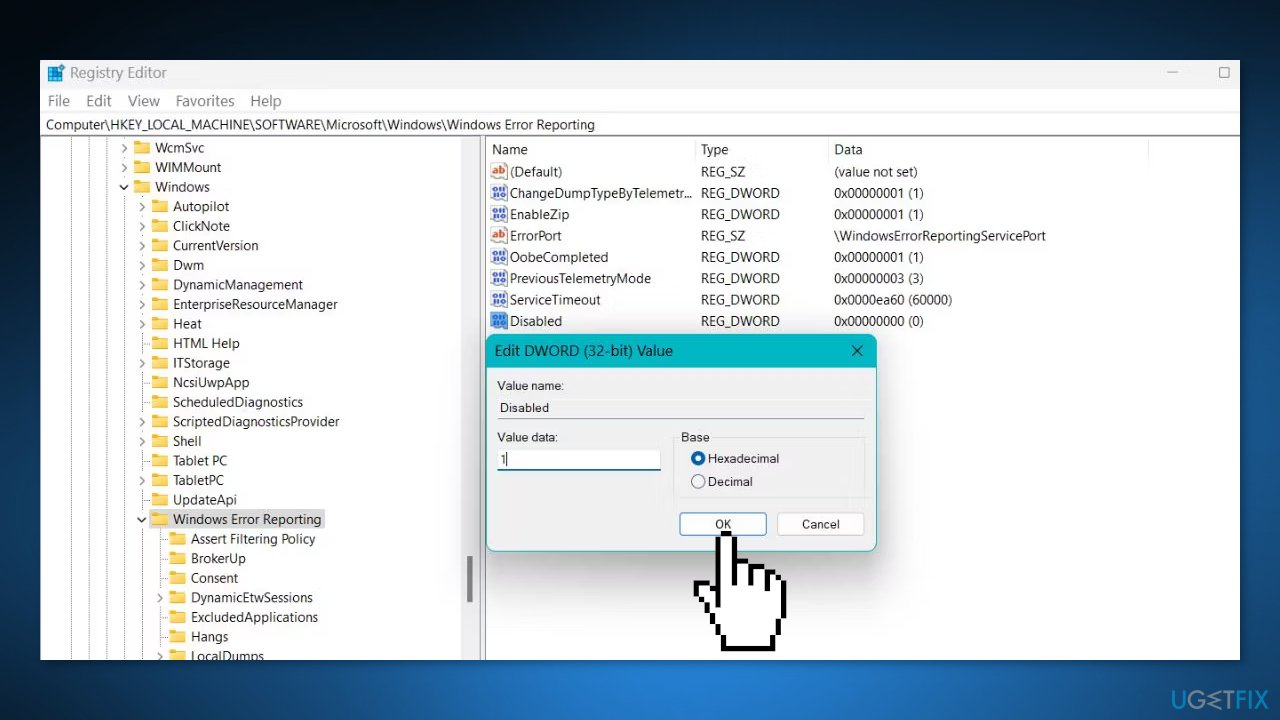
- Navigate to Computer\HKEY_LOCAL_MACHINE\SOFTWARE\Microsoft\Windows\Windows Error Reporting
- Right-click on the right-hand side pane and select New > DWORD (32-bit) value

- Name the value as Disabled and double-click on it
- Go to the Value Data field and enter 1
- Keep the base as hexadecimal
- Click OK to save the changes and restart your system
Method 4. On older Windows OS versions
On Windows 7, you can disable the Windows Error Reporting feature using the old Action Center, which was merged with the Security and Maintenance section in Control Panel on Windows 10 and 11.
- Press the Windows key and click on Control Panel in the Start Menu
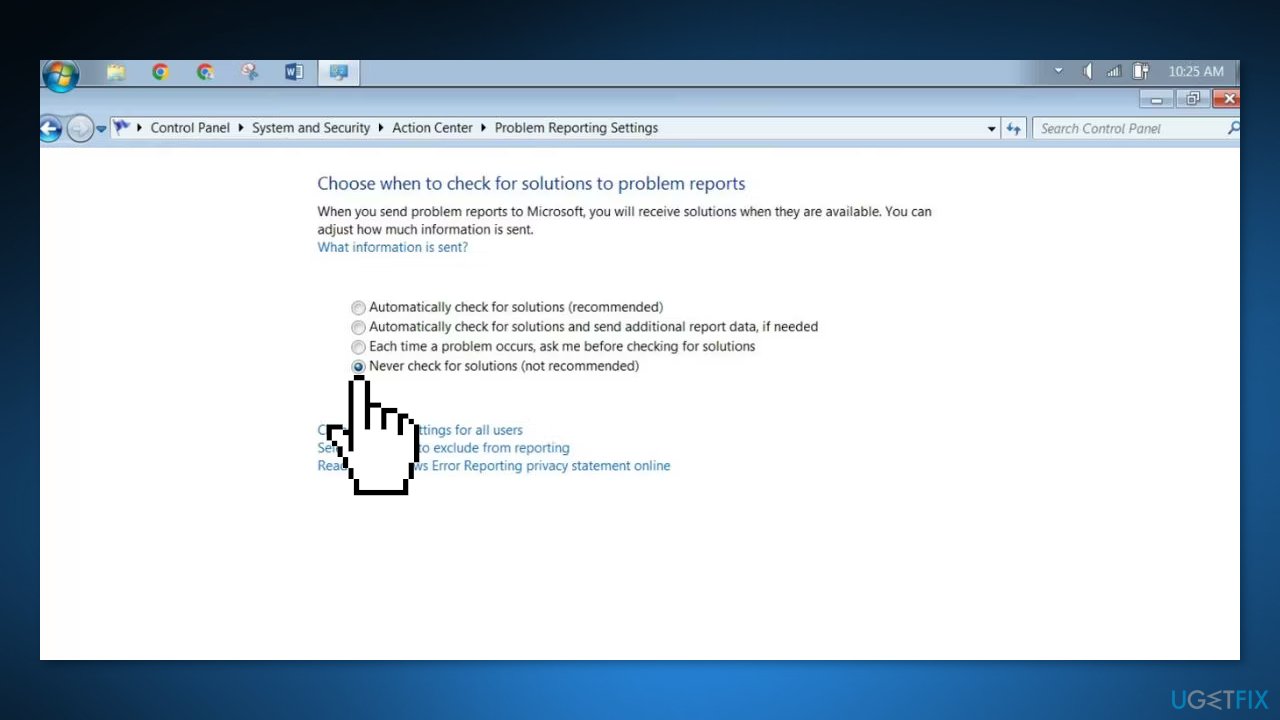
- Navigate to System and Security > Action Center > Problem Reporting Settings
- Click on Change Setting and select Never Check for Solutions
- Click OK to save the changes

Optimize your system and make it work more efficiently
Optimize your system now! If you don't want to inspect your computer manually and struggle with trying to find issues that are slowing it down, you can use optimization software listed below. All these solutions have been tested by ugetfix.com team to be sure that they help improve the system. To optimize your computer with only one click, select one of these tools:
Access geo-restricted video content with a VPN
Private Internet Access is a VPN that can prevent your Internet Service Provider, the government, and third-parties from tracking your online and allow you to stay completely anonymous. The software provides dedicated servers for torrenting and streaming, ensuring optimal performance and not slowing you down. You can also bypass geo-restrictions and view such services as Netflix, BBC, Disney+, and other popular streaming services without limitations, regardless of where you are.
Don’t pay ransomware authors – use alternative data recovery options
Malware attacks, particularly ransomware, are by far the biggest danger to your pictures, videos, work, or school files. Since cybercriminals use a robust encryption algorithm to lock data, it can no longer be used until a ransom in bitcoin is paid. Instead of paying hackers, you should first try to use alternative recovery methods that could help you to retrieve at least some portion of the lost data. Otherwise, you could also lose your money, along with the files. One of the best tools that could restore at least some of the encrypted files – Data Recovery Pro.
- ^ Chris Hoffman. Everything You Need To Know About the Blue Screen of Death. Howtogeek. Technology Magazine.
- ^ Windows Registry. Wikipedia, the free encyclopedia.
- ^ Difference between Cache and Cookies. Geeksforgeeks. IT Education.


