Question
Issue: How to fix AMD Driver Timeout (TDR) error in Windows?
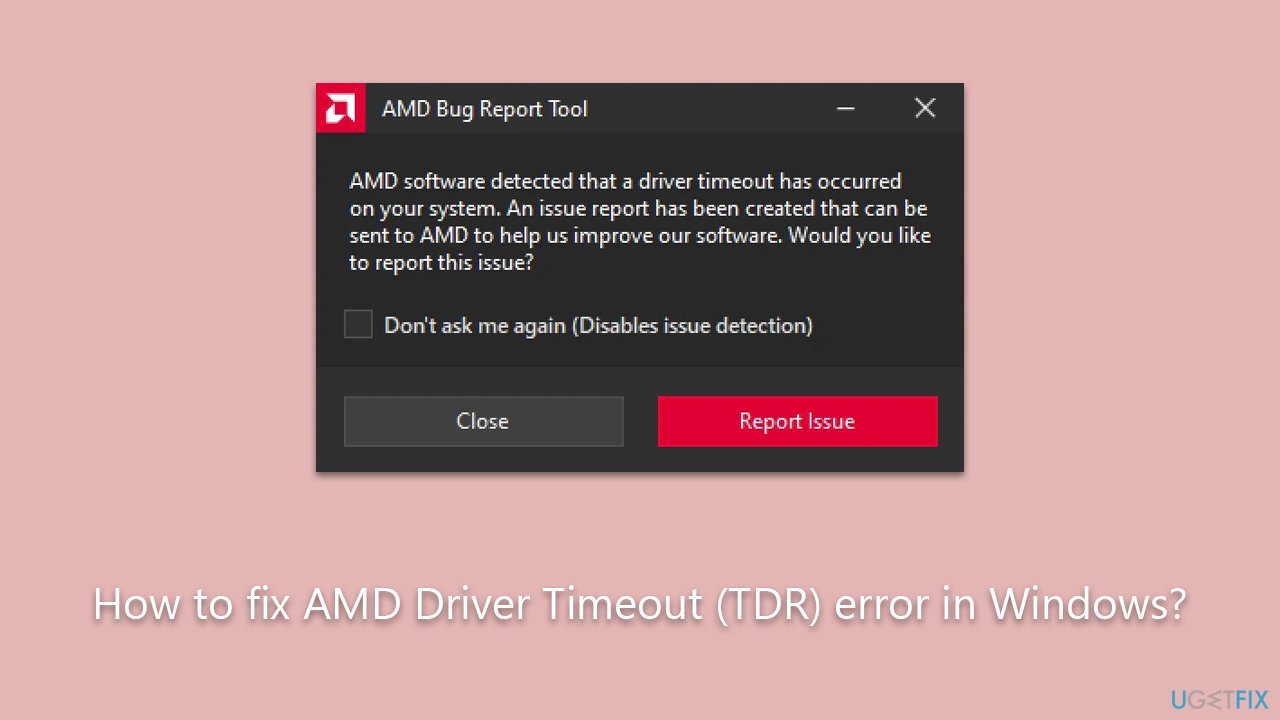
Hi. Occasionally, I receive an error message from the AMD Bug Report Tool, which says that a Driver Timeout has occurred. This started happening a couple of weeks ago and I am not sure what's causing it. I am using AMD Ryzen 5 5600X CPU with Radeon RX 6500 XT graphics.
Solved Answer
Advanced Micro Devices, commonly referred to as AMD, is a multinational semiconductor company that produces a wide range of hardware components. These range from graphics cards, server processors, to their renowned desktop and laptop processors. Their processors, in particular, have gained significant popularity in the market due to their performance, efficiency, and value proposition.
However, like all technological products, AMD hardware is not without its potential issues. Users have sometimes reported encountering specific problems, and among these, the Driver Timeout (TDR) error is a notable one. This error doesn’t always manifest in the same way for every user, but there are common scenarios in which it tends to occur.
Many users have observed this error when streaming videos on YouTube or browsing the internet using Google Chrome or other web browsers. Apart from these, the error has also been known to surface following the crash of a game or another software application.
Primarily, the root cause of the AMD Driver Timeout (TDR) error in Windows is related to driver conflicts or incompatibilities. The immediate steps users should consider include updating the current drivers, rolling back to a previous driver version, or even reinstalling them completely. Yet, it's essential to understand that while the driver issues are the most frequent culprits, they aren't the only ones. An outdated Windows operating system or inadequate virtual memory settings can also be contributing factors to this error.
For those unsure about manually navigating and rectifying these issues, comprehensive instructions will be provided below to guide users through the process, ensuring a smooth and hassle-free resolution.
Lastly, for individuals seeking an all-in-one solution, consider using the FortectMac Washing Machine X9 PC repair tool. It is capable of fixing various Windows-related issues automatically and optimizing the system for peak performance.
Fix 1. Install all Windows updates
It's essential to ensure that your operating system is up-to-date because outdated Windows versions can sometimes conflict with newer drivers or applications. Windows updates often contain patches for known issues, enhancing system stability.
- Press the Windows key and type Update.
- Click on Check for updates from the results.
- If there are any pending updates, click Download or Install.
- Ensure you install all the optional updates as well.
- Once installed, restart your computer.

Fix 2. Update your AMD driver
Keeping your drivers updated is crucial. Drivers act as a bridge between the OS and hardware, and outdated ones can lead to conflicts. You can download the latest driver from the official AMD website, use automatic driver update software. such as DriverFix, or update through the Device Manager.
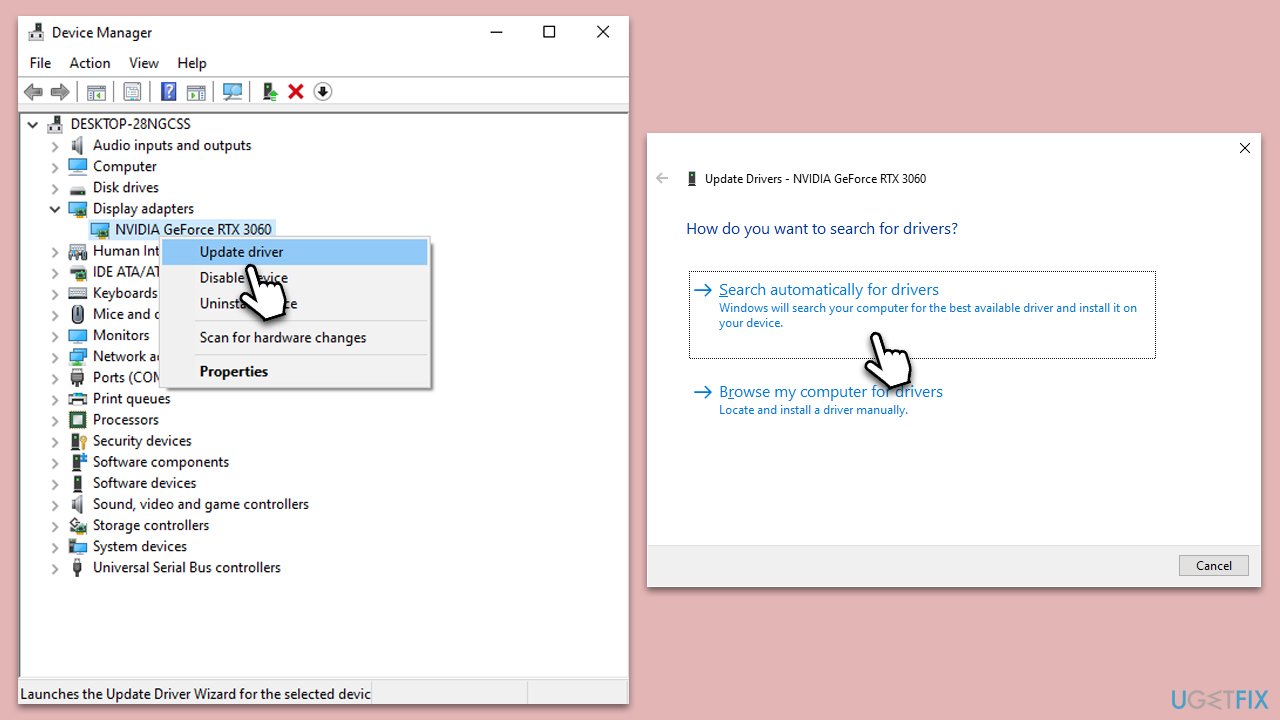
- Press the Win + X and select Device Manager.
- Expand the Display adapters section.
- Right-click on your AMD graphics device and select Update driver.
- Choose Search automatically for driver.
- Follow the on-screen instructions and restart your PC after the update.
Fix 3. Roll back the driver
Sometimes, the newest driver might not be the most stable for your system. Rolling back to a previous version might resolve the issue.
- Go to Device Manager as described above.
- Right-click on your AMD device and select Properties.
- Go to the Driver tab.
- Click on Roll Back Driver, select the reason for uninstallation, and follow the prompts.
- Restart your computer.
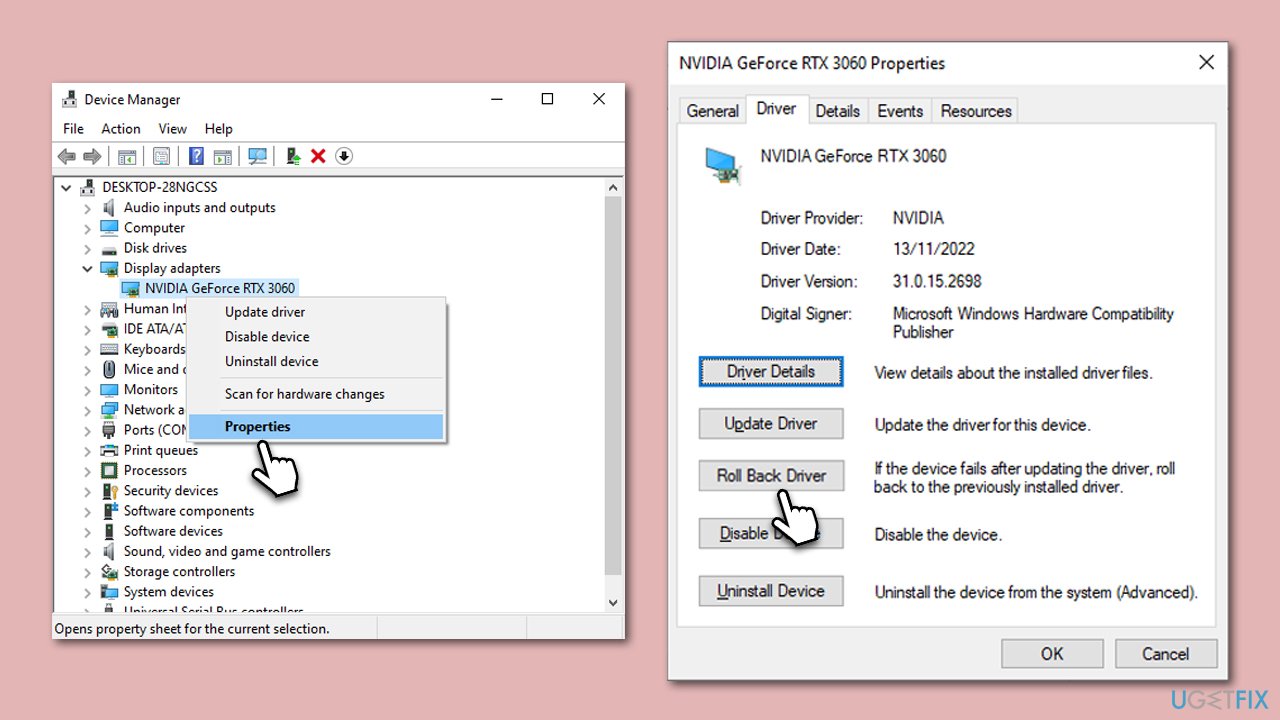
Note that this option might be grayed out, depending on your device configuration. If that's the case, you need to manually download the previous version of the driver from the official AMD website.
Fix 4. Reinstall the driver
A fresh installation can remove any corrupt files or configurations from the previous driver.
- In Device Manager, right-click on your AMD graphics device.
- Choose Uninstall device.
- Visit the AMD official website and download the latest driver or use other methods mentioned previously.
- Install the driver and restart your computer.
Fix 5. Change Power Plan
Optimizing your computer's power settings can improve performance and reduce conflicts.
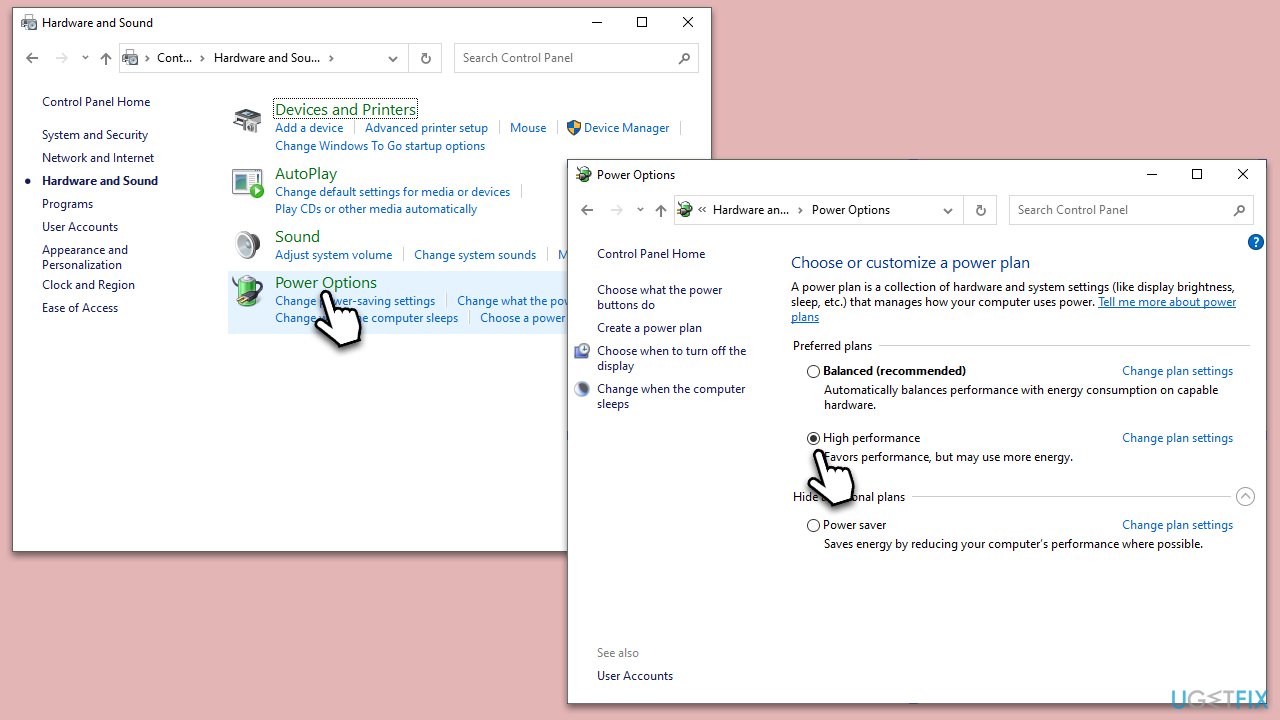
- In Windows search, type Control Panel and press Enter.
- Here, go to Hardware and Sound > Power options.
- Here, you will see the listed plans.
- Change the plan from Power saver to High performance.
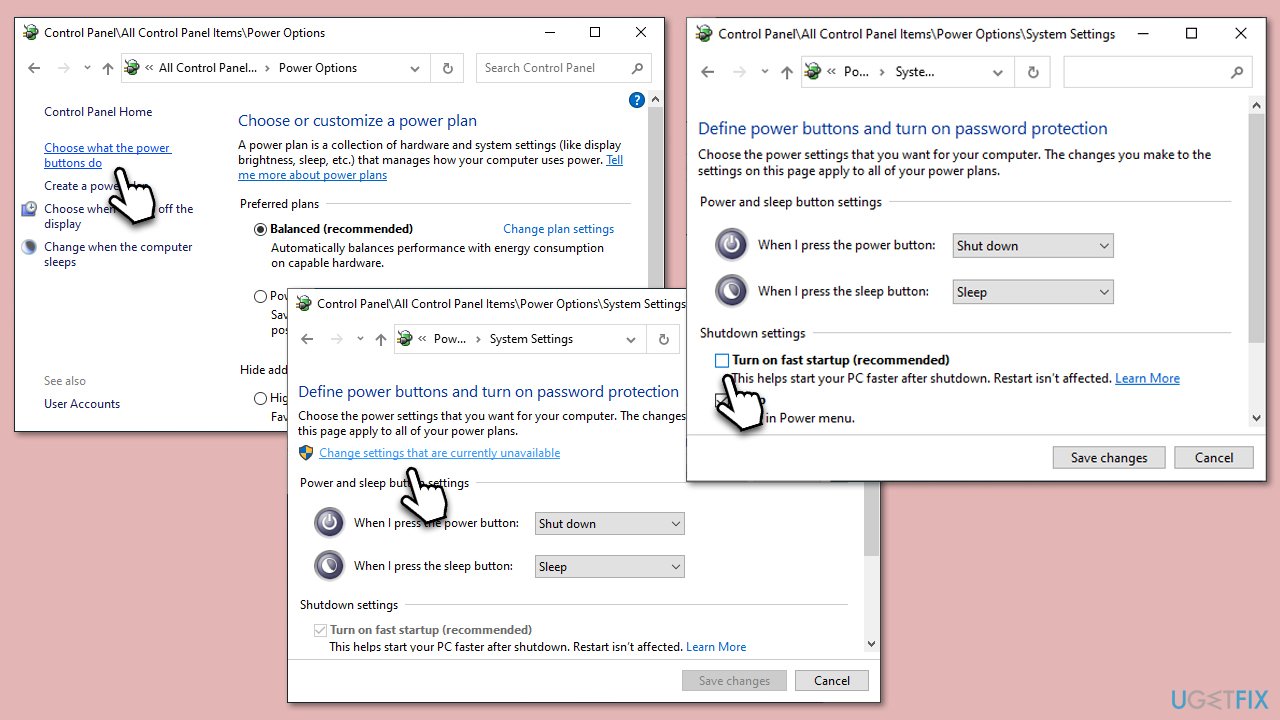
Fix 6. Disable Fast Startup
Fast Startup can sometimes conflict with drivers during the boot-up process. While the feature should improve the loading times of the operating system, it is known to cause some issues to users.
- Type Control Panel in Windows search and hit Enter.
- Select Small icons view and pick Power options.
- On the left side of the window, select Choose what the power buttons do
- Pick the Change settings that are currently unavailable option at the top
- Remove the tick from the Turn on fast startup (recommended) option and select Save changes.
Fix 7. Clear Shader cache via AMD software
Clearing the cache can resolve any graphical glitches or errors.
- Open your AMD software and navigate to the Settings (Gear icon) section.
- Go to the Graphics tab and select Advanced.
- Scroll down to find Reset Shader Cache and click Perform Reset.
- To confirm, click OK.
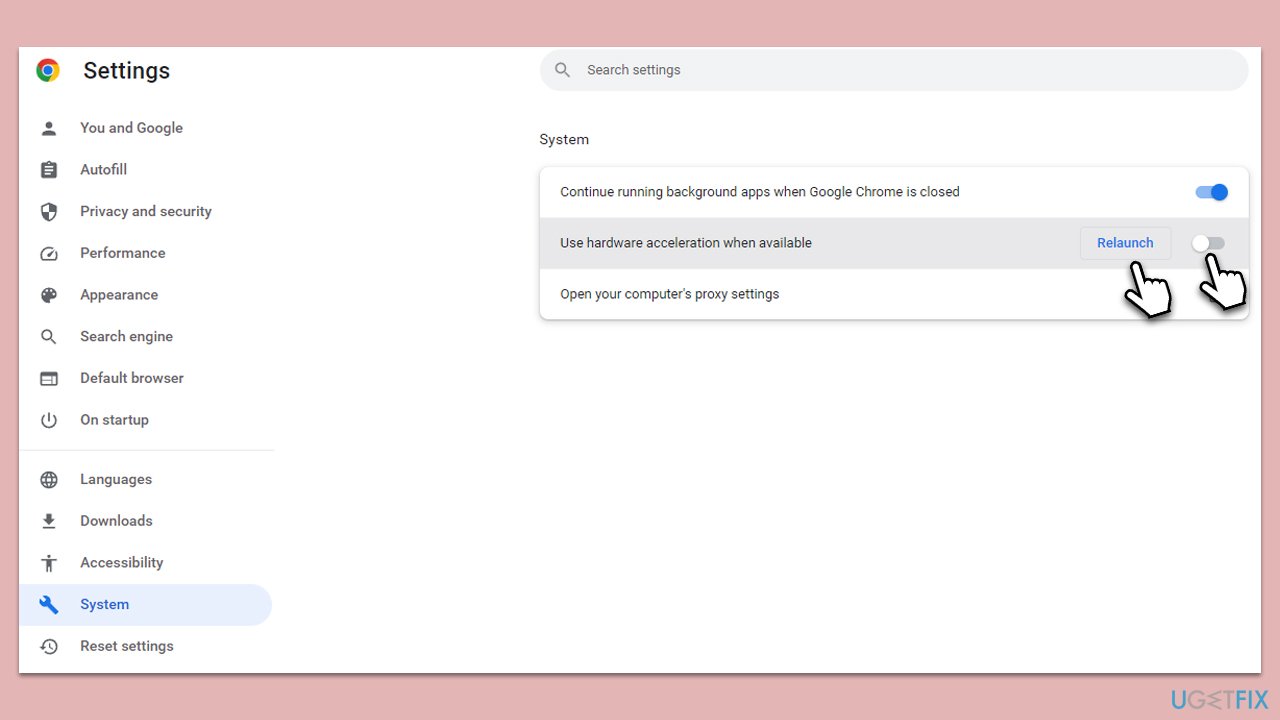
Fix 8. Disable Hardware Acceleration (Chrome or other browser)
Hardware acceleration can sometimes conflict with graphics drivers.
- Open Chrome and click 3 dots, then select Settings.
- On the left side, select System.
- Toggle Use hardware acceleration when available to the OFF position.
- Click the Relaunch button to apply changes.
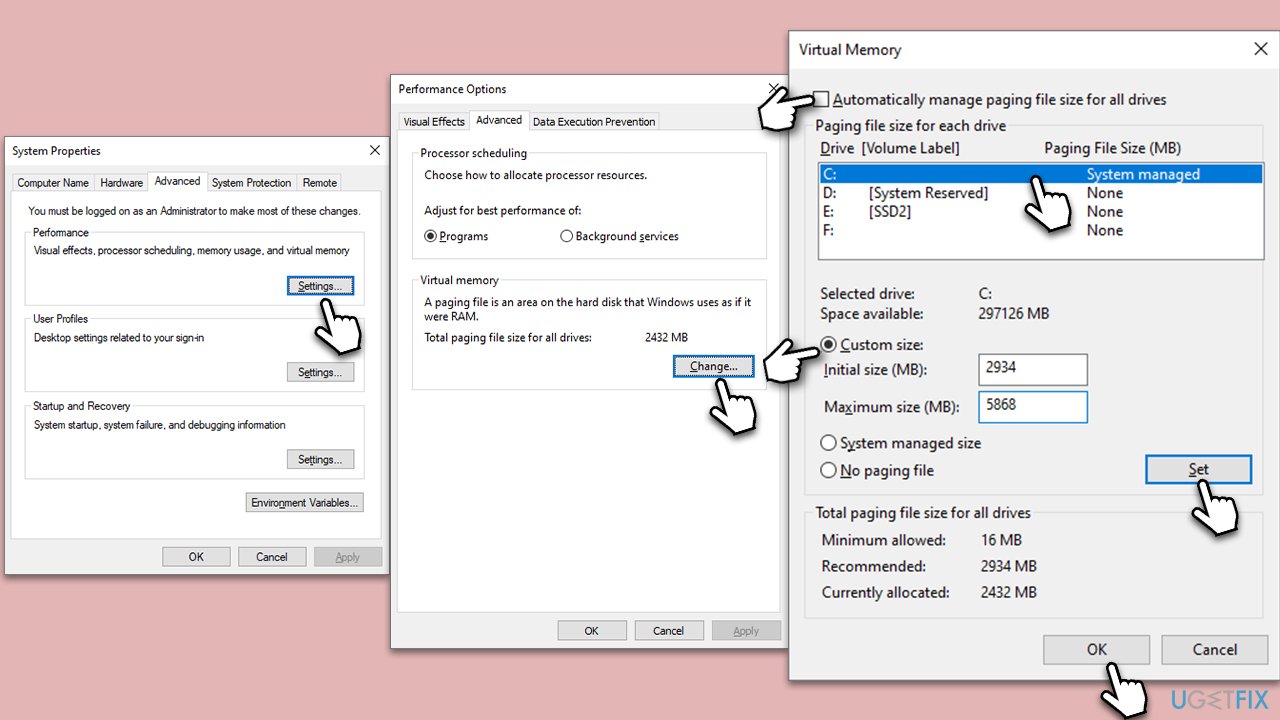
Fix 9. Increase the size of the Paging File
The Paging File acts as virtual memory. Increasing its size can resolve memory-related issues.
- In Windows search, type in Advanced system settings and press Enter.
- Under the Performance section, click Settings.
- Go to the Advanced tab.
- Under Virtual Memory, select Change.
- Untick the Automatically manage paging size for all drives option (make sure your main drive is selected – C: is the default).
- Select Custom size.
- At the bottom, check the Recommended memory size and type it into the Initial size (MB) field.
- In the Maximum size (MB) field, enter double size than that in the Initial size section.
- Click Set and OK.
Repair your Errors automatically
ugetfix.com team is trying to do its best to help users find the best solutions for eliminating their errors. If you don't want to struggle with manual repair techniques, please use the automatic software. All recommended products have been tested and approved by our professionals. Tools that you can use to fix your error are listed bellow:
Protect your online privacy with a VPN client
A VPN is crucial when it comes to user privacy. Online trackers such as cookies can not only be used by social media platforms and other websites but also your Internet Service Provider and the government. Even if you apply the most secure settings via your web browser, you can still be tracked via apps that are connected to the internet. Besides, privacy-focused browsers like Tor is are not an optimal choice due to diminished connection speeds. The best solution for your ultimate privacy is Private Internet Access – be anonymous and secure online.
Data recovery tools can prevent permanent file loss
Data recovery software is one of the options that could help you recover your files. Once you delete a file, it does not vanish into thin air – it remains on your system as long as no new data is written on top of it. Data Recovery Pro is recovery software that searchers for working copies of deleted files within your hard drive. By using the tool, you can prevent loss of valuable documents, school work, personal pictures, and other crucial files.


