Question
Issue: How to fix "Could not reconnect all network drives" error in Windows?
Hello. Whenever I turn on my Windows PC I receive the “Could not reconnect all network drives” error. How can I fix it?
Solved Answer
Windows automatically recognizes connected external devices and maps[1] them accordingly. Because of this, users do not have to map external network drives manually. However, due to issues with the User Account Control, people may encounter the “Could not reconnect all network drives” error.
The error message “Could not reconnect all network drives” appears whenever users power on their Windows system. This can happen because the mapped drives might be failing or have been disconnected. The error could also be caused by a slight delay before the network is available. As a result, the system tries to map the drives before the network is available which causes the issue.
A simple disconnect and reconnect of network drives might help resolve this error. However, if that does not work, you will find 5 more steps that should fix the issue. Keep in mind that manual troubleshooting can be a lengthy process. To avoid it, you can use a maintenance tool like FortectMac Washing Machine X9. It can fix most system errors, BSODs,[2] corrupted files, and registry[3] issues.

Method 1. Disconnect Network Drives
- Press the Windows key + E to open File Explorer
- Right-click on This PC and select Disconnect Network Drive. In Windows 11, select Show more options to view the disconnect drive option
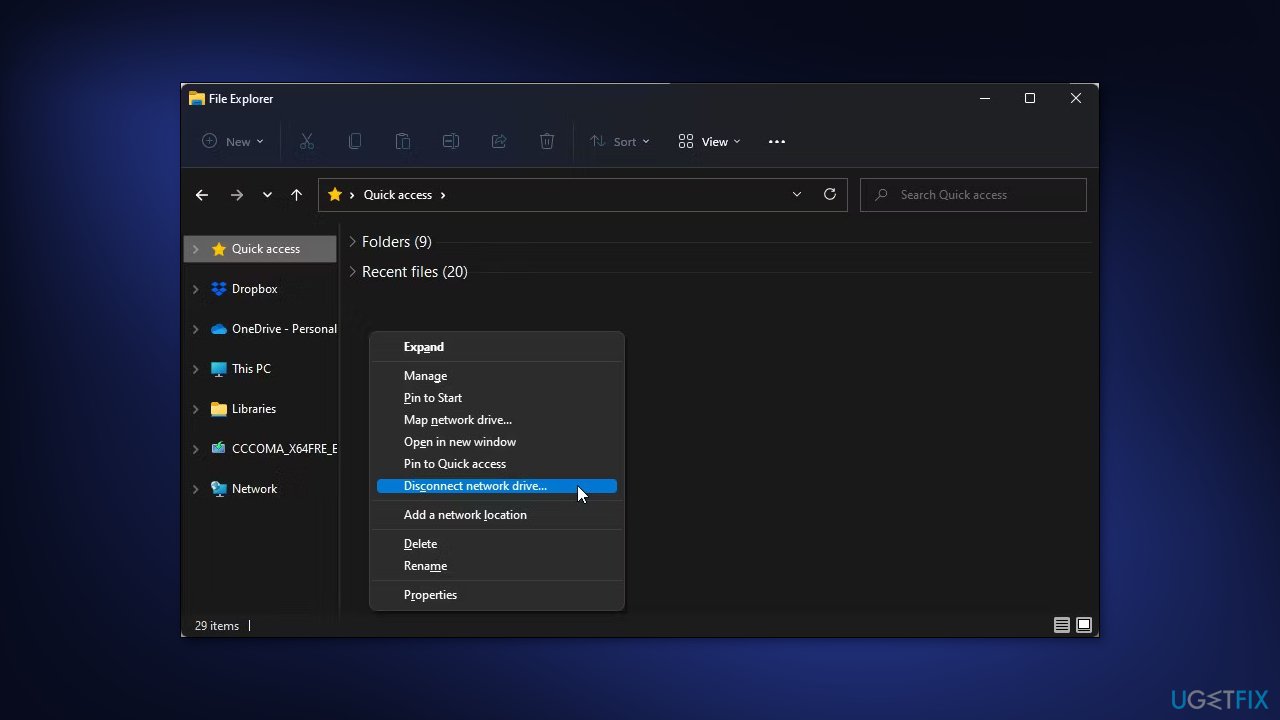
- Select the drive you want to disconnect and click OK
Method 2. Use the Group Policy Editor
- Press the Windows key + R to open Run
- type gpedit.msc and click OK to open Group Policy Editor
- Navigate to the following policy:
Computer Configuration > Administrative Templates > System > Logon
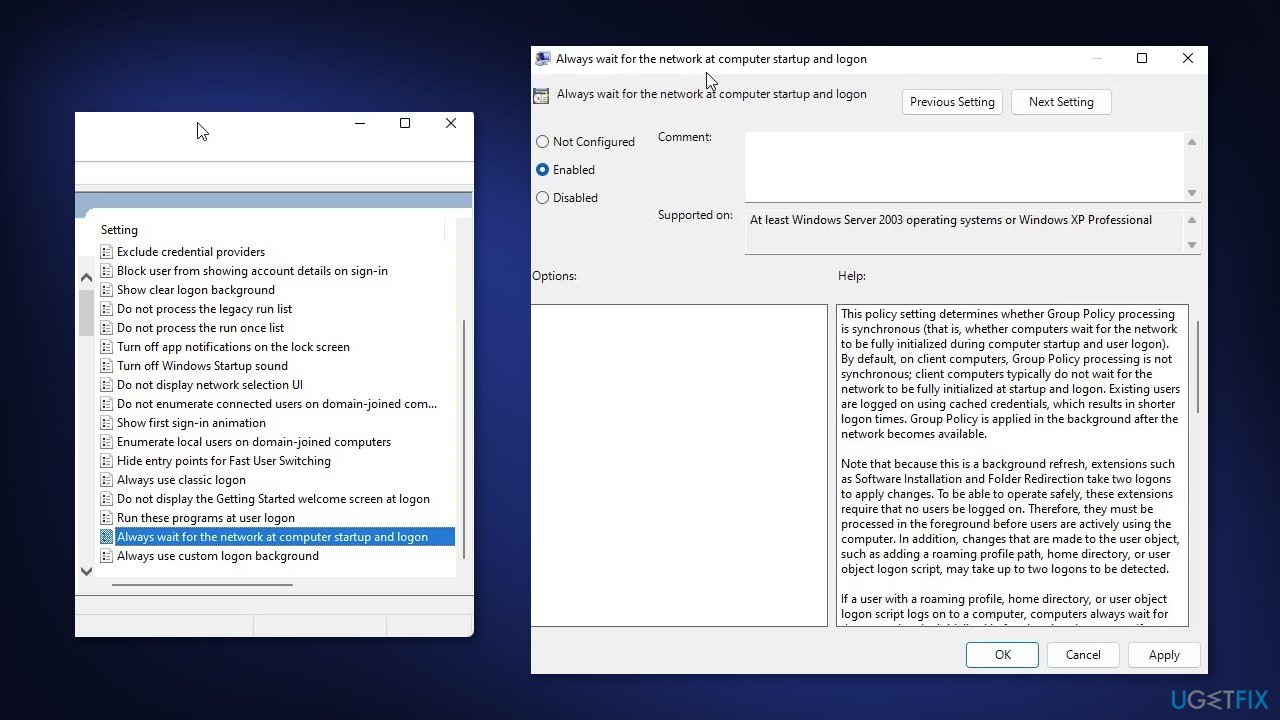
- Locate and double-click on Always for the network at computer startup and logon policy
- In the pop-up dialog, select Enabled
- Click Apply and OK to save the changes
Method 3. Map Drives Using a Batch Script
- Open a new Notepad file
- Copy and paste the following script:
PowerShell -Command “Set-ExecutionPolicy -Scope CurrentUser Unrestricted“ >> “%TEMP%\StartupLog.txt“ 2>&1
PowerShell -File “%SystemDrive%\Scripts\MapDrives.ps1“ >> “%TEMP%\StartupLog.txt“ 2>&1
- Press Ctrl + S to open the Save dialog
- For the File name, type batch.cmd
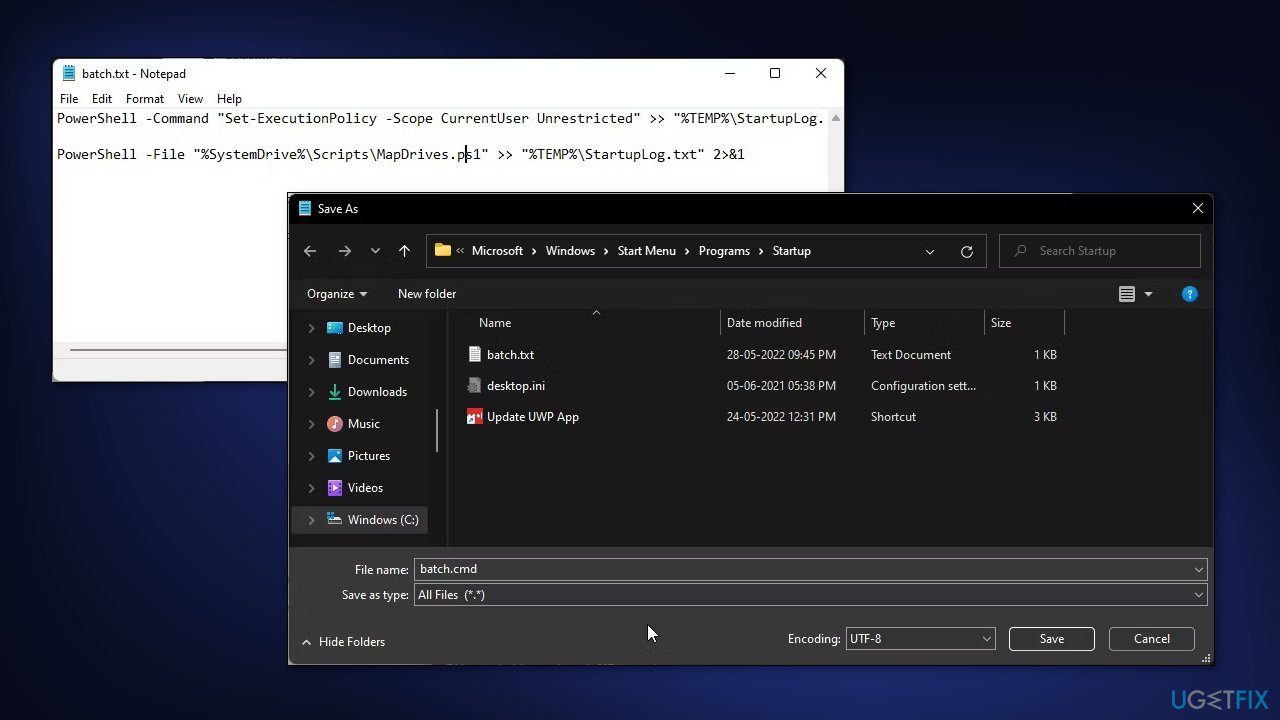
- Next, click the Save as type drop-down and select All Files
- Click Save to save the file
- Open a new Notepad file
- Copy and paste the following script:
$i=3
while($True){
$error.clear()
$MappedDrives = Get-SmbMapping |where -property Status -Value Unavailable -EQ | select LocalPath,RemotePath
foreach( $MappedDrive in $MappedDrives)
{
try {
New-SmbMapping -LocalPath $MappedDrive.LocalPath -RemotePath $MappedDrive.RemotePath -Persistent $True
} catch {
Write-Host “There was an error mapping $MappedDrive.RemotePath to $MappedDrive.LocalPath”
}
}
$i = $i – 1
if($error.Count -eq 0 –Or $i -eq 0) {break}
Start–Sleep –Seconds 30
}
- Again, press Ctrl + S to open the Save dialog
- Type MapDrives.ps1 as the file name
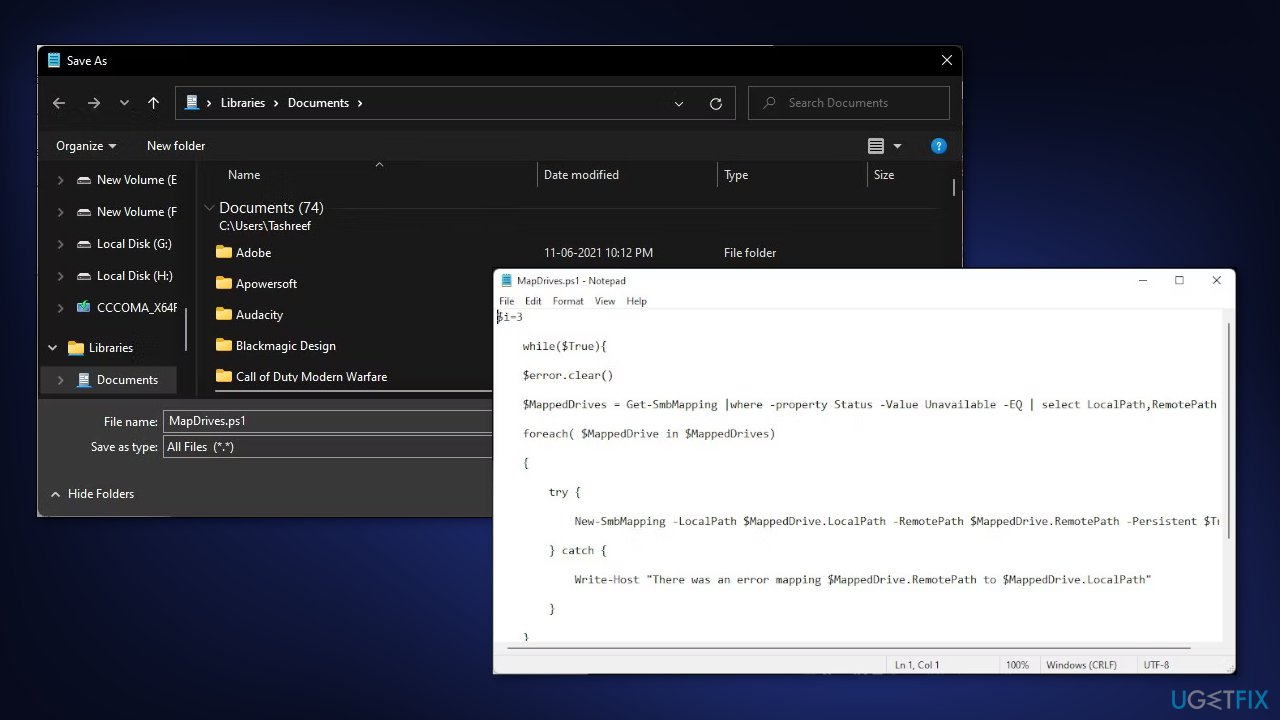
- Next, click the drop-down for Save as type and select All Files
- Click Save to save the file
- Next, you need to move the batch.cmd file to the Startup folder of your Windows computer
- To do this, press the Windows key + R to open Run
- Copy and paste the following path to access the Startup folder:
C:\ProgramData\Microsoft\Windows\Start Menu\Programs\StartUp
- Move the batch.cmd file to the Startup folder
- Next, press the Windows key + E to open File Explorer
- In the left pane, click on Windows C under This PC to access the C:\ drive
- Right-click and select New > Folder
- Rename the folder as Scripts
- Now, move the MapDrives.ps1 file to the Scripts folder
- Restart your PC
Method 4. Use Task Scheduler to Run the Script
- Open the Task Scheduler program
- Click on Action and then click on Create Task
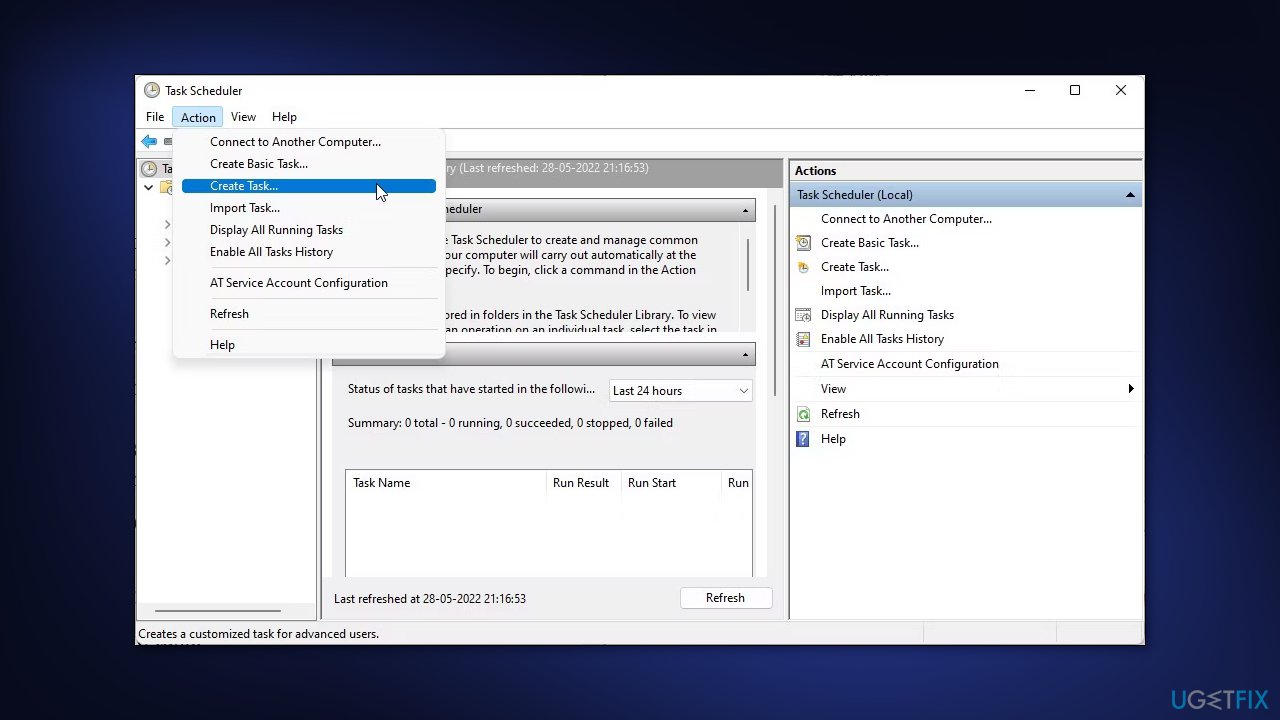
- In the Name field, type a name for the task
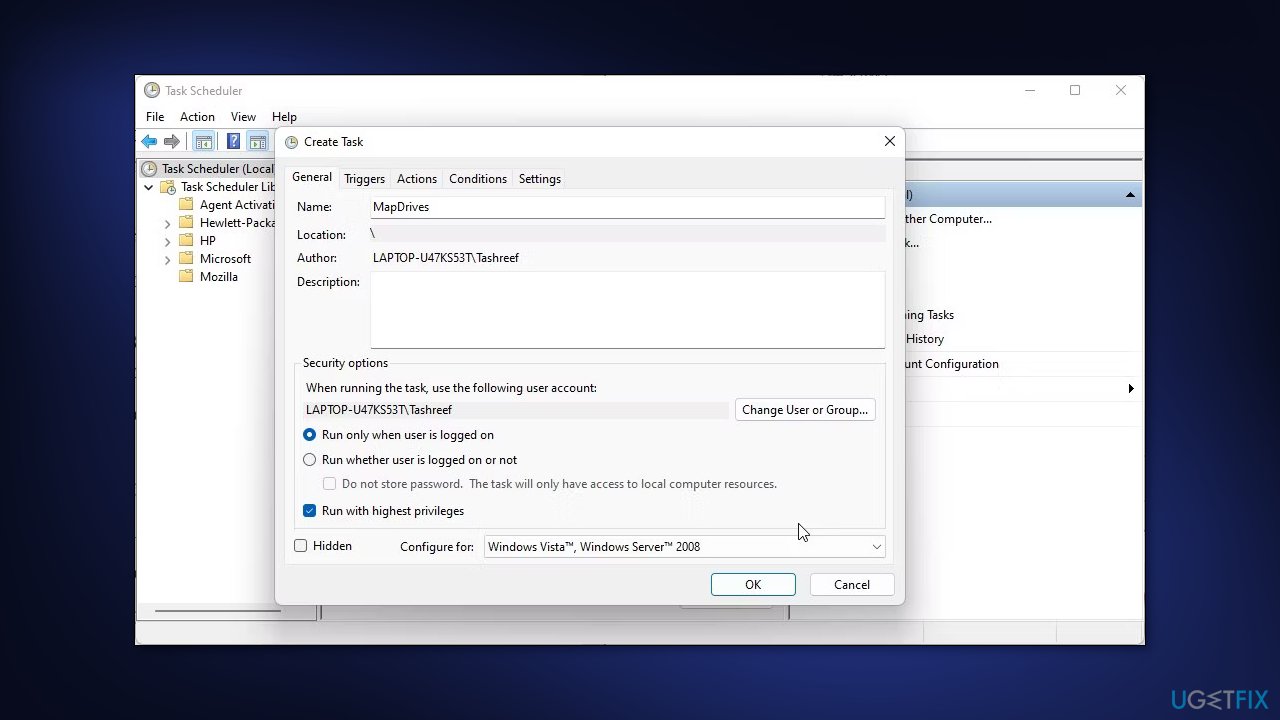
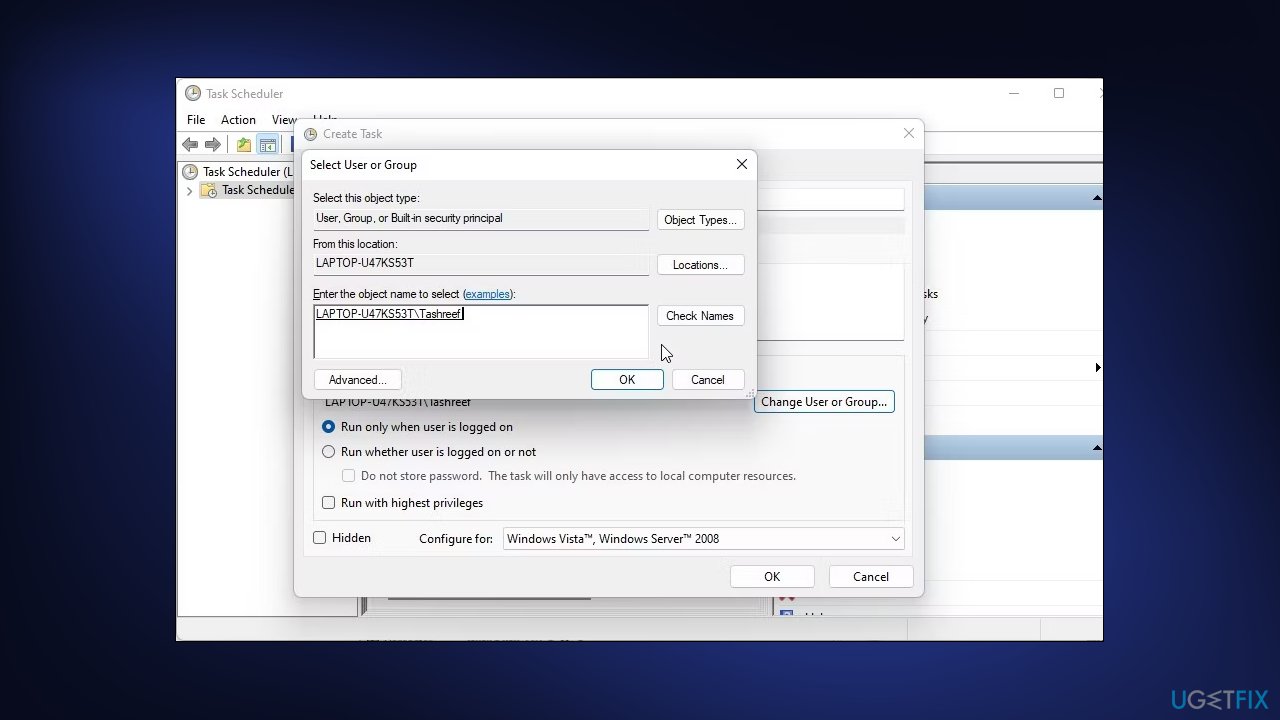
- Next, click on Change User or Group option under Security options
- Type the username or group you want to assign the task to and click Check Names
- Once done, click OK
- Select the Run with the highest privileges option
- Next, open the Triggers tab
- Click on New
- Click the Begin the task drop-down and select At log on
- Next, open the Actions tab and click the New button
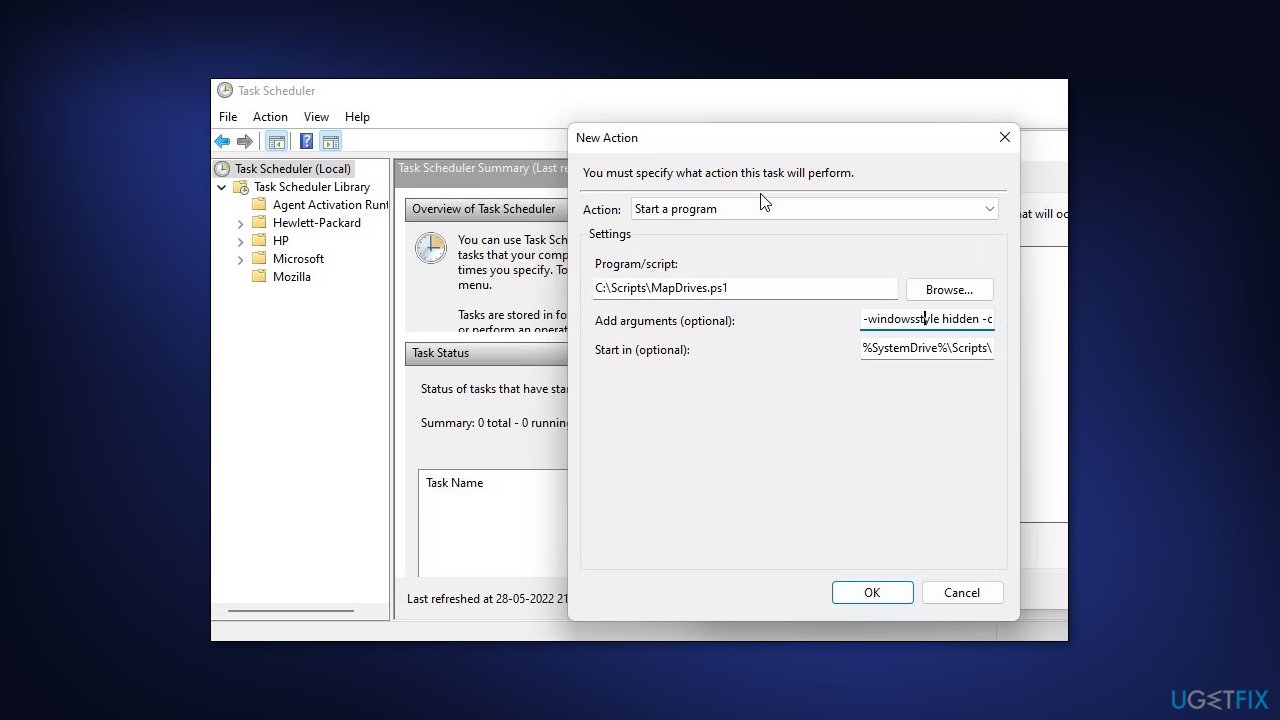
- Here make sure the Action drop-down is set to Start a program
- Next, click on the Browse button
- Now select the MapDrives.ps1 script you created in the previous step and click Open
- In the Add arguments field, type the following:
-windowsstyle hidden –command .\MapDrives.ps1 >> %TEMP%\StartupLog.txt 2>&1
- In the Start in field, type the following:
%SystemDrive%\Scripts\
- Click OK to save the changes
- Open the Conditions tab and select the Start only if the following network is available option
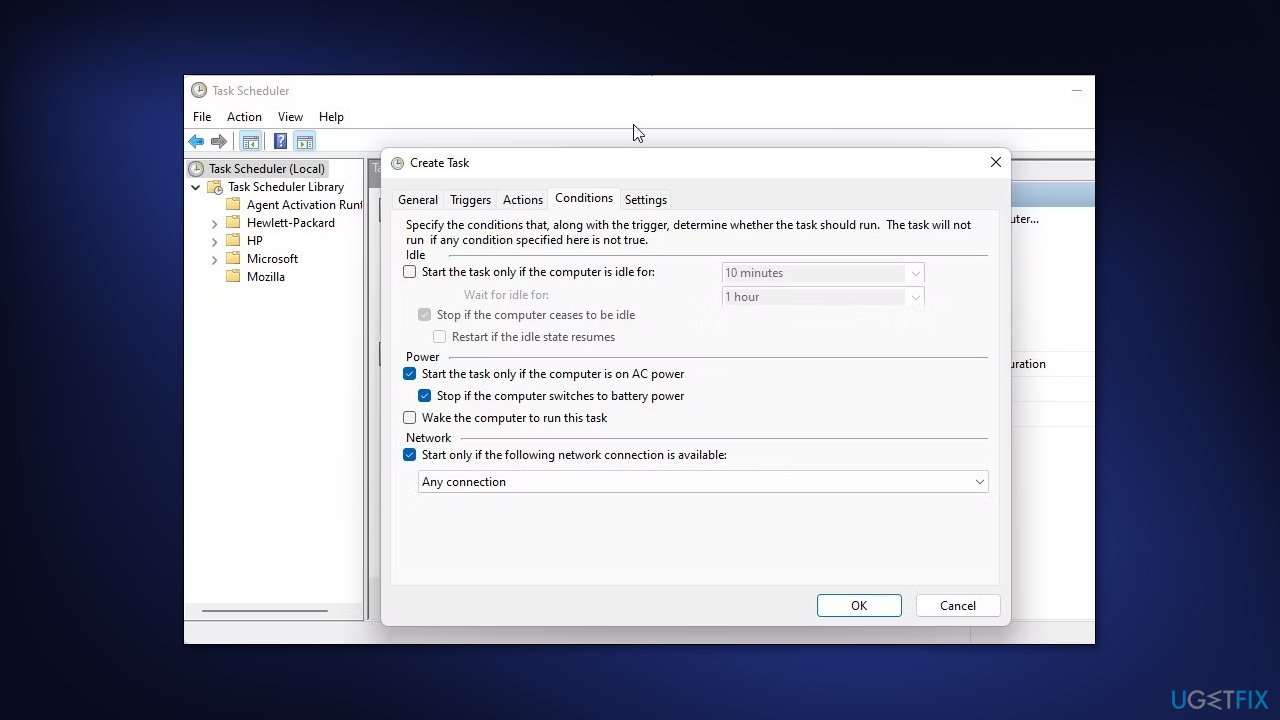
- In the drop-down below, select Any connection
- Click OK to save the changes
- Restart your PC to apply the changes
Method 5. Disable The Network Drive Notification
- Press the Windows key + R to open Run
- Type regedit and click OK to open Registry Editor. Click Yes when prompted by UAC
- Navigate to the following location:
HKEY_LOCAL_MACHINE\SYSTEM\CurrentControlSet\Control\NetworkProvider
- Look for the RestoreConnection value. If it doesn’t exist, you will need to create a new value
- To create a new value, right-click on the NetworkProvider key and select New > DWORD (32-bit) Value
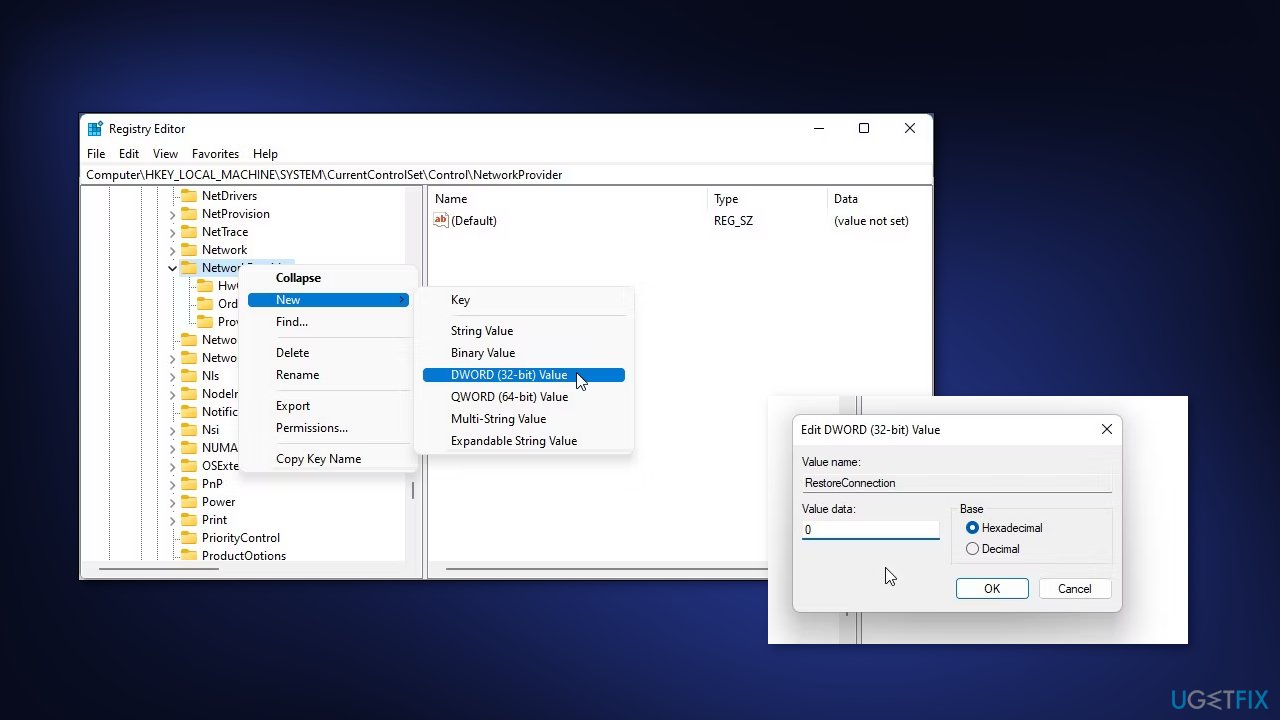
- Rename the value as RestoreConnection
- Right-click on RestoreConnection and select Modify
- In the Value data field, type 0 and click OK to save the changes
Method 6. Install the KB4469342 Update
If you are on Windows 10, you should install the KB4469342 update which was a patch released by Microsoft.
- Go to the Windows Update Catalog
- Search for the KB4469342 update and then download the update for your system
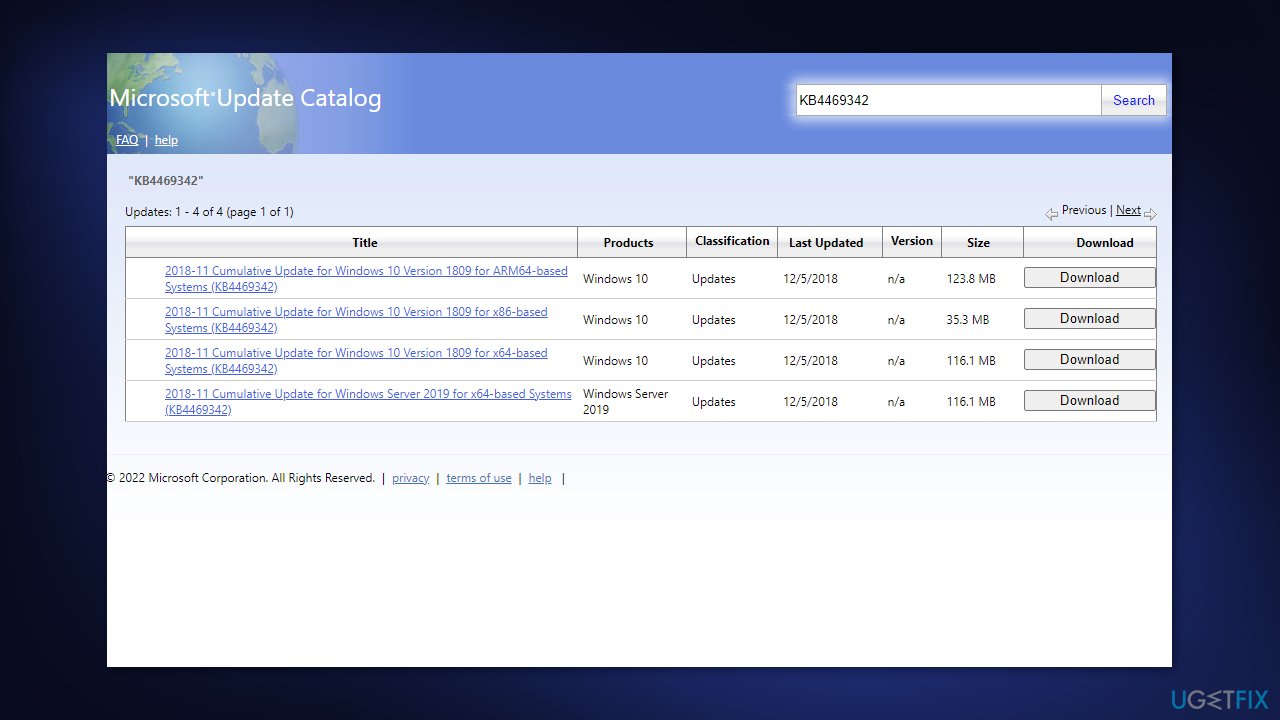
- Once downloaded, run the update to install it.
- Finally, reboot your system to see if the issue has been fixed
Repair your Errors automatically
ugetfix.com team is trying to do its best to help users find the best solutions for eliminating their errors. If you don't want to struggle with manual repair techniques, please use the automatic software. All recommended products have been tested and approved by our professionals. Tools that you can use to fix your error are listed bellow:
Protect your online privacy with a VPN client
A VPN is crucial when it comes to user privacy. Online trackers such as cookies can not only be used by social media platforms and other websites but also your Internet Service Provider and the government. Even if you apply the most secure settings via your web browser, you can still be tracked via apps that are connected to the internet. Besides, privacy-focused browsers like Tor is are not an optimal choice due to diminished connection speeds. The best solution for your ultimate privacy is Private Internet Access – be anonymous and secure online.
Data recovery tools can prevent permanent file loss
Data recovery software is one of the options that could help you recover your files. Once you delete a file, it does not vanish into thin air – it remains on your system as long as no new data is written on top of it. Data Recovery Pro is recovery software that searchers for working copies of deleted files within your hard drive. By using the tool, you can prevent loss of valuable documents, school work, personal pictures, and other crucial files.
- ^ Drive mapping. Wikipedia, the free encyclopedia.
- ^ Chris Hoffman. Everything You Need To Know About the Blue Screen of Death. Howtogeek. Tech Insight Magazine.
- ^ Tim Fisher. What Is the Windows Registry?. Lifewire. Software and Apps.


