Question
Issue: How to fix "Couldn’t Unmount Disk" Error on Mac?
I was trying to erase my drive on MacBook, but I received an error message saying “Disk Erase failed with the error: Couldn't unmount disk.” What does it mean? Is there something that I can do about it?
Solved Answer
“Couldn’t Unmount Disk” is the error that, in most cases, appear when users try to format internal disk by Disk Utility or repair it on the Mac device. Disk Utility is an important feature that helps to solve problems on the system. However, it can still fail to fix some of them or even deliver error messages like “Couldn’t Unmount Disk” error.
Due to the “Couldn’t Unmount Disk” error users might encounter these problems as well:
- Inability to partition Mac HFS;
- Inability to open particular files or programs;
- Lost or corrupted data on the hard drive;
- Sudden elimination of the running application.

“Couldn’t Unmount Disk” error is an error message that might pop up on your Mac’s screen when the device is not allowed to repair particular permissions or directories in Disk Utility,[1] for instance when trying to repair a hard drive. When a device cannot erase or partition the drive, users are delivered one of these error messages:
Disc erase failed couldn’t unmount disc.
or
Disk Erase failed with the error: Couldn’t unmount disk.
There are several reasons why users cannot complete the necessary tasks because of this error. Usually, the source of the error is a particular boot drive[2] which is modified or corrupted. The alert might also pop up when the driver is being used by other apps or processes. Sometimes, the issue is an internal drive.
However, the error might be triggered by malware as well. Nevertheless, Mac OS X is pretty resistant to various cyber threats;[3] security experts warn about an increase of Mac malware[4] that might sneak inside the device and might trigger various errors and problems.
How to deal with “Couldn’t Unmount Disk” error
If you ever noticed other symptoms besides the error or the ones that resemble the virus attack, you should obtain a professional security software, such as Reimage, and scan the system with an updated tool.
If virus attack was not the problem, try the methods below that will help to fix “Couldn’t Unmount Disk” error. There are a few solutions for the issue, but users should try all of them of one of them doesn't work at first.
Check USB Boot Drive
- Make sure that USB boot drive is attached to the device.
- Reboot the system. When rebooting hold the Option key. From the appeared menu select the attached boot drive.
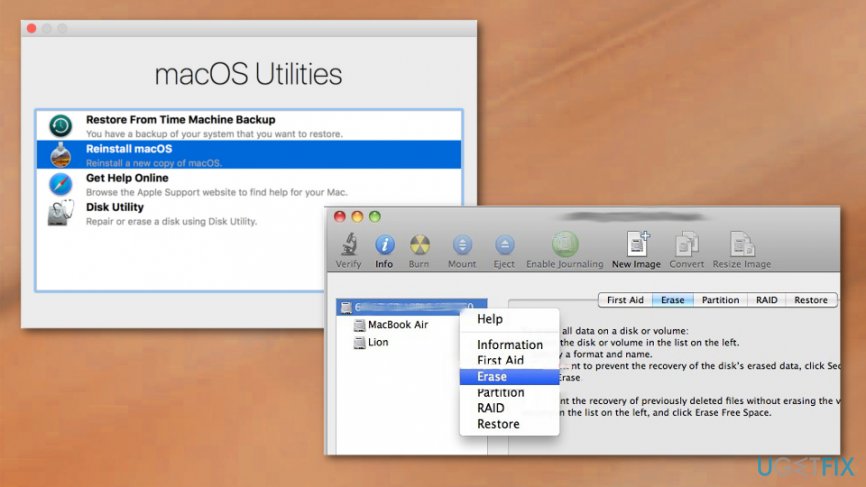
- Access Disk Utility from the appeared Boot menu (however, if you use Installer disk, go to Utilities menu and click Disk Utility option).
- Go to First aid. Verify the disk and repair it if it’s necessary.
Once it’s done, try to complete the same task again. If the “Couldn’t Unmount Disk” error shows up again, try the second method.
Use Recovery Partition
This method should help if the “Couldn’t Unmount Disk” error occurred when formatting a non-boot partition or caused by first aid. The Recovery partition is included in all new OS X versions. Therefore, follow these steps:
- Reboot Mac. When rebooting hold down the Option key.
- From the appeared menu choose Recovery partition option.

- In the appeared boot menu choose Disk Utility.
– Go to First Aid if you want to verify and repair the disk.
– Go to Erase if you want to format the disk.
Use the command line to fix “Couldn’t Unmount Disk” error
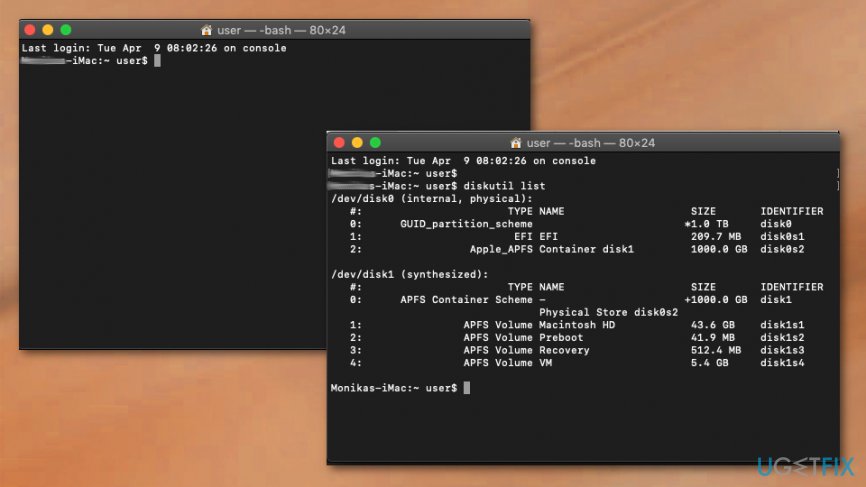
- Access Terminal application.
- Input diskutil list line.

- When the list of all disks appears you need to found the disk that you want to force unmount.
- Type sudo diskutil unmountDisk force /dev/diskx line.
- Replace /dev/diskx with correct disk number.
- Follow with steps further to forcibly unmount the disk from your Mac.
Repair your Errors automatically
ugetfix.com team is trying to do its best to help users find the best solutions for eliminating their errors. If you don't want to struggle with manual repair techniques, please use the automatic software. All recommended products have been tested and approved by our professionals. Tools that you can use to fix your error are listed bellow:
Happiness
Guarantee
Access geo-restricted video content with a VPN
Private Internet Access is a VPN that can prevent your Internet Service Provider, the government, and third-parties from tracking your online and allow you to stay completely anonymous. The software provides dedicated servers for torrenting and streaming, ensuring optimal performance and not slowing you down. You can also bypass geo-restrictions and view such services as Netflix, BBC, Disney+, and other popular streaming services without limitations, regardless of where you are.
Don’t pay ransomware authors – use alternative data recovery options
Malware attacks, particularly ransomware, are by far the biggest danger to your pictures, videos, work, or school files. Since cybercriminals use a robust encryption algorithm to lock data, it can no longer be used until a ransom in bitcoin is paid. Instead of paying hackers, you should first try to use alternative recovery methods that could help you to retrieve at least some portion of the lost data. Otherwise, you could also lose your money, along with the files. One of the best tools that could restore at least some of the encrypted files – Data Recovery Pro.
- ^ Chris Hoffman. How to Use Your Mac’s Disk Utility to Partition, Wipe, Repair, Restore, and Copy Drives. How-to Geek. The website about computers and technology.
- ^ Definition of: boot drive. PCMag. Technology product reviews, news, prices and downlo.
- ^ Olivia Morelli. Top 6 most dangerous computer viruses of 2016. No Virus. British cyber security news.
- ^ Juli Clover. Malware Attacks on Macs Up 744% in 2016, Mostly Due to Adware. MacRumors. The news and rumors about Macs.


