How to fix
“System Restore did not complete successfully” error
on Windows
Resolve the "System Restore did not complete successfully" error on Windows 10 effortlessly. Get back on track with expert-tested solutions!
What causes How to fix “System Restore did not complete successfully” error on Windows 10?
- Error code 0x80070091
- Error code 0x80070057
- ERROR_DIR_NOT_EMPTY
- Corrupted folder blocking restoration
- System not optimized
- Missing Windows updates
Repairs Windows system files, removes malware, and restores a clean OS state — without reinstalling.
Hello all. I wanted to perform system restore, but the service does not function properly. Each time it fails with an error “System Restore did not complete successfully.” What can I do to fix that?
“System Restore did not complete successfully” is a Windows 10 bug, which occur when the PC’s owner attempts to enable the System Restore Point. The coding of this error may differ regarding the circumstances and the culprit of the issue. To name a few, the “System Restore did not complete successfully” error may be marked with an error code 0x80070091, 0x80070057 or ERROR_DIR_NOT_EMPTY. The failure of a System Restore feature may be a serious headache, especially if PC’s owner is encountering serious PC’s problems, which can be solved by initiating a simple System Restore.

“System Restore did not complete successfully” error is bugging Windows users for more than a year. Although Microsoft’s team is working hard to prevent such and similar errors, they still keep sliding to the surface. To prevent errors like 0x80070091 or 0x80070057, it’s advisable to install all the latest Windows Updates and keep the system optimized. If you haven’t disabled automatic Windows 10 updating, all required updates should be installed on your PC on time. However, optimization process is not automatic and can hardly be initiated manually. For this purpose, it’s advisable to use a professional PC’s optimization utility, such as [d1].
Unfortunately, installed updates and optimized system does not guarantee zero errors. If you have encountered a System Restore error anyway, you can try several manual “System Restore did not complete successfully” error fixes.
Option #1. Rename the corrupted folder
If you get an error message while running System Restore and the message indicates a specific file, which blocks the restoration process, you may try to perform these steps:
System Restore did not complete successfully. Your computer's files and settings were not changed. Details: System Restore failed to extract the file (C:\\Program Files(x86)\\XXX) from the Restore Point.
An unspecified error occured during System-Restore (XXX)
- Right-click on empty space on the desktop and select New -> Shortcut.
- Type cmd.exe and press Enter twice.
- Now right-click on the cmd.exe shortcut and select Run as Administrator.
- A black window should show up on your screen. Copy and paste the TaskKill /f /im explorer.exe command in it and press Enter.
- Now the desktop should go black. Now copy and paste the Explorer.exe command in the black window and hit Enter again.
- Now launch Windows File Explorer (right- click on Windows key and select File Explorer).
- Rename the corrupted folder, which is mentioned in the error message, e.g. C:\\Program Files(x86)\\XXX to C:\\Program Files(x86)\\XXX.bad
- After that, try to enable System Restore.
Option #2. Rename the WindowsApps folder
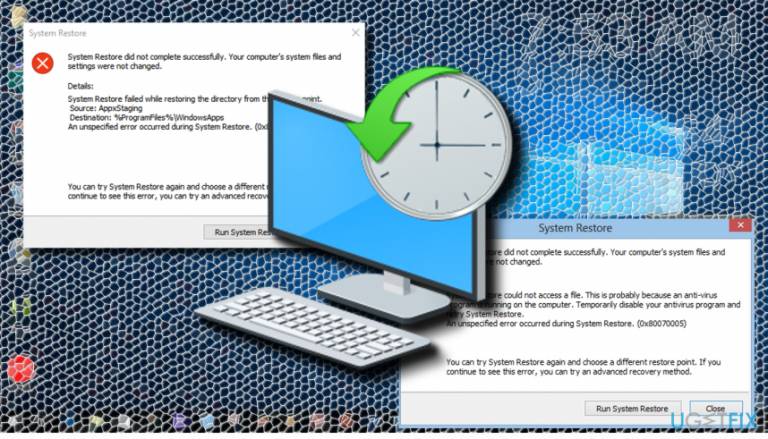
If the “System Restore did not complete successfully” error occurred due to the fact that the System Restore failed while restoring the directory from the restore point at the AppxStaging, you should try to rename the WindowsApps to WindowsApps Old.
System Restore did not complete successfully. Your computer’s system files and settings were not changed.
Details: System Restore failed whil restoring the directory from the restore point.
Source: AppxStaging
Destination: %ProgramFiles%\\WindowsApps
Since %ProgramFiles%\\WindowsApps is exploited by TrustedInstaller, to initiate any modifications regarding it you’ll have to change its ownership. Assign this folder to yourself (instructions here). After that, rename the folder from WindowsApps to WindowsApps Old. If these steps did not help, you may try to list the content of the %ProgramFiles%\\WindowsApps folder.
- Right-click on Windows key and select Command Prompt (Admin).
- Click Yes on the UAC.
- Type PowerShell and hit Enter.
- Locate the C:\\WINDOWS\\system32 folder and if it’s there, copy-paste the cd $env:programfiles\\WindowsApps command and press Enter. This command will change the path of the WindowsApps folder.
- Now copy and paste the (LS -Re -Fi * -Fo -Ea:Inquire).FullName | clip command and press Enter.
- To enlist folders and sub-folders and its content using PowerShell, copy all results provided below the last command and paste them within the clipboard.
- Type notepad in the PowerShell and press Ctrl + V hotkey.
Bottom line
To fix the 'System Restore did not complete successfully' error, you can try renaming the corrupted folder, ensuring your system is optimized, and installing all the latest Windows updates. If these solutions do not resolve the issue, consider using a professional PC optimization utility or seeking further technical support.
Frequently asked questions
This error can occur due to corrupted system files, conflicts with antivirus software, or insufficient disk space. It's important to ensure that your system is in a stable state before attempting a restore.
Yes, you can run the System File Checker tool via Command Prompt to repair corrupted files that may be causing the error. Use the command 'sfc /scannow' for this purpose.
Absolutely, you can try using the System File Checker or the DISM tool to fix issues without affecting your personal data. Always back up important files before performing system repairs.


Report an issue
What's wrong with this guide? We review every report and update or remove content.
Report received — thank you. We'll review and fix it.
You need a free account to submit a report.
Be the first to comment