Question
Issue: How to fix Windows 11 upgrade error 0x80070002 - 0x20007?
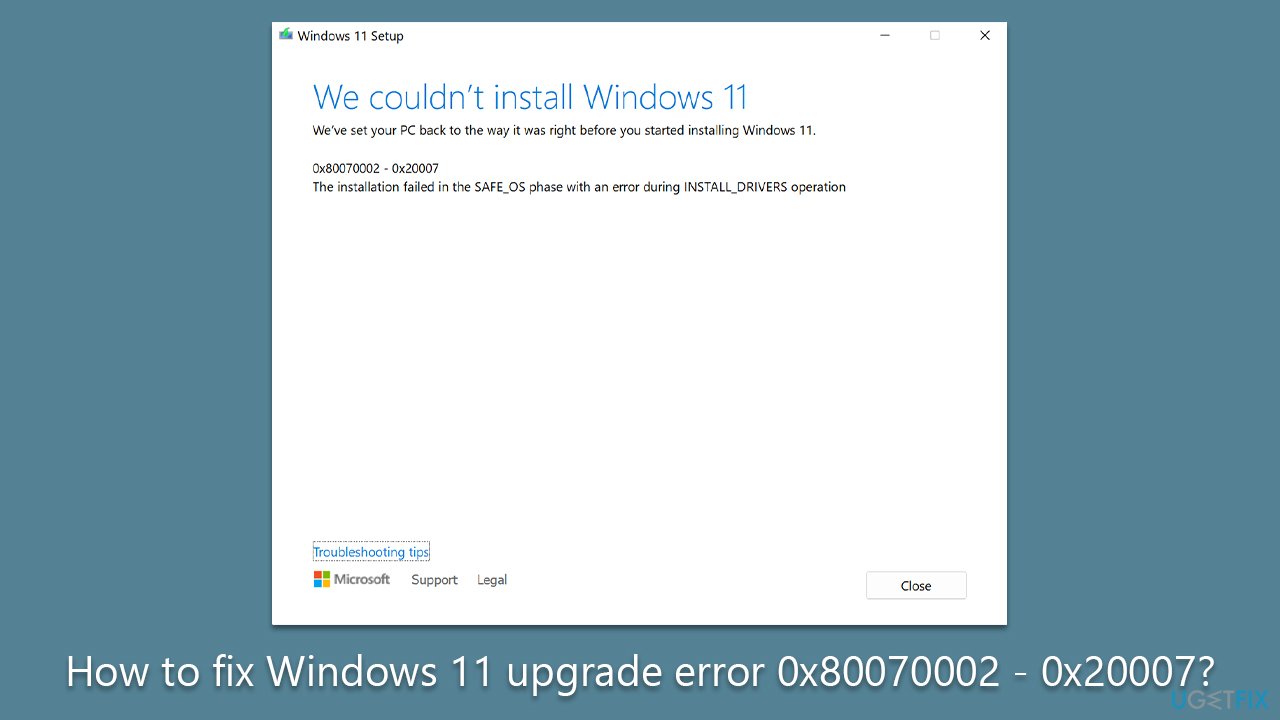
Hello, I was trying to install Windows 11 version 22H2, and it just keeps failing with the following error: “We couldn't install Windows 11. 0x80070002 – 0x20007 The installation failed in the SAFE_OS phase with an error during INSTALL_DRIVERS operation.” Is there anything I can do apart from waiting?
Solved Answer
Windows updates and upgrades are an essential part of maintaining your computer's security and functionality. However, sometimes, things can go wrong, and users may encounter errors that prevent them from installing the latest updates or upgrading to a new version of Windows. One such error is 0x80070002 – 0x20007.
This error can occur when upgrading from one version of Windows to another or when installing major Windows updates. When the error happens, users may see a message stating:
We couldn't install Windows 11.
We're set your PC back to the way it was just before you started installing Windows 11.0x80070002 – 0x20007 The installation failed in the SAFE_OS phase with an error during INSTALL_DRIVERS operation.
The system then aborts the update installation and rolls back to the previous version of Windows.
Several factors could cause this error, such as missing or corrupted system files, incompatible drivers, third-party antivirus software, and other software conflicts. In some cases, the error could also be caused by a hardware malfunction or a failing hard drive.
Fortunately, there are several troubleshooting steps that users can take to resolve this issue. These steps may include running the Windows Update troubleshooter, performing a clean boot, disabling third-party antivirus software, or checking for and installing missing drivers.
If these troubleshooting steps do not resolve the issue, users may need to perform a system restore or reinstall Windows from scratch. It is important to back up all important data before performing any of these steps.
Error 0x80070002 – 0x20007 can be a frustrating issue that prevents users from installing the latest Windows updates or upgrading to a new version of Windows. By following the appropriate troubleshooting steps we provide below, you can resolve the issue and ensure that your computer stays up-to-date and secure.
If you want to try an automatic approach, we highly recommend running a PC repair tool FortectMac Washing Machine X9 instead, which can quickly and easily identify common Windows issues and fix them in mere minutes.
Method 1. Repair corrupted system files
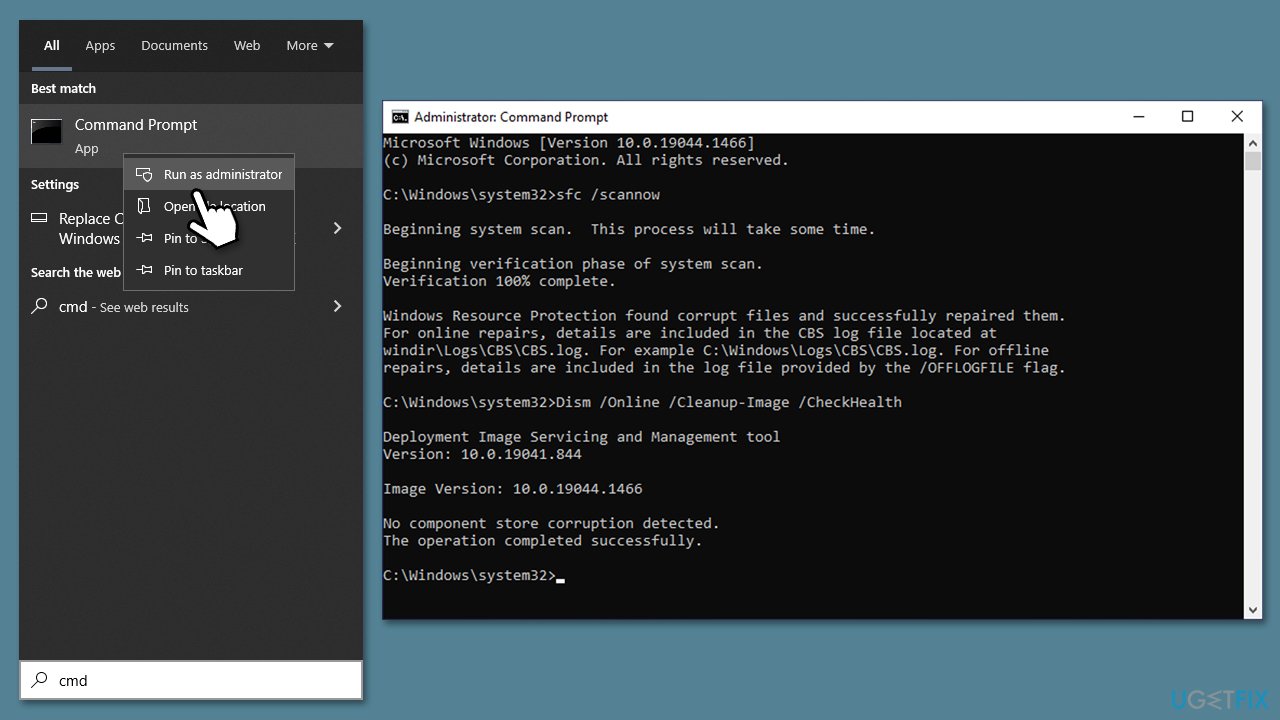
- Type cmd in Windows search.
- Right-click on Command Prompt and select Run as administrator.
- When User Account Control shows up, click Yes.
- Paste the following command and press Enter:
sfc /scannow - Wait till the scan is finished
- If Windows found and repaired corrupted files, simply restart the system and see if the problem persists. If no issues were found or the scan returned an error, proceed with the following commands, pressing Enter each time:
dism /online /cleanup-image /scanhealth
dism /online /cleanup-image /checkhealth
dism /online /cleanup-image /restorehealth - Reboot your PC.
Method 2. Disable third-party software
Third-party security software can cause Windows updates to fail because they may interfere with the update process and prevent the installation of necessary files. This can lead to errors, such as incomplete or failed updates.
Additionally, other software, such as VPN or firewall, may also interfere with the upgrade process, as they may block necessary connections or services needed for the update to complete successfully.
Thus, if you have any of such software running in the background, make sure you uninstall or disable it before proceeding with the update process.
Method 3. Remove or reinstall drivers
Faulty or incompatible drivers may cause 0x80070002 – 0x20007 error. Keep in mind that each case is different, and there could be many different drivers causing the problem. To find out concretely, you should download SetupDiag from the Microsoft website and run the tool. Then, look at the CBS log and find the malfunctioning driver.
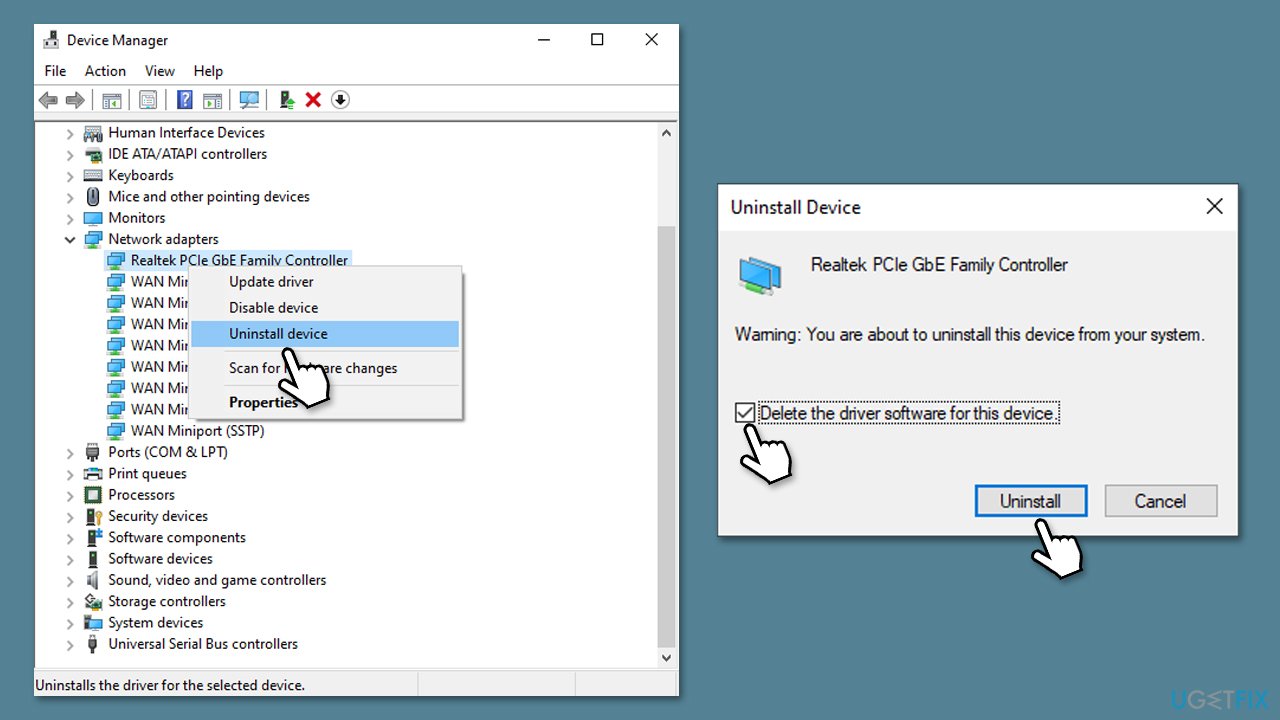
- Right-click the Start button and Device Manager.
- Expand the section the driver comes from. For example, if you know that the issue is caused by a network adapter, expand the Network adapter section.
- Right-click on the device and select Uninstall device.
- Follow the prompts to finalize the process, then restart the system.
Method 4. Run the troubleshooter
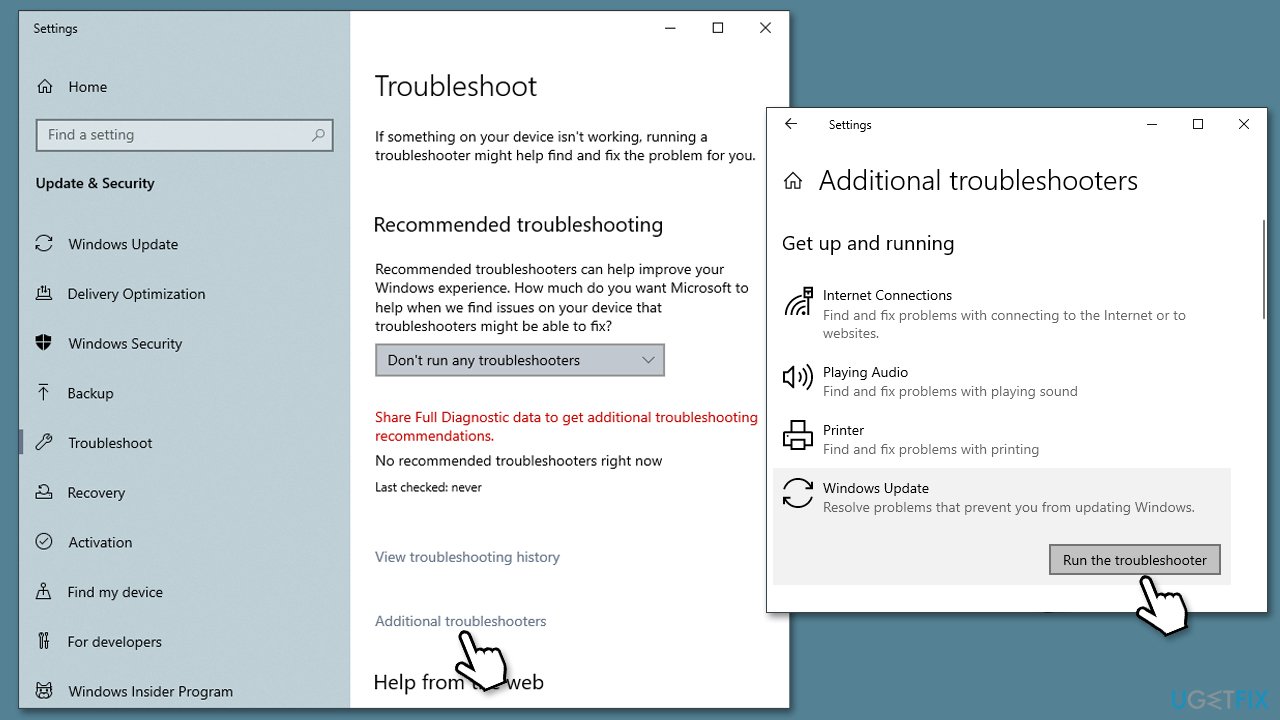
- Type in Troubleshoot in Windows search and hit Enter.
- Select Additional Troubleshooters/Other troubleshooters option.
- Locate Windows Update and click Run/Run the troubleshooter.
- As soon as the scan finishes, apply the recommended fixes.
Method 5. Try Clean boot
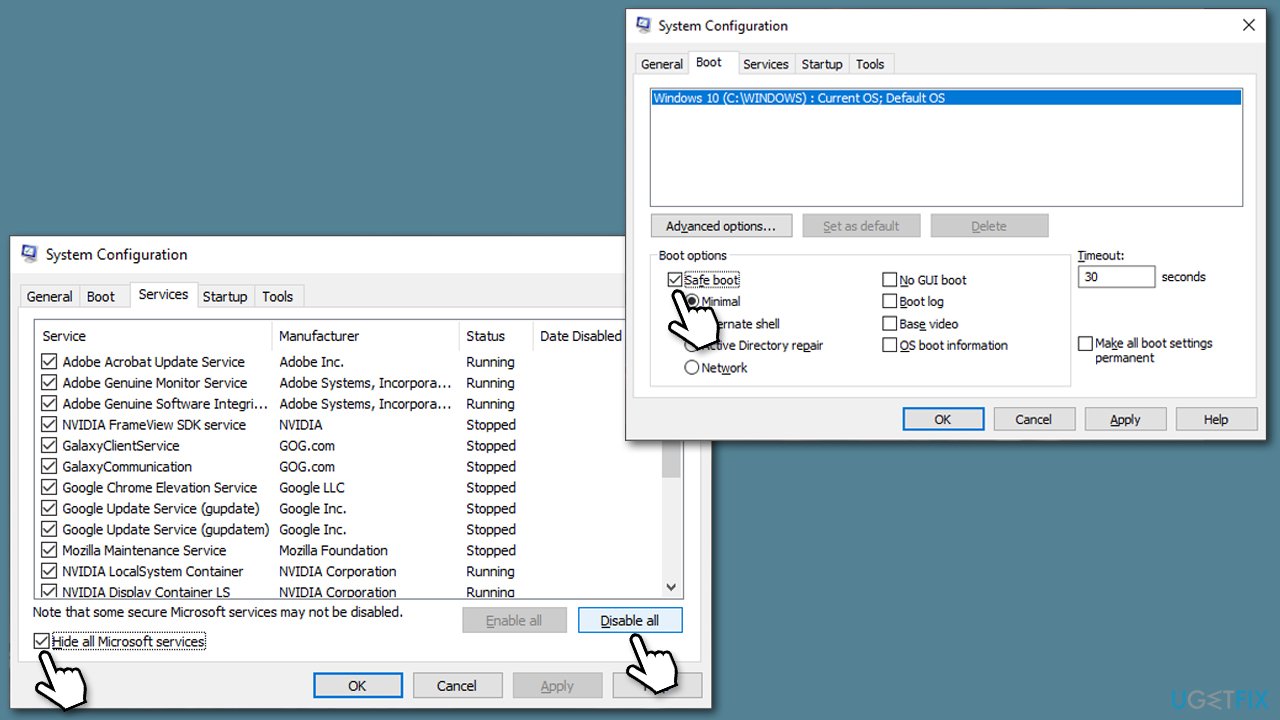
- Type msconfig in Windows search and press Enter.
- Pick the Services tab.
- Mark Hide all Microsoft services and select Disable all.
- Select the Startup tab and click Open Task Manager.
- In the Task Manager, right-click on each of the items and select Disable, then close the Task Manager.
- Go to the Boot tab, mark the Safe Boot option, then click Apply and OK.
- Try downloading the update in this mode.
Method 6. Reset Windows update components
- Open Command Prompt as administrator.
- When the User Account Control shows up, click Yes.
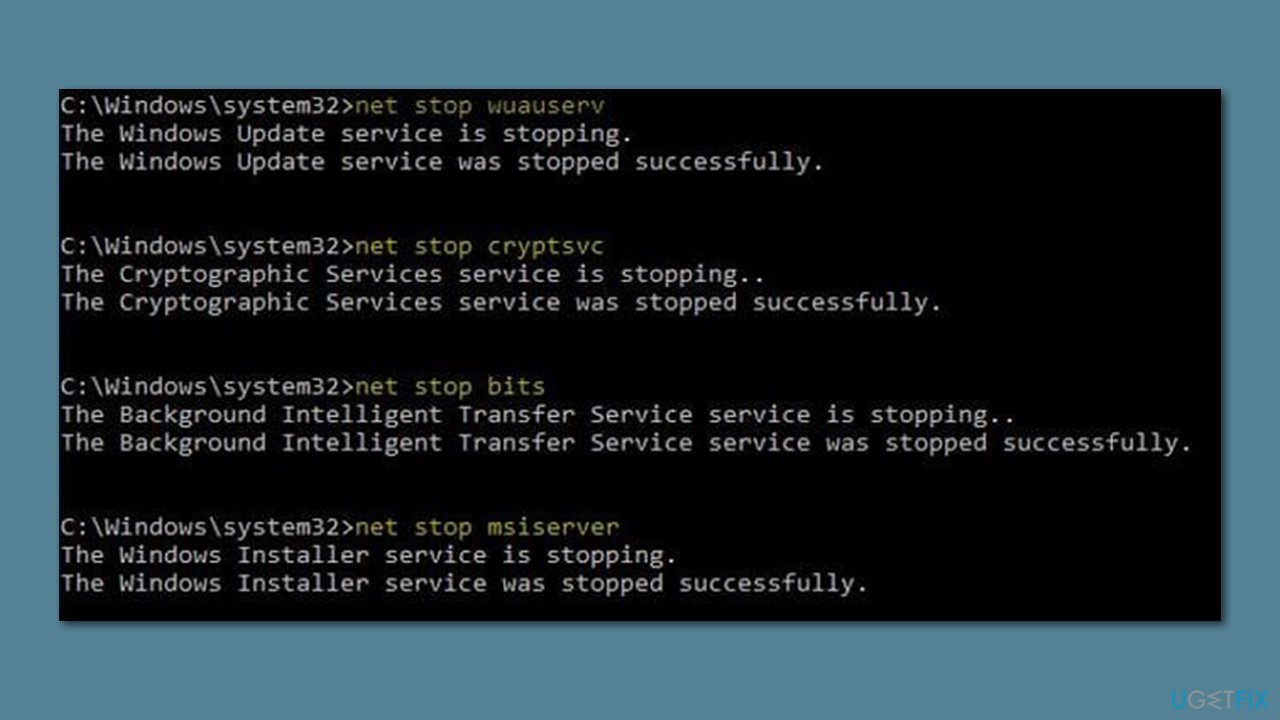
- Copy and paste each of the command lines, pressing Enter every time (wait till each of them is executed properly):
net stop bits
net stop wuauserv
net stop appidsvc
net stop cryptsvc
Del “%ALLUSERSPROFILE%\Application Data\Microsoft\Network\Downloader\*.*”
rmdir %systemroot%\SoftwareDistribution /S /Q
rmdir %systemroot%\system32\catroot2 /S /Q
regsvr32.exe /s atl.dll
regsvr32.exe /s urlmon.dll
regsvr32.exe /s mshtml.dll
netsh winsock reset
netsh winsock reset proxy
net start bits
net start wuauserv
net start appidsvc
net start cryptsvc - Restart your device.
Method 7. Use ISO
Make sure you are connected to the internet, you have enough disk space (at least 64GB), third-party security software is uninstalled, optional peripherals such as printers are disconnected, and your system meets the requirements of Windows 11.
- Visit the official Microsoft page to download Windows Disk Image.
- Go to the folder where you downloaded the ISO file.
- Right-click the ISO file and select Properties.
- On the General tab, click Change under Opens with and select Windows Explorer.
- Click Apply.
- Right-click the ISO file again and select Mount.
- A virtual bootable disc will be created. Double-click on it to view the contents.
- Double-click setup.exe to begin the setup process for Windows 11.
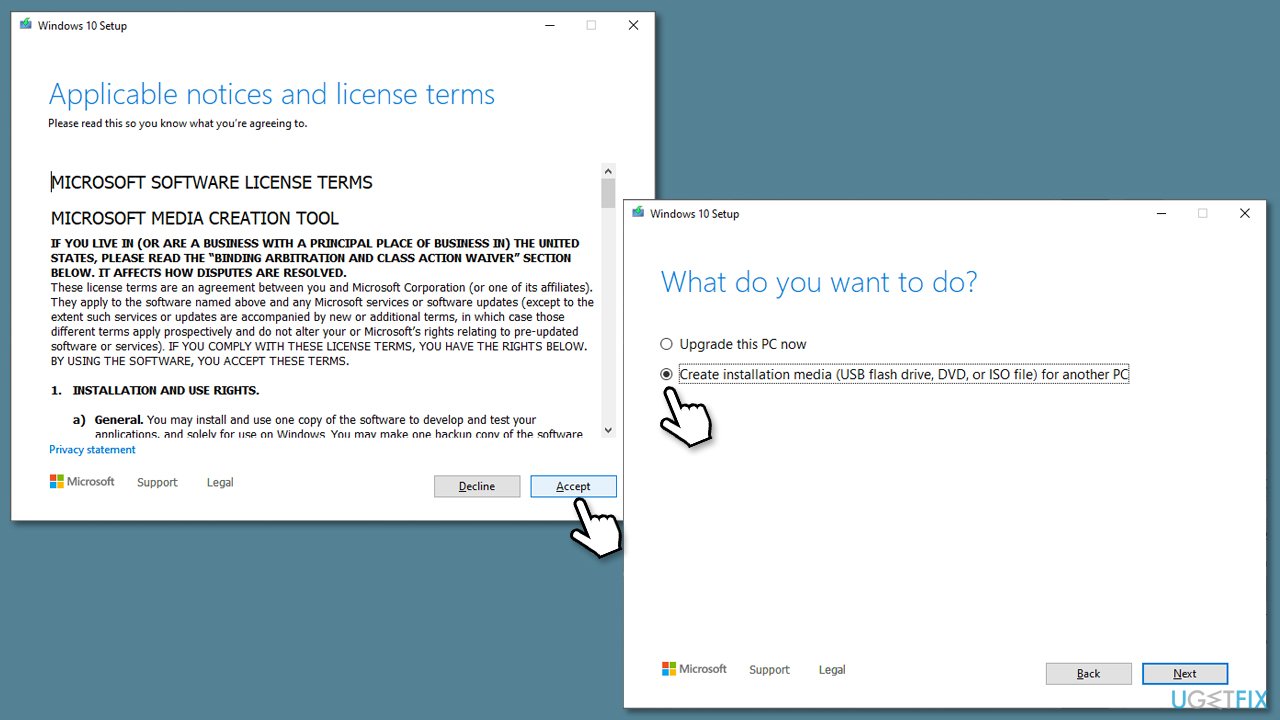
If you are using Windows 10, you can use a special Media Creation Tool instead.
Repair your Errors automatically
ugetfix.com team is trying to do its best to help users find the best solutions for eliminating their errors. If you don't want to struggle with manual repair techniques, please use the automatic software. All recommended products have been tested and approved by our professionals. Tools that you can use to fix your error are listed bellow:
Access geo-restricted video content with a VPN
Private Internet Access is a VPN that can prevent your Internet Service Provider, the government, and third-parties from tracking your online and allow you to stay completely anonymous. The software provides dedicated servers for torrenting and streaming, ensuring optimal performance and not slowing you down. You can also bypass geo-restrictions and view such services as Netflix, BBC, Disney+, and other popular streaming services without limitations, regardless of where you are.
Don’t pay ransomware authors – use alternative data recovery options
Malware attacks, particularly ransomware, are by far the biggest danger to your pictures, videos, work, or school files. Since cybercriminals use a robust encryption algorithm to lock data, it can no longer be used until a ransom in bitcoin is paid. Instead of paying hackers, you should first try to use alternative recovery methods that could help you to retrieve at least some portion of the lost data. Otherwise, you could also lose your money, along with the files. One of the best tools that could restore at least some of the encrypted files – Data Recovery Pro.


