Question
Issue: How to fix Windows update error 0x8024800c?
I've been trying to install Windows update KB5022729 for a while now, but I keep getting a 0x8024800c error every time. I have never encountered update errors before, so I'm not quite sure how to resolve this. It has been going on for a couple of weeks now, so it's clear it won't be resolved on its own.
Solved Answer
Windows updates are essential for keeping your system secure and up-to-date. They offer security patches and bug fixes to keep your computer running smoothly. Windows updates are usually installed automatically by the system or can be installed manually by the user. These updates are crucial as they help protect your computer from cyber attacks and provide new features.
However, despite their importance, Windows updates do not always succeed. When updates fail, they can return a variety of error codes, one of which is 0x8024800c. This error code can occur on all versions of Windows, and it can be frustrating to deal with.
There are many possible reasons for receiving the 0x8024800c update error. One common cause is corrupted system files, which can prevent Windows from properly installing updates. Another possible cause is third-party security software, which can interfere with Windows updates and prevent them from being installed. Additionally, bugged Software Distribution folder caches, lack of space, and network issues can also contribute to this error.
Receiving the 0x8024800c update error can be frustrating, but there are several fixes available. These fixes include clearing the Software Distribution folder cache, disabling the third-party security software, freeing up disk space, repairing corrupted system files, and resetting the Windows Update components.
So, if you are facing this error, please check out our instructions below. Note that if you would like to take a faster approach, we recommend performing many of the steps automatically with FortectMac Washing Machine X9 PC repair.
General checks
There are several things you should do before proceeding with more advanced troubleshooting steps:
- Restart your system if you haven't done so.
- Check your system for malware – you can use Microsoft Defender offline scan or employ a third-party tool.
- If you are running third-party security, VPN, or firewall software, temporarily disable it and see if the problem is gone.
- Check time and date settings and ensure it is correct.
Method 1. Use Disk Cleanup
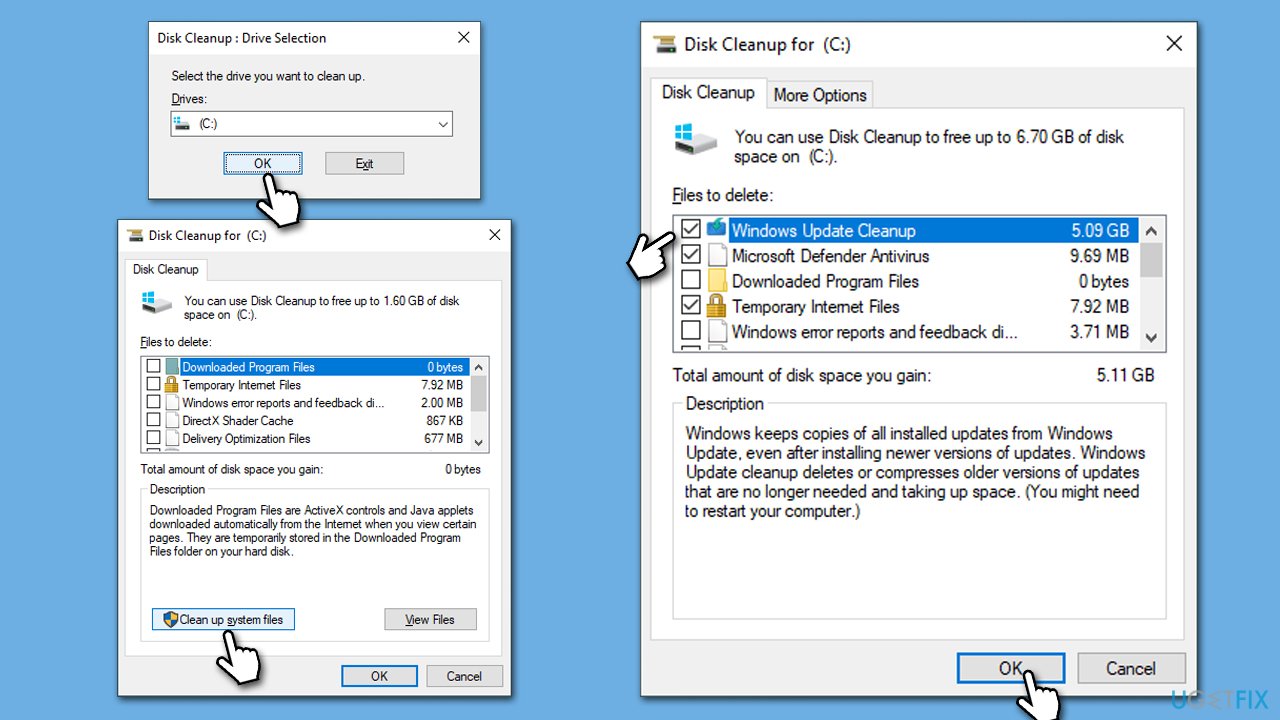
Insufficient space and bugged files might cause Windows updates to fail. Thus, perform disk cleanup as follows:
- Open the Windows search bar and type Disk Cleanup. Press Enter to open the Disk Cleanup utility.
- In the Disk Cleanup window, select the drive where your Windows operating system is installed (usually drive C:) and click OK.
- Click Clean up system files.
- Select the drive again and click OK.
- In the list of files that can be cleaned up, select the largest portions of data, such as Temporary Internet Files, Windows Update, Temporary Files, and others.
- Click OK to begin the cleanup process.
Method 2. Run the troubleshooter
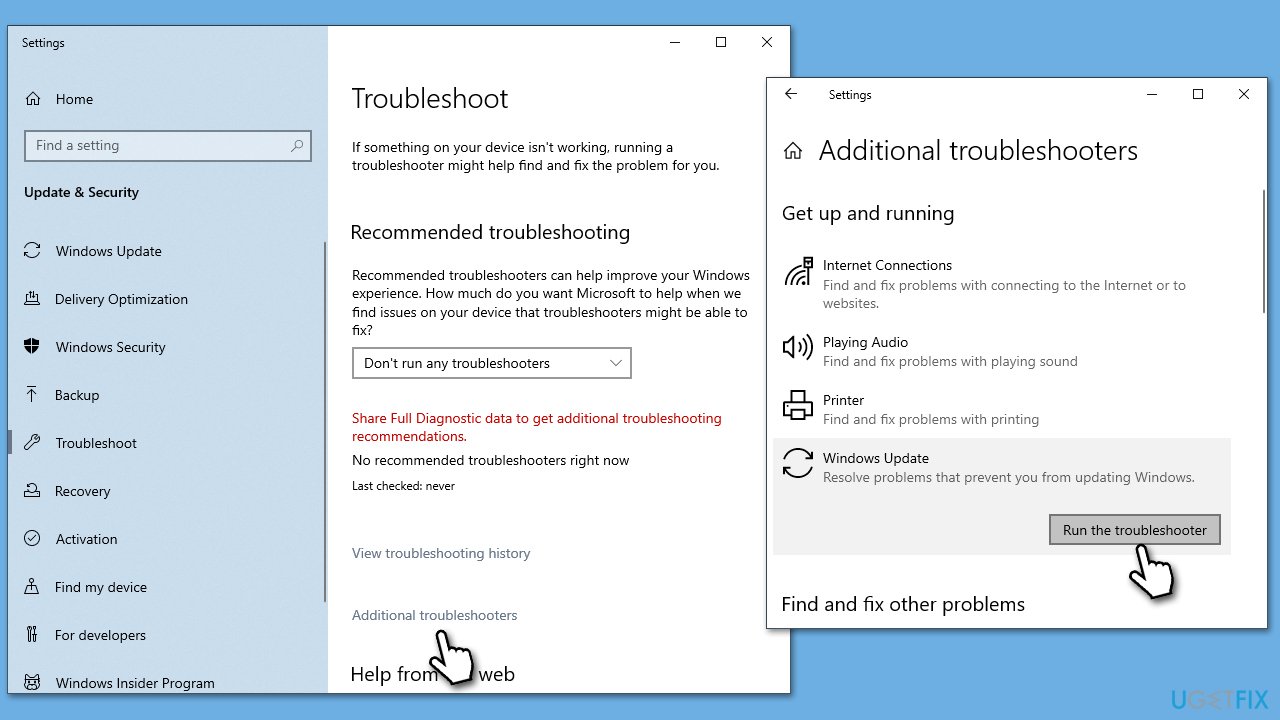
- Type Troubleshoot in Windows search and hit Enter.
- Click Additional troubleshooters/Other troubleshooters.
- Scroll down to find Windows update and select it.
- Click Run the troubleshooter/Run.
- Wait till the process is finished and apply the fixes, then try updating again.
Method 3. Run SFC and DISM scans
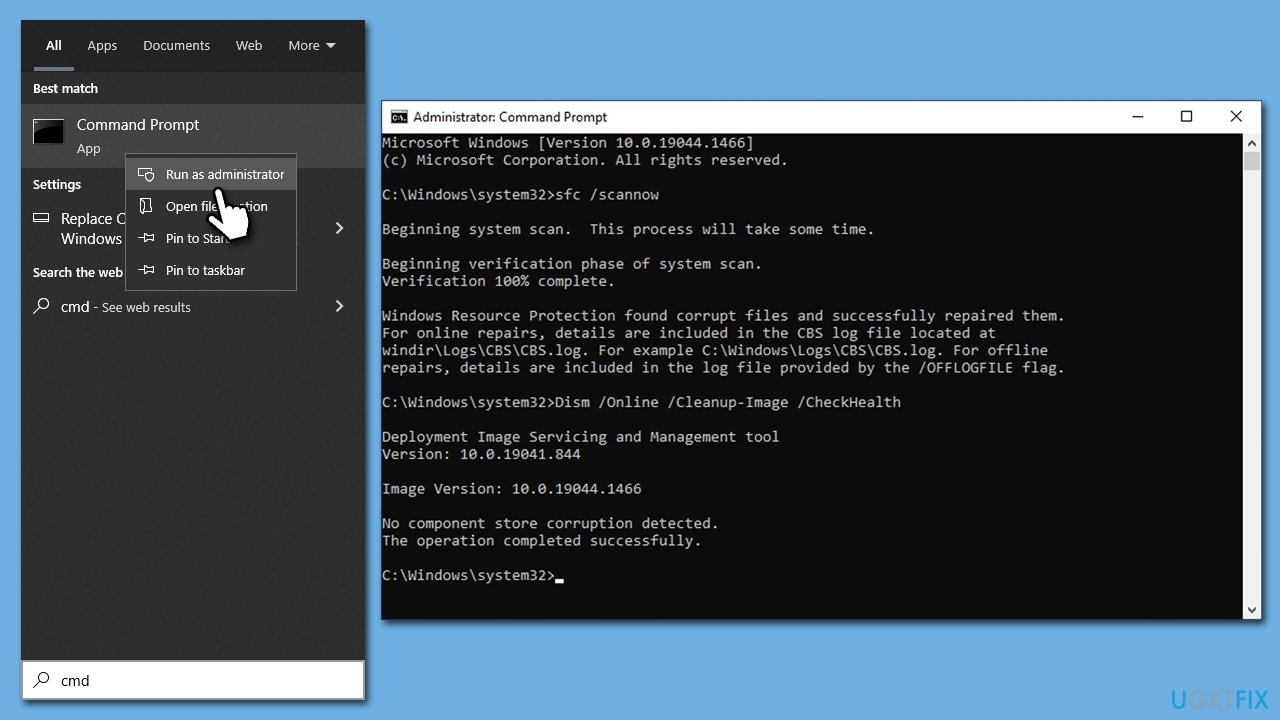
- Type cmd in Windows search.
- Right-click on Command Prompt and pick Run as administrator.
- When User Account Control (UAC) asks you whether you want to allow changes, click Yes.
- Use the following command and press Enter:
sfc /scannow - When the scan is complete, you should also run the following commands to repair Windows image files:
DISM /Online /Cleanup-Image /CheckHealth
DISM /Online /Cleanup-Image /ScanHealth
DISM /Online /Cleanup-Image /RestoreHealth - Restart your system.
Method 4. Clear the Software Distribution folder
- Type cmd in the Windows search box.
- Right-click on Command Prompt and select Run as administrator.
- User Account Control (UAC) window will ask whether you want to make changes – click Yes.
- In the Command Prompt window, copy and paste the following commands, pressing Enter after each:
net stop wuauserv
net stop cryptSvc
net stop bits
net stop msiserver - Press Win + E to open File Explorer.
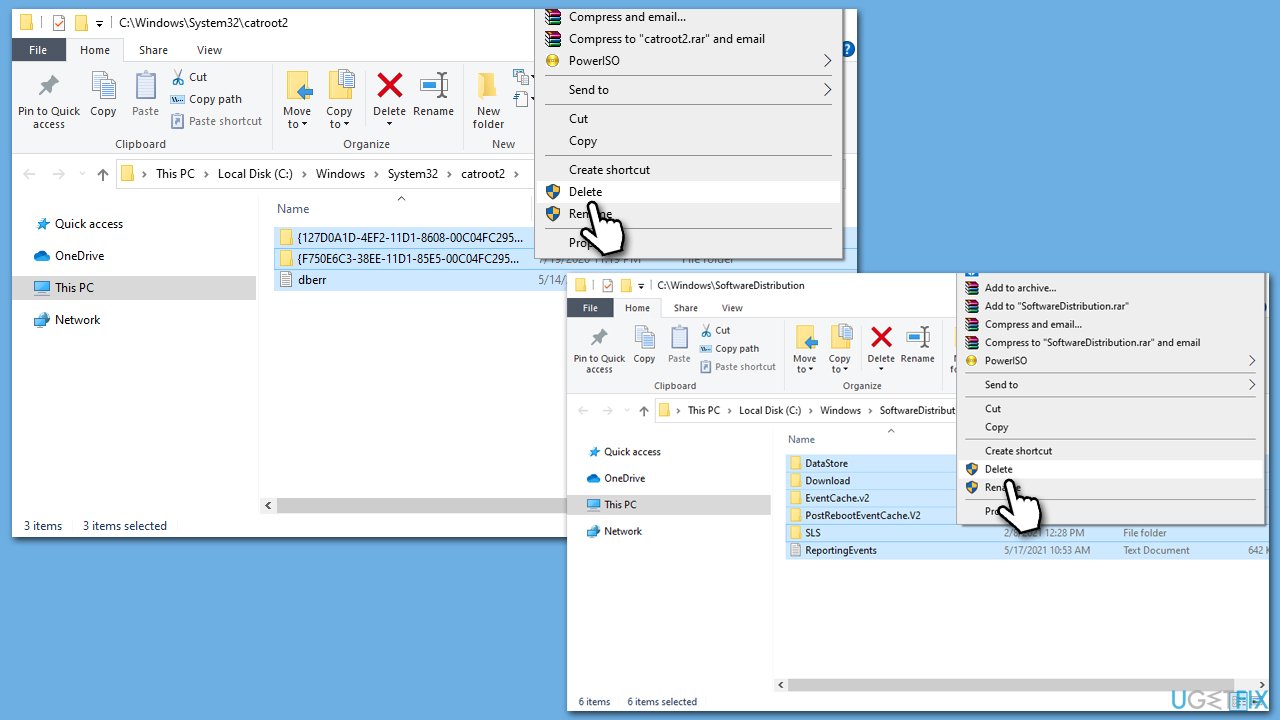
- Go to the following locations and delete the contents of these folders (make sure Hidden items are visible):
C:\Windows\System32\catroot2
C:\Windows\SoftwareDistribution - Open the Command Prompt window again and paste the following, pressing Enter every time:
net start wuauserv
net start cryptSvc
net start bits
net start msiserver - Restart your device.
Method 5. Check services
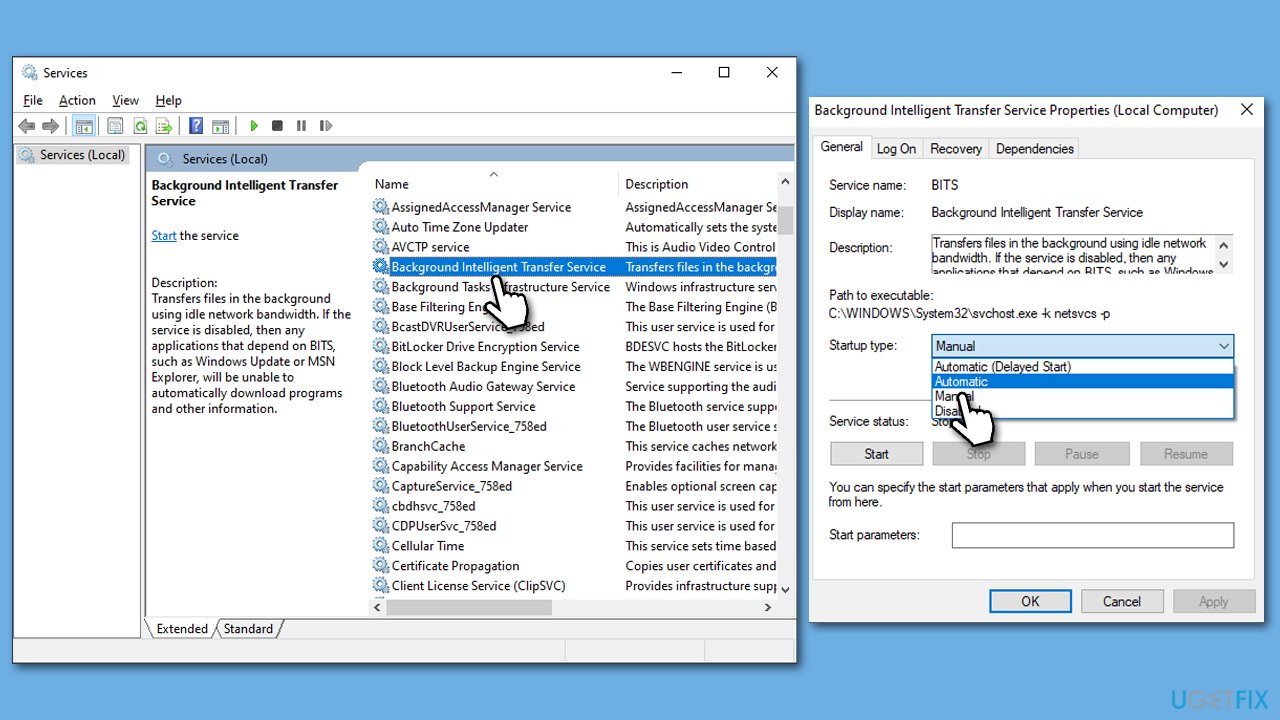
- Type in Services in Windows search and press Enter.
- Locate Background Intelligent Transfer Service (BITS).
- If it is already running, right-click and select Restart.
- If the service is not running, double-click it, select Automatic under the Startup type from the drop-down menu.
- Click Start, Apply, and OK.
- Find Windows Update Service and repeat the steps as explained above.
Method 6. Perform in-place upgrade
- Visit the official Microsoft website and download Windows 10 installation media (Windows 11 version).
- Double-click the installer, select Yes when UAC shows up, and agree to the terms.
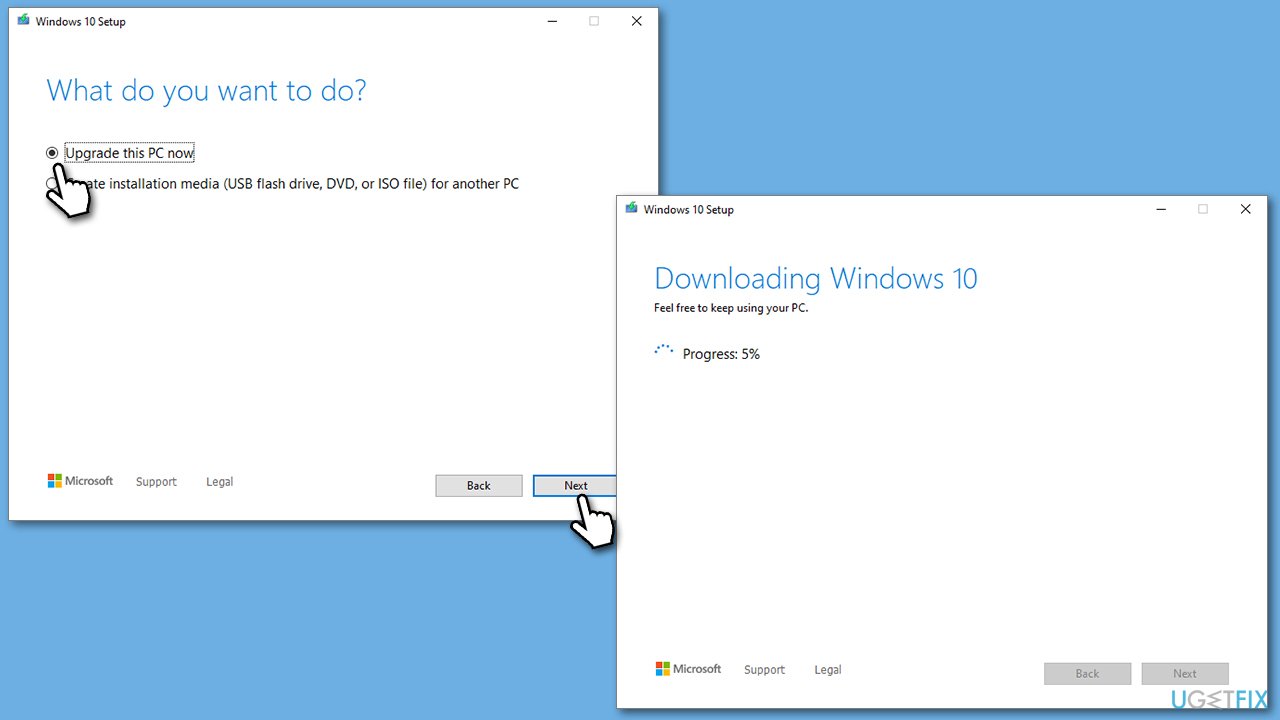
- Select Upgrade this PC now and click Next.
- Windows will start downloading the needed files.
- Agree to the terms once again and click Next.
- Before installing, make sure that you are happy with your choices (otherwise, you can click Change what to keep option).
- Finally, click Install to begin the upgrade process.
Repair your Errors automatically
ugetfix.com team is trying to do its best to help users find the best solutions for eliminating their errors. If you don't want to struggle with manual repair techniques, please use the automatic software. All recommended products have been tested and approved by our professionals. Tools that you can use to fix your error are listed bellow:
Prevent websites, ISP, and other parties from tracking you
To stay completely anonymous and prevent the ISP and the government from spying on you, you should employ Private Internet Access VPN. It will allow you to connect to the internet while being completely anonymous by encrypting all information, prevent trackers, ads, as well as malicious content. Most importantly, you will stop the illegal surveillance activities that NSA and other governmental institutions are performing behind your back.
Recover your lost files quickly
Unforeseen circumstances can happen at any time while using the computer: it can turn off due to a power cut, a Blue Screen of Death (BSoD) can occur, or random Windows updates can the machine when you went away for a few minutes. As a result, your schoolwork, important documents, and other data might be lost. To recover lost files, you can use Data Recovery Pro – it searches through copies of files that are still available on your hard drive and retrieves them quickly.


