Question
Issue: How to free up Disk space on Mac OS?
I have been struggling with my Mac's storage space for awhile now… It is coming to the point where I will need to delete my videos in order to make the computer running. Any tips you could give me?
Solved Answer
New technologies evolve constantly, and what used to be a huge storage space 20 years ago is considered to be terrible by modern-day standards. However, people who buy new computers believe that storage is almost endless at the time. Unfortunately, those who do not tend to change their Macs to new machines every several years might find that the once believed to be unlimited disk space is, in fact, very limited. Note how this is true for every other type of device, including phone, tablet, or laptop.
As a result, macOS or Mac OS X users soon notice that their computers begin to struggle, the lack of storage space render loading of applications a tedious task – even the web browsing sessions might be interrupted. Possibly the most annoying part of low disk space on Mac is that bringing in new photos, videos, music, and other files becomes almost impossible. Therefore, is there a way to free up disk space on Mac without losing important files like photos?
The answer is yes – there are plenty of ways how you can free up storage space on Mac without having to upgrade to the newer machine and still using the old one without limitations. For that, there are several parts of the operating system that can be cleaned, freeing up lots of gigabytes of space.
During our everyday work with the Mac system, we don’t even notice how much information we are pumping into it, such as movies, music files, photos, apps, etc. These files are pretty much obvious – each time you upload a new file or install a new application, the space on your macOS gets diminished.
However, there are hundreds of files that are leftovers of uninstalled apps, the system stores duplicate files, temporary files,[1] and so on. Consequently, the system gets burdened with useless files that cause the shortage of free disk space over time. In this short post, we are going to provide several useful tips that will help you to free up disk space on Mac. Wonder what are the benefits of that?
- Increased Mac’s speed;
- No risk of being unavailable to save files;
- OS woks adequately.
The very first thing you should do is checking the version of your Apple machine. I if the macOS 10.12 or later is installed on your system, it will make things a lot easier when trying to free up space on Mac. Additionally, check how much free disk space there is left on the system. For this purpose, you have to click Apple menu, select About This Mac – Storage. If it turns out that the disk has to be freed up, then consider if you want to do that manually or automatically.
Clean up your Mac’s disk automatically
Before spending your time analyzing what can be done to free up disk space on Mac, you could think of automatic options. There are plenty of tools to choose from – these programs are capable of cleaning temporary files, file leftovers, extra language files, removing useless apps, duplicate files, and so on.
However, you should be aware that there has been a rise of scareware[2] apps dedicated to macOS computers – these claim to do all the good for your Mac, but typically get installed using deceptive online scam sites[3] and show exaggerated scan results. Once users press the “Fix” or “Repair” button, however, they are redirected to a payment page where they are asked to buy the app's full version. One of the best examples of rogue optimizers includes Advanced Mac Cleaner, Mac Tuneup Pro, Mac Tweak, and many more.
However, by no means are all apps deceptive or rogue. There are several applications that can help you free up Mac space and make it run faster. Our choice is FortectMac Washing Machine X9, although there are plenty of other reputable tools like Gemini or CleanMyMac.
If you are prepared to free up disk space on macOS manually, proceed with the next solutions.
Step 1. Empty your Trash
Trash on Macs works identically like on Recycle Bin does on Windows – all the files moved there to remain until they are cleared. Therefore, in some cases, you might have forgotten that there are hundreds of megabytes of space that could be reclaimed after removing the remnants of apps and other useless files.
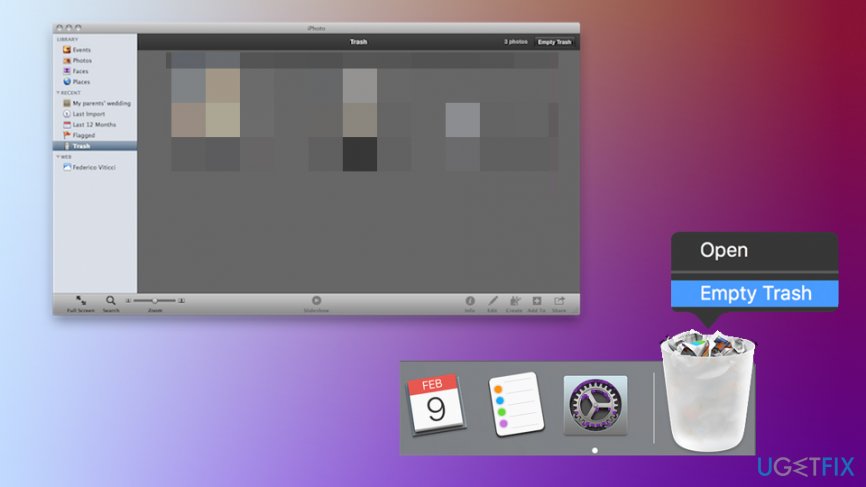
However, Macs have multiple trash cans – not only the one that sits on your desktop, although you should definitely start from it. Right-click on Trash and select Empty Trash – this is going to get rid of all files sent from Finder for you.
Now, you need to remember that apps like iPhoto, as well as your Mail app, have separate trash cans that need to be emptied as well – as long as you delete files from there that is. Simply open the app, right-click Trash option on the left and select Empty Trash.
Step 2. Uninstall useless programs and remove leftovers
Without a doubt, applications take space. If you do not check this folder very often, however, there is a chance that potentially unwanted programs are hogging your Mac's space – these usually get installed along with other software you download from third-party sites, thus you might not even know they are there.
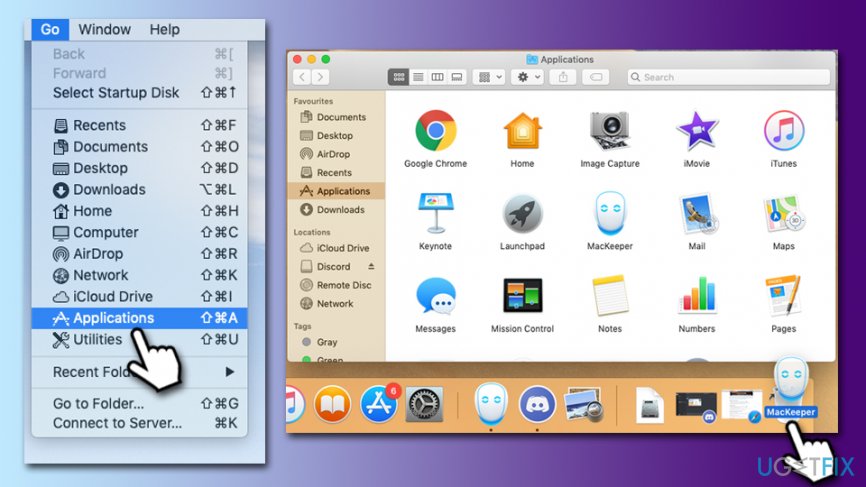
To check for potentially unwanted apps, access the Applications folder:
- From the menu, click on Go
- Select Applications
- Right-click on the app and select Move to Trash, or manually drag it into Trash on your desktop
- Empty Trash
Note that some apps might reside inside folders. In such a case, access the folder and look for an uninstaller – if it is there, launches it and follow the on-screen instructions. If no such a file is present, simply move a full folder to Trash.
There are also several other places you could check to remove the leftovers of unwanted apps – these also take space. Here's how to reach the folders in question:
- Select Go from the menu bar at the top
- Pick Go to Folder…
- You need to visit the following Library folders in order to delete the unneeded .plist and similar files:
/Library/LaunchAgents
/Library/Application Support
/Library/LaunchDaemons
/Library/Caches
Step 3. Clean up your browsers
Web browsers can store a lot of files, cookies, and other data related to your web browsing activities. Note that cookies should be cleaned regularly due to privacy reasons, as many services use them to track your web browsing information. Here's how to clean your web browsers:
Safari
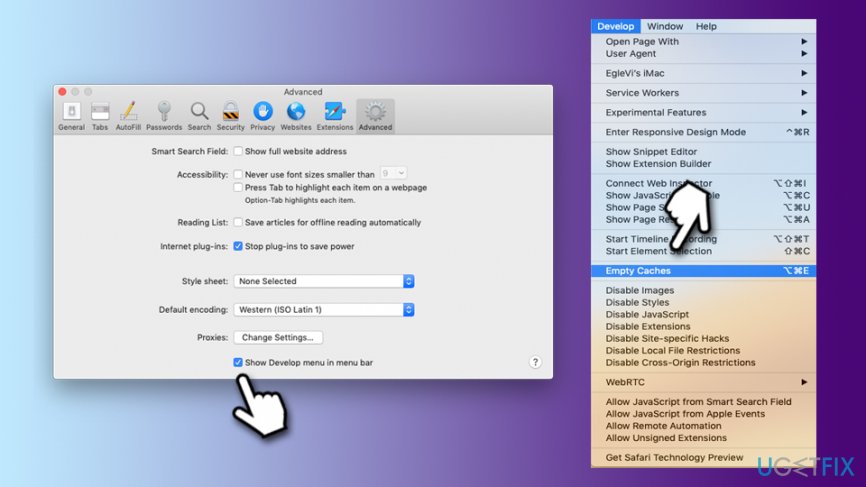
- Click on Safari and pick Preferences…
- Go to Advanced tab
- Tick the Show Develop menu in menu bar
- From the menu bar, select Develop, and then click on Empty Caches
Google Chrome
- Click on Menu and pick Settings
- Scroll down and select Advanced
- Pick Clear browsing data
- Select Browsing history, Cookies and other site data, and Cached images and files
- Click on Clear data
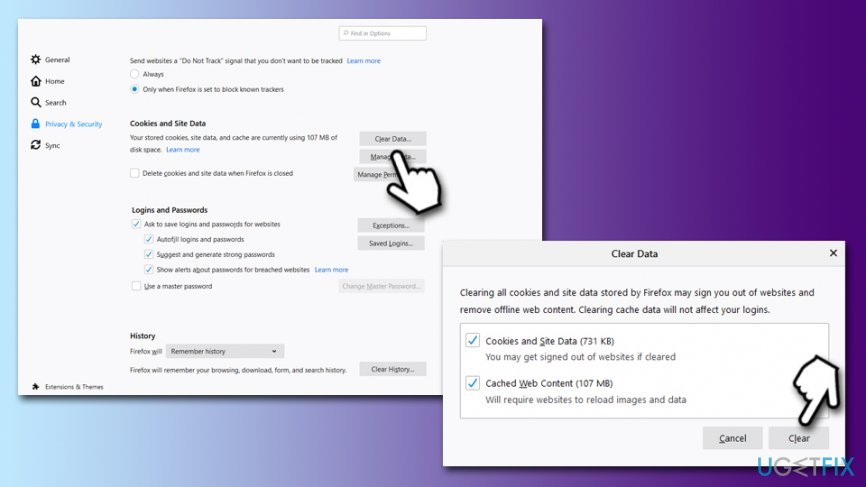
Mozilla Firefox
- Click on Menu and pick Options
- On the left side, pick Privacy & Security
- Scroll down to Cookies and Site Data
- Click on Clear Data
- Follow up with Clear
Step 4. Clean iTunes backups
Backing your files from your iPhone and iPad is a good idea. However, these files clutter your computer if they are not cleaned on time, and usually take gigabytes of space. To get rid of massive backups, you should close iTunes and go to the following folder:
~/Library/Application Support/MobileSync/Backup
Once there, delete the backup folders. Note: these folders will be named randomly and will not indicate what is inside of them.
Step 5. Use built-in macOS recommendations regarding storage
To free up space on your Mac, it would be a good idea to move them to iCloud storage, set the trash to be emptied automatically, reduce clutter by reviewing files, etc. In other words, the Storage Management window will provide you with the same functionality that most optimizers do, although it will take you more time to set it up correctly. In any case, both methods can be effective.
Here's how to tweak storage options on your Mac:
- Click on Apple menu and select About this Mac option
- Pick Storage tab
- Select Manage
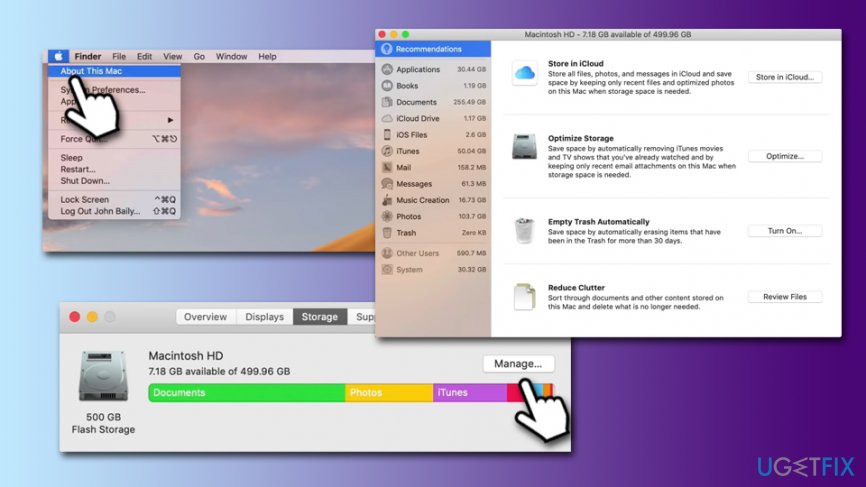
In here, you can tweak various settings, including setting up an iCloud storage, ensuring Trash is emptied automatically, removing movies automatically after you finish watching them, etc.
Optimize your system and make it work more efficiently
Optimize your system now! If you don't want to inspect your computer manually and struggle with trying to find issues that are slowing it down, you can use optimization software listed below. All these solutions have been tested by ugetfix.com team to be sure that they help improve the system. To optimize your computer with only one click, select one of these tools:
Happiness
Guarantee
Access geo-restricted video content with a VPN
Private Internet Access is a VPN that can prevent your Internet Service Provider, the government, and third-parties from tracking your online and allow you to stay completely anonymous. The software provides dedicated servers for torrenting and streaming, ensuring optimal performance and not slowing you down. You can also bypass geo-restrictions and view such services as Netflix, BBC, Disney+, and other popular streaming services without limitations, regardless of where you are.
Don’t pay ransomware authors – use alternative data recovery options
Malware attacks, particularly ransomware, are by far the biggest danger to your pictures, videos, work, or school files. Since cybercriminals use a robust encryption algorithm to lock data, it can no longer be used until a ransom in bitcoin is paid. Instead of paying hackers, you should first try to use alternative recovery methods that could help you to retrieve at least some portion of the lost data. Otherwise, you could also lose your money, along with the files. One of the best tools that could restore at least some of the encrypted files – Data Recovery Pro.
- ^ Temporary file. Computer Hope. Free computer help.
- ^ What is Scareware?. Forcepoint. Security blog.
- ^ "Your computer is infected" fake anti-virus pop-up alert scams. ACCC. Australian competition & Consumer Comission.


