Question
Issue: How to fix Hswultpep.sys BSOD in Windows?
I was playing a game through Steam recently, and suddenly, my PC crashed and produced a Blue Screen of Death. In the “What failed” section, it shows Hswultpep.sys file, with code SYSTEM_THREAD_EXCEPTION_NOT_HANDLED. I am now stuck in a boot loop and can't load to Windows. Please advise.
Solved Answer
Windows is a complex system that is responsible for managing a wide range of hardware and software components. While it is generally stable and reliable, sometimes it may run into issues that cause a Blue Screen of Death. A BSOD is a critical error that occurs when Windows encounters a problem that it cannot recover from, and it results in a blue screen with white text that provides information about the error.
One specific BSOD that some people encounter is related to the Hswultpep.sys file. This usually happens when performing resource-demanding tasks, such as gaming, and a code SYSTEM_THREAD_EXCEPTION_NOT_HANDLED is shown. It can be frustrating to encounter this type of error, especially if you are in the middle of an important task or game.
The majority of issues like this are caused by drivers and the Hswultpep.sys BSOD is no exception. Hswultpep.sys is an Intel Processor Line Power Engine Plug-in driver designed to optimize the power consumption and performance of the processor by adjusting the power states and settings. While this driver is generally reliable, it can sometimes cause issues that result in a system crash.
In addition to resource-demanding tasks, some people also get this BSOD when they attempt to enable Core Isolation in Windows. Core Isolation is a security feature that helps protect your system from attacks by isolating sensitive processes and data in a protected environment. However, it can sometimes conflict with the Hswultpep.sys driver, causing the BSOD.
If you encounter the Hswultpep.sys BSOD, the first thing you should do is check to see if there are any updates available for the driver. You can do this by visiting the Intel website and downloading the latest version of the driver. If that doesn't work, you may need to uninstall the driver and then reinstall it. In other cases, overclocking can also be the reason for crashes, so disabling it may be helpful.
We provide these and other solutions in the step-by-step guide below. If your Windows is not stuck in a boot loop, you can skip the first step. Likewise, we recommend fixing the problem automatically with FortectMac Washing Machine X9, as it is a powerful tool designed to fix the most common Windows issues, including Blue Screen errors.
1. Access Safe Mode
If your PC is stuck in a boot loop, you should be able to bypass it by using Safe Mode.
- Restart your system.
- Once Windows starts booting, press and hold the Power button, interrupting the loading process – do this three times.
- After that, Windows will automatically enter Advanced Startup mode.
- Select Troubleshoot > Advanced options > Startup Settings and Restart.
- After a reboot, pick either 4/F4 for Safe Mode or 5/F5 for Safe Mode with Networking.
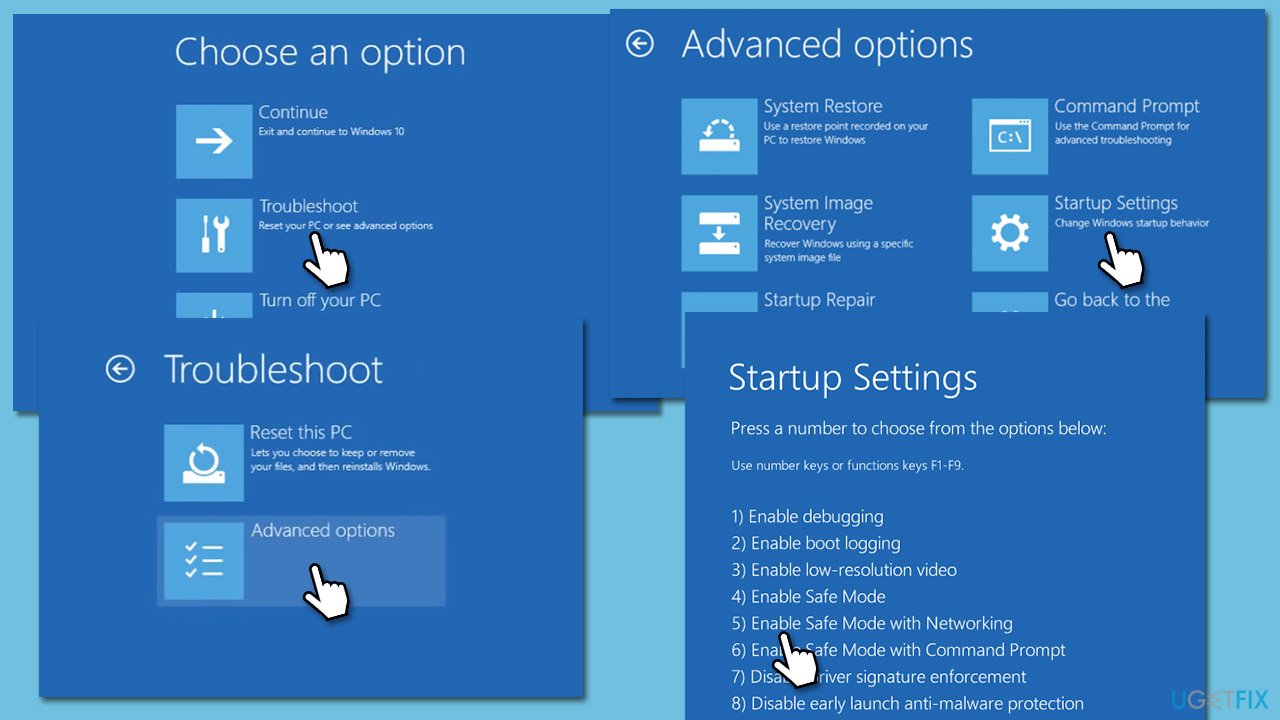
Once in Safe Mode, proceed with the troubleshooting steps below.
2. Update Intel drivers
Updating Intel drivers might help you solve the situation. First, you can employ the Windows update feature:
- Type Updates in Windows search and hit Enter.
- Select Check for Updates and let Windows download the necessary files.
- Pay attention to optional updates – install them all, as that's how Windows implements driver updates.
- When all the drivers are installed, reboot your system.
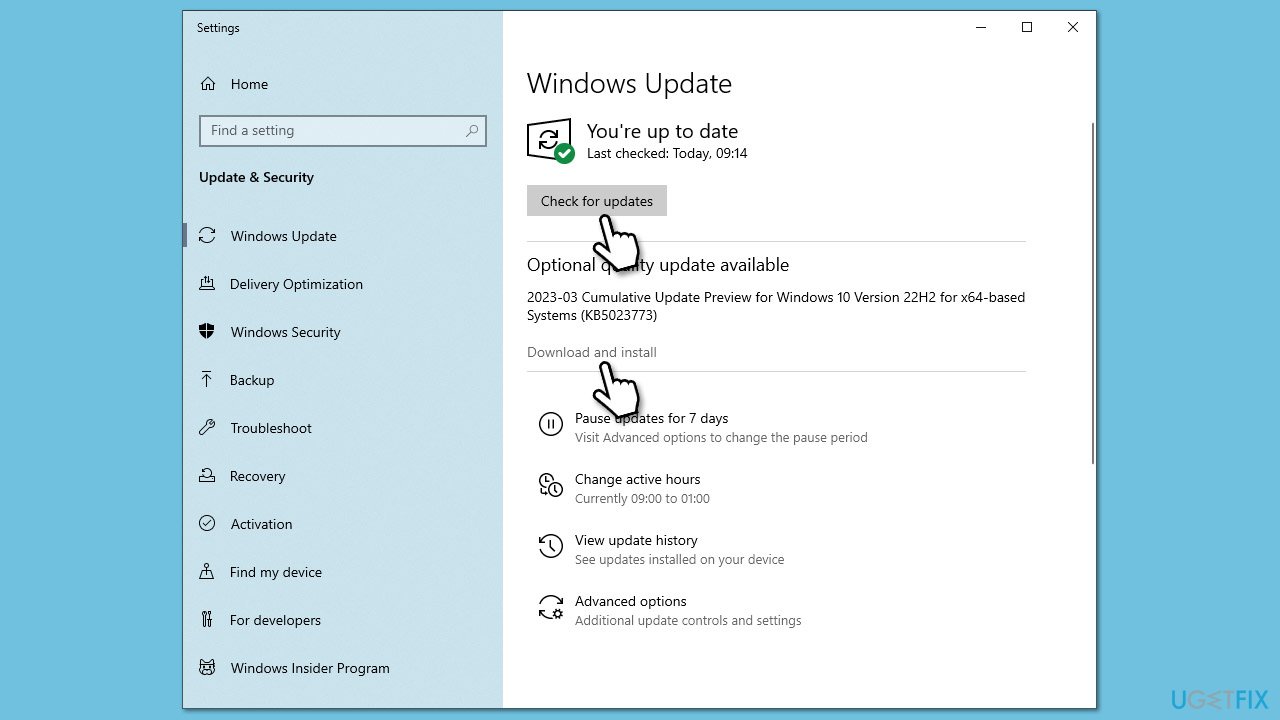
If no driver updates are available, you can opt for an automatic driver updater such as DriverFix or install the newest drivers directly from the Intel website.
Note: you can also try reinstalling drivers if this option doesn't help.
3. Disable XMP
XMP (Extreme Memory Profile) is a type of memory technology that allows you to overclock your computer's RAM for better performance. It may cause problems, which may end up in BSODs. Thus, you should disable the feature and see if it helps.
- Restart your PC and start repeatedly pressing F2, F8, F10, Del, Esc, or another button (refer to your motherboard manufacturer for the instruction) – this should boot you into BIOS.
- Check Overclocking, Advanced, or similar sections to find the XMP feature.
- Disable XMP and restart your system in normal mode.
- If you have any other overclocking systems enabled, disable them as well.

4. Run SFC and DISM
To ensure your system files aren't corrupted, run SFC and DISM scans.
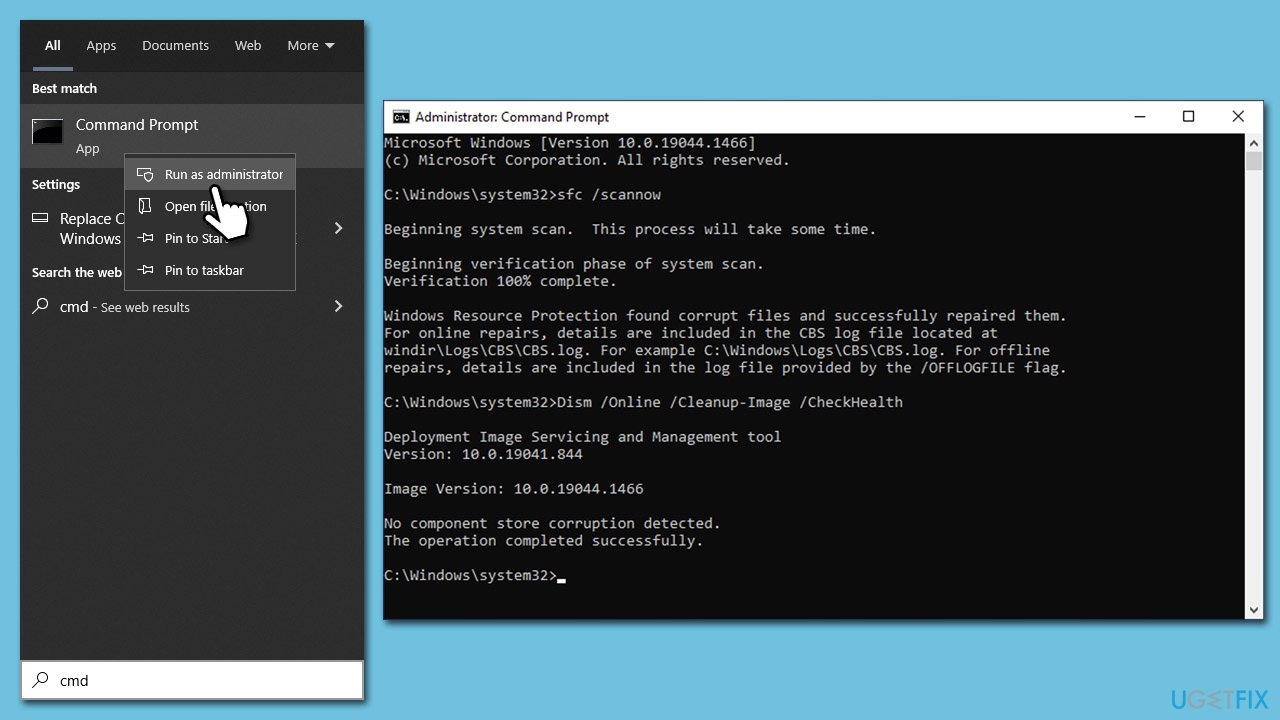
- Type cmd in Windows search.
- Right-click on the Command Prompt result and pick Run as administrator.
- User Account Control will ask you whether you want to allow changes – click Yes.
- Paste the following command into the new window:
sfc /scannow - Press Enter and wait till the scan finishes.
- When done, run this set of commands, pressing Enter each time:
DISM /Online /Cleanup-Image /CheckHealth
DISM /Online /Cleanup-Image /ScanHealth
DISM /Online /Cleanup-Image /RestoreHealth - Restart your system.
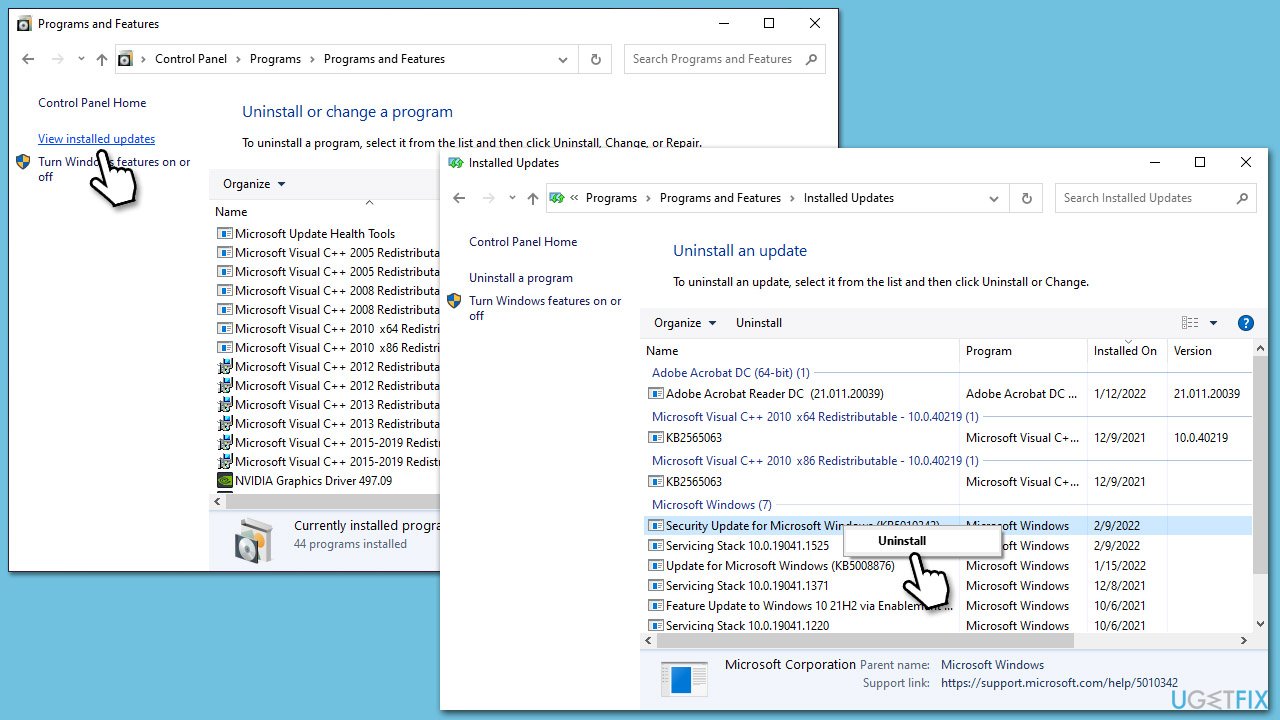
5. Uninstall the latest update
If the problem started after a recent Windows update, try uninstalling it and see if that helps.
- Type Control Panel in Windows search and press Enter.
- Select Programs > Uninstall a program.
- Click on View installed updates on the left side of the window.
- Sort all the updates by date.
- Right-click on the most recent update and select Uninstall.
- Proceed with on-screen instructions.
- Then, type Updates in Windows search and press Enter.
- Click Pause the updates for 7 days (in Windows 11, you can pick a different time period).
6. Repair-install Windows
You will have to create a bootable ISO for this method. Here's how:
- Download Windows 10 installation media (Windows 11 version) from the official Microsoft website.
- Double-click the installer to launch it.
- Agree to Terms and select Next.
- Select Create installation media (USB flash drive, DVD or ISO file) for another PC and click Next.
- Pick a USB flash drive (make sure you have USB connected to your PC).
- Mark the Use Recommended options for this PC checkbox and click Next
- Pick ISO file and click Next to finish the process.
Once you have the USB ready, proceed with the following:
- Connect the USB to the PC that you are having trouble with.
- Boot into BIOS and go to the Boot menu.
- Here, select the Boot priority option and set it to USB.
- Restart the system.
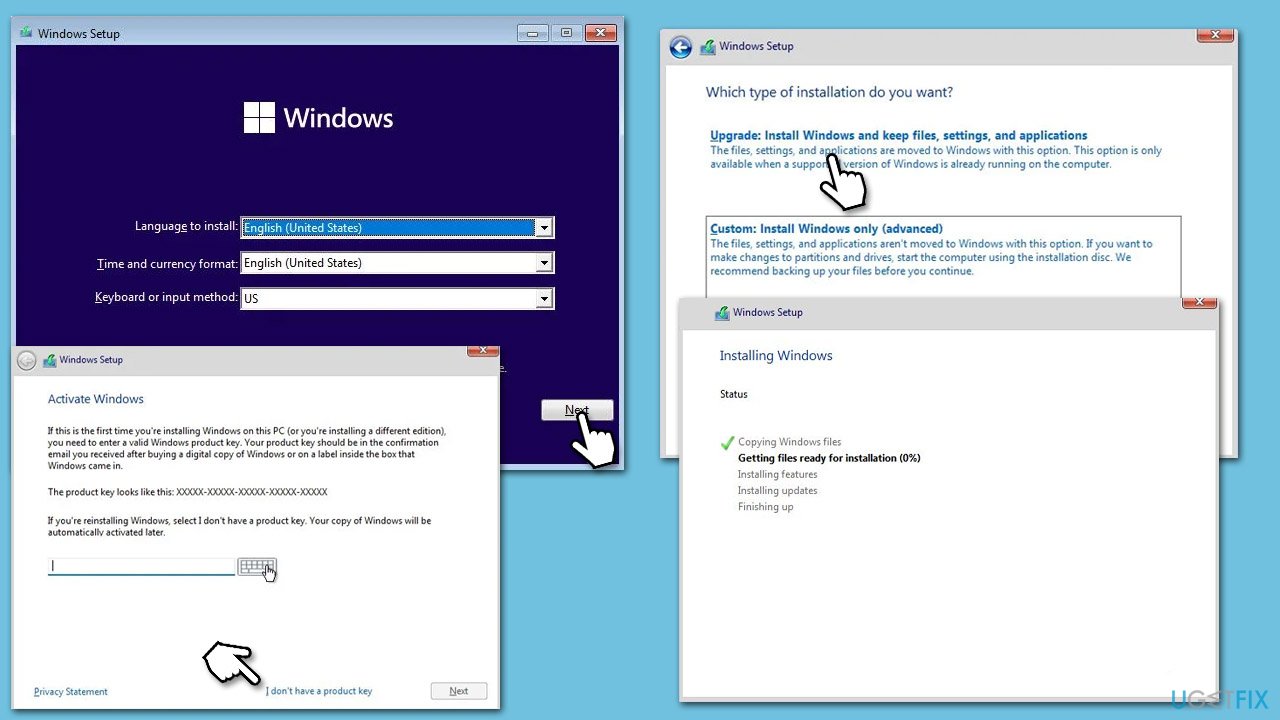
- When the system boots, you will be presented with the Install now option – click it.
- Select all the preferences and click Next.
- Skip Windows activation for now – select I don't have a product key.
- Select the correct version of the operating system (if you were using Windows 11 Home before, use the same option).
- In the next step, select Upgrade: Install Windows and keep files, settings, and applications.
- Select the correct partition and click Next.
Repair your Errors automatically
ugetfix.com team is trying to do its best to help users find the best solutions for eliminating their errors. If you don't want to struggle with manual repair techniques, please use the automatic software. All recommended products have been tested and approved by our professionals. Tools that you can use to fix your error are listed bellow:
Access geo-restricted video content with a VPN
Private Internet Access is a VPN that can prevent your Internet Service Provider, the government, and third-parties from tracking your online and allow you to stay completely anonymous. The software provides dedicated servers for torrenting and streaming, ensuring optimal performance and not slowing you down. You can also bypass geo-restrictions and view such services as Netflix, BBC, Disney+, and other popular streaming services without limitations, regardless of where you are.
Don’t pay ransomware authors – use alternative data recovery options
Malware attacks, particularly ransomware, are by far the biggest danger to your pictures, videos, work, or school files. Since cybercriminals use a robust encryption algorithm to lock data, it can no longer be used until a ransom in bitcoin is paid. Instead of paying hackers, you should first try to use alternative recovery methods that could help you to retrieve at least some portion of the lost data. Otherwise, you could also lose your money, along with the files. One of the best tools that could restore at least some of the encrypted files – Data Recovery Pro.


