Question
Issue: How to uninstall Nvidia drivers?
Hi, I got a new RX6800 graphics card as a present for my birthday. I used to run GTX 980 before, and I have Nvidia drivers installed. I have never meddled with drivers before, as I know they are important for the PC to work correctly. Can you please explain how to correctly uninstall Nvidia drivers so that I can install the new GPU?
Solved Answer
Nvidia is among the most prominent technology companies focusing on GPU design and manufacturing for the gaming industry. Its brand GeForce is likely the most used among users who use dedicated graphics cards for their computers around the world. While its direct competitor AMD is behind when it comes to overall sales, the number of people shifting to the latter increases continually.[1]
It does not matter from which brand you are shifting, however, as the most important is to do it correctly in order to not break delicate components of the hardware. Our “How to upgrade your graphics card” article explains the peculiarities of the full process, so make sure to check it out before starting.
While replacing hardware correctly is important, it is also imperative to ensure that software is handled correctly as well, as the device might fail to function completely. In other words, if you don't uninstall Nvidia drivers before installing the new graphic card, it will not be picked up by your computer at all and can lead to various software conflicts, resulting in more errors and headaches.
Therefore, there is a great need to uninstall Nvidia drivers correctly. In order to do that, you need to find all the related components besides the drivers that could be present on your device. Windows registry[2] could also be cleaned for the best results, although meddling with it without advanced knowledge is not recommended.
In any case, if you need to uninstall Nvidia drivers to swap for another GPU or any other reason, proceed with this free guide.
Important: Do not install new drivers for AMD GPU before uninstalling Nvidia drivers, as it can lead to all sorts of software conflicts. Despite the popular belief, your GPU will function without drivers (although very poorly), so you will be able to use your computer to install new drivers without problems
Step 1. Uninstall Nvidia drivers
While it may seem complicated, uninstalling Nvidia or any other driver is not as difficult as it may seem initially. While you can do it through the Device Manager, the uninstallation process is more accurate.
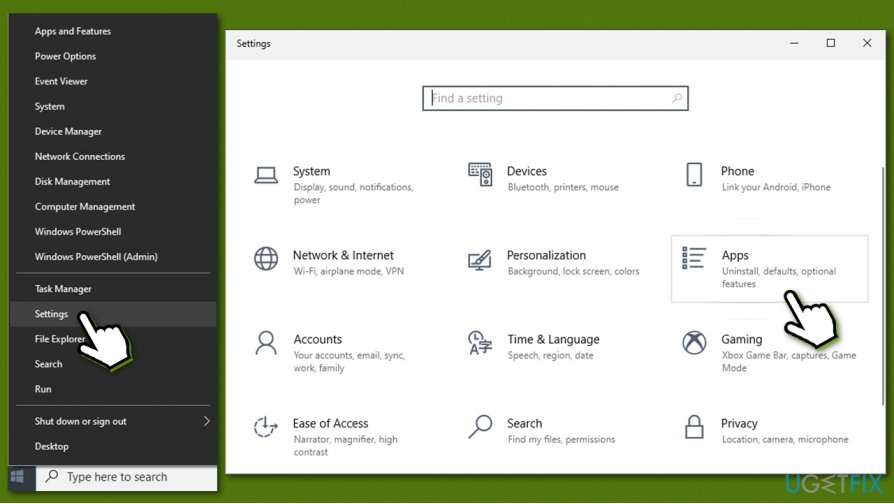
- Right-click on Start and pick Settings
- Go to Apps section (or Apps & Features, depending on your Windows version)

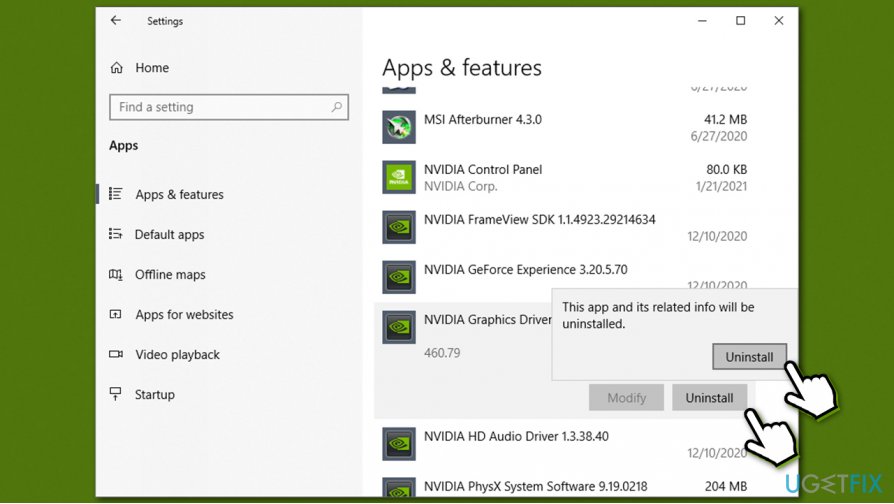
- Scroll down until you find bunch of Nvidia entries
- Locate Nvidia Graphics Driver and click it
- Click Uninstall
- When the warning shows up, hit Uninstall once again

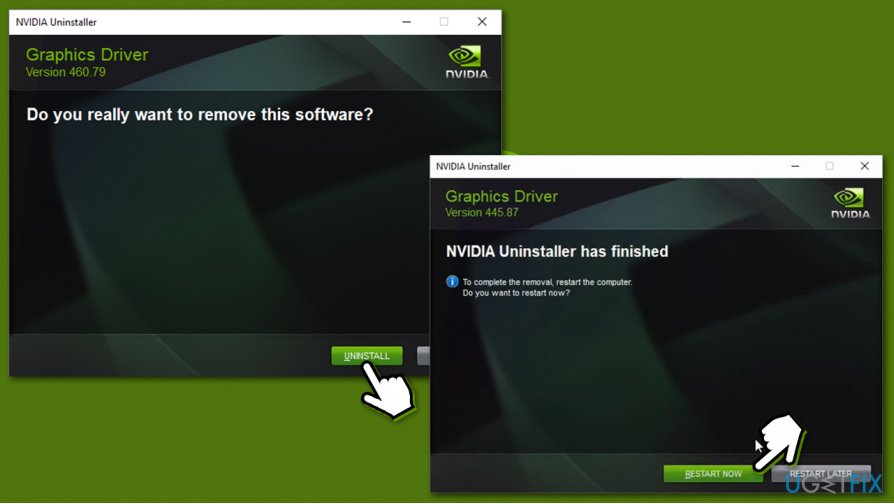
- When Nvidia Uninstaller shows up, proceed with Uninstall
- Wait and finally click Restart now – your PC will immediately reboot.

Step 2. Uninstall additional programs related to Nvidia
After a restart and the uninstallation of the main GPU driver, your screen might seem a bit weird – don't worry, it is completely normal. Now you should proceed with uninstalling other Nvidia components, such as Nvidia Control Panel, Nvidia HD Audio Driver, Nvidia PhysiX, GeForce Experience, and software, depending on what you had installed before.
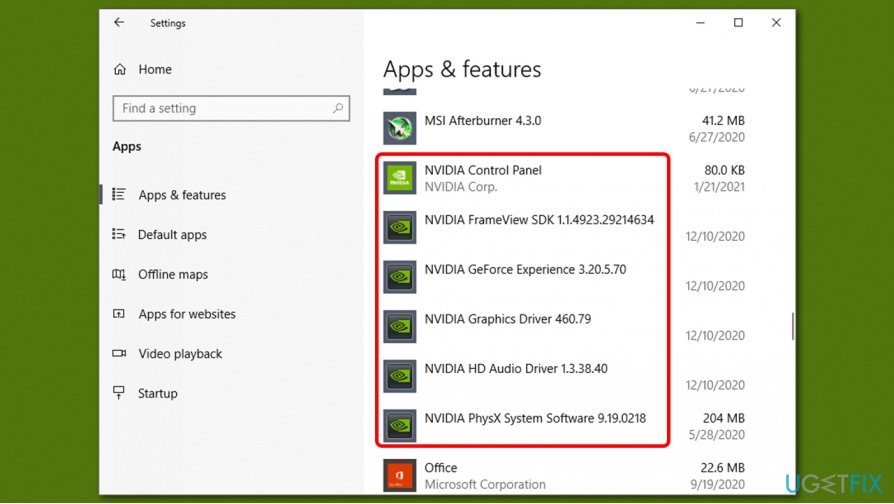
Note that you might have to reboot your PC several times before you uninstall all Nvidia components.
Step 3. Delete leftover files
While this step is not mandatory for those who want to simply reinstall Nvidia drivers, it is relatively important for those swapping from Nvidia to AMD.
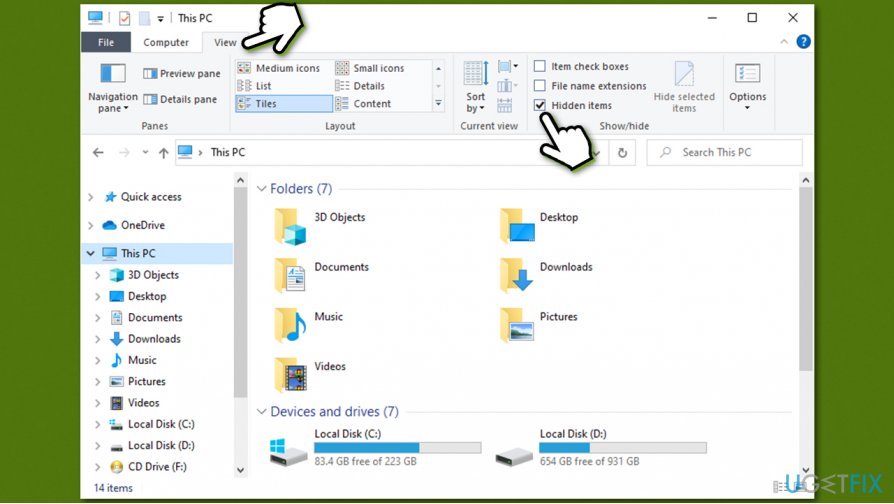
First of all, you need to enable hidden file visibility, which can be done via the File Explorer:
- Press Win + E on your keyboard to open File Explorer
- At the top, select the View tab
- Tick the Hidden items option

Now you can delete the leftover components of Nvidia files:
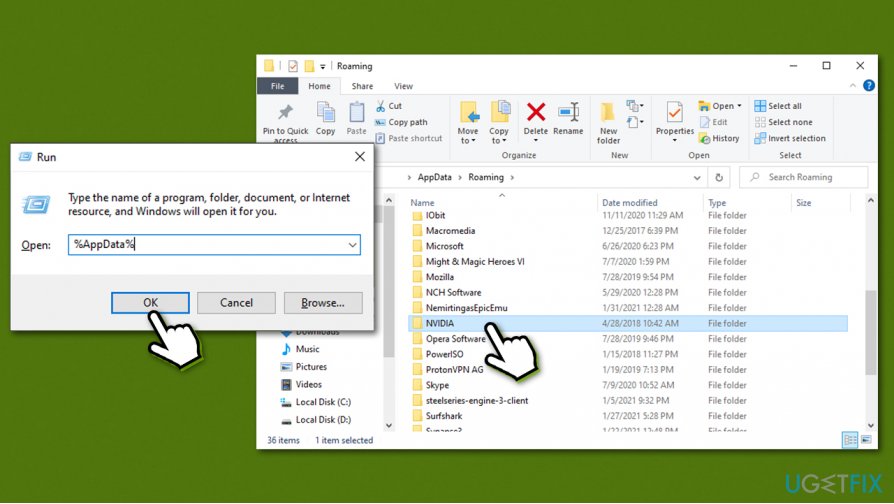
- Press Win + R on your keyboard
- Type in %AppData%
- Scroll down and delete NVIDIA folder.

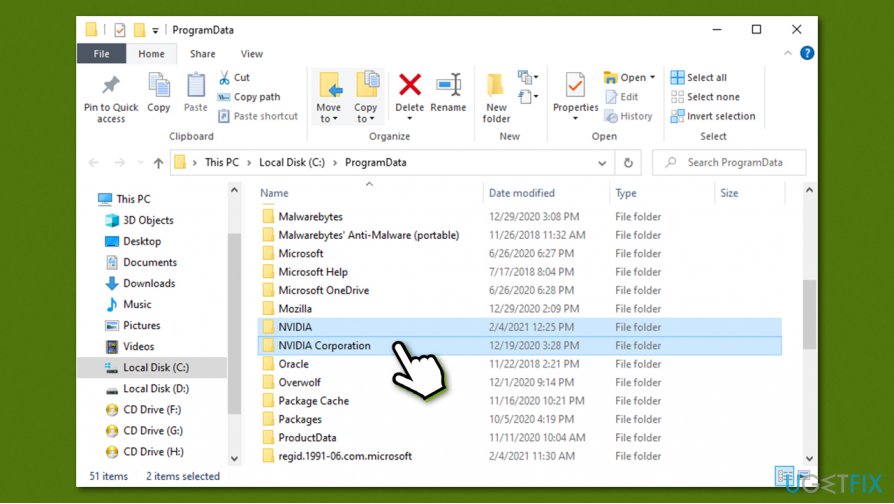
After this, you should do the same in the following locations:
- %ProgramData%

- %ProgramFiles%
- %LocalAppData%
Step 4. Delete Windows registry entries
Warning: we do not recommend meddling with the register unless you know what you are doing, as incorrectly deleting entries might cause serious system malfunctions. Before proceeding with the below steps, backup your registry
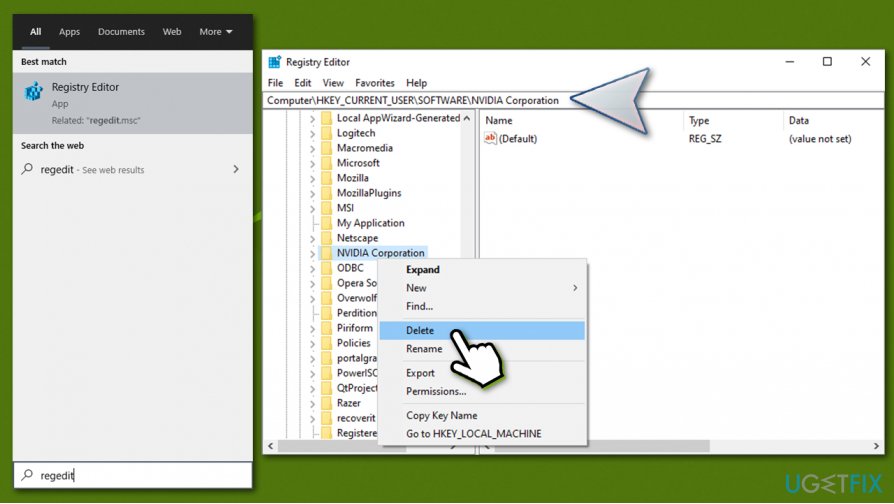
- Type in regedit in Windows search and press Enter
- Got to the following location:
Computer\\HKEY_CURRENT_USER\\SOFTWARE\\NVIDIA Corporation
- Delete NVIDIA Corporation folder

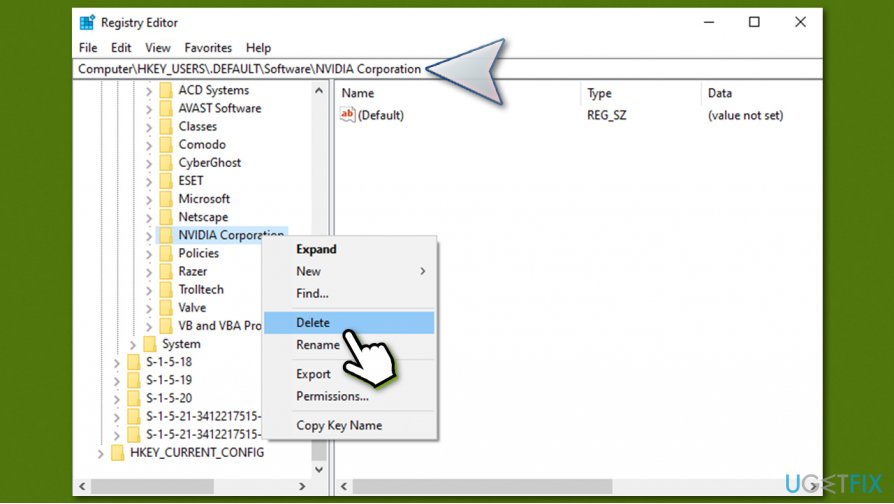
- Go to the following location:
Computer\\HKEY_USERS\\.DEFAULT\\Software\\NVIDIA Corporation
- Delete NVIDIA Corporation folder.

If you are a novice computer user, we highly recommend you not touch the registry at all. Instead, you can clean your registry with the help of optimization software such as FortectMac Washing Machine X9. Besides, if you encounter lag, errors, BSODs,[3] or other computer issues, this utility can help you fix these problems automatically.
Step 5. Download and install the newest drivers for your new GPU
You should keep in mind that GPU drivers are crucial for the optimal operation of any graphics card. Without them, there is no point in upgrading.
Windows Task Manager can indeed be used for this purpose, but it is far from accurate and might not install the latest drivers that are available for the device. GPU drivers, unlike many other drivers (for example, for mice or keyboards), are very specific and should be acquired from the manufacturer's website.
Here is the list of websites for the three brands for GPU drivers:
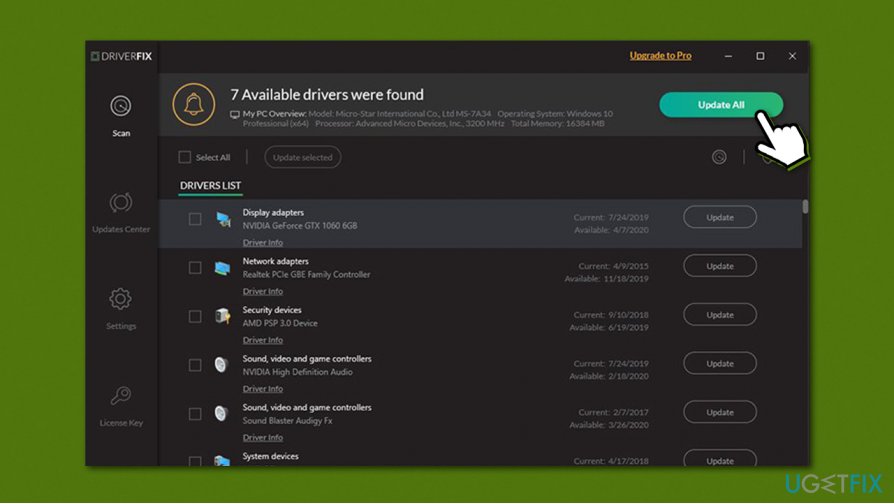
Keep in mind you need to know your precise device model information in order to install the correct drivers. Or, you could rely on a third-party driver updater such as DriverFix. Not only will it determine which drivers you need automatically, but it will also keep all the other software up-to-date at all times. In other words, you will never have to worry about drivers, their versions, compatibility, and other problems.
Get rid of programs with only one click
You can uninstall this program with the help of the step-by-step guide presented to you by ugetfix.com experts. To save your time, we have also selected tools that will help you carry out this task automatically. If you are in a hurry or if you feel that you are not experienced enough to uninstall the program by your own, feel free to use these solutions:
Access geo-restricted video content with a VPN
Private Internet Access is a VPN that can prevent your Internet Service Provider, the government, and third-parties from tracking your online and allow you to stay completely anonymous. The software provides dedicated servers for torrenting and streaming, ensuring optimal performance and not slowing you down. You can also bypass geo-restrictions and view such services as Netflix, BBC, Disney+, and other popular streaming services without limitations, regardless of where you are.
Don’t pay ransomware authors – use alternative data recovery options
Malware attacks, particularly ransomware, are by far the biggest danger to your pictures, videos, work, or school files. Since cybercriminals use a robust encryption algorithm to lock data, it can no longer be used until a ransom in bitcoin is paid. Instead of paying hackers, you should first try to use alternative recovery methods that could help you to retrieve at least some portion of the lost data. Otherwise, you could also lose your money, along with the files. One of the best tools that could restore at least some of the encrypted files – Data Recovery Pro.
- ^ Hassan Mujtaba. NVIDIA GeForce GPUs Gain Major Market Share Versus AMD Radeon in Q2 2020, Hits 80% Market Share In The Discrete Segment. Wccftech. Tech news, reviews, guides and more.
- ^ Windows Registry. Wikipedia. The free encyclopedia.
- ^ Chris Hoffman. Everything You Need To Know About the Blue Screen of Death. How-to Geek. Site that explains technology.
